
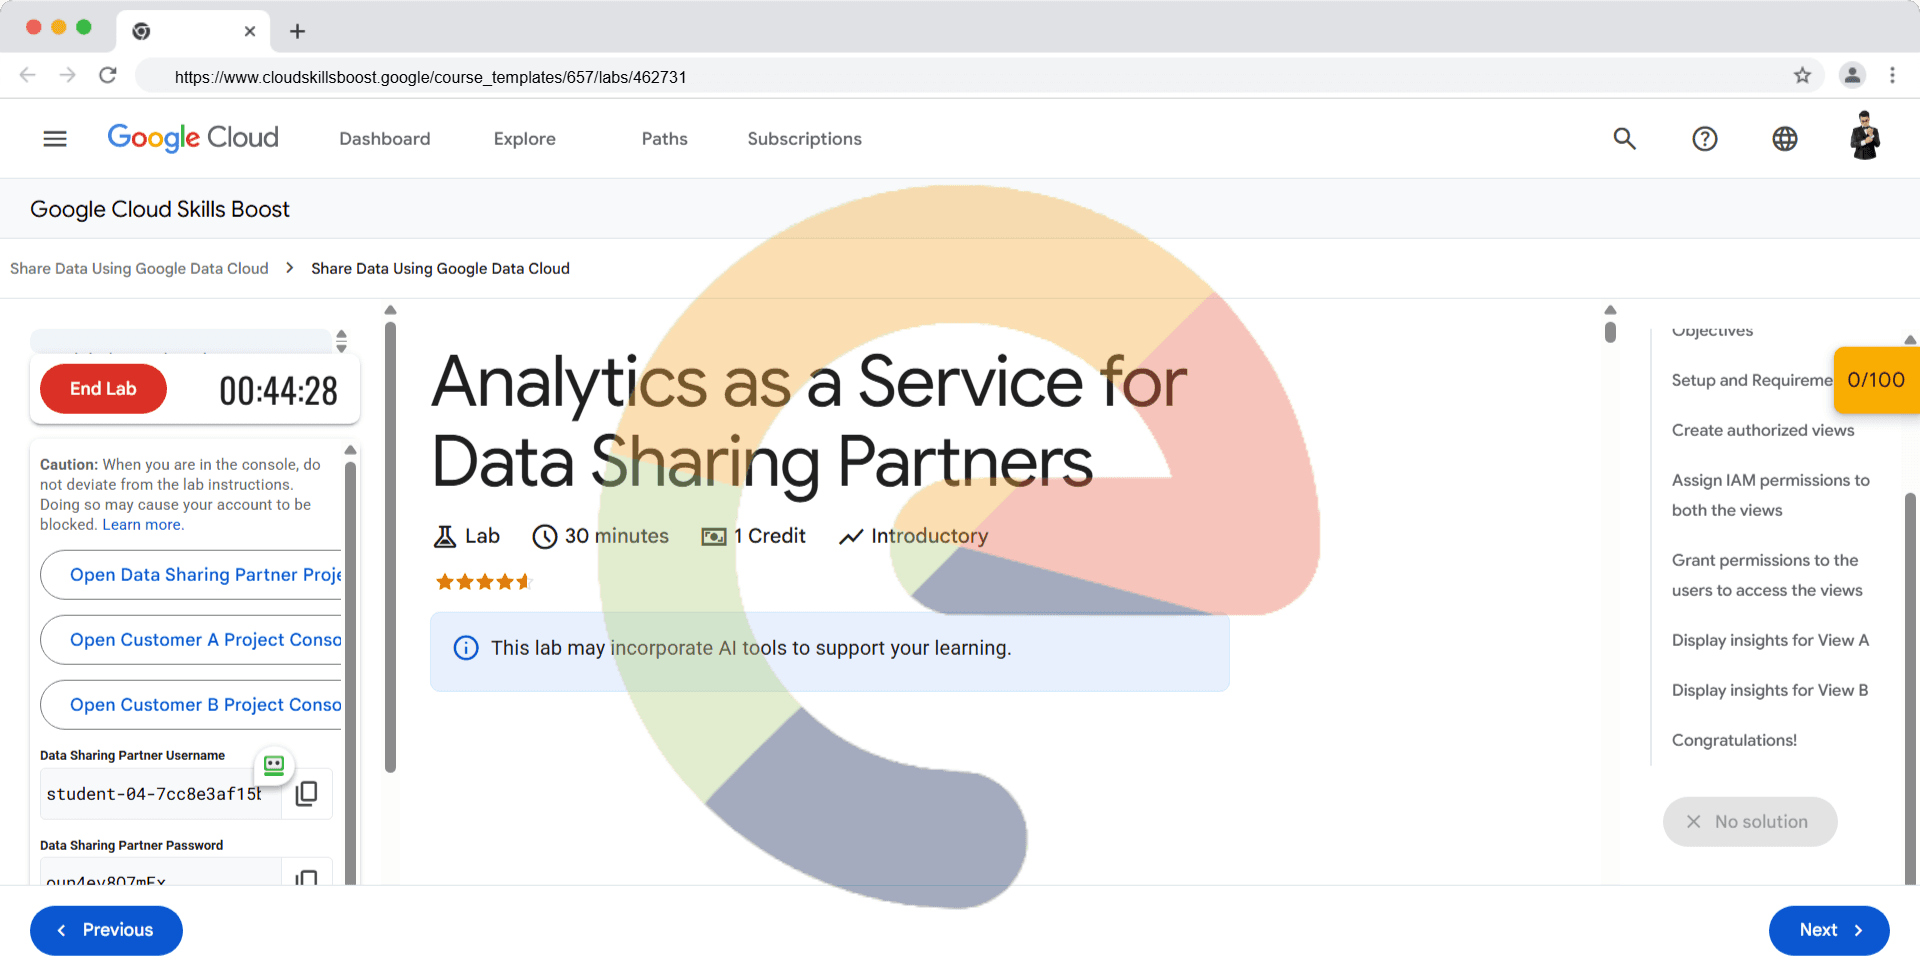
Analytics as a Service for Data Sharing Partners - GSP1042
A passionate full-stack developer from @ePlus.DEV
Overview
A common scenario is where a Google Cloud Data Sharing Partner has proprietary datasets that customers can use for their analytics use cases. Customers need to subscribe to this data, query it within their own platform, then augment it with their own datasets and use their visualization tools for their customer facing dashboards. This enables Data Sharing Partners to simplify and accelerate how they build and deliver value from data-driven solutions.

Through integration with Google Cloud IAM, you can set permissions on BigQuery objects to enable access by users inside or outside of organizations. In this lab, you will learn how both Data Sharing Partners and their customers can use BigQuery data stored in a partner project in the form of customer facing dashboards for analytics as a managed service. You will be given three projects: the Data Sharing Partner project which owns the dataset and two separate and distinct customers who can access a subset of the dataset from their respective projects. Customers will list customer information specific to their geographical region.
Objectives
In this lab, you will:
Copy a public dataset into a Data Sharing Partner Project.
Create distinct authorized views for each customer.
Consume the authorized views to create customer-specific dashboards.
Setup and Requirements
Before you click the Start Lab button
Read these instructions. Labs are timed and you cannot pause them. The timer, which starts when you click Start Lab, shows how long Google Cloud resources are made available to you.
This hands-on lab lets you do the lab activities in a real cloud environment, not in a simulation or demo environment. It does so by giving you new, temporary credentials you use to sign in and access Google Cloud for the duration of the lab.
To complete this lab, you need:
- Access to a standard internet browser (Chrome browser recommended).
Note: Use an Incognito (recommended) or private browser window to run this lab. This prevents conflicts between your personal account and the student account, which may cause extra charges incurred to your personal account.
- Time to complete the lab—remember, once you start, you cannot pause a lab.
Note: Use only the student account for this lab. If you use a different Google Cloud account, you may incur charges to that account.
How to start your lab and sign in to the Google Cloud console
Click the Start Lab button. If you need to pay for the lab, a dialog opens for you to select your payment method. On the left is the Lab Details pane with the following:
The Open Google Cloud console button
Time remaining
The temporary credentials that you must use for this lab
Other information, if needed, to step through this lab
Click Open Google Cloud console (or right-click and select Open Link in Incognito Window if you are running the Chrome browser).
The lab spins up resources, and then opens another tab that shows the Sign in page.
Tip: Arrange the tabs in separate windows, side-by-side.
Note: If you see the Choose an account dialog, click Use Another Account.
If necessary, copy the Username below and paste it into the Sign in dialog.
student-04-7cc8e3af15b8@qwiklabs.netYou can also find the Username in the Lab Details pane.
Click Next.
Copy the Password below and paste it into the Welcome dialog.
oun4ev8O7mFxYou can also find the Password in the Lab Details pane.
Click Next.
Important: You must use the credentials the lab provides you. Do not use your Google Cloud account credentials.
Note: Using your own Google Cloud account for this lab may incur extra charges.
Click through the subsequent pages:
Accept the terms and conditions.
Do not add recovery options or two-factor authentication (because this is a temporary account).
Do not sign up for free trials.
After a few moments, the Google Cloud console opens in this tab.
Note: To access Google Cloud products and services, click the Navigation menu or type the service or product name in the Search field.

Create authorized views
In the first project, you will take on the role of a Data Sharing Partner creating and sharing a dataset using an authorized view.
Create Authorized View A
From the lab pane. open the Data Sharing Partner Project Console and log in with the associated credentials.
From the Navigation Menu, go to BigQuery > BigQuery Studio. If prompted click Done.
Click on + (Create SQL query) where you can run your query.
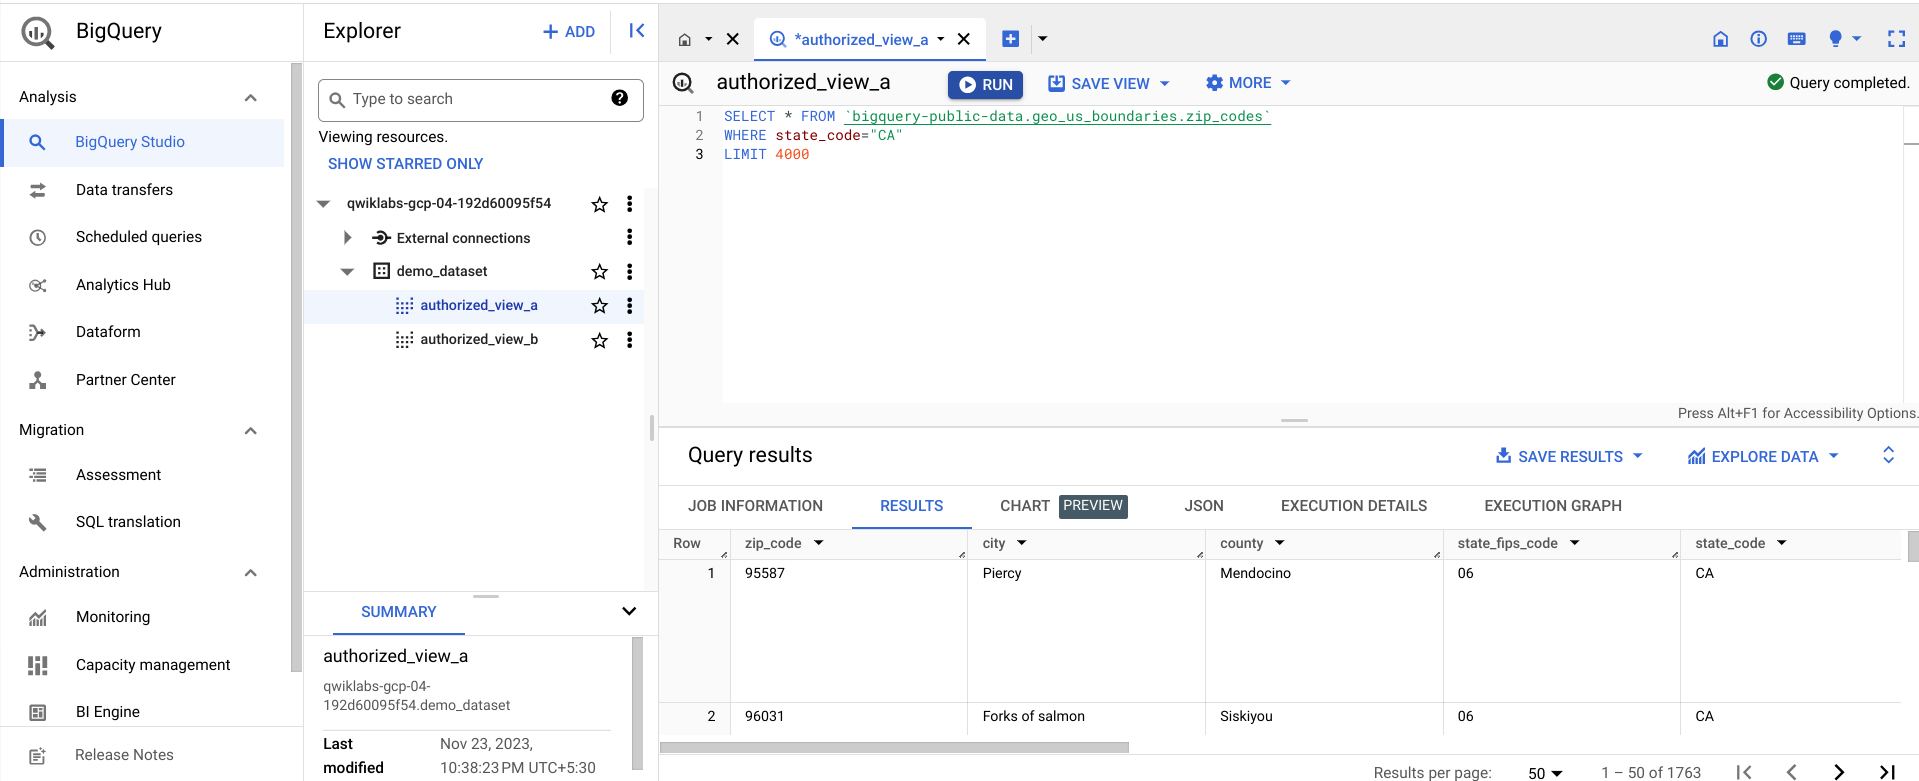
Run the following query to create an authorized view for Customer A, based on a public geographical dataset.
SELECT * FROM `bigquery-public-data.geo_us_boundaries.zip_codes`
WHERE state_code="TX"
LIMIT 4000
Click Run.
From the toolbar, click Save > Save View.
Keep the project as default and for the Dataset select
demo_dataset.For Table type
authorized_view_a.Click Save.
Create Authorized View B
In the query editor, remove the previous query you just ran.
Run the following query to create an authorized view for Customer B, based on a public geographical dataset.
SELECT * FROM `bigquery-public-data.geo_us_boundaries.zip_codes`
WHERE state_code="CA"
LIMIT 4000
Click Run.
From the toolbar, click Save View > Save View as.
Keep the project as default and for the Dataset select
demo_dataset.For Table type
authorized_view_b.Click Save.
Your authorized views should resemble the following:
Click Check my progress to verify your performed task.
Created Authorized Views
Check my progress
Assign IAM permissions to both the views
- From the BigQuery Explorer pane, open the demo_dataset and click + Sharing > Authorize Views.

Add Authorized View A that needs to be authorized to share:
qwiklabs-gcp-00-d6842afe23d9.demo_dataset.authorized_view_a.Click Add Authorization.
Add Authorized View B that needs to be authorized to share:
qwiklabs-gcp-00-d6842afe23d9.demo_dataset.authorized_view_b.Click Add Authorization. Your authorized views should resemble the following:
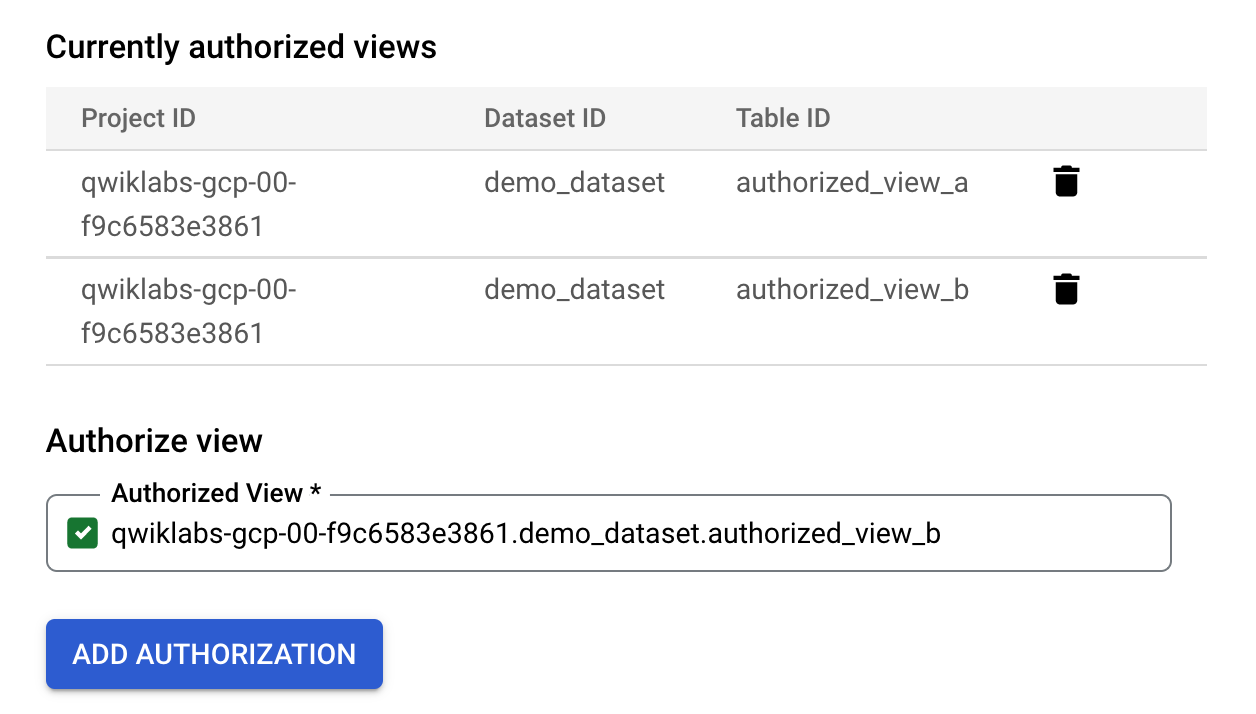
- Click Close.
Click Check my progress to verify your performed task.
Assign IAM permissions to both the views
Check my progress
Grant permissions to the users to access the views
In this section, you will assign permissions for each customer user and their associated authorized views.
Assign IAM permissions for Customer A
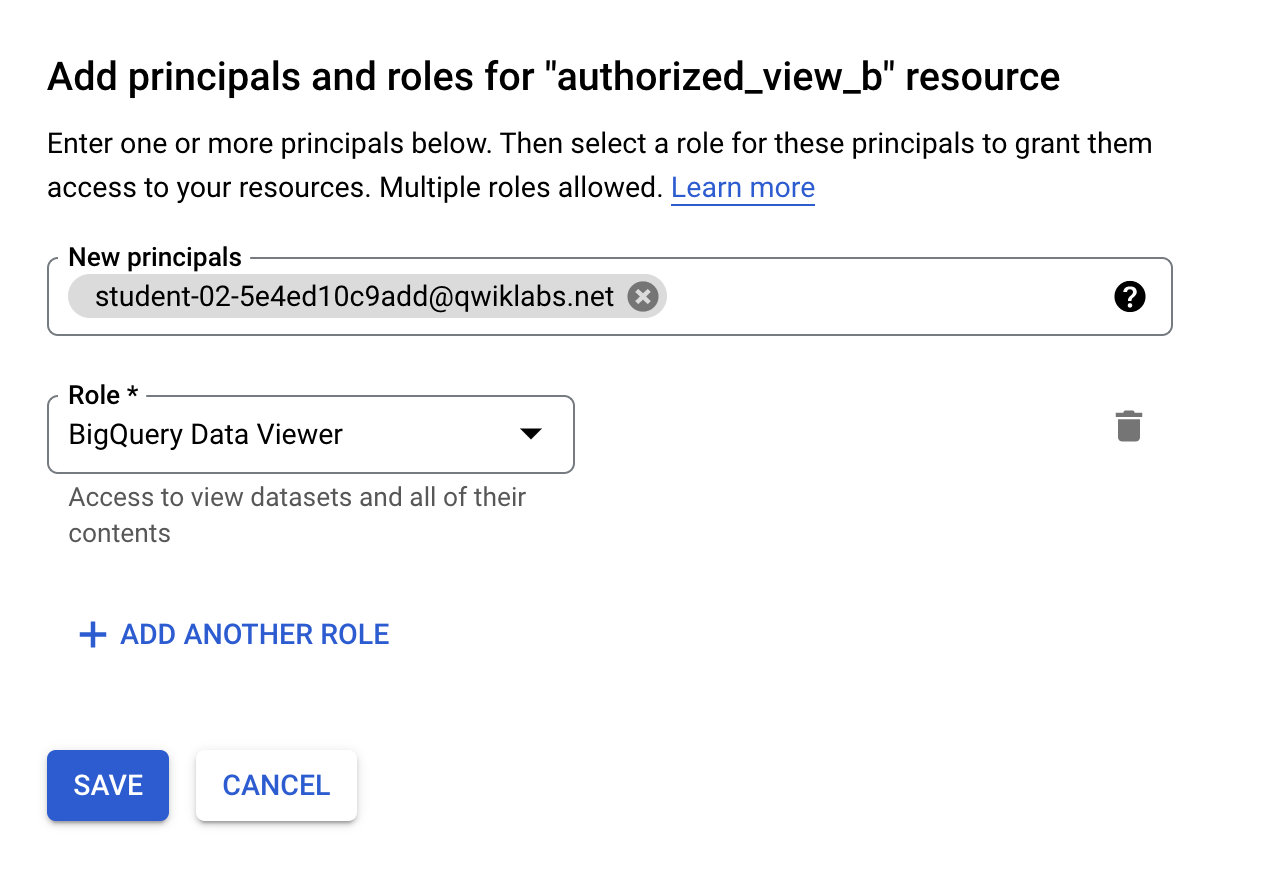
Under your project, inside of demo_dataset, open the
authorized_view_aview.Click Share.
Click on Add Principal and add the Customer A user:
student-04-7983086a5e34@qwiklabs.net
Select the BigQuery Data Viewer role.

Click Save.
Click Close.
Assign IAM permissions for Customer B
Under your project, inside of demo_dataset, open the
authorized_view_bview.Click Share.
Click on Add Principal and add the Customer B user:
student-04-7d758470618c@qwiklabs.net
Select the BigQuery Data Viewer role.
Click Save.
Click Close.
Click Check my progress to verify your performed task.
Grant permissions to the users to access the views
Check my progress
Display insights for View A
In this section, you will verify that the authorized views were shared for each customer user correctly.
Verify authorized view sharing for Customer A
Close the Data Sharing Partner Project Console and from the lab pane open the Customer Project A Console. Log in with the associated credentials.
From the Navigation Menu, go to BigQuery > BigQuery Studio. If prompted click Done.
Click on + (Create SQL query) where you can run your query.
Now you will join the data from Customer A's authorized view to the customer specific dataset to generate new insights.
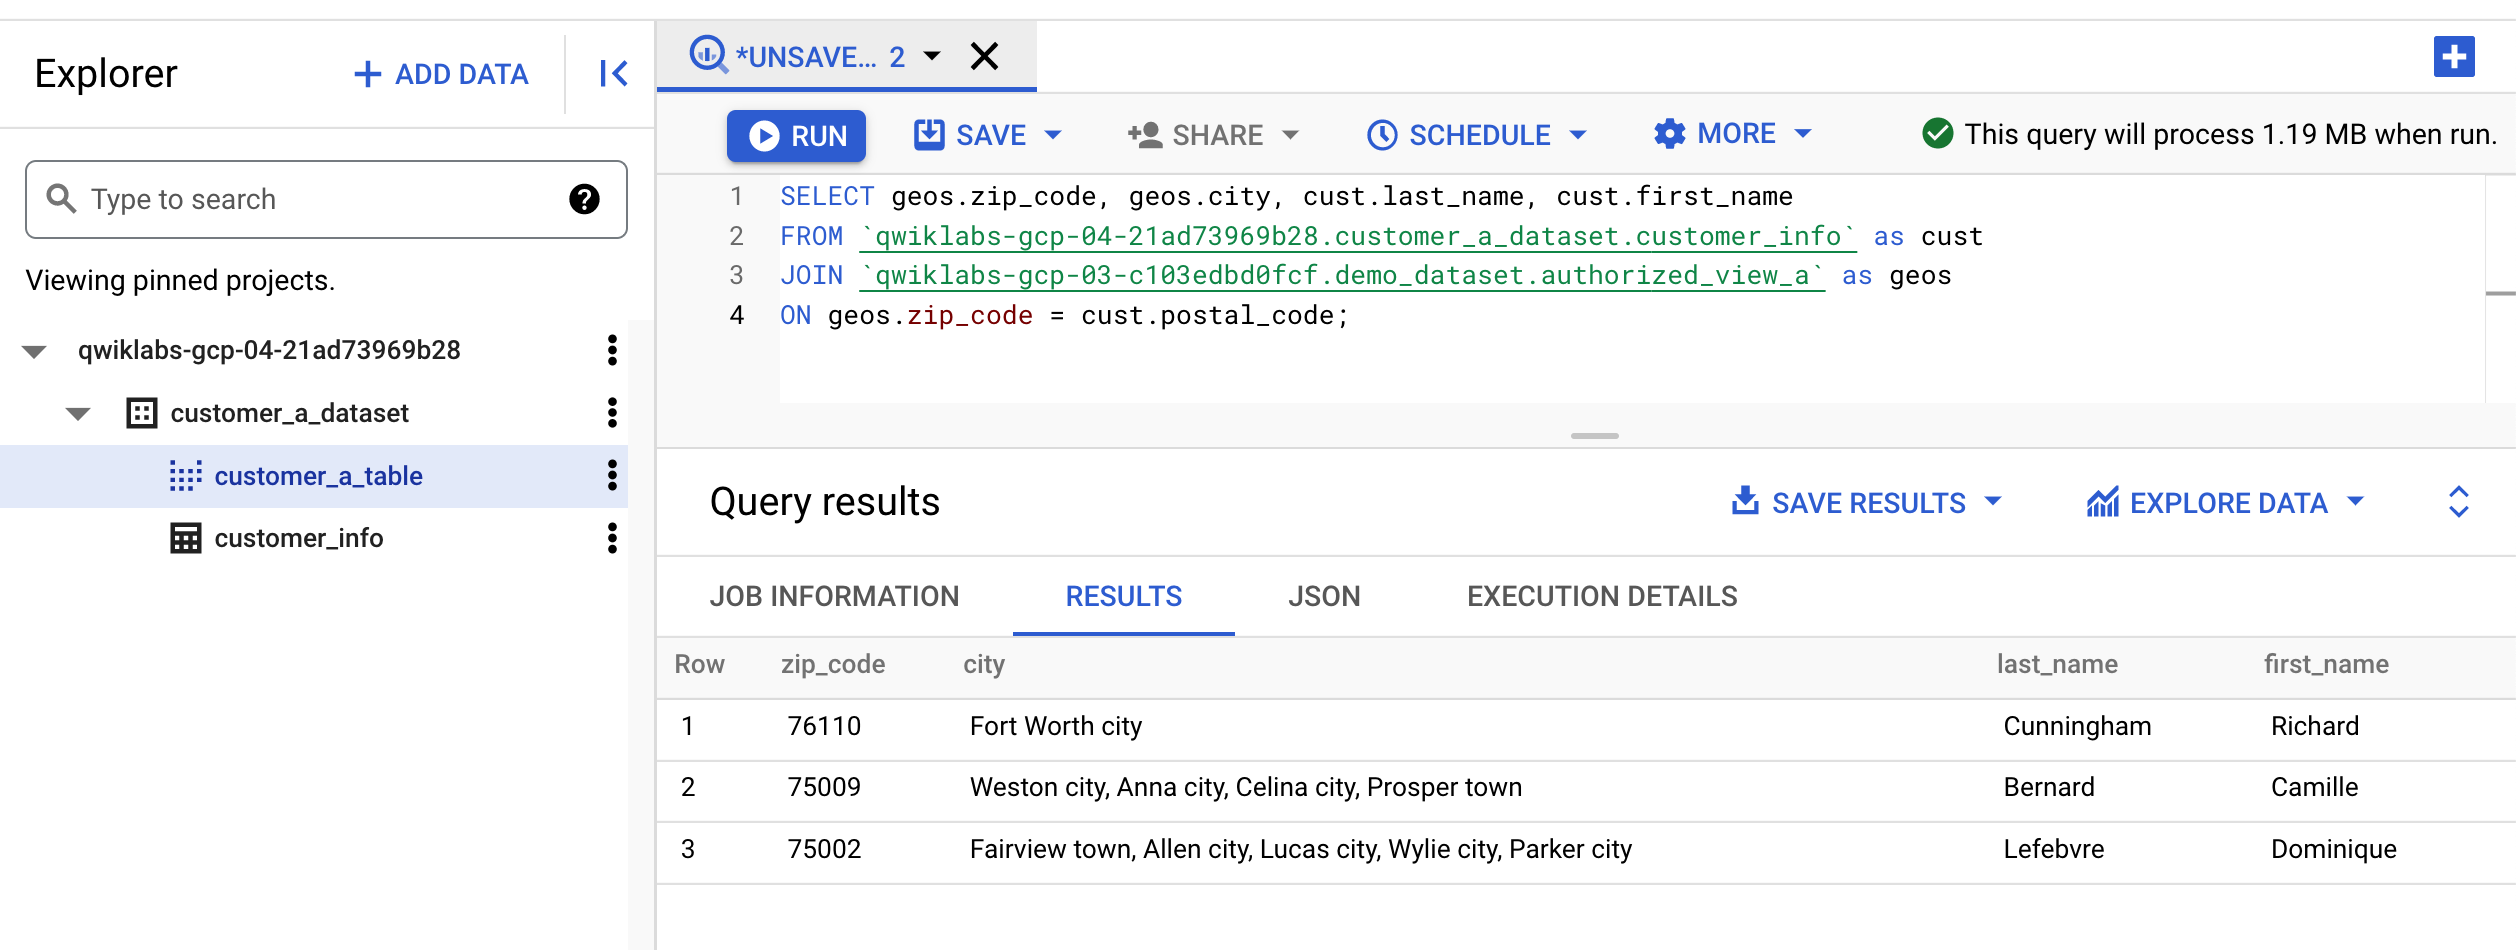
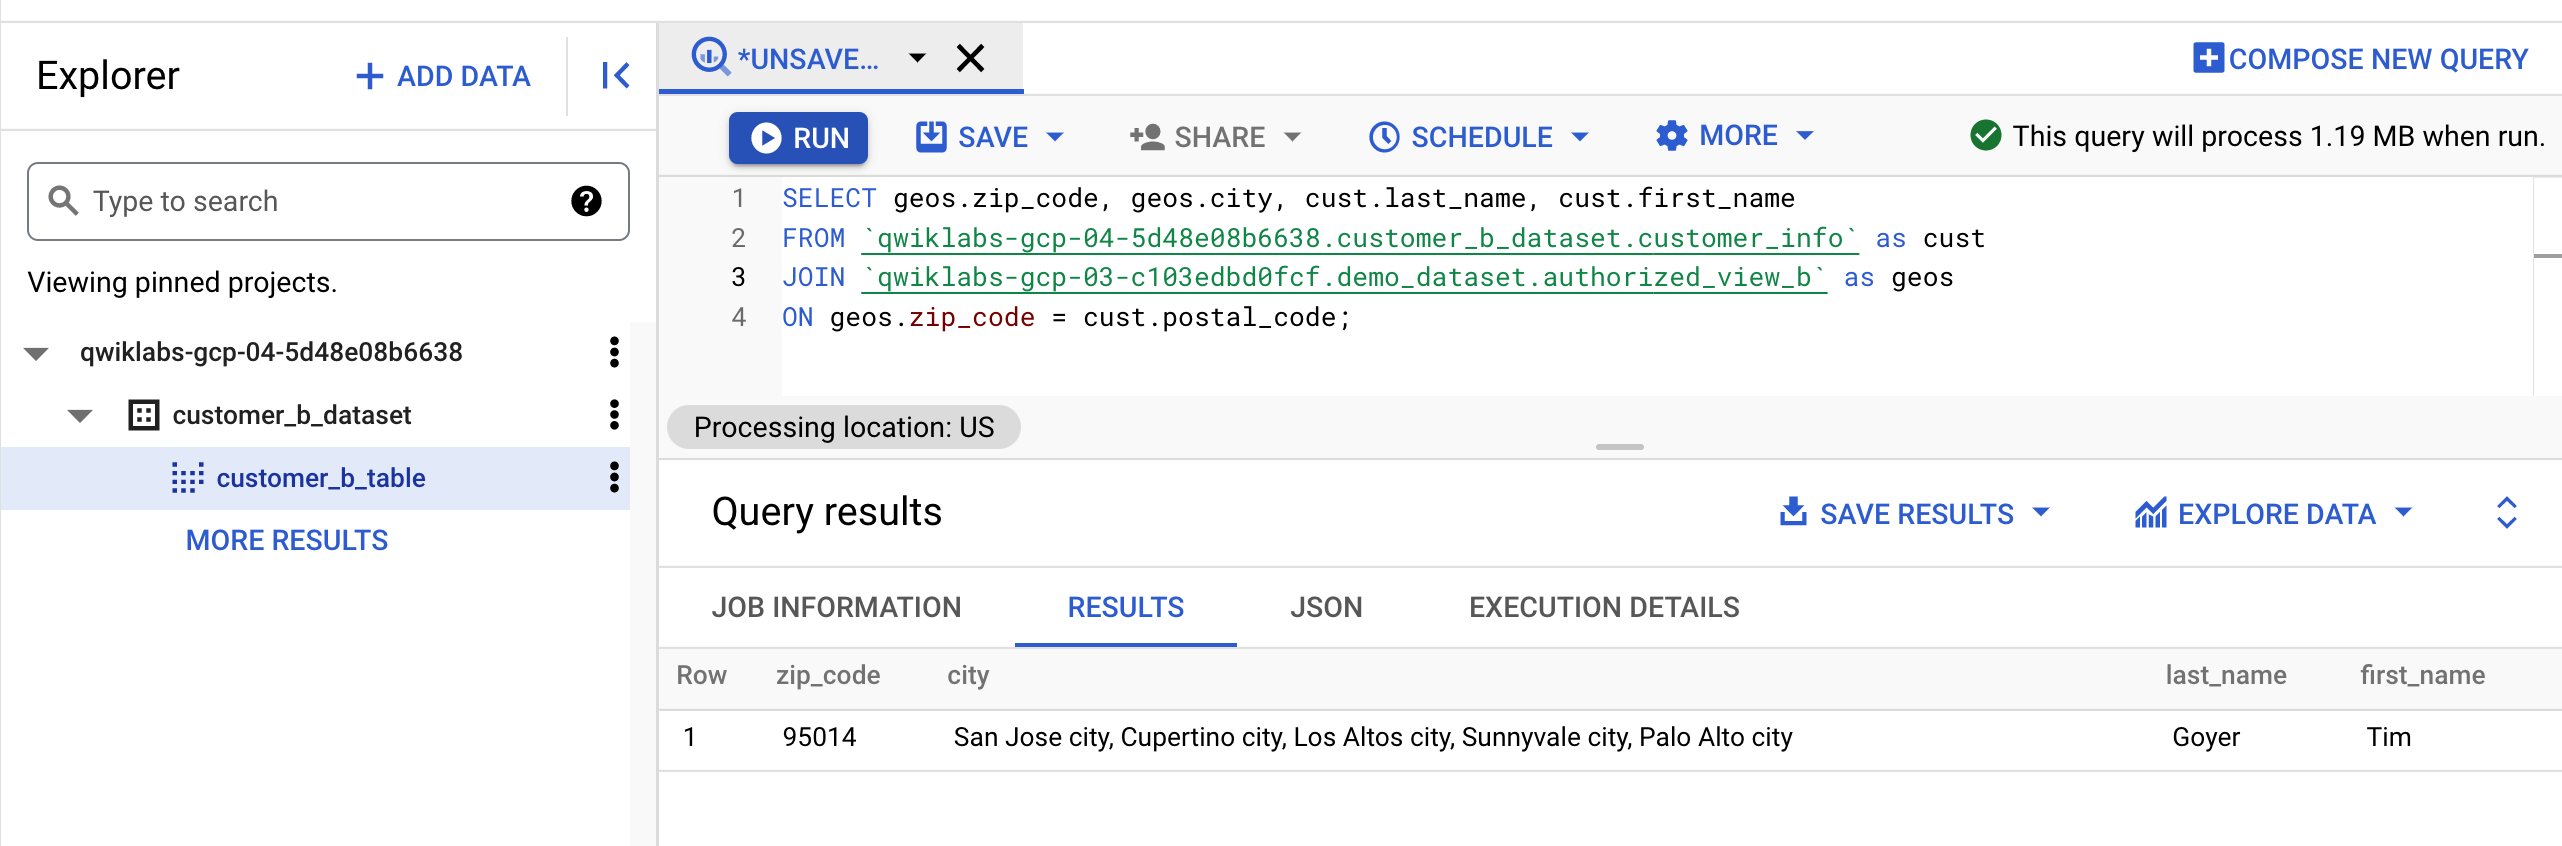
- Run the following query to find all customers in a State. Since the authorized view available to Customer A is filtered on the state of Texas, the query should return only customers in that state.
SELECT geos.zip_code, geos.city, cust.last_name, cust.first_name
FROM `qwiklabs-gcp-02-81e5e0b4d29f.customer_a_dataset.customer_info` as cust
JOIN `qwiklabs-gcp-00-d6842afe23d9.demo_dataset.authorized_view_a` as geos
ON geos.zip_code = cust.postal_code;
- Click Run.
Your results should resemble the following:
On the query toolbar, select Save > Save View.
Click in the Dataset field and select
customer_a_dataset.In the Table field, type
customer_a_table.Click Save. You should now be able to see the dataset and table, as well as query it.
Connect BigQuery to Looker Studio
Open Looker Studio.
On the Reports page, in the Start with a Template section, click the Blank Report template. This creates a new untitled report.
If prompted, complete Account setup settings and then click Continue.
Click the Blank Report template again.
In the Add data to report window, in the search box, enter
BigQuery.
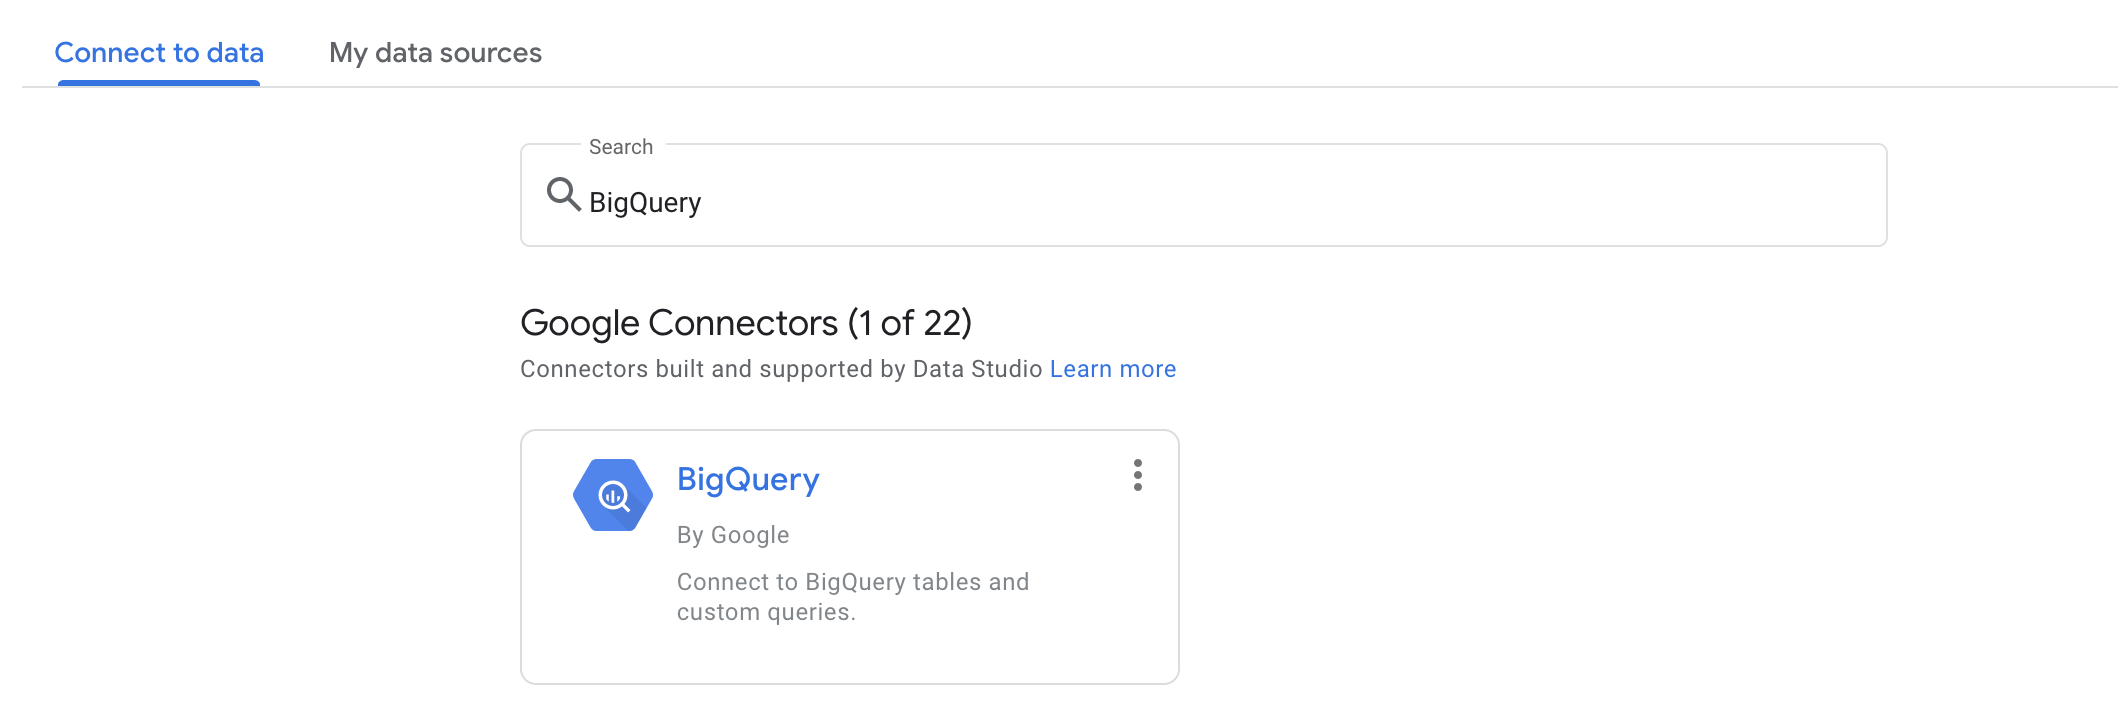
Click the BigQuery Connector.
For Authorization, click Authorize. This action lets Looker Studio access to your Google Cloud project.
In the Request for permission dialog, click Allow to give Looker Studio the ability to view data in BigQuery.
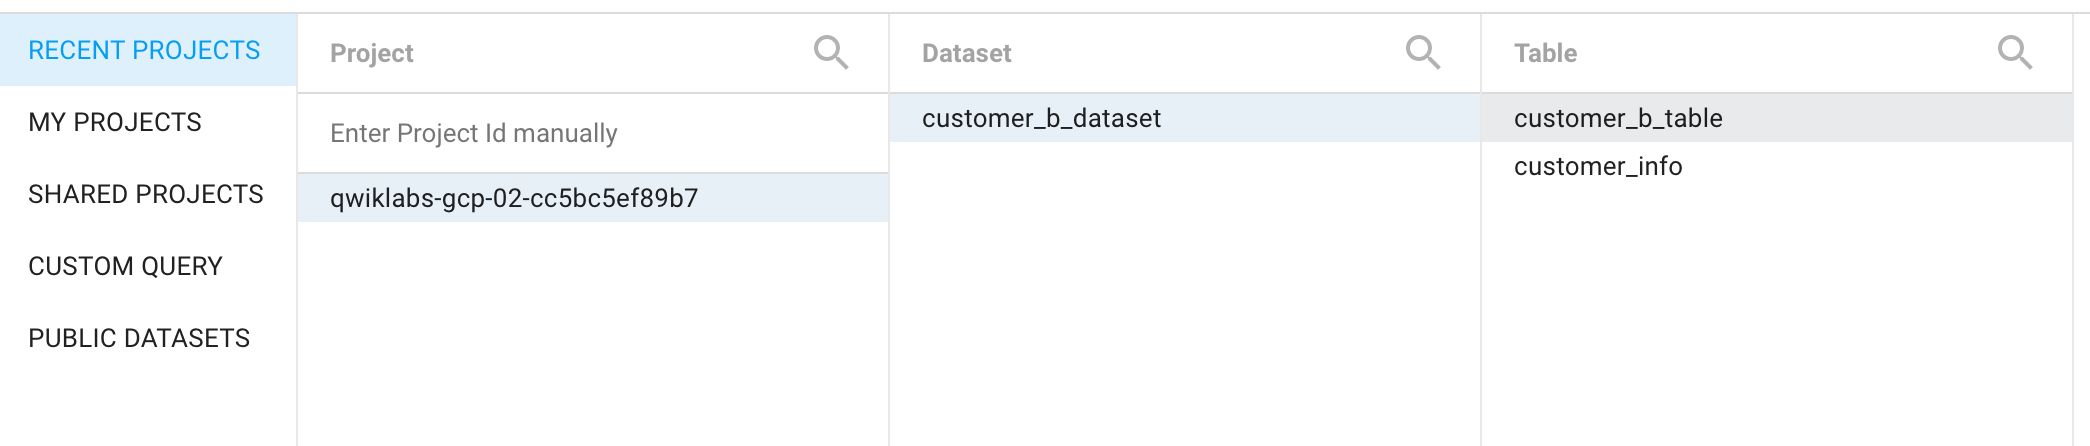
- Select Recent Projects from the left pane, select
qwiklabs-gcp-02-81e5e0b4d29f>customer_a_dataset>customer_a_table.
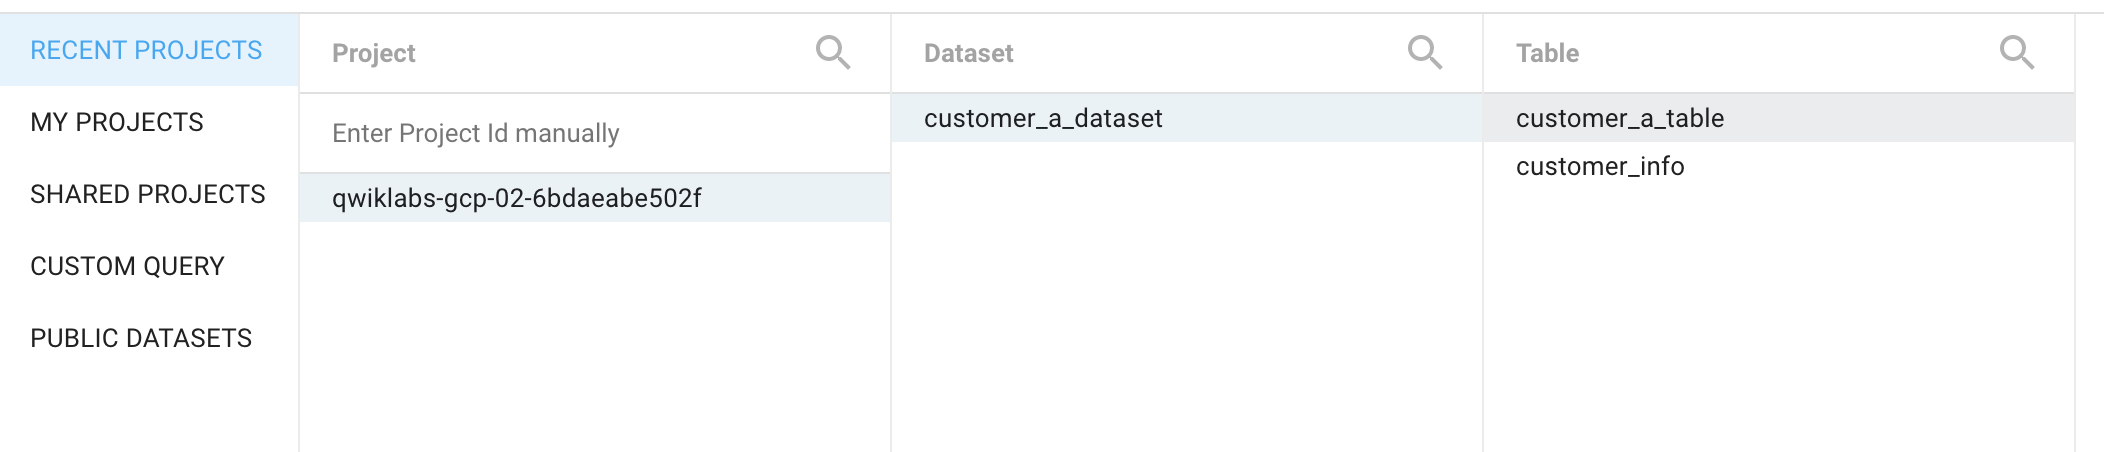
Click Add.
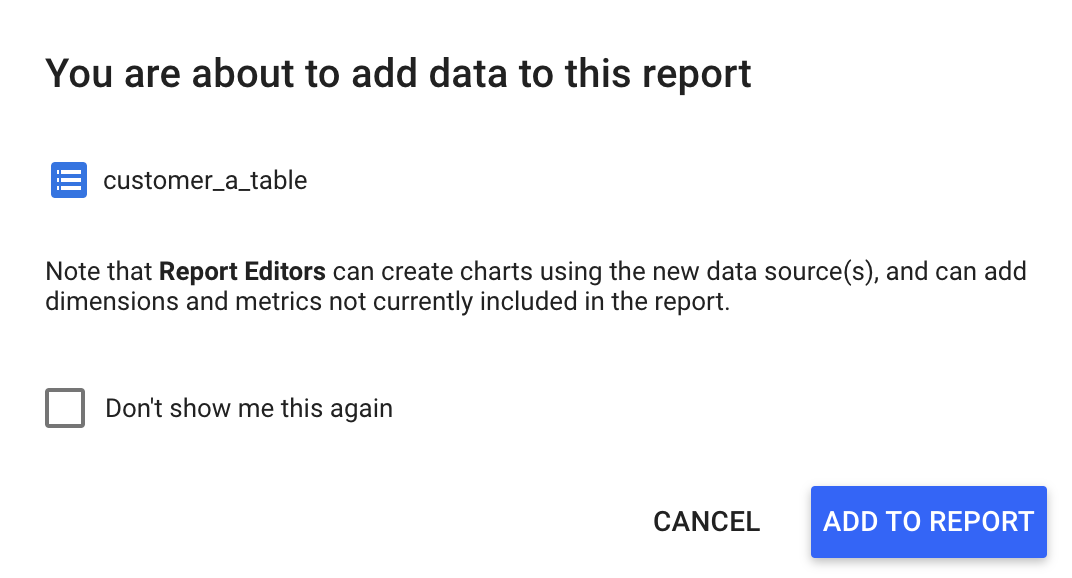
When prompted, click Add to Report.
Create a visualization in Looker Studio
At the top of the page, click Untitled Report to change the report name. Type
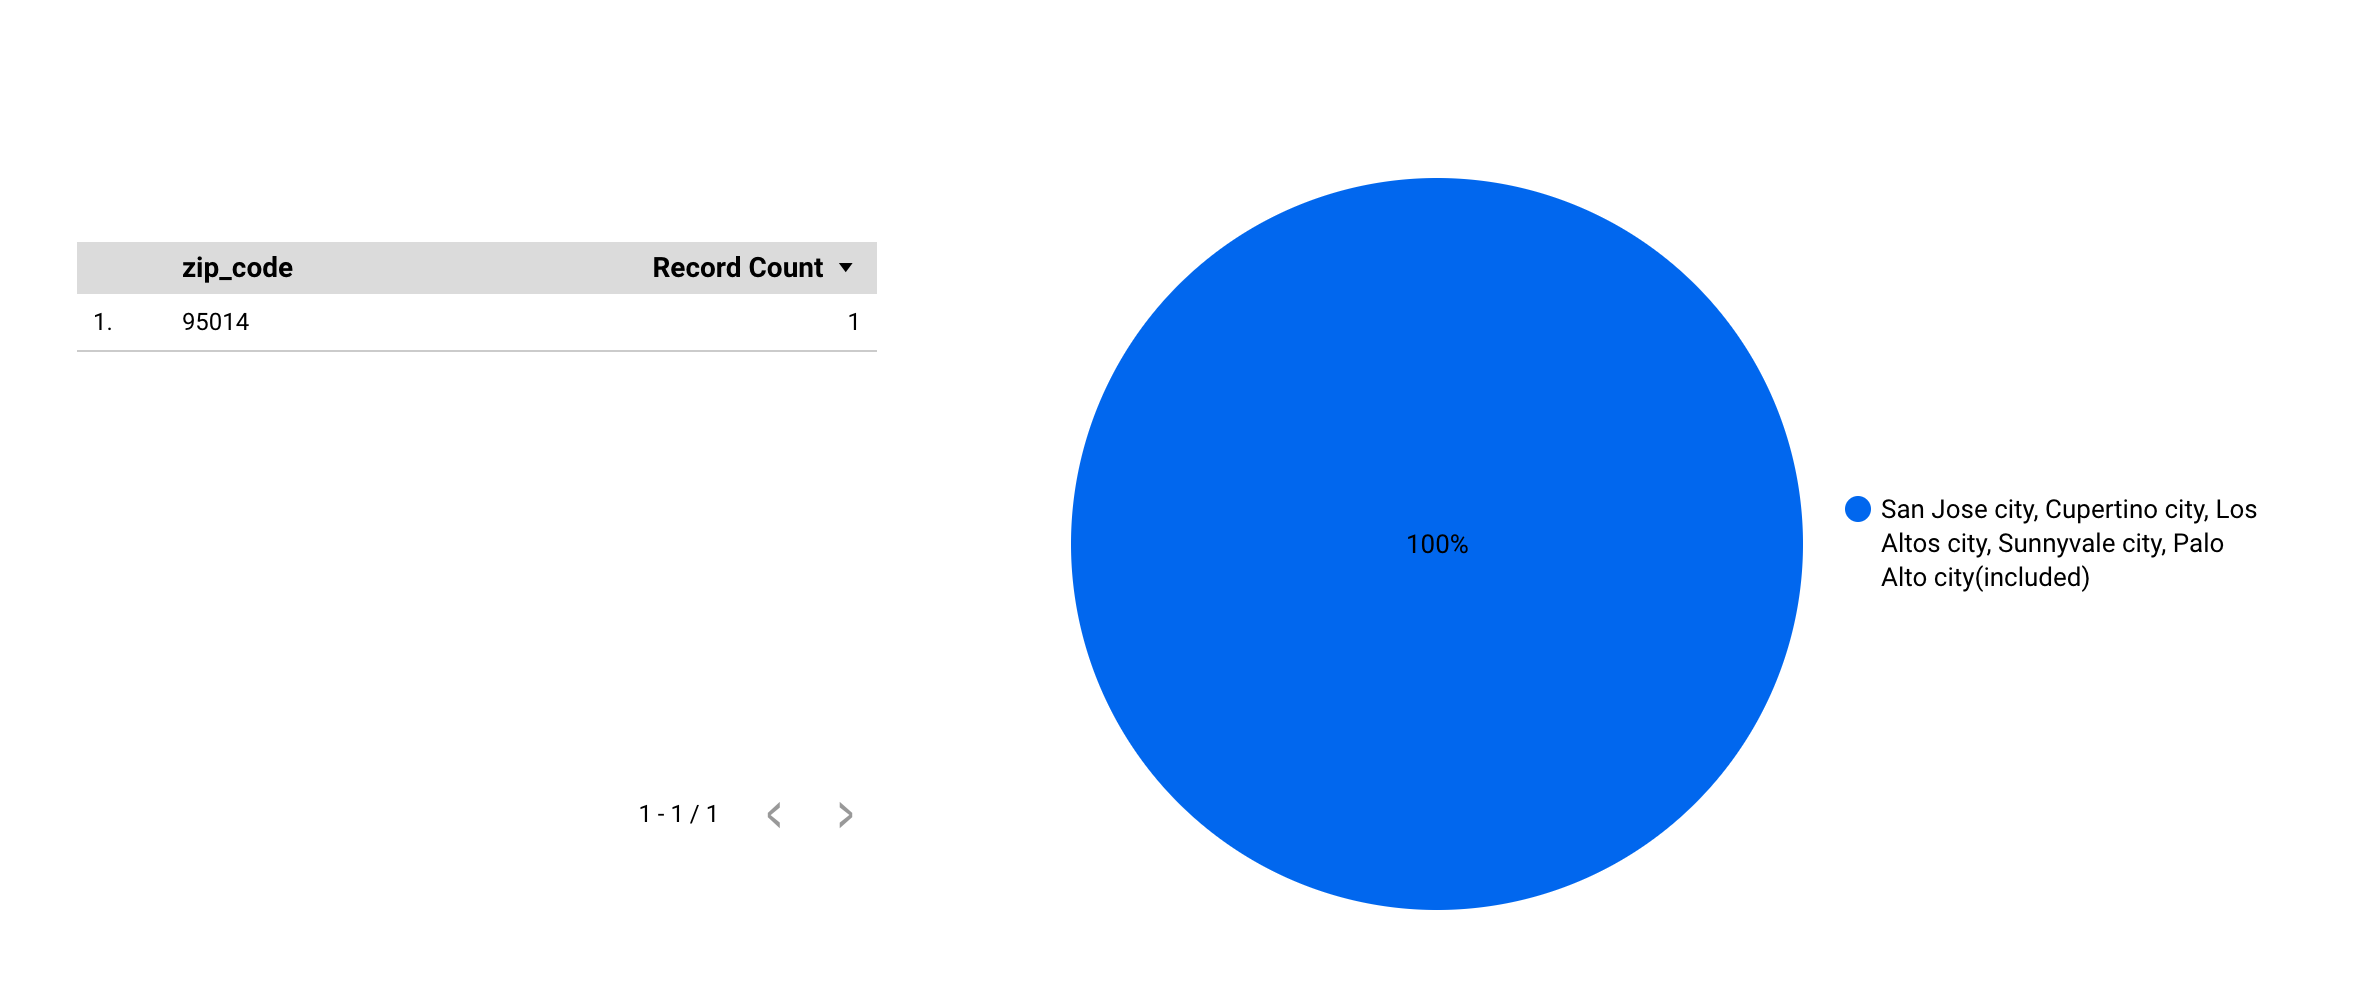
Customer A Visualization.After the report editor loads, click Insert > Pie chart.
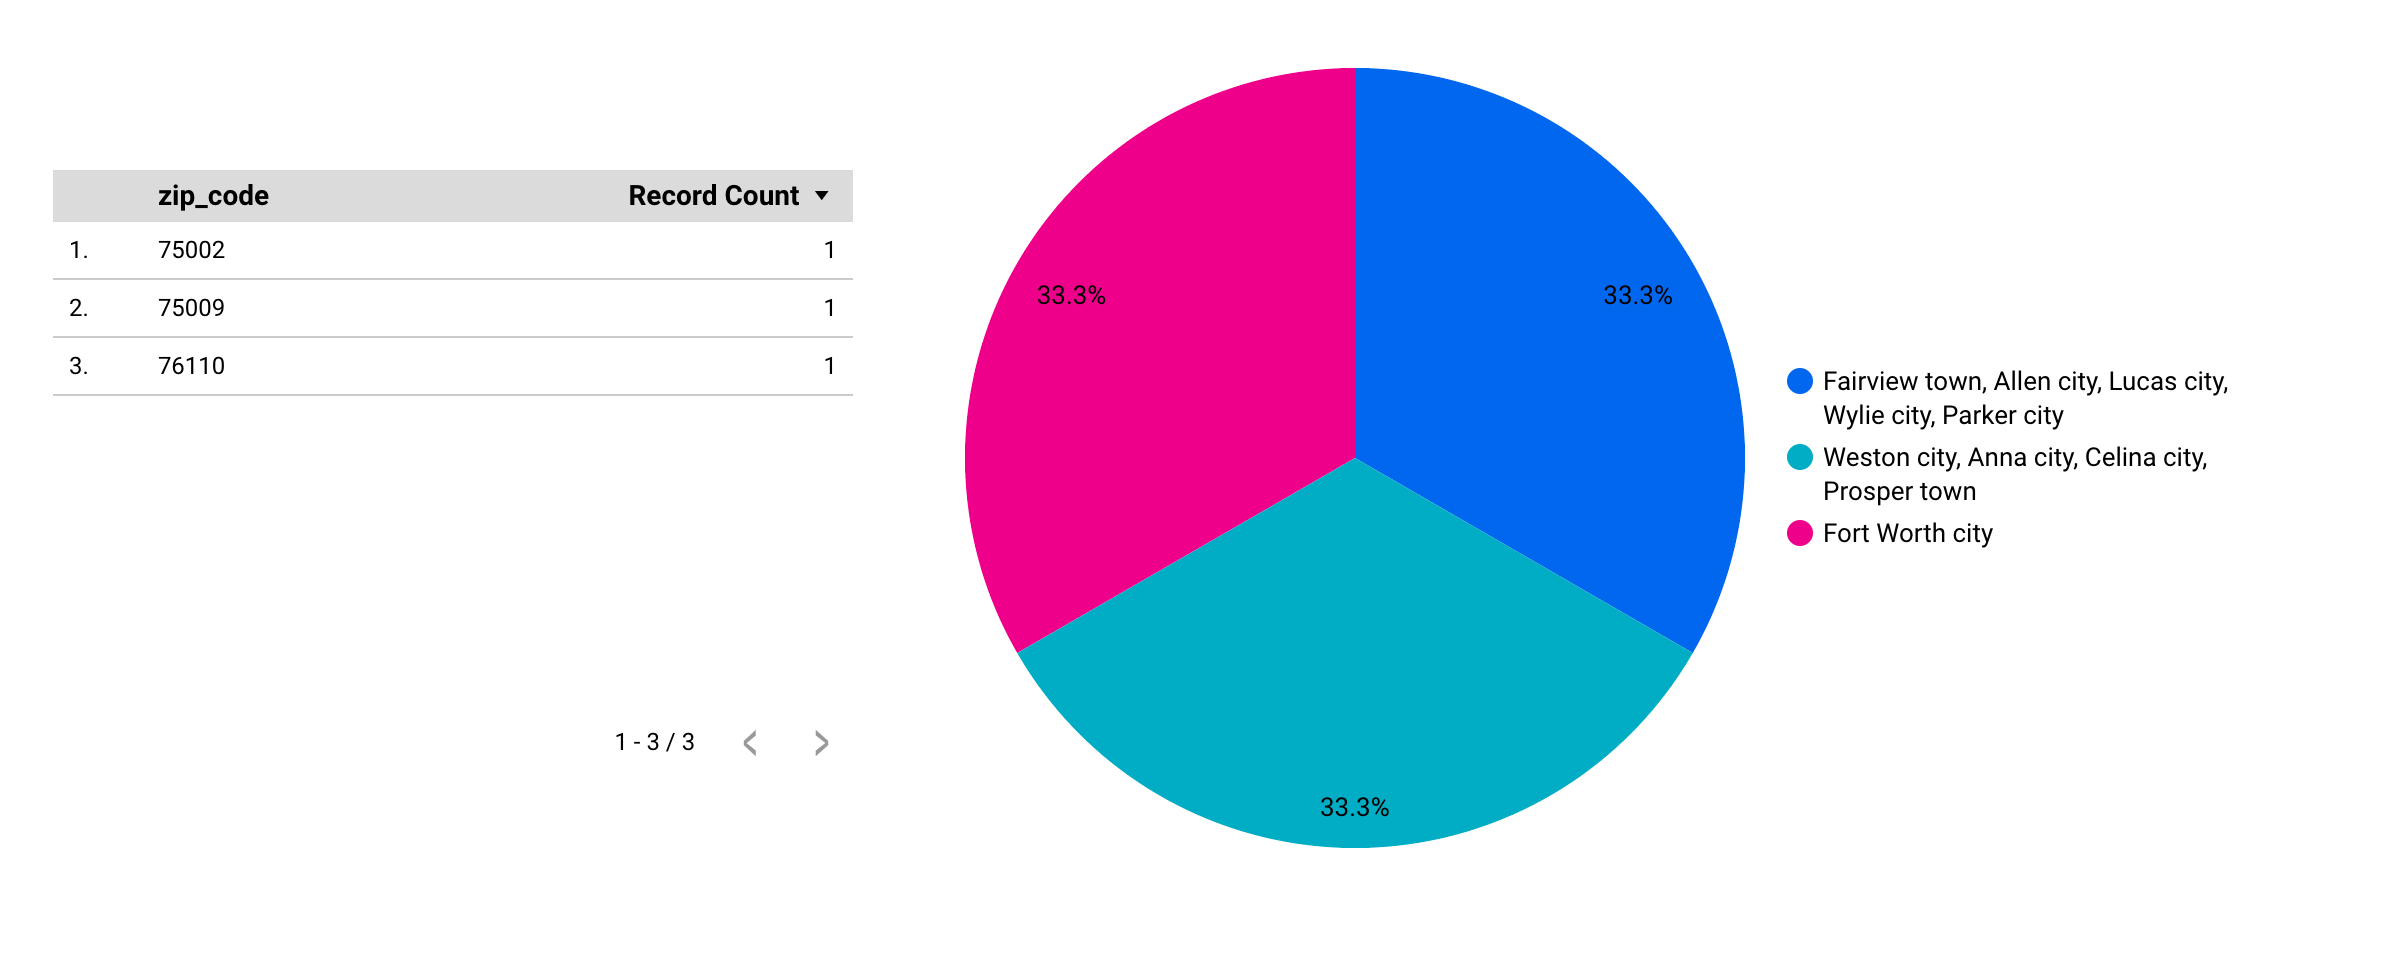
On the Pie Chart Data tab, notice the value for Data Source (
customer_a_table) and the default values for Dimension and Metric:zip_codeandRecord Count.Drag
cityfrom Available Fields onto thezip_codedimension to replace it.
The visualization should resemble the following:
Verify Analytics security
- From the toolbar, expand + Share > Get report link.
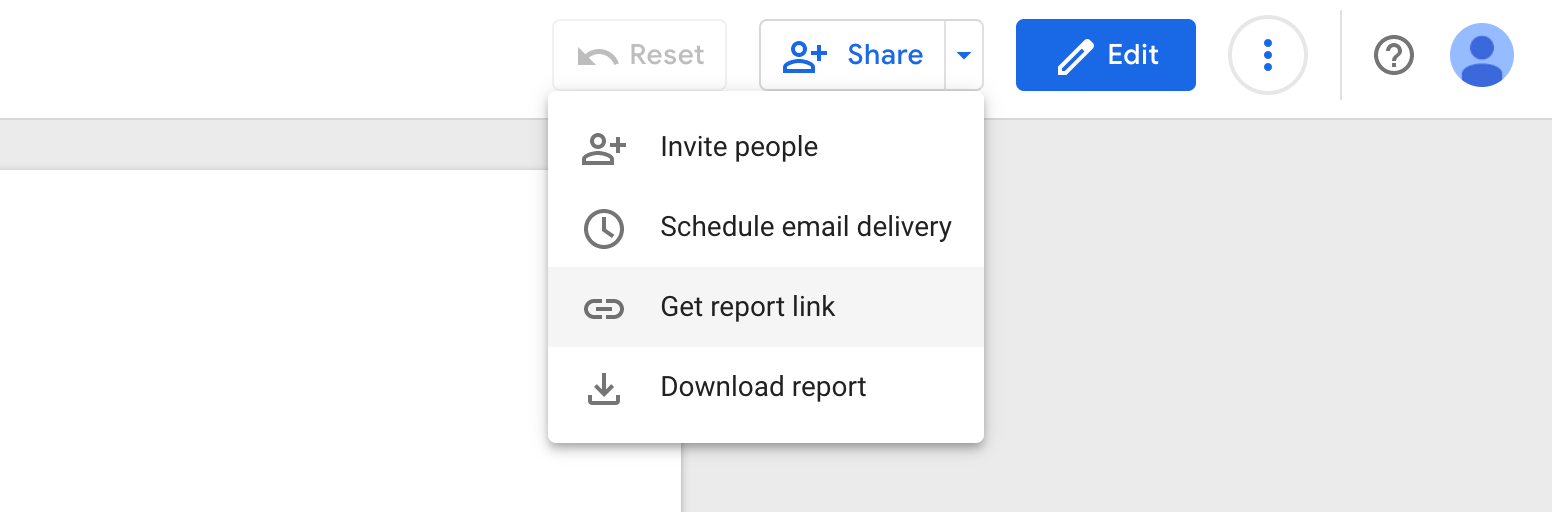
In the pop-up dialogue, click Copy Link and save it somewhere. Exit out of the window.
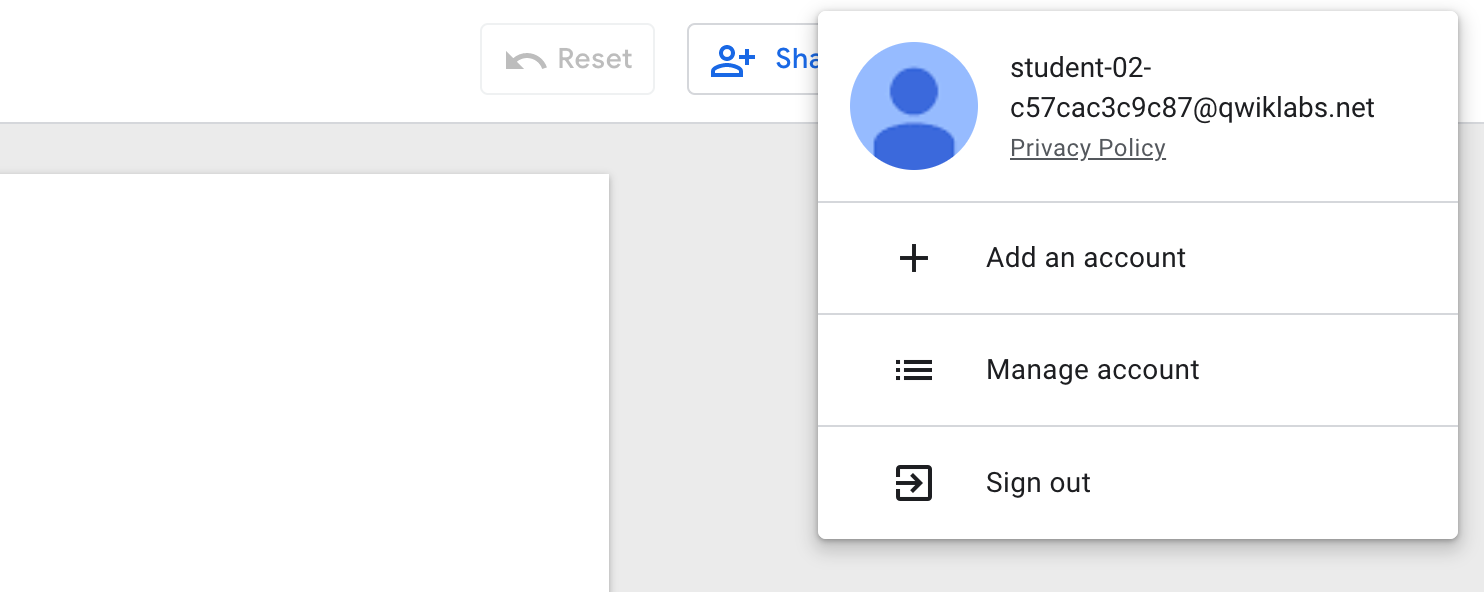
Click the student profile in the top right and click Sign out.
- Select Use another account.
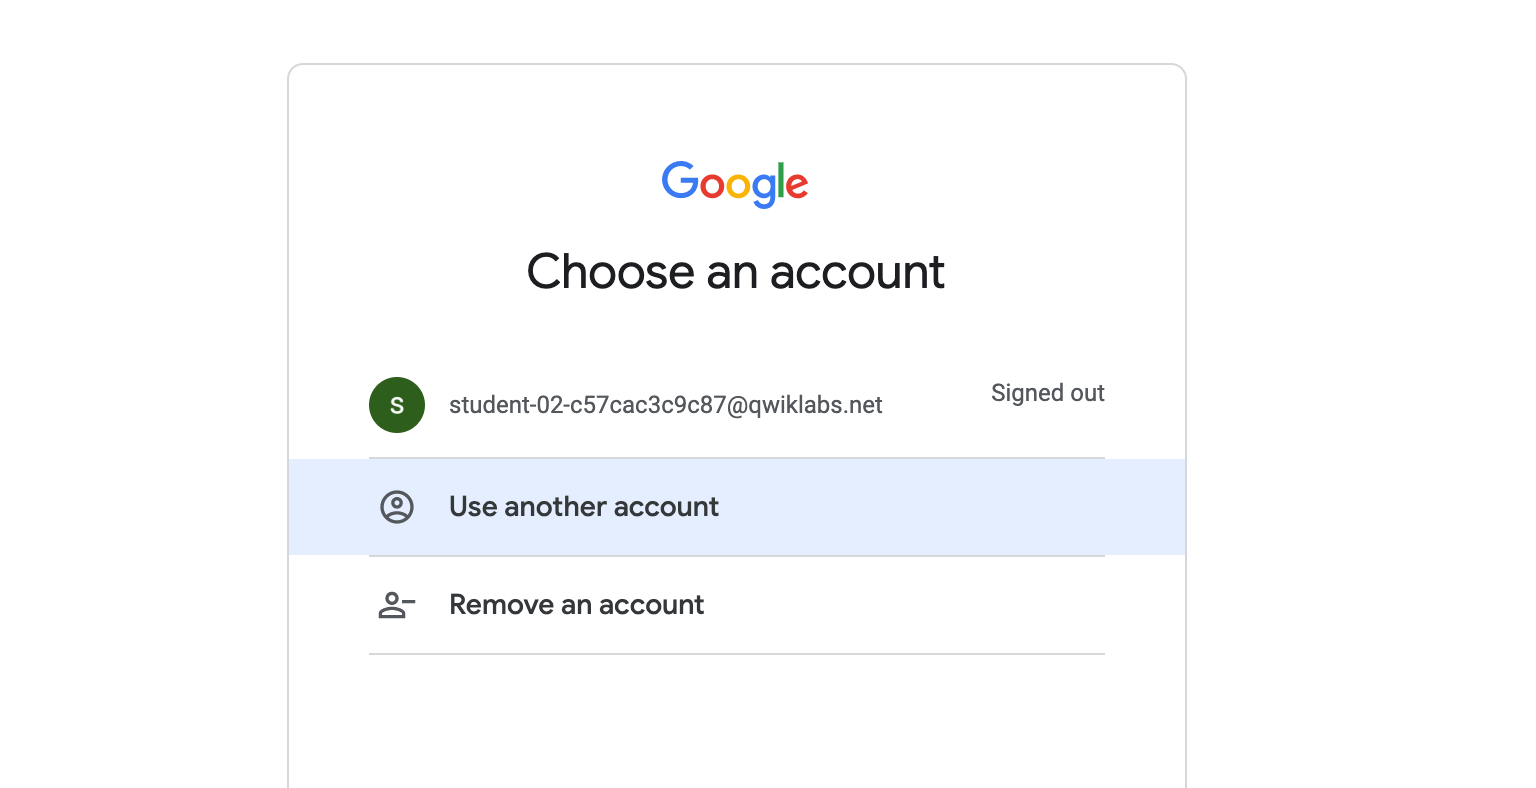
Log in with the Customer B user credentials.
You will be taken to your Google Account home page.
Open a new tab and navigate to the Looker Studio link you copied earlier.
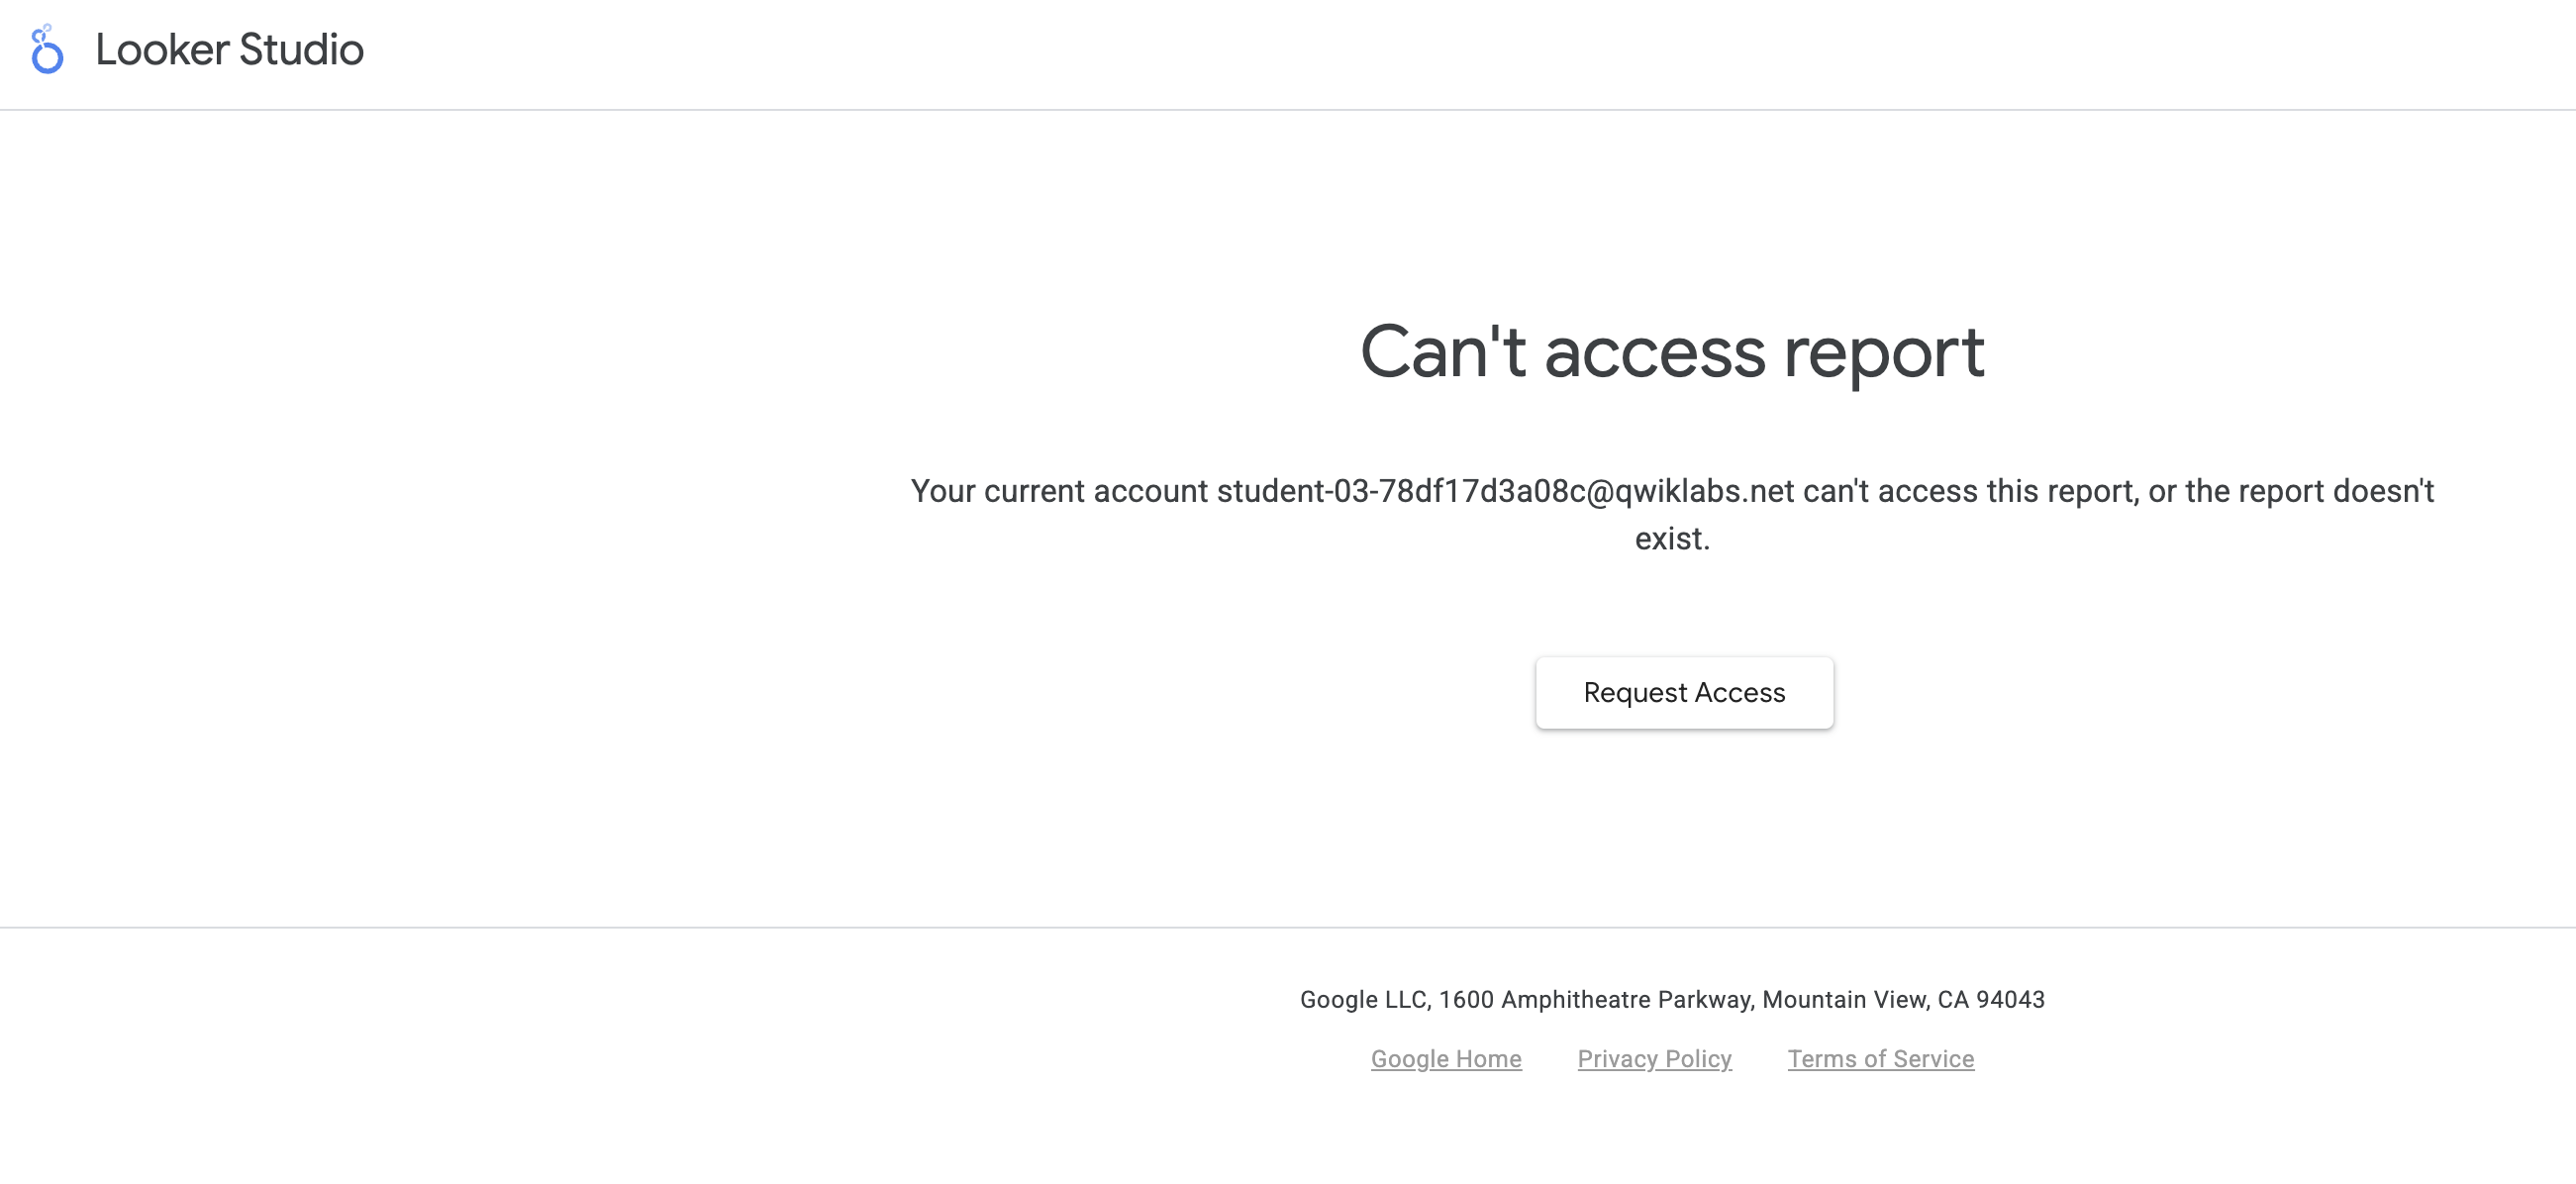
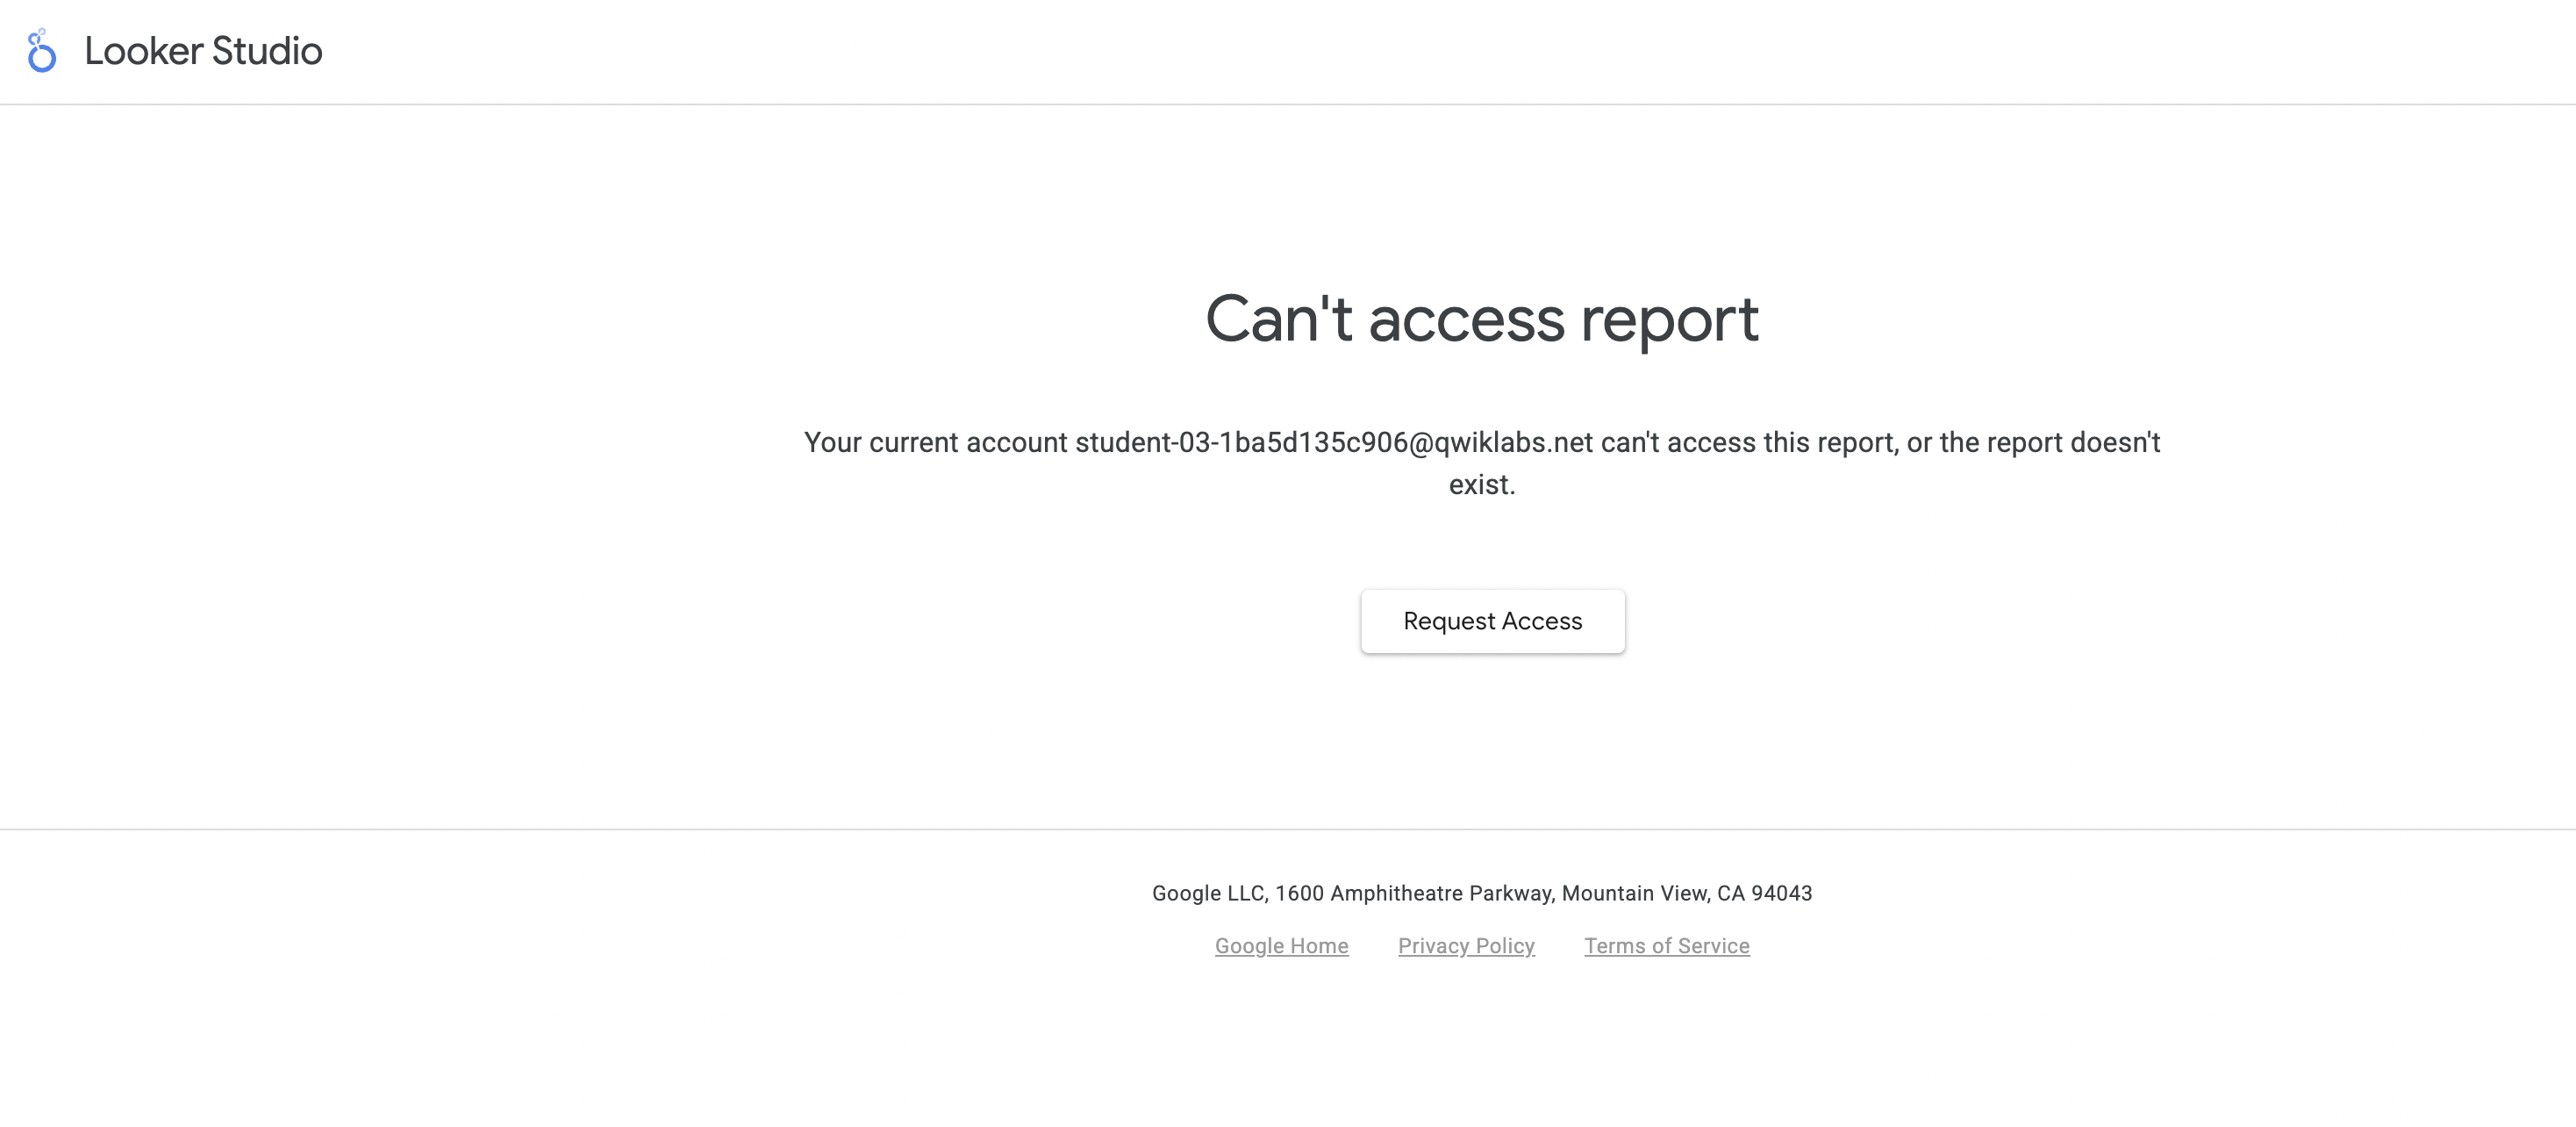
Upon logging in as Customer B, you should not be able to access the Analytics Dashboard of Customer A since you are not authorized.
Click Check my progress to verify your performed task.
Display insights for View A
Check my progress
Display insights for View B
Verify authorized view sharing for Customer B
Close the Customer Project A Console and from the lab pane open the Customer Project B Console. Log in with the associated credentials.
From the Navigation Menu, go to BigQuery > BigQuery Studio. If prompted click Done.
Click on + (Create SQL query) where you can run your query.
Now you will join the data from Customer B's authorized view to the customer specific dataset to generate new insights.
- Run the following query to find all customers in a State. Since the authorized view available to Customer A is filtered on the state of California, the query should return only customers in that state.
SELECT geos.zip_code, geos.city, cust.last_name, cust.first_name
FROM `qwiklabs-gcp-04-9e3a7e896dcb.customer_b_dataset.customer_info` as cust
JOIN `qwiklabs-gcp-00-d6842afe23d9.demo_dataset.authorized_view_b` as geos
ON geos.zip_code = cust.postal_code;
- Click Run.
Your results should resemble the following:
On the query toolbar, select Save > Save View.
Click in the Dataset field and select
customer_b_dataset.In the Table field, type
customer_b_table.Click Save. You should now be able to see the dataset and table, as well as query it.
Connect BigQuery to Looker Studio
Open Looker Studio.
On the Reports page, in the Start with a Template section, click the Blank Report template. This creates a new untitled report.
If prompted, complete Account setup settings and then click Continue.
Click the Blank Report template again.
In the Add data to report window, in the search box, enter
BigQuery.
Click the BigQuery Connector.
For Authorization, click Authorize. This action lets Google Looker Studio access to your Google Cloud project.
In the Request for permission dialog, click Allow to give Looker Studio the ability to view data in BigQuery.
- Select Recent Projects from the left pane, select
qwiklabs-gcp-04-9e3a7e896dcb>customer_b_dataset>customer_b_table.
Click Add.
When prompted, click Add to Report.
Create a visualization in Looker Studio
At the top of the page, click Untitled Report to change the report name. Type
Customer B Visualization.After the report editor loads, click Insert > Pie chart.
On the Pie Chart Data tab, notice the value for Data Source (
customer_b_table) and the default values for Dimension and Metric:zip_codeandRecord Count.Drag
cityfrom Available Fields onto thezip_codedimension to replace it.
The visualization should resemble the following:
Verify Analytics security
- From the toolbar, expand + Share > Get report link.
In the pop-up dialogue, click Copy Link and save it somewhere. Exit out of the window.
Click the student profile in the top right and click Sign out.
- Select Use another account.
Log in with the Customer A user credentials.
You will be taken to your Google Account home page.
Open a new tab and navigate to the Looker Studio link you copied earlier.
Upon logging in as Customer A, you should not be able to access the Analytics Dashboard of Customer B since you are not authorized.
Click Check my progress to verify your performed task.
Display insights for View B
Check my progress
Solution of Lab
New Solution
Run in CloudShell
bq mk \
--use_legacy_sql=false \
--description "DESCRIPTION" \
--view 'SELECT * FROM `bigquery-public-data.geo_us_boundaries.zip_codes`
WHERE state_code="TX"
LIMIT 4000' \
--project_id $DEVSHELL_PROJECT_ID \
demo_dataset.authorized_view_a
bq mk \
--use_legacy_sql=false \
--description "DESCRIPTION" \
--view 'SELECT * FROM `bigquery-public-data.geo_us_boundaries.zip_codes`
WHERE state_code="CA"
LIMIT 4000' \
--project_id $DEVSHELL_PROJECT_ID \
demo_dataset.authorized_view_b
echo "PROJECT ID=$DEVSHELL_PROJECT_ID"
Copy the project id (From last line in terminal) and Store it
Bigquery > demo_dataset
sharing > Authorize Views >
demo_dataset> select a > add authorizationThen again >
demo_dataset> select b > add authorization > close
authorized_view_a > Share
Add Principal > Paste username A from lab > Role
BigQuery Data Viewer> save
authorized_view_b > Share
Add Principal > Paste username B from lab > Role
BigQuery Data Viewer> save
Close the incognito window
Login to Project A Console
PROJECT_ID=
bq mk --use_legacy_sql=false --view 'SELECT geos.zip_code, geos.city, cust.last_name, cust.first_name
FROM `'$DEVSHELL_PROJECT_ID'.customer_a_dataset.customer_info` as cust
JOIN `'$PROJECT_ID'.demo_dataset.authorized_view_a` as geos
ON geos.zip_code = cust.postal_code;' customer_a_dataset.customer_a_table
Open in incognito Looker > Blank report > Country
India> CompanycloudhustlersAgree and continue > Yes to all > Continue > Bigquery > Authorize
GCP ID > customer_a_dataset > customer_a_table > ADD > add to report
Close the incognito window
Login to Project B Console
PROJECT_ID=
bq mk --use_legacy_sql=false --view 'SELECT geos.zip_code, geos.city, cust.last_name, cust.first_name
FROM `'$DEVSHELL_PROJECT_ID'.customer_b_dataset.customer_info` as cust
JOIN `'$PROJECT_ID'.demo_dataset.authorized_view_b` as geos
ON geos.zip_code = cust.postal_code;' customer_b_dataset.customer_b_table
Open in incognito Looker > Blank report > Country
India> CompanycloudhustlersAgree and continue > Yes to all > Continue > Bigquery > Authorize
GCP ID > customer_b_dataset > customer_b_table > ADD > add to report
Old Solution
1. ☁️ Initialize Views in Cloud Shell
curl -LO https://raw.githubusercontent.com/ArcadeCrew/Google-Cloud-Labs/refs/heads/main/Analytics%20as%20a%20Service%20for%20Data%20Sharing%20Partners/arcadecrew.sh
sudo chmod +x arcadecrew.sh
./arcadecrew.sh

2. 🔑 Store Your Main Project ID
After running the commands above, copy the PROJECT ID displayed in the last line of your Cloud Shell output (e.g., PROJECT ID=qwiklabs-gcp-xxxx). You'll need this ID for subsequent steps.
3. 👁️ BigQuery: Authorize Views
Follow these steps in the Google Cloud Console for your Main Lab Project:
Navigate to ☰ Menu > BigQuery.
In the Explorer panel, find your project, then expand
demo_dataset.In the "Authorize views" panel:
Select
authorized_view_afrom the list.Click ADD AUTHORIZATION.
- Repeat for the other view:
Select
authorized_view_bfrom the list.Click ADD AUTHORIZATION.
- Click CLOSE.
4. 🤝 Share Authorized Views
Now, share these views with the user accounts specified in the lab:
For authorized_view_a:
In BigQuery, under
demo_dataset, findauthorized_view_a.Click the three dots (⋮) next to it (or select it) and choose SHARE.
In the "Share
authorized_view_a" panel, click ADD PRINCIPAL.In the "New principals" field, paste Username A (from the lab instructions).
Assign the Role:
BigQuery Data Viewer.Click SAVE.
For authorized_view_b:
Similarly, find
authorized_view_bunderdemo_dataset.Click the three dots (⋮) next to it (or select it) and choose SHARE.
Click ADD PRINCIPAL.
Paste Username B (from the lab instructions).
Assign the Role:
BigQuery Data Viewer.Click SAVE.
5. 🚪 Close Incognito Window (If Open)
If you have any incognito windows open from previous lab activity, close them.
🚀 Project A: Configuration
1. 💻 Access Project A
Log in to the Google Cloud Console using the credentials provided for Project A.
Open a new Cloud Shell session within Project A.
2. 🛠️ Create View in Project A
In the Project A Cloud Shell, first set an environment variable for your Main Lab Project ID (the one you copied in step 1.2):
curl -LO https://raw.githubusercontent.com/ArcadeCrew/Google-Cloud-Labs/refs/heads/main/Analytics%20as%20a%20Service%20for%20Data%20Sharing%20Partners/arcadecrew1.sh
sudo chmod +x arcadecrew1.sh
./arcadecrew1.sh
3. 📊 Connect Looker Studio (for Project A)
Open a new Incognito window.
Navigate to Looker Studio.
Click on Blank Report.
If prompted for account setup (country/company):
Country: Select India (or your preferred country).
Company: Enter ArcadeCrew (or any name).
Agree to the terms and click Continue. Answer any subsequent prompts (e.g., "Yes to all" for email preferences).
In the "Add data to report" window, select the BigQuery connector.
Click AUTHORIZE if prompted, and allow access.
Under "Project", select Project A's ID.
Under "Dataset", select
customer_a_dataset.Under "Table", select
customer_a_table.Click ADD (bottom right), then confirm by clicking ADD TO REPORT.
4. 🚪 Close Incognito Window
Close the Incognito window used for Project A's Looker Studio.
🚀 Project B: Configuration
1. 💻 Access Project B
Log in to the Google Cloud Console using the credentials provided for Project B.
Open a new Cloud Shell session within Project B.
2. 🛠️ Create View in Project B
In the Project B Cloud Shell, set the environment variable for your Main Lab Project ID again:
curl -LO https://raw.githubusercontent.com/ArcadeCrew/Google-Cloud-Labs/refs/heads/main/Analytics%20as%20a%20Service%20for%20Data%20Sharing%20Partners/arcadecrew2.sh
sudo chmod +x arcadecrew2.sh
./arcadecrew2.sh
3. 📊 Connect Looker Studio (for Project B)
Open a new Incognito window.
Navigate to Looker Studio.
Click on Blank Report.
(You might not be prompted for account setup again if you recently did it for Project A). If prompted:
Country: Select India (or your preferred country).
Company: Enter ArcadeCrew (or any name).
Agree and Continue.
Select the BigQuery connector.
Click AUTHORIZE if needed.
Under "Project", select Project B's ID.
Under "Dataset", select
customer_b_dataset.Under "Table", select
customer_b_table.Click ADD, then ADD TO REPORT.


