
Awwvision: Cloud Vision API from a Kubernetes Cluster - GSP066
A passionate full-stack developer from @ePlus.DEV
Overview
The Awwvision lab uses Kubernetes and Cloud Vision API to demonstrate how to use the Vision API to classify (label) images from Reddit's /r/aww subreddit and display the labelled results in a web app.
Awwvision has three components:
A simple Redis instance.
A web app that displays the labels and associated images.
A worker that handles scraping Reddit for images and classifying them using the Vision API. Cloud Pub/Sub is used to coordinate tasks between multiple worker instances.
Objectives
In this lab, you will learn how to perform the following tasks:
Create a Kubernetes Engine cluster
Deploy the sample awwvision app that uses the Vision API
Visit your new webapp and start its crawler.
Setup and requirements
Before you click the Start Lab button
Read these instructions. Labs are timed and you cannot pause them. The timer, which starts when you click Start Lab, shows how long Google Cloud resources will be made available to you.
This hands-on lab lets you do the lab activities yourself in a real cloud environment, not in a simulation or demo environment. It does so by giving you new, temporary credentials that you use to sign in and access Google Cloud for the duration of the lab.
To complete this lab, you need:
- Access to a standard internet browser (Chrome browser recommended).
Note: Use an Incognito or private browser window to run this lab. This prevents any conflicts between your personal account and the Student account, which may cause extra charges incurred to your personal account.
- Time to complete the lab---remember, once you start, you cannot pause a lab.
Note: If you already have your own personal Google Cloud account or project, do not use it for this lab to avoid extra charges to your account.
How to start your lab and sign in to the Google Cloud console
Click the Start Lab button. If you need to pay for the lab, a pop-up opens for you to select your payment method. On the left is the Lab Details panel with the following:
The Open Google Cloud console button
Time remaining
The temporary credentials that you must use for this lab
Other information, if needed, to step through this lab
Click Open Google Cloud console (or right-click and select Open Link in Incognito Window if you are running the Chrome browser).
The lab spins up resources, and then opens another tab that shows the Sign in page.
Tip: Arrange the tabs in separate windows, side-by-side.
Note: If you see the Choose an account dialog, click Use Another Account.
If necessary, copy the Username below and paste it into the Sign in dialog.
student-04-ba9df686689b@qwiklabs.netYou can also find the Username in the Lab Details panel.
Click Next.
Copy the Password below and paste it into the Welcome dialog.
hjdzHFQSPCYrYou can also find the Password in the Lab Details panel.
Click Next.
Important: You must use the credentials the lab provides you. Do not use your Google Cloud account credentials.
Note: Using your own Google Cloud account for this lab may incur extra charges.
Click through the subsequent pages:
Accept the terms and conditions.
Do not add recovery options or two-factor authentication (because this is a temporary account).
Do not sign up for free trials.
After a few moments, the Google Cloud console opens in this tab.
Note: To view a menu with a list of Google Cloud products and services, click the Navigation menu at the top-left.

Activate Cloud Shell
Cloud Shell is a virtual machine that is loaded with development tools. It offers a persistent 5GB home directory and runs on the Google Cloud. Cloud Shell provides command-line access to your Google Cloud resources.
Click Activate Cloud Shell
at the top of the Google Cloud console.

When you are connected, you are already authenticated, and the project is set to your Project_ID, qwiklabs-gcp-03-03a0e75d7a05. The output contains a line that declares the Project_ID for this session:
Your Cloud Platform project in this session is set to qwiklabs-gcp-03-03a0e75d7a05
gcloud is the command-line tool for Google Cloud. It comes pre-installed on Cloud Shell and supports tab-completion.
- (Optional) You can list the active account name with this command:
gcloud auth list
- Click Authorize.
Output:
ACTIVE: *
ACCOUNT: student-04-ba9df686689b@qwiklabs.net

To set the active account, run:
    $ gcloud config set account `ACCOUNT`
- (Optional) You can list the project ID with this command:
gcloud config list project
Output:
[core]
project = qwiklabs-gcp-03-03a0e75d7a05
Note: For full documentation of gcloud, in Google Cloud, refer to the gcloud CLI overview guide.
Task 1. Create a Kubernetes Engine cluster
In this lab you will use gcloud, Google Cloud's command-line tool, to set up a Kubernetes Engine cluster. You can specify as many nodes as you want, but you need at least one. The cloud platform scope is used to allow access to the Pub/Sub and Vision APIs.
- In Cloud Shell, run the following to create a cluster in the
us-east4-bzone:
gcloud config set compute/zone us-east4-b
- Then start up the cluster by running:
gcloud container clusters create awwvision \
    --num-nodes 2 \
    --scopes cloud-platform
Test completed task
Click Check my progress to verify your performed task. If you have successfully created a Kubernetes cluster, you will see an assessment score.
Create a Kubernetes Engine cluster
Check my progress
- Run the following to use the container's credentials:
gcloud container clusters get-credentials awwvision
- Verify that everything is working using the
kubectlcommand-line tool:
kubectl cluster-info
Task 2. Create a virtual environment
Python virtual environments are used to isolate package installation from the system.
- Install the
virtualenvenvironment:
sudo apt-get install -y virtualenv
- Build the virtual environment:
python3 -m venv venv
- Activate the virtual environment.
source venv/bin/activate
Task 3. Get the sample
- Add sample data to your project by running:
gsutil -m cp -r gs://spls/gsp066/cloud-vision .
Task 4. Deploy the sample
- In Cloud Shell, change to the
python/awwvisiondirectory in the cloned cloud-vision repo:
cd cloud-vision/python/awwvision
- Once in the
awwvisiondirectory, runmake allto build and deploy everything:
make all
As part of the process, Docker images will be built and uploaded to the Google Container Registry private container registry.
In addition, yaml files will be generated from templates, filled in with information specific to your project, and used to deploy the redis, webapp, and worker Kubernetes resources for the lab.
Task 5. Check the Kubernetes resources on the cluster
After you've deployed, check that the Kubernetes resources are up and running.
- First, list the pods by running:
kubectl get pods
You should see something like the following, though your pod names will be different. Make sure all of your pods have a Running before executing the next command.
NAME                     READY     STATUS    RESTARTS   AGE
awwvision-webapp-vwmr1   1/1       Running   0          1m
awwvision-worker-oz6xn   1/1       Running   0          1m
awwvision-worker-qc0b0   1/1       Running   0          1m
awwvision-worker-xpe53   1/1       Running   0          1m
redis-master-rpap8       1/1       Running   0          2m
- Next, list the deployments by running:
kubectl get deployments -o wide
You can see the number of replicas specified for each, and the images used:
NAME               READY   UP-TO-DATE   AVAILABLE   AGE       CONTAINERS         IMAGES                                 SELECTOR
awwvision-webapp   1/1     1            1           1m        awwvision-webapp   gcr.io/your-project/awwvision-webapp   app=awwvision
awwvision-worker   3/3     3            3           1m        awwvision-worker   gcr.io/your-project/awwvision-worker   app=awwvision
redis-master       1/1     1            1           1m        redis-master       redis                                  app=redis
- Once deployed, get the external IP address of the webapp service by running:
kubectl get svc awwvision-webapp
It may take a few minutes for the assigned external IP to be listed in the output. You should see something like the following, though your IPs will be different:
NAME               TYPE          CLUSTER_IP      EXTERNAL_IP    PORT(S)         AGE
awwvision-webapp   LoadBalancer  10.163.250.49   23.236.61.91   80:31925/TCP    13m
Test completed task
Click Check my progress to verify your performed task. If you have successfully deployed the sample app, you will see an assessment score.
Deploy the sample
Check my progress
Task 6. Visit your new webapp and start its crawler
Copy and paste the external IP of the
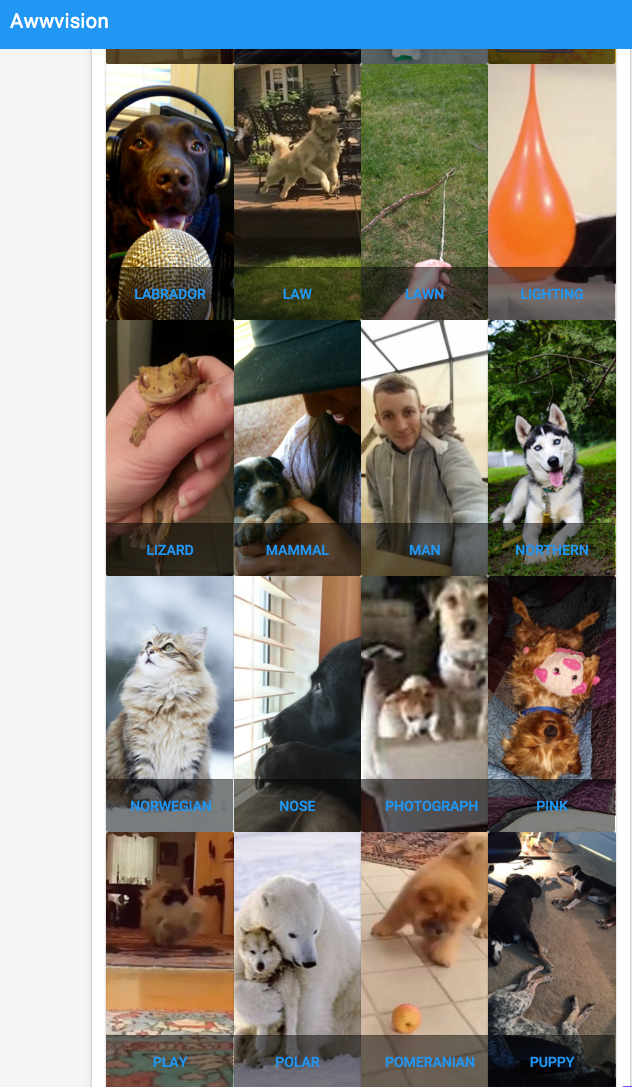
awwvision-webappservice into a new browser to open the webapp, then click Start the Crawler button.Next, click go back and you should start to see images from the /r/aww subreddit classified by the labels provided by the Vision API. You will see some of the images classified multiple times, when multiple labels are detected for them. (You can reload in a bit, in case you brought up the page before the crawler was finished).
Your results will look something like this:
Task 7. Test your understanding
Below is a multiple choice question to reinforce your understanding of this lab's concepts. Answer it to the best of your abilities.
____ allows developers to easily integrate vision detection features within applications, including image labeling, face and landmark detection and much more.
Cloud Vision API
Compute
Cloud ML
Solution of Lab
export ZONE=

curl -LO raw.githubusercontent.com/quiccklabs/Labs_solutions/master/Awwvision%20Cloud%20Vision%20API%20from%20a%20Kubernetes%20Cluster/quicklabgsp066.sh
sudo chmod +x quicklabgsp066.sh
./quicklabgsp066.sh


