
Clean Up Unused and Orphaned Persistent Disks - GSP648
A passionate full-stack developer from @ePlus.DEV
Overview
In this lab, you will use Cloud Functions and Cloud Scheduler to identify and clean up wasted cloud resources. In this case, you will schedule the Cloud Function to identify and clean up unattached and orphaned persistent disks.
What you'll do
Create two persistent disks.
Create a VM that uses one of the disks.
Detach the disk from the VM.
Review the Cloud Function code.
Deploy the Cloud Function.
Test the Cloud Function by using Cloud Scheduler jobs.
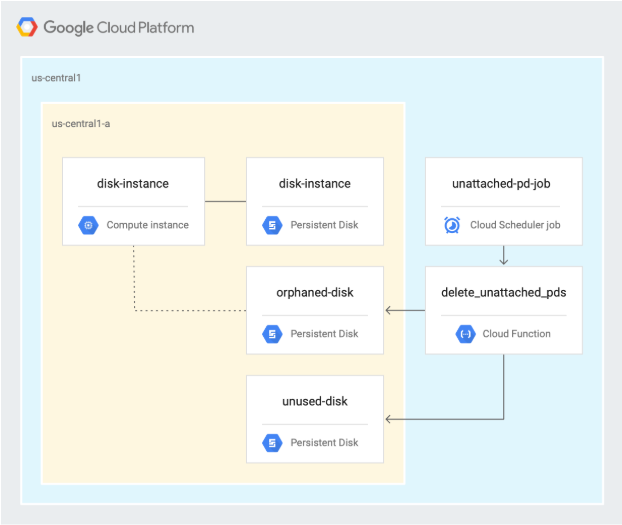
Architecture
The following diagram describes the architecture used in the first section of this lab, where you schedule a Cloud Function to identify and clean up unused and orphaned persistent disks.
Setup and requirements
In this section, you configure the infrastructure and identities required to complete the lab.
Before you click the Start Lab button
Read these instructions. Labs are timed and you cannot pause them. The timer, which starts when you click Start Lab, shows how long Google Cloud resources are made available to you.
This hands-on lab lets you do the lab activities in a real cloud environment, not in a simulation or demo environment. It does so by giving you new, temporary credentials you use to sign in and access Google Cloud for the duration of the lab.
To complete this lab, you need:
- Access to a standard internet browser (Chrome browser recommended).
Note: Use an Incognito (recommended) or private browser window to run this lab. This prevents conflicts between your personal account and the student account, which may cause extra charges incurred to your personal account.
- Time to complete the lab—remember, once you start, you cannot pause a lab.
Note: Use only the student account for this lab. If you use a different Google Cloud account, you may incur charges to that account.
How to start your lab and sign in to the Google Cloud console
Click the Start Lab button. If you need to pay for the lab, a dialog opens for you to select your payment method. On the left is the Lab Details pane with the following:
The Open Google Cloud console button
Time remaining
The temporary credentials that you must use for this lab
Other information, if needed, to step through this lab
Click Open Google Cloud console (or right-click and select Open Link in Incognito Window if you are running the Chrome browser).
The lab spins up resources, and then opens another tab that shows the Sign in page.
Tip: Arrange the tabs in separate windows, side-by-side.
Note: If you see the Choose an account dialog, click Use Another Account.
If necessary, copy the Username below and paste it into the Sign in dialog.
student-00-6df03a3ac8d4@qwiklabs.netYou can also find the Username in the Lab Details pane.
Click Next.
Copy the Password below and paste it into the Welcome dialog.
CILEzndXTNCOYou can also find the Password in the Lab Details pane.
Click Next.
Important: You must use the credentials the lab provides you. Do not use your Google Cloud account credentials.
Note: Using your own Google Cloud account for this lab may incur extra charges.
Click through the subsequent pages:
Accept the terms and conditions.
Do not add recovery options or two-factor authentication (because this is a temporary account).
Do not sign up for free trials.
After a few moments, the Google Cloud console opens in this tab.
Note: To access Google Cloud products and services, click the Navigation menu or type the service or product name in the Search field.

Activate Cloud Shell
Cloud Shell is a virtual machine that is loaded with development tools. It offers a persistent 5GB home directory and runs on the Google Cloud. Cloud Shell provides command-line access to your Google Cloud resources.
Click Activate Cloud Shell at the top of the Google Cloud console.
Click through the following windows:
Continue through the Cloud Shell information window.
Authorize Cloud Shell to use your credentials to make Google Cloud API calls.
When you are connected, you are already authenticated, and the project is set to your Project_ID, qwiklabs-gcp-03-9c9f1bd3b103. The output contains a line that declares the Project_ID for this session:
Your Cloud Platform project in this session is set to qwiklabs-gcp-03-9c9f1bd3b103
gcloud is the command-line tool for Google Cloud. It comes pre-installed on Cloud Shell and supports tab-completion.
- (Optional) You can list the active account name with this command:
gcloud auth list
Copied!
- Click Authorize.
Output:
ACTIVE: *
ACCOUNT: student-00-6df03a3ac8d4@qwiklabs.net

To set the active account, run:
    $ gcloud config set account `ACCOUNT`
- (Optional) You can list the project ID with this command:
gcloud config list project
Copied!
Output:
[core]
project = qwiklabs-gcp-03-9c9f1bd3b103
Note: For full documentation of gcloud, in Google Cloud, refer to the gcloud CLI overview guide.
Task 1. Enable APIs and clone repository
In Cloud Shell, enable the Cloud Scheduler API:
gcloud services enable cloudscheduler.googleapis.comClone the repository:
gsutil cp -r gs://spls/gsp648 . && cd gsp648Set environment variables and make the repository folder your $WORKDIR where you run all commands related to this lab:
 export PROJECT_ID=$(gcloud config list --format 'value(core.project)' 2>/dev/null)
 WORKDIR=$(pwd)
Set the project region for this lab:
gcloud config set compute/region us-central1Create a variable for region:
export REGION=us-central1Create a variable for zone:
export ZONE=us-central1-c
Learn more from the Regions & Zones documentation.
Note: When you run gcloud on your own machine, the config settings are persisted across sessions. But in Cloud Shell, you need to set this for every new session or reconnection.
Task 2. Create persistent disks
In Cloud Shell, navigate to the unattached-pd directory:
cd $WORKDIR/unattached-pdExport the names of the disks as variables:
 export ORPHANED_DISK=orphaned-disk
 export UNUSED_DISK=unused-disk
Create two disks:
 gcloud compute disks create $ORPHANED_DISK --project=$PROJECT_ID --type=pd-standard --size=500GB --zone=$ZONE

 gcloud compute disks create $UNUSED_DISK --project=$PROJECT_ID --type=pd-standard --size=500GB --zone=$ZONE
This lab uses the
us-central1region, but you can choose a different region and refer to it consistently throughout the rest of the lab.Confirm that two disks were created:
gcloud compute disks listYour output should look as follows:
 NAME           LOCATION       LOCATION_SCOPE  SIZE_GB  TYPE         STATUS
 orphaned-disk  us-central1-c  zone            500      pd-standard  READY
 unused-disk    us-central1-c  zone            500      pd-standard  READY
Test completed task
Click Check my progress to verify your performed task. If you have successfully created a Persistent Disk, you will see an assessment score.
Create Persistent Disk
Task 3. Create a VM and inspect the disks
In Cloud Shell, create an instance:
 gcloud compute instances create disk-instance \
 --zone=$ZONE \
 --machine-type=e2-medium \
 --disk=name=$ORPHANED_DISK,device-name=$ORPHANED_DISK,mode=rw,boot=no
Inspect the disk that was attached to the VM:
gcloud compute disks describe $ORPHANED_DISK --zone=$ZONE --format=json | jqThe output is similar to the following:
 {
     "creationTimestamp": "2019-06-12T12:21:25.546-07:00",
     "id": "7617542552306904666",
     "kind": "compute#disk",
     "labelFingerprint": "42WmSpB8rSM=",
     "lastAttachTimestamp": "2019-06-12T12:24:53.989-07:00",
     "name": "orphaned-disk",
     "physicalBlockSizeBytes": "4096",
     "selfLink": "https://www.googleapis.com/compute/v1/projects/automating-cost-optimization/zones/us-central1-c/disks/orphaned-disk",
     "sizeGb": "500",
     "status": "READY",
     "type": "https://www.googleapis.com/compute/v1/projects/automating-cost-optimization/zones/us-central1-c/diskTypes/pd-standard",
     "users": [
         "https://www.googleapis.com/compute/v1/projects/automating-cost-optimization/zones/us-central1-c/instances/disk-instance"
     ],
     "zone": "https://www.googleapis.com/compute/v1/projects/automating-cost-optimization/zones/us-central1-c"
 }
In the preceding code sample, the following is important:
usersidentifies the VM that the disk is attached to.lastAttachTimestampidentifies when the disk was last attached to a VM.
Test completed task
Click Check my progress to verify your performed task. If you have successfully created a VM instance with Persistent Disk, you will see an assessment score.
Create a VM instance with Persistent Disk
Detach the orphaned disk from the VM:
gcloud compute instances detach-disk disk-instance --device-name=$ORPHANED_DISK --zone=$ZONEInspect the orphaned disk:
gcloud compute disks describe $ORPHANED_DISK --zone=$ZONE --format=json | jqThe output is similar to the following:
 {
 "creationTimestamp": "2019-06-12T12:21:25.546-07:00",
 "id": "7617542552306904666",
 "kind": "compute#disk",
 "labelFingerprint": "42WmSpB8rSM=",
 "lastAttachTimestamp": "2019-06-12T12:24:53.989-07:00",
 "lastDetachTimestamp": "2019-06-12T12:34:56.040-07:00",
 "name": "orphaned-disk",
 "physicalBlockSizeBytes": "4096",
 "selfLink": "https://www.googleapis.com/compute/v1/projects/automating-cost-optimization/zones/us-central1-c/disks/orphaned-disk",
 "sizeGb": "500",
 "status": "READY",
 "type": "https://www.googleapis.com/compute/v1/projects/automating-cost-optimization/zones/us-central1-c/diskTypes/pd-standard",
 "zone": "https://www.googleapis.com/compute/v1/projects/automating-cost-optimization/zones/us-central1-c"
 }
In the preceding code sample, the following is important:
The disk doesn’t have
userslisted, which indicates that it isn’t currently in use.There is now a
lastDetachTimestampentry, indicating when the disk was last detached from a VM and therefore, when it was last in use.The
lastAttachTimestampfield is still present.
Test completed task
Click Check my progress to verify your performed task. If you have successfully detached the orphaned disk from the VM, you will see an assessment score.
Detach the orphaned disk from the VM
Task 4. Review the Cloud Function code
In Cloud Shell, output the section of the code that retrieves all persistent disks in the project:
cat $WORKDIR/unattached-pd/main.py | grep "(request)" -A 12The output is as follows:
 def delete_unattached_pds(request):
 # get list of disks and iterate through it:
 disksRequest = compute.disks().aggregatedList(project=project)
 while disksRequest is not None:
     diskResponse = disksRequest.execute()
     for name, disks_scoped_list in diskResponse['items'].items():
         if disks_scoped_list.get('warning') is None:
             # got disks
             for disk in disks_scoped_list['disks']: # iterate through disks
                 diskName = disk['name']
                 diskZone = str((disk['zone'])).rsplit('/',1)[1]
                 print (diskName)
                 print (diskZone)
The function uses the
aggregatedListmethod to get all persistent disks in the Google Cloud project where it’s running and iterates through each of the disks.Output the section of the code that checks the
lastAttachTimestampfield and deletes the disk if it doesn’t exist:cat $WORKDIR/unattached-pd/main.py | grep "handle never" -A 11The output is as follows:
 # handle never attached disk - delete it
    # lastAttachedTimestamp is not present
    try:
    if disk["lastAttachTimestamp"] is None:
         print ("none!")
         except KeyError:
             print ("disk " + diskName + " was never attached - deleting")
             deleteRequest = compute.disks().delete(project=project,
             zone=diskZone, disk=diskName)
             deleteResponse = deleteRequest.execute()
             waitForZoneOperation(deleteResponse, project, diskZone)
             print ("disk " + diskName + " was deleted")
             continue
This section deletes the disk if
lastAttachTimestampisn’t present—meaning this disk was never in use.Output the section of the code that calculates the age of the disk if it’s orphaned, creates a snapshot of it, and deletes it:
cat $WORKDIR/unattached-pd/main.py | grep "handle detached" -A 32The output is as follows:
 # handle detached disk - snapshot and delete
                 # lastAttachTimestamp is present AND users is not present

                 try:
                     if disk['users'] is None and disk['lastDetachTimestamp'] is not None:
                         print ("users is none")
                 except KeyError:
                     print ("disk " + diskName + " has no users and has been detached")
                     detachTimestamp = dateutil.parser.parse(disk['lastDetachTimestamp'])
                     detachedFor = pytz.utc.localize(datetime.utcnow()) - detachTimestamp

                     print ("disk has been detached for " + str(detachedFor))

                     # update this for your preferred age
                     if detachedFor.days > -1:
                         # take a snapshot
                         snapShotName = diskName + str(int(time.time()))
                         print ("taking snapshot: " + snapShotName)
                         snapshotBody = {
                             "name": snapShotName
                         }
                         snapshotRequest = compute.disks().createSnapshot(project=project,
                         zone=diskZone, disk=diskName, body=snapshotBody)
                         snapshotResponse = snapshotRequest.execute()
                         waitForZoneOperation(snapshotResponse, project, diskZone)
                         print ("snapshot completed")

                         # delete the disk
                         print ("deleting disk " + diskName)
                         deleteRequest = compute.disks().delete(project=project, zone=diskZone, disk=diskName)
                         deleteResponse = deleteRequest.execute()
                         waitForZoneOperation(deleteResponse, project, diskZone)
                         print ("disk " + diskName + " was deleted")
                         continue
This section of code is used when the disk does have users listed and
lastDetachTimestampis present, which means the disk is currently not in use, but was used at some point in time. In this case, the Cloud Function creates a snapshot of the disk to retain data and then deletes the disk.In Cloud Shell, click Open Editor to open the Cloud Shell Editor to edit the
main.pyfile.
Note: If prompted, click Open in New Window.
Navigate to
gsp648/unattached-pd.Open
main.py.Edit line 15 of the file and replace
automating-cost-optimizationwith your project id (it should look similar to):project = 'qwiklabs-gcp-03-9c9f1bd3b103'Save the file by clicking File > Save.
Task 5. Deploy the Cloud Function
Disable the Cloud Functions API:
gcloud services disable cloudfunctions.googleapis.comRe-enable the Cloud Functions API:
gcloud services enable cloudfunctions.googleapis.comAdd the
artifactregistry.readerpermission for your appspot service account:gcloud projects add-iam-policy-binding qwiklabs-gcp-03-9c9f1bd3b103 \ --member="serviceAccount:qwiklabs-gcp-03-9c9f1bd3b103@appspot.gserviceaccount.com" \ --role="roles/artifactregistry.reader"In Cloud Shell, deploy the Cloud Function:
 cd ~/gsp648/unattached-pd
 gcloud functions deploy delete_unattached_pds --gen2 --trigger-http --runtime=python39 --region us-central1
Note: Type y when asked:
Allow unauthenticated invocations of new function [delete_unattached_pds]? (y/N)?Note: Deploying a cloud function can take 2-5 minutes, depending on region.
Capture the trigger URL of the Cloud Function as an environment variable:
export FUNCTION_URL=$(gcloud functions describe delete_unattached_pds --format=json --region us-central1 | jq -r '.url')
Test completed task
Click Check my progress to verify your performed task. If you have successfully deployed the Cloud Function, you will see an assessment score.
Deploy the Cloud Function
Task 6. Schedule and test the Cloud Function
- In Cloud Shell, create an App Engine app to use Cloud Scheduler:
gcloud app create --region=us-central
Copied!
In Cloud Shell, create a Cloud Scheduler task to run the Cloud Function at 2 AM every night:
 gcloud scheduler jobs create http unattached-pd-job \
 --schedule="* 2 * * *" \
 --uri=$FUNCTION_URL \
 --location=$REGION
Test completed task
Click Check my progress to verify your performed task. If you have successfully created a Cloud Scheduler task to run the Cloud Function, you will see an assessment score.
Create a Cloud Scheduler task to run the Cloud Function
Test the job by manually triggering it:
 gcloud scheduler jobs run unattached-pd-job \
 --location=$REGION
Confirm that a snapshot of the orphaned disk was created:
gcloud compute snapshots listThe output is similar to the following:
 NAME                     DISK_SIZE_GB  SRC_DISK                           STATUS
 orphaned-disk1560455894  500           us-central1-c/disks/orphaned-disk  READY
Confirm that the unused disk and the orphaned disk were deleted:
gcloud compute disks listThe output is similar to the following:
 NAME                LOCATION       LOCATION_SCOPE  SIZE_GB  TYPE         STATUS
 disk-instance       us-central1-c  zone            10       pd-standard  READY
Test completed task
Click Check my progress to verify your performed task. If you have successfully tested the job by manually triggering it, you will see an assessment score.
Test the job by manually triggering it
Solution of Lab
curl -LO raw.githubusercontent.com/ePlus-DEV/storage/refs/heads/main/labs/GSP648/lab.sh
source lab.sh
Script Alternative
curl -LO https://raw.githubusercontent.com/Itsabhishek7py/GoogleCloudSkillsboost/refs/heads/main/Clean%20Up%20Unused%20and%20Orphaned%20Persistent%20Disks/drabhishek.sh
sudo chmod +x drabhishek.sh
./drabhishek.sh


