Cloud Run Canary Deployments - GSP1078

A passionate full-stack developer from @ePlus.DEV
Overview
Many organizations use robust release pipelines to move code into production. Cloud Run provides unique traffic management capabilities that let you implement advanced release management techniques with little effort.
In this lab you implement a deployment pipeline for Cloud Run. This pipeline executes a progression of code from developer branches to production with automated canary testing and percentage based traffic management.
This lab is for developers and DevOps engineers who are responsible for creating and managing CI/CD pipelines to Cloud Run.
Objectives
In this lab, you learn how to:
Create a Cloud Run service.
Enable a developer branch.
Implement a canary testing.
Safely rollout revisions to production.
Prerequisites
This lab assumes that you have a basic understanding of Git, Cloud Run, and CI/CD pipeline concepts.
In addition, you must have a personal GitHub account that you'll clone a repo into.
Setup
Before you click the Start Lab button
Read these instructions. Labs are timed and you cannot pause them. The timer, which starts when you click Start Lab, shows how long Google Cloud resources are made available to you.
This hands-on lab lets you do the lab activities in a real cloud environment, not in a simulation or demo environment. It does so by giving you new, temporary credentials you use to sign in and access Google Cloud for the duration of the lab.
To complete this lab, you need:
- Access to a standard internet browser (Chrome browser recommended).
Note: Use an Incognito (recommended) or private browser window to run this lab. This prevents conflicts between your personal account and the student account, which may cause extra charges incurred to your personal account.
- Time to complete the lab—remember, once you start, you cannot pause a lab.
Note: Use only the student account for this lab. If you use a different Google Cloud account, you may incur charges to that account.
How to start your lab and sign in to the Google Cloud console
Click the Start Lab button. If you need to pay for the lab, a dialog opens for you to select your payment method. On the left is the Lab Details pane with the following:
The Open Google Cloud console button
Time remaining
The temporary credentials that you must use for this lab
Other information, if needed, to step through this lab
Click Open Google Cloud console (or right-click and select Open Link in Incognito Window if you are running the Chrome browser).
The lab spins up resources, and then opens another tab that shows the Sign in page.
Tip: Arrange the tabs in separate windows, side-by-side.
Note: If you see the Choose an account dialog, click Use Another Account.
If necessary, copy the Username below and paste it into the Sign in dialog.
student-03-1e31e8d5db90@qwiklabs.netYou can also find the Username in the Lab Details pane.
Click Next.
Copy the Password below and paste it into the Welcome dialog.
VZOCcAo2sLT1You can also find the Password in the Lab Details pane.
Click Next.
Important: You must use the credentials the lab provides you. Do not use your Google Cloud account credentials.
Note: Using your own Google Cloud account for this lab may incur extra charges.
Click through the subsequent pages:
Accept the terms and conditions.
Do not add recovery options or two-factor authentication (because this is a temporary account).
Do not sign up for free trials.
After a few moments, the Google Cloud console opens in this tab.
Note: To access Google Cloud products and services, click the Navigation menu or type the service or product name in the Search field.

Activate Cloud Shell
Cloud Shell is a virtual machine that is loaded with development tools. It offers a persistent 5GB home directory and runs on the Google Cloud. Cloud Shell provides command-line access to your Google Cloud resources.
Click Activate Cloud Shell at the top of the Google Cloud console.
Click through the following windows:
Continue through the Cloud Shell information window.
Authorize Cloud Shell to use your credentials to make Google Cloud API calls.
When you are connected, you are already authenticated, and the project is set to your Project_ID, qwiklabs-gcp-02-7b1a2214d5f8. The output contains a line that declares the Project_ID for this session:
Your Cloud Platform project in this session is set to qwiklabs-gcp-02-7b1a2214d5f8
gcloud is the command-line tool for Google Cloud. It comes pre-installed on Cloud Shell and supports tab-completion.
- (Optional) You can list the active account name with this command:
gcloud auth list
- Click Authorize.
Output:
ACTIVE: *
ACCOUNT: student-03-1e31e8d5db90@qwiklabs.net

To set the active account, run:
    $ gcloud config set account `ACCOUNT`
- (Optional) You can list the project ID with this command:
gcloud config list project
Output:
[core]
project = qwiklabs-gcp-02-7b1a2214d5f8
Note: For full documentation of gcloud, in Google Cloud, refer to the gcloud CLI overview guide.
Task 1. Prepare your environment
- In Cloud Shell, run the following code to create environment variables to use in this lab:
export PROJECT_ID=$(gcloud config get-value project)
export PROJECT_NUMBER=\((gcloud projects describe \)PROJECT_ID --format='value(projectNumber)')
export REGION=us-west1
gcloud config set compute/region $REGION
In the next step, you enable the following APIs:
Cloud Resource Manager
GKE
Cloud Build
Container Registry
Cloud Run
Secret Manager
- Run the following code to enable the APIs:
gcloud services enable \
cloudresourcemanager.googleapis.com \
container.googleapis.com \
cloudbuild.googleapis.com \
containerregistry.googleapis.com \
run.googleapis.com \
secretmanager.googleapis.com
- Grant the Secret Manager Admin role (roles/secretmanager.admin) to the Cloud Build Service Agent by running the following command:
gcloud projects add-iam-policy-binding $PROJECT_ID \
--member=serviceAccount:service-$PROJECT_NUMBER@gcp-sa-cloudbuild.iam.gserviceaccount.com \
--role=roles/secretmanager.admin
Run the following commands to configure Git and GitHub in Cloud Shell.
curl -sS https://webi.sh/gh | sh
gh auth login
gh api user -q ".login"
GITHUB_USERNAME=$(gh api user -q ".login")
git config --global user.name "${GITHUB_USERNAME}"
git config --global user.email "${USER_EMAIL}"
echo ${GITHUB_USERNAME}
echo ${USER_EMAIL}
Press ENTER to accept the default options. The last default you accept is to Login with a web browser.
Copy the one-time code, and then click the URL provided in the output that takes you to GitHub.
In GitHub, follow the prompts to connect this project to your GitHub account. This involves signing into your GitHub account, entering the one-time code when prompted, then authorizing the connection to GitHub CLI.
- Back in Cloud Shell, run the following command to create an empty repository named
cloudrun-progressionin GitHub Repositories:
gh repo create cloudrun-progression --private
- Clone and prepare the sample repository:
git clone https://github.com/GoogleCloudPlatform/training-data-analyst
- Use the following command to copy the sample code into your
cloudrun-progressiondirectory:
mkdir cloudrun-progression
cp -r /home/$USER/training-data-analyst/self-paced-labs/cloud-run/canary/*  cloudrun-progression
cd cloudrun-progression
- Click Open Editor to open Cloud Shell Editor. For the following files, set
REGIONin theDefault Valuessection tous-west1:
branch-cloudbuild.yamlmaster-cloudbuild.yamltag-cloudbuild.yaml
Note : Optionally you can use any code editor, this lab provides instructions for Cloud Shell Editor.
- Click Open Terminal to return to the Cloud Shell terminal window and run the commands below. These commands replace the placeholder values in the sample repository with your
PROJECT_IDandPROJECT_NUMBER:
sed -e "s/PROJECT/\({PROJECT_ID}/g" -e "s/NUMBER/\){PROJECT_NUMBER}/g" branch-trigger.json-tmpl > branch-trigger.json
sed -e "s/PROJECT/\({PROJECT_ID}/g" -e "s/NUMBER/\){PROJECT_NUMBER}/g" master-trigger.json-tmpl > master-trigger.json
sed -e "s/PROJECT/\({PROJECT_ID}/g" -e "s/NUMBER/\){PROJECT_NUMBER}/g" tag-trigger.json-tmpl > tag-trigger.json
- Make your first commit with the sample code added to your cloudrun-progression directory, and push the changes to the master branch:
git init
git config credential.helper gcloud.sh
git remote add gcp https://github.com/${GITHUB_USERNAME}/cloudrun-progression
git branch -m master
git add . && git commit -m "initial commit"
git push gcp master
Click Check my progress to verify the objective.
Preparing your environment
Task 2. Create your Cloud Run service
In this section, you build and deploy the initial production application that you use throughout this lab.
- In Cloud Shell, build and deploy the application, which includes a service that requires authentication.
gcloud builds submit --tag gcr.io/$PROJECT_ID/hello-cloudrun
gcloud run deploy hello-cloudrun \
--image gcr.io/$PROJECT_ID/hello-cloudrun \
--platform managed \
--region $REGION \
--tag=prod -q
The output looks similar to the following:
Deploying container to Cloud Run service [hello-cloudrun] in project [sdw-mvp6] region us-west1
✓ Deploying new service... Done.
✓ Creating Revision...
✓ Routing traffic...
Done.
Service [hello-cloudrun] revision [hello-cloudrun-00001-tar] has been deployed and is serving 100 percent of traffic.
Service URL: https://hello-cloudrun-apwaaxltma-uc.a.run.app
The revision can be reached directly at https://prod---hello-cloudrun-apwaaxltma-uc.a.run.app
The output includes the service URL and a unique URL for the revision. Your values will differ slightly from what's indicated here.
After the deployment completes, you can view the newly deployed service:
In the Google Cloud console, in the Navigation menu (), click Cloud Run.
Click hello-cloudrun from the Services list to open the Service details page.
Click the Revisions tab to view the hello-cloudrun status.
To view the authenticated service response, return to Cloud Shell and run the following commands:
PROD_URL=\((gcloud run services describe hello-cloudrun --platform managed --region \)REGION --format=json | jq --raw-output ".status.url")
echo $PROD_URL
curl -H "Authorization: Bearer \((gcloud auth print-identity-token)" \)PROD_URL
Click Check my progress to verify the objective.
Create the CloudRun service and view the authenticated service response
Task 3. Enable dynamic developer deployments
In this section, you provide developers with a unique URL for development branches in your GitHub account. Each branch is represented by a URL identified by the branch name. Commits to the branch trigger a deployment, and the updates are accessible at that same URL.
- In Cloud Shell, enter the following command to initiate a connection to your GitHub repository:
gcloud builds connections create github cloud-build-connection --project=\(PROJECT_ID  --region=\)REGION

gcloud builds connections describe cloud-build-connection --region=$REGION
- In the output, copy (do not click) the actionUri URL.
Be sure that you are copying the URL in the actionUri field in a new tab. If you click, you may not be directed to the correct location.
etag: yKV297keFBHzs1UcgMsbYJlEYvYdIkfFLJMYZfOADu8
githubConfig: {}
installationState:
  actionUri: https://accounts.google.com/AccountChooser?continue=https%3A%2F%2Fconsole.cloud.google.com%2Fm%2Fgcb%2Fgithub%2Flocations%2Fus-east4%2Foauth_v2%3Fconnection_name%3Dprojects%252F921646058273%252Flocations%252Fus-east4%252Fconnections%252Fcloud-build-connection
  message: Please log in to https://github.com using a robot account and then follow
    this link to authorize Cloud Build to access that account. After authorization,
    your GitHub authorization token will be stored in Cloud Secret Manager.
  stage: PENDING_USER_OAUTH
name: projects/qwiklabs-gcp-00-40e7d6bb49bb/locations/us-east4/connections/cloud-build-connection
reconciling: false
updateTime: '2024-12-12T08:52:48.505263316Z'
Click Continue. Install the Cloud Build GitHub App in your GitHub account.
Choose Only select repositories, and then click Select repositories and select the
cloudrun-progressionrepository.Click Save.
In Cloud Shell, enter the following command to create a Cloud Build repository:
gcloud builds repositories create cloudrun-progression \
     --remote-uri="https://github.com/${GITHUB_USERNAME}/cloudrun-progression.git" \
     --connection="cloud-build-connection" --region=$REGION
Set up the trigger
- In Cloud Shell, run the following command to set up the trigger:
gcloud builds triggers create github --name="branch" \
   --repository=projects/\(PROJECT_ID/locations/\)REGION/connections/cloud-build-connection/repositories/cloudrun-progression \
   --build-config='branch-cloudbuild.yaml' \
   --service-account=projects/\(PROJECT_ID/serviceAccounts/\)PROJECT_NUMBER-compute@developer.gserviceaccount.com \
   --region=$REGION \
   --branch-pattern='[^(?!.*master)].*'
To review the trigger, select Cloud Build from the Google Cloud console menu and select Triggers.
In Cloud Shell, create a new branch:
git checkout -b new-feature-1
Click Open Editor to open the sample application code in Cloud Shell Editor:
In the sample application (~/cloudrun-progression/app.py), in line 24, change
v1.0tov1.1:
@app.route('/')
def hello_world():
return 'Hello World v1.1'
Click Open Terminal to return to your Cloud Shell terminal.
In Cloud Shell, commit the change and push it to the remote repository:
git add . && git commit -m "updated" && git push gcp new-feature-1
To review the build in progress, go back to the Cloud Build page and view the current build running on your new branch.
When the build completes, review the revision:
The Cloud Run page should still be open in the console. Otherwise, in the Navigation menu click Cloud Run.
Choose the hello-cloudrun service.
Select the Revisions tab.
Click Check my progress to verify the objective.
Connect to a GitHub repository, set up the branch trigger and update the sample application
- In Cloud Shell, get the unique URL for this branch:
BRANCH_URL=\((gcloud run services describe hello-cloudrun --platform managed --region \)REGION --format=json | jq --raw-output ".status.traffic[] | select (.tag==\"new-feature-1\")|.url")
echo $BRANCH_URL
- Access the authenticated URL:
curl -H "Authorization: Bearer \((gcloud auth print-identity-token)" \)BRANCH_URL
The updated response output looks like the following:
Hello World v1.1
Task 4. Automate canary testing
When code is released to production, it's common to release a small subset of live traffic before migrating all traffic to the new code base.
In this section, you implement a trigger that activates by a code commit to the main branch. The trigger deploys the code to a unique canary URL and routes 10% of the live traffic to it.
- In Cloud Shell, set up the branch trigger:
gcloud builds triggers create github --name="master" \
   --repository=projects/\(PROJECT_ID/locations/\)REGION/connections/cloud-build-connection/repositories/cloudrun-progression \
   --build-config='master-cloudbuild.yaml' \
   --service-account=projects/\(PROJECT_ID/serviceAccounts/\)PROJECT_NUMBER-compute@developer.gserviceaccount.com  \
   --region=$REGION \
   --branch-pattern='master'
To review the new trigger, go to the Cloud Build > Triggers page.
In Cloud Shell, merge the branch to the main line and push to the remote repository:
git checkout master
git merge new-feature-1
git push gcp master
To review the build in progress, go back to the Cloud Build page and view the current build.
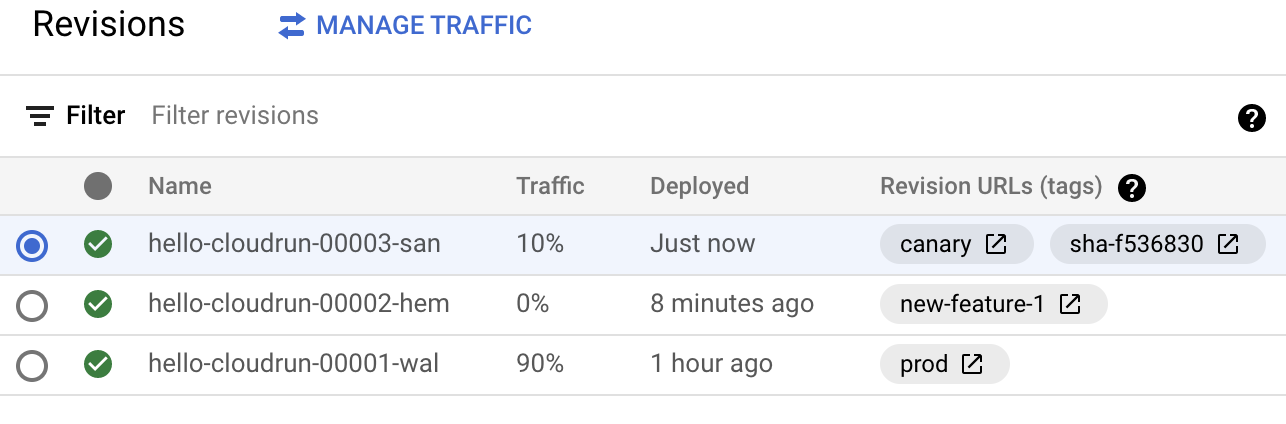
After the build completes, to review the new revision, go to Cloud Run, choose the hello-cloudrun service , and select the Revisions page. Note that 90% of the traffic is routed to prod, 10% to canary, and 0% to the branch revisions.
Click Check my progress to verify the objective.
Create the master trigger and build a new revision
- Review the key lines of
master-cloudbuild.yamlthat implement the logic for the canary deploy.
Lines 39-44 deploy the new revision and use the tag flag to route traffic from the unique canary URL:
gcloud run deploy ${_SERVICE_NAME} \
--platform managed \
--region ${_REGION} \
--image gcr.io/\({PROJECT_ID}/\){_SERVICE_NAME} \
--tag=canary \
--no-traffic
Line 61 adds a static tag to the revision that notes the Git short Secure Hash Algorithm (SHA) of the deployment:
Note: The SHA is a unique identifier for each commit. The SHA ensures the integrity of data by generating a unique, fixed-size string from the content of the commit.
gcloud beta run services update-traffic \({_SERVICE_NAME} --update-tags=sha-\)SHORT_SHA=$${CANARY} --platform managed --region ${_REGION}
Line 62 updates the traffic to route 90% to production and 10% to canary:
gcloud run services update-traffic ${_SERVICE_NAME} --to-revisions=$${PROD}=90,$${CANARY}=10 --platform managed --region ${_REGION}
- In Cloud Shell, get the unique URL for the canary revision:
CANARY_URL=\((gcloud run services describe hello-cloudrun --platform managed --region \)REGION --format=json | jq --raw-output ".status.traffic[] | select (.tag==\"canary\")|.url")
echo $CANARY_URL
- Review the canary endpoint directly:
curl -H "Authorization: Bearer \((gcloud auth print-identity-token)" \)CANARY_URL
- To see percentage-based responses, make a series of requests:
LIVE_URL=\((gcloud run services describe hello-cloudrun --platform managed --region \)REGION --format=json | jq --raw-output ".status.url")
for i in {0..20};do
curl -H "Authorization: Bearer \((gcloud auth print-identity-token)" \)LIVE_URL; echo \n
done
Task 5. Release to production
After you validate the canary deployment with a small subset of traffic, release the deployment to the remainder of the live traffic.
In this section, you set up a trigger that is activated when you create a tag in the repository. The trigger migrates 100% of traffic to the already deployed revision based on the commit SHA of the tag. Using the commit SHA ensures the revision validated with canary traffic is the revision utilized for the remainder of production traffic.
- In Cloud Shell, set up the tag trigger:
gcloud builds triggers create github --name="tag" \
   --repository=projects/\(PROJECT_ID/locations/\)REGION/connections/cloud-build-connection/repositories/cloudrun-progression \
   --build-config='tag-cloudbuild.yaml' \
   --service-account=projects/\(PROJECT_ID/serviceAccounts/\)PROJECT_NUMBER-compute@developer.gserviceaccount.com  \
   --region=$REGION \
   --tag-pattern='.*'
To review the new trigger, go to the console title bar, enter Cloud Build Trigger in the Search field, and then click Triggers in the search results.
Return to Cloud Shell to create a new tag and push the update to the remote repository:
git tag 1.1
git push gcp 1.1
To review the build in progress, return to the console with the Cloud Build page open, and click History in the left pane.
After the build is complete, still in the console, click the hello-cloudrun service and select the Revisions tab. The revision should now indicate the prod tag and be serving 100% of live traffic.

Click Check my progress to verify the objective.
Create the tag trigger and view the updated revision
- In Cloud Shell, to see percentage-based responses, make a series of requests:
LIVE_URL=\((gcloud run services describe hello-cloudrun --platform managed --region \)REGION --format=json | jq --raw-output ".status.url")
for i in {0..20};do
curl -H "Authorization: Bearer \((gcloud auth print-identity-token)" \)LIVE_URL; echo \n
done
- Review the key lines of
tag-cloudbuild.yamlthat implement the production deployment logic.
Line 37 updates the canary revision adding the prod tag. The deployed revision is now tagged for both prod and canary:
gcloud beta run services update-traffic ${_SERVICE_NAME} --update-tags=prod=$${CANARY} --platform managed --region ${_REGION}
Line 39 updates the traffic for the base service URL to route 100% of traffic to the revision tagged as prod:
gcloud run services update-traffic ${_SERVICE_NAME} --to-revisions=$${NEW_PROD}=100 --platform managed --region ${_REGION}
Task 6. GitHub cleanup
To keep your GitHub account organized, remove the GitHub repo you created in this lab.
In GitHub.com, navigate to the
cloudrun-progressionrepo.In the title bar, click Settings, then scroll down to the Danger Zone section.
Click Delete this repository.
Step through the prompts that confirm you have the correct repository and that you want to delete it.
Warning: Be sure you are deleting the correct repo, you cannot undo the deletion.
Solution of Lab
Quick
curl -LO raw.githubusercontent.com/ePlus-DEV/storage/refs/heads/main/labs/GSP1078/lab.sh
source lab.sh


Script Alternative
export PROJECT_ID=$(gcloud config get-value project)
export PROJECT_NUMBER=\((gcloud projects describe \)PROJECT_ID --format='value(projectNumber)')
REGION=$(gcloud compute project-info describe \
  --format="value(commonInstanceMetadata.items[google-compute-default-region])")
gcloud config set compute/region $REGION


gcloud services enable \
cloudresourcemanager.googleapis.com \
container.googleapis.com \
cloudbuild.googleapis.com \
containerregistry.googleapis.com \
run.googleapis.com \
secretmanager.googleapis.com

sleep 60


gcloud projects add-iam-policy-binding $PROJECT_ID \
--member=serviceAccount:service-$PROJECT_NUMBER@gcp-sa-cloudbuild.iam.gserviceaccount.com \
--role=roles/secretmanager.admin


curl -sS https://webi.sh/gh | sh
gh auth login
gh api user -q ".login"
GITHUB_USERNAME=$(gh api user -q ".login")
git config --global user.name "${GITHUB_USERNAME}"
git config --global user.email "${USER_EMAIL}"
echo ${GITHUB_USERNAME}
echo ${USER_EMAIL}
Press ENTER to accept the default options. The last default you accept is to Login with a web browser.
Copy the one-time code, and then click the URL provided in the output that takes you to GitHub.
In GitHub, follow the prompts to connect this project to your GitHub account.
This involves:Signing into your GitHub account
Entering the one-time code when prompted
Authorizing the connection to GitHub CLI
gh repo create cloudrun-progression --private

git clone https://github.com/GoogleCloudPlatform/training-data-analyst

mkdir cloudrun-progression
cp -r /home/$USER/training-data-analyst/self-paced-labs/cloud-run/canary/*  cloudrun-progression
cd cloudrun-progression

sed -i "s/_REGION: us-central1/_REGION: $REGION/g" branch-cloudbuild.yaml
sed -i "s/_REGION: us-central1/_REGION: $REGION/g" master-cloudbuild.yaml
sed -i "s/_REGION: us-central1/_REGION: $REGION/g" tag-cloudbuild.yaml


sed -e "s/PROJECT/\({PROJECT_ID}/g" -e "s/NUMBER/\){PROJECT_NUMBER}/g" branch-trigger.json-tmpl > branch-trigger.json
sed -e "s/PROJECT/\({PROJECT_ID}/g" -e "s/NUMBER/\){PROJECT_NUMBER}/g" master-trigger.json-tmpl > master-trigger.json
sed -e "s/PROJECT/\({PROJECT_ID}/g" -e "s/NUMBER/\){PROJECT_NUMBER}/g" tag-trigger.json-tmpl > tag-trigger.json


git init
git config credential.helper gcloud.sh
git remote add gcp https://github.com/${GITHUB_USERNAME}/cloudrun-progression
git branch -m master
git add . && git commit -m "initial commit"
git push gcp master


gcloud builds submit --tag gcr.io/$PROJECT_ID/hello-cloudrun
gcloud run deploy hello-cloudrun \
--image gcr.io/$PROJECT_ID/hello-cloudrun \
--platform managed \
--region $REGION \
--tag=prod -q


PROD_URL=\((gcloud run services describe hello-cloudrun --platform managed --region \)REGION --format=json | jq --raw-output ".status.url")
echo $PROD_URL
curl -H "Authorization: Bearer \((gcloud auth print-identity-token)" \)PROD_URL


gcloud builds connections create github cloud-build-connection --project=\(PROJECT_ID  --region=\)REGION

gcloud builds connections describe cloud-build-connection --region=$REGION
Click Continue. Install the Cloud Build GitHub App in your GitHub account.
Choose Only select repositories, and then click Select repositories and select the cloudrun-progression repository.
For Better Understading Follow the Video
gcloud builds repositories create cloudrun-progression \
     --remote-uri="https://github.com/${GITHUB_USERNAME}/cloudrun-progression.git" \
     --connection="cloud-build-connection" --region=$REGION


gcloud builds triggers create github --name="branch" \
   --repository=projects/\(PROJECT_ID/locations/\)REGION/connections/cloud-build-connection/repositories/cloudrun-progression \
   --build-config='branch-cloudbuild.yaml' \
   --service-account=projects/\(PROJECT_ID/serviceAccounts/\)PROJECT_NUMBER-compute@developer.gserviceaccount.com \
   --region=$REGION \
   --branch-pattern='[^(?!.*master)].*'


git checkout -b new-feature-1


sed -i "s/v1.0/v1.1/g" app.py

git add . && git commit -m "updated" && git push gcp new-feature-1

BRANCH_URL=\((gcloud run services describe hello-cloudrun --platform managed --region \)REGION --format=json | jq --raw-output ".status.traffic[] | select (.tag==\"new-feature-1\")|.url")
echo $BRANCH_URL


gcloud builds triggers create github --name="master" \
   --repository=projects/\(PROJECT_ID/locations/\)REGION/connections/cloud-build-connection/repositories/cloudrun-progression \
   --build-config='master-cloudbuild.yaml' \
   --service-account=projects/\(PROJECT_ID/serviceAccounts/\)PROJECT_NUMBER-compute@developer.gserviceaccount.com  \
   --region=$REGION \
   --branch-pattern='master'


git checkout master
git merge new-feature-1
git push gcp master


CANARY_URL=\((gcloud run services describe hello-cloudrun --platform managed --region \)REGION --format=json | jq --raw-output ".status.traffic[] | select (.tag==\"canary\")|.url")
echo $CANARY_URL

curl -H "Authorization: Bearer \((gcloud auth print-identity-token)" \)CANARY_URL


gcloud builds triggers create github --name="tag" \
   --repository=projects/\(PROJECT_ID/locations/\)REGION/connections/cloud-build-connection/repositories/cloudrun-progression \
   --build-config='tag-cloudbuild.yaml' \
   --service-account=projects/\(PROJECT_ID/serviceAccounts/\)PROJECT_NUMBER-compute@developer.gserviceaccount.com  \
   --region=$REGION \
   --tag-pattern='.*'


git tag 1.1
git push gcp 1.1