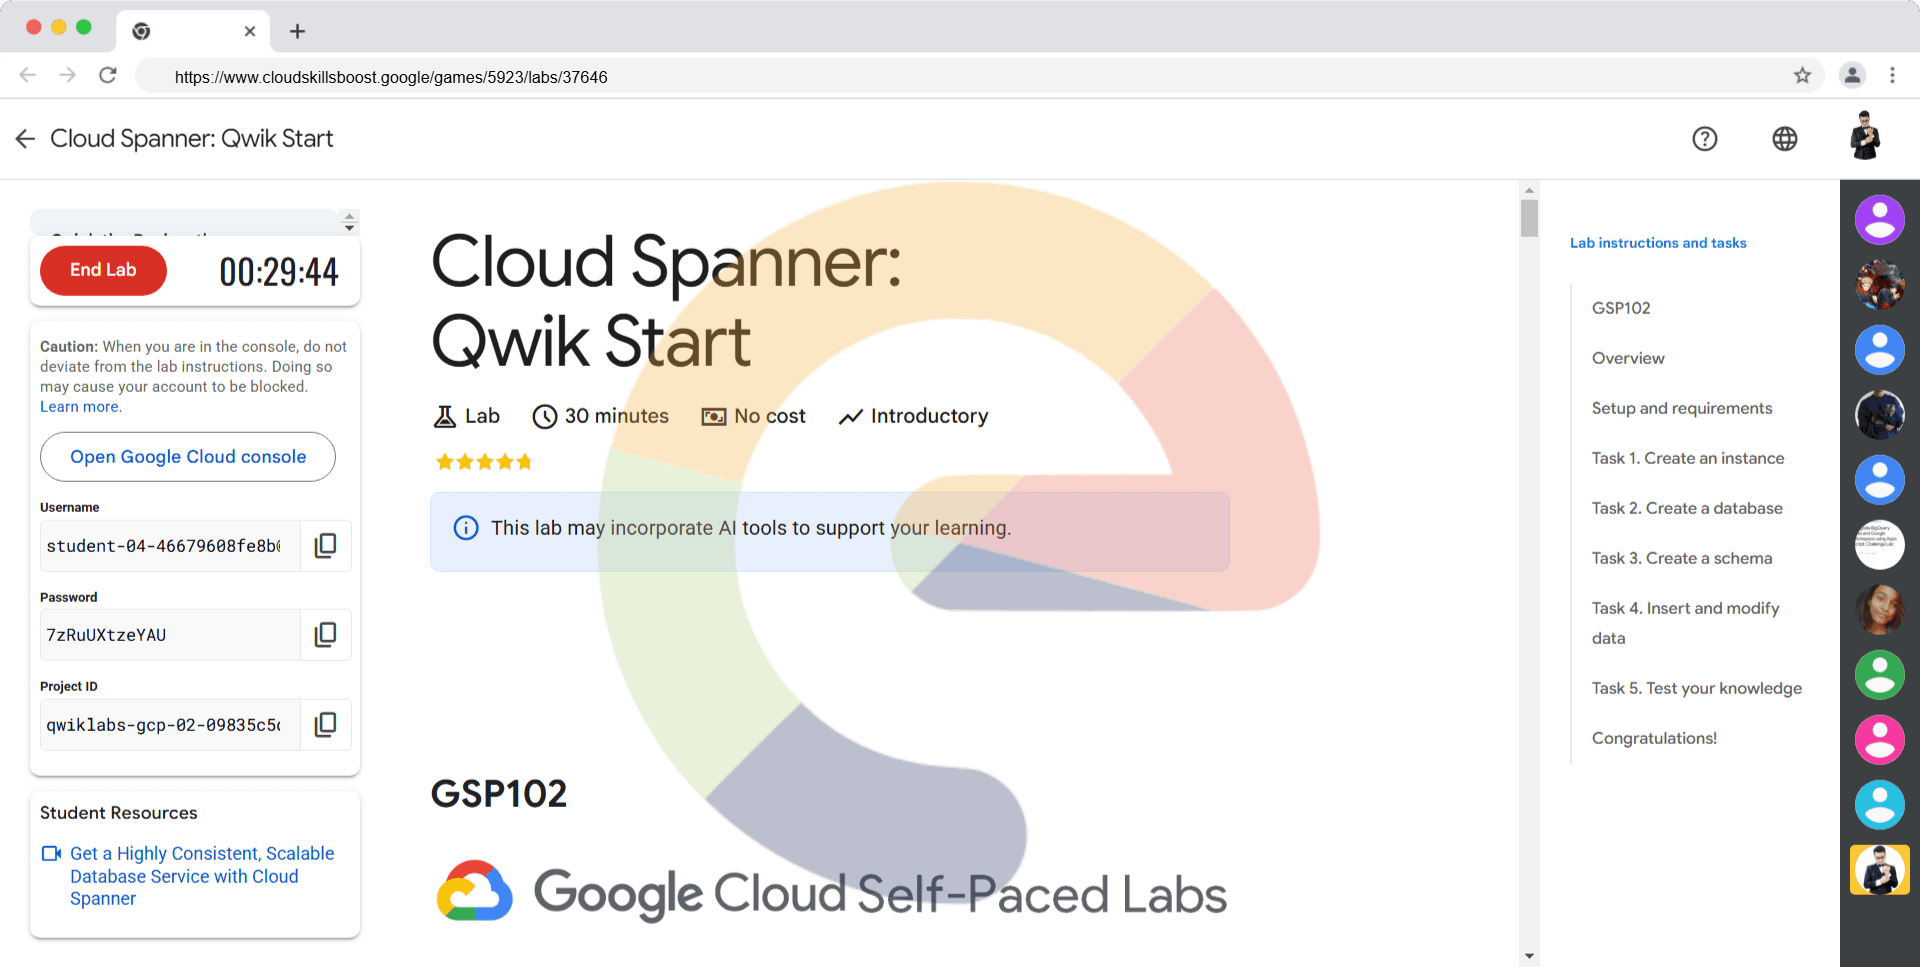
Cloud Spanner: Qwik Start - GSP102
A passionate full-stack developer from @ePlus.DEV
Overview
Cloud Spanner is a fully managed, mission-critical, relational database service that offers transactional consistency at global scale, schemas, SQL (ANSI 2011 with extensions), and automatic, synchronous replication for high availability.
Cloud Spanner offers:
Strong consistency, including strongly consistent secondary indexes.
SQL support, with ALTER statements for schema changes.
Managed instances with high availability through transparent, synchronous, built-in data replication.
Cloud Spanner offers regional and multi-region instance configurations.
What it's good for
Cloud Spanner is ideal for relational, structured, and semi-structured data that requires high availability, strong consistency, and transactional reads and writes.
Other storage options
Here are some common scenarios where you should probably consider an alternative to Cloud Spanner:
If you do not want a strongly consistent and horizontally scaling relational database. Consider other storage offerings listed at Storage Options in Google Cloud and Data Lifecycle on Google Cloud.
If you need an open source database.
This hands-on lab shows you how to create a Cloud Spanner instance, database, and table; add a schema, write and modify data, and run a query.
Setup and requirements
Before you click the Start Lab button
Read these instructions. Labs are timed and you cannot pause them. The timer, which starts when you click Start Lab, shows how long Google Cloud resources are made available to you.
This hands-on lab lets you do the lab activities in a real cloud environment, not in a simulation or demo environment. It does so by giving you new, temporary credentials you use to sign in and access Google Cloud for the duration of the lab.
To complete this lab, you need:
- Access to a standard internet browser (Chrome browser recommended).
Note: Use an Incognito (recommended) or private browser window to run this lab. This prevents conflicts between your personal account and the student account, which may cause extra charges incurred to your personal account.
- Time to complete the lab—remember, once you start, you cannot pause a lab.
Note: Use only the student account for this lab. If you use a different Google Cloud account, you may incur charges to that account.
How to start your lab and sign in to the Google Cloud console
Click the Start Lab button. If you need to pay for the lab, a dialog opens for you to select your payment method. On the left is the Lab Details pane with the following:
The Open Google Cloud console button
Time remaining
The temporary credentials that you must use for this lab
Other information, if needed, to step through this lab
Click Open Google Cloud console (or right-click and select Open Link in Incognito Window if you are running the Chrome browser).
The lab spins up resources, and then opens another tab that shows the Sign in page.
Tip: Arrange the tabs in separate windows, side-by-side.
Note: If you see the Choose an account dialog, click Use Another Account.
If necessary, copy the Username below and paste it into the Sign in dialog.
student-04-46679608fe8b@qwiklabs.netYou can also find the Username in the Lab Details pane.
Click Next.
Copy the Password below and paste it into the Welcome dialog.
7zRuUXtzeYAUYou can also find the Password in the Lab Details pane.
Click Next.
Important: You must use the credentials the lab provides you. Do not use your Google Cloud account credentials.
Note: Using your own Google Cloud account for this lab may incur extra charges.
Click through the subsequent pages:
Accept the terms and conditions.
Do not add recovery options or two-factor authentication (because this is a temporary account).
Do not sign up for free trials.
After a few moments, the Google Cloud console opens in this tab.
Note: To access Google Cloud products and services, click the Navigation menu or type the service or product name in the Search field.

Task 1. Create an instance
When you first use Cloud Spanner, you must create an instance, which is an allocation of resources that are used by Cloud Spanner databases in that instance.
From the Console, from the Navigation menu select Spanner.
Then click CREATE A PROVISIONED INSTANCE.
Fill in the following field:
Instance Name: Test Instance
Leave the Instance ID as default and click Continue.
In Choose a configuration page, select Regional configuration and from the drop-down menu select region as
us-central1.Click Continue.
Leave the Configure compute capacity page as default and click CREATE.
You will now see your instance on the Instance Details page.
Task 2. Create a database
In the Instance Overview page, click CREATE DATABASE.
For the Database name, enter example-db, and click CREATE.
You're now on the Database Overview page for the new database you created.
Click Check my progress to verify the objective.
Create an instance and database
Check my progress
Task 3. Create a schema
The Cloud Console provides two ways to create, alter, and delete tables and indexes in a database:
Use the default Database editor to specify each part of tables, columns, and indexes.
Enter SQL statements in Cloud Spanner Data Definition Language (DDL) syntax.
This lab uses DDL.
Now click CREATE TABLE.
In the DDL TEMPLATES field, replace the existing query with:
CREATE TABLE Singers (
  SingerId   INT64 NOT NULL,
  FirstName  STRING(1024),
  LastName   STRING(1024),
  SingerInfo BYTES(MAX),
  BirthDate  DATE,
) PRIMARY KEY(SingerId);
- Click RUN.
Click Check my progress to verify the objective.
Create a schema for your database
Check my progress
Task 4. Insert and modify data
The Cloud Console provides an interface for inserting, editing, and deleting data.
Insert data
On the Database Overview page Click Singers
In the left menu click Data, then click the INSERT button.
Replace the placeholder values for the following fields:
| Field | Value |
| SingerID: INT64 | 1 |
| FirstName: STRING | 'Marc' |
| LastName: STRING | 'Richards' |
| SingerInfo: BYTES | NULL |
| BirthDate: DATE | NULL |
Your query should look similar to this:
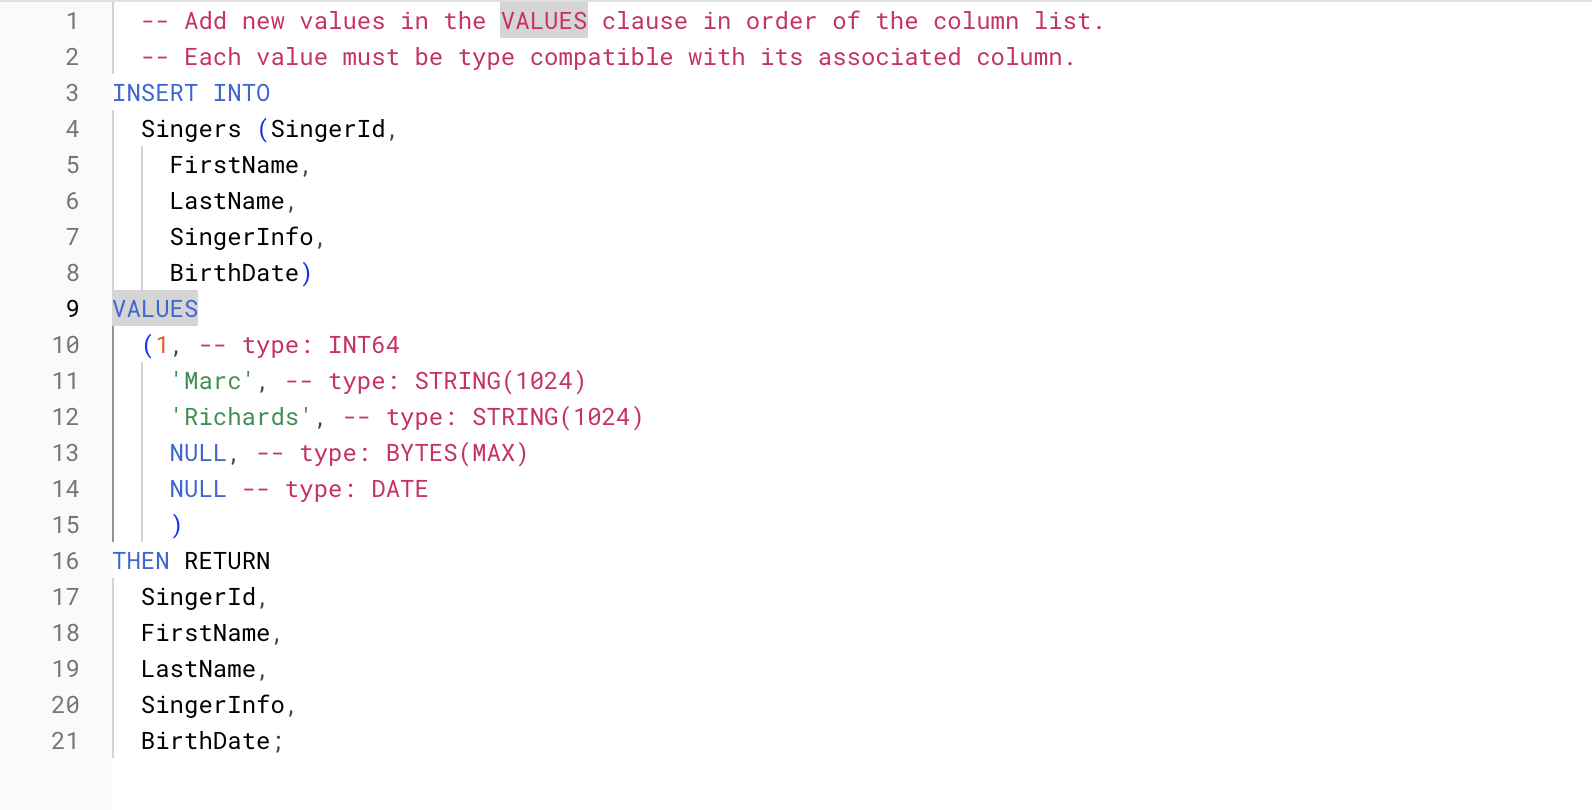
Note: Make sure to replace SingerID with the given value in the Where condition.
Then click RUN.
On the Database Overview page, navigate to Singers > Data and you'll see that the Singers table now has one row.
Click INSERT to add an additional row and replace the placeholder values with the following:
| Field | Value |
| SingerID: INT64 | 2 |
| FirstName: STRING | 'Catalina' |
| LasteName: STRING | 'Smith' |
| SingerInfo: BYTES | NULL |
| BirthDate: DATE | NULL |
Then click RUN.
On the Database Overview page, navigate to Singers > Data and you'll see that the Singers table now has two rows.
You can also insert empty string values when you enter data.
Click INSERT.
Then enter in the following:
| Field | Value |
| SingerID: INT64 | 3 |
| FirstName: STRING | 'Kena' |
| LastName: STRING | ' ' |
| SingerInfo: BYTES | NULL |
| BirthDate: DATE | NULL |
Then click RUN.
On the Database Overview page, navigate to Singers > Data and you'll see that the Singers table now has three rows, and the row for SingerID
3has a LastName that is an empty string.
Edit data
You will continue working on the Singers table.
Check the box next to the row for SingerId
3.Then click EDIT.
Enter in the following:
| Field | Value |
| BirthDate: DATE | '1961-04-01' |
| SingerInfo: BYTES | NULL |
[all other fields] | [leave as-is] |
Your query will look similar to this:
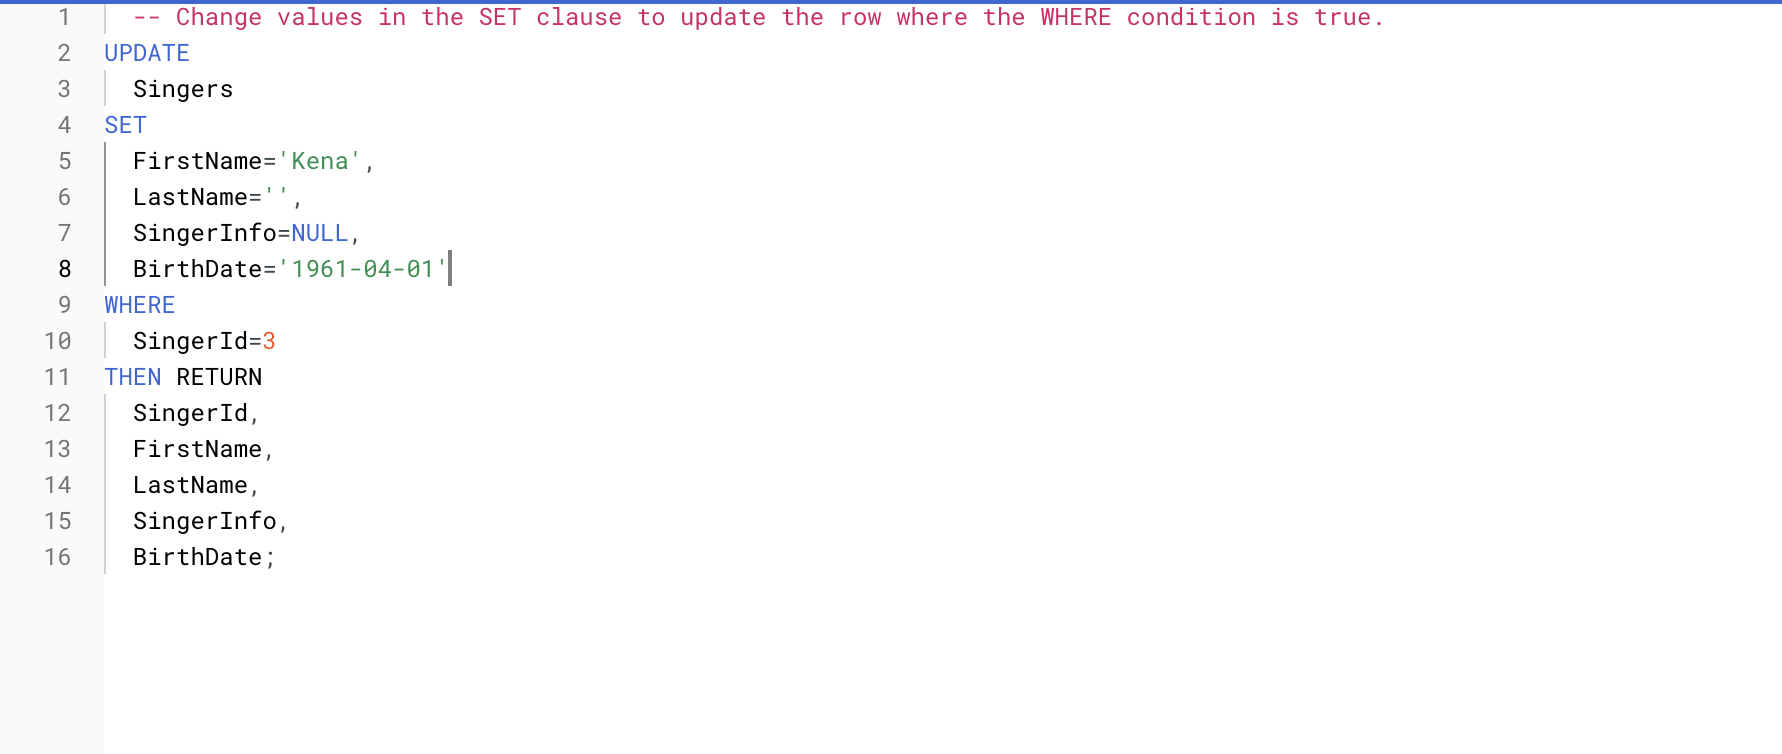
Then Click RUN.
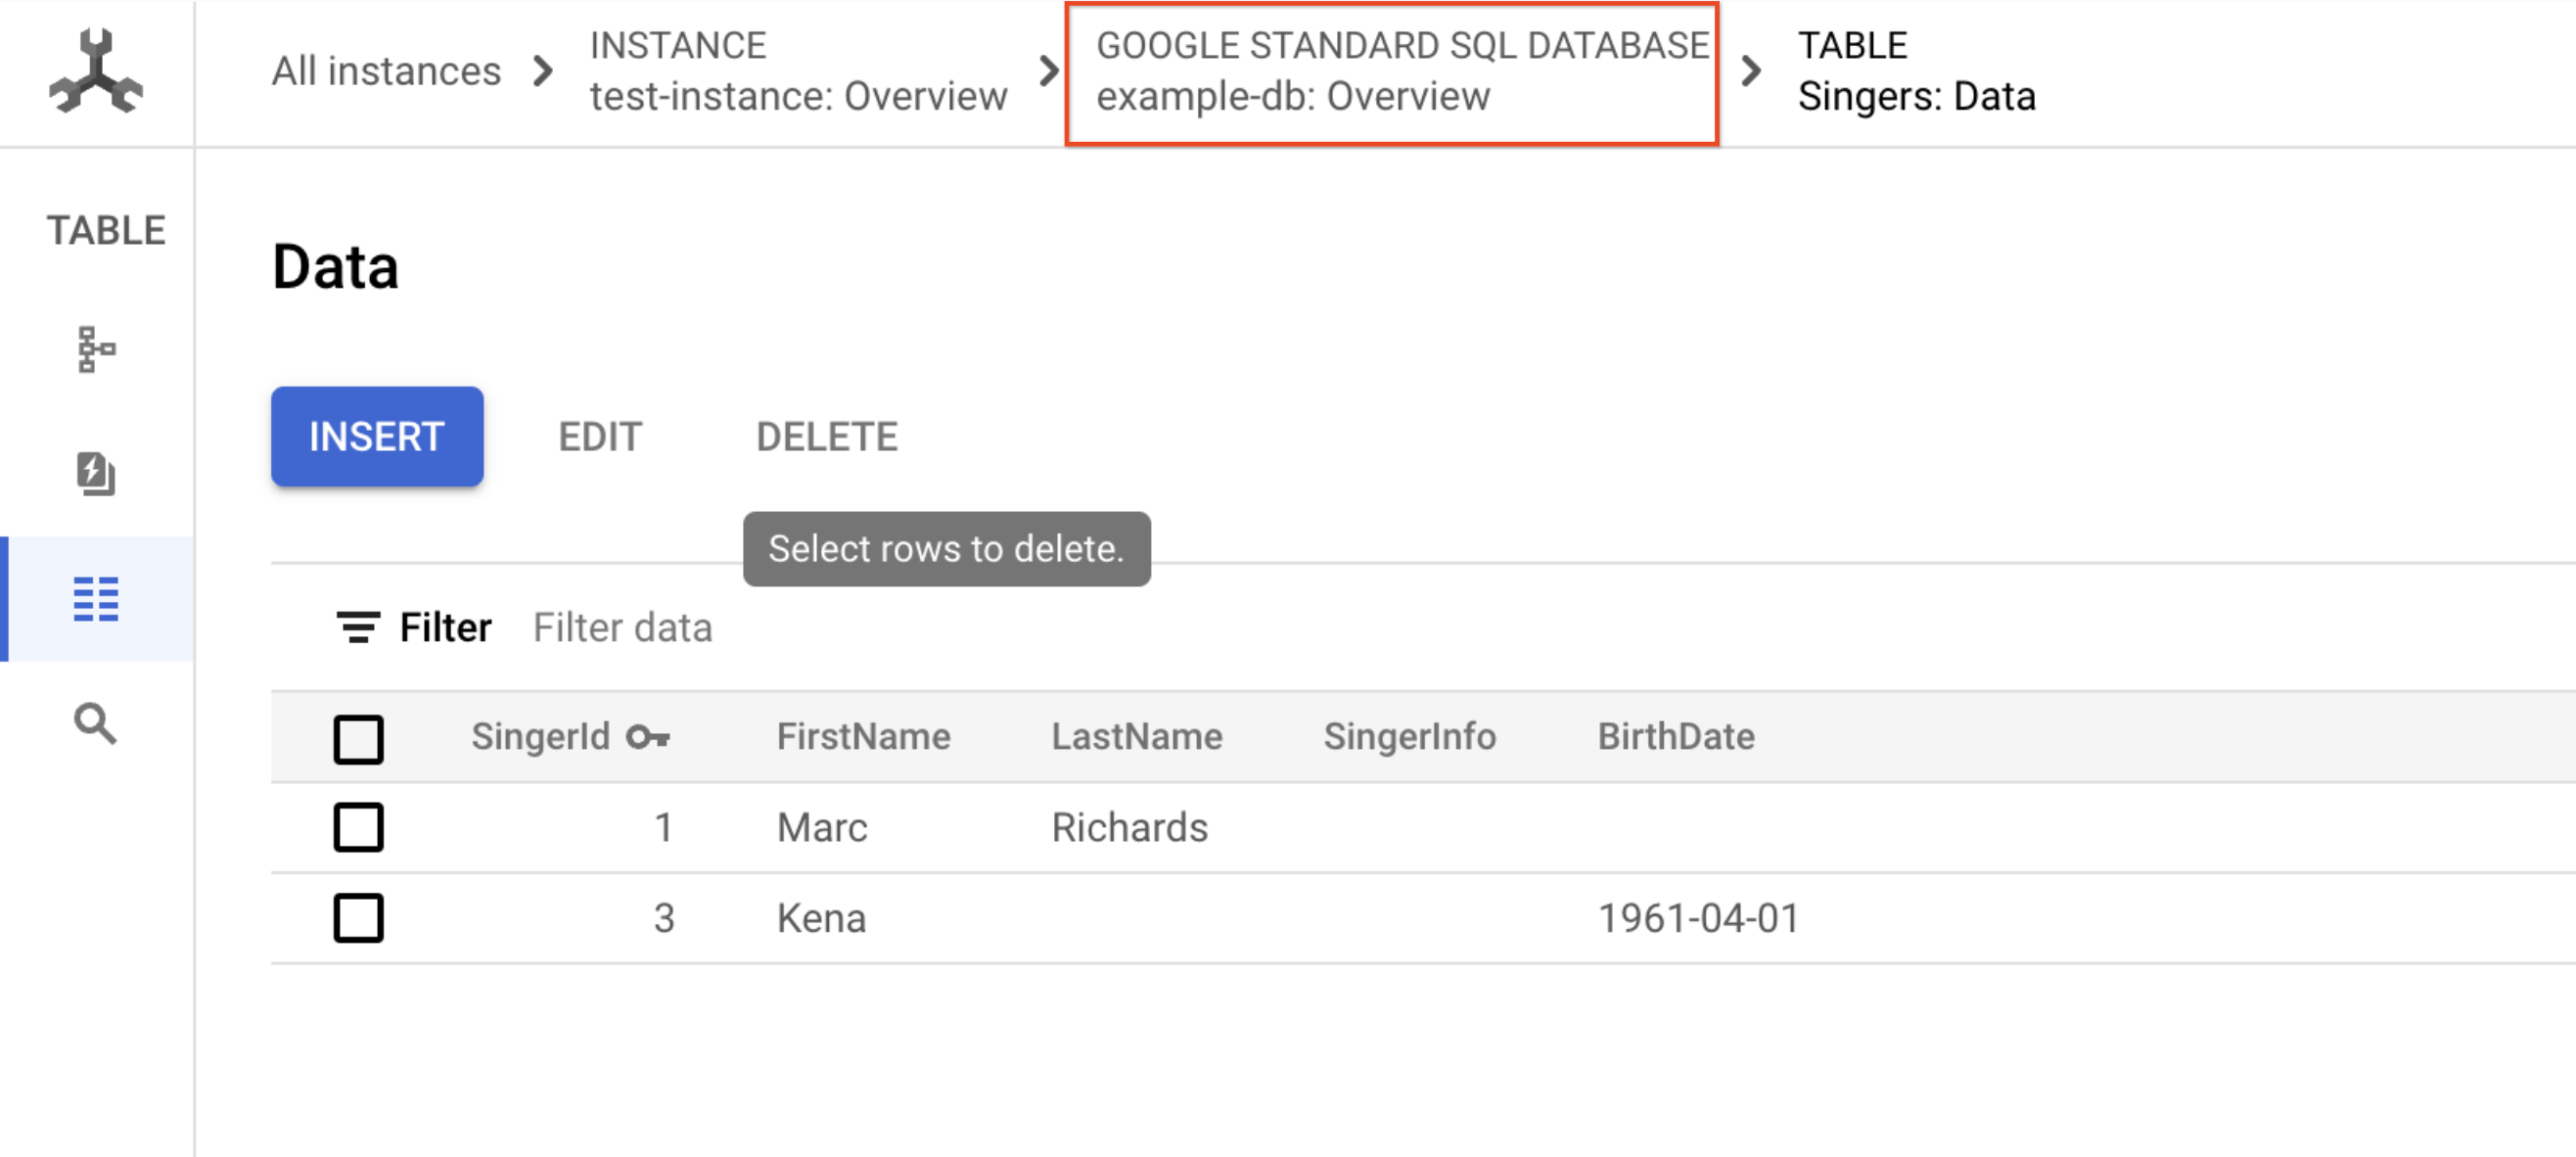
On the Database Overview page, navigate to Singers > Data.
The row for SingerId 3 in the Singers table now has a BirthDate value.
Delete data
Now try deleting some data from the table.
Check the box next to the row for SingerId
2.Then click Delete.
You can safely ignore the warning that appears in the dialog.
- In the panel, click Confirm.
The Singers table now has two rows.
Run a query
You can execute a SQL statement on the query page of your database.
- Navigate to your Spanner database by selecting Google Standard SQL Database in the path at the top of your current table data page:
Click Spanner Studio from the left menu.
Click CLEAR to clear the query you used for your table.
For the query enter:
SELECT * FROM Singers
- Click RUN.
The Cloud Console displays the result of your query.
Task 5. Test your knowledge
Test your knowledge about Cloud Spanner by taking the following quiz. (Please select multiple correct options if necessary.)
Cloud Spanner is a Mission-critical, relational database service with transactional consistency, global scale and high availability.
True
False
Solution of Lab
curl -LO raw.githubusercontent.com/ePlus-DEV/storage/refs/heads/main/labs/GSP102/lab.sh
source lab.sh
Script Alternative
export REGION=

curl -LO https://raw.githubusercontent.com/Itsabhishek7py/GoogleCloudSkillsboost/refs/heads/main/Cloud%20Spanner%20Qwik%20Start/abhishek.sh
sudo chmod +x abhishek.sh
./abhishek.sh