
Connecting Cloud Functions
A passionate full-stack developer from @ePlus.DEV
Overview
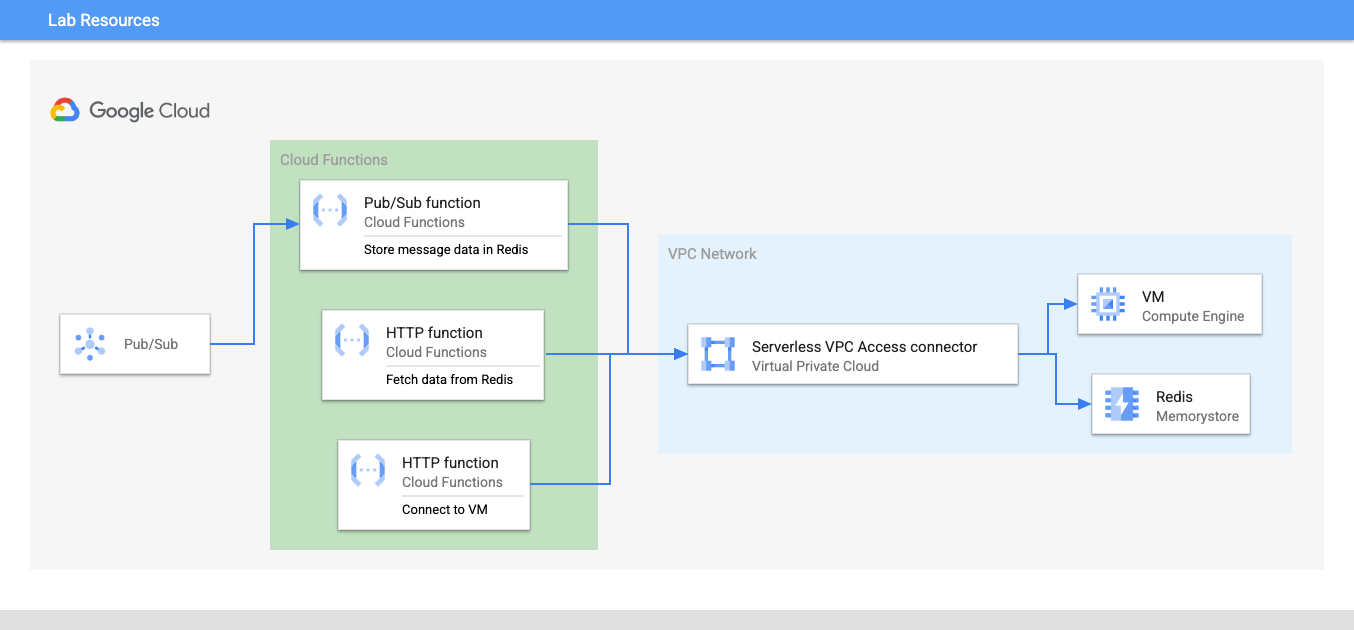
Cloud Functions let you connect directly to your VPC network enabling your functions to access Compute Engine VM instances, Memorystore instances, and other resources with an internal IP address.
In this lab, you will use Serverless VPC Access to connect a function to your VPC network and access data in a Memorystore instance running in your network. You will also use the connector to access a web server running on a VM instance in your network.
Objectives
In this lab, you will:
Set up a Memorystore for Redis instance.
Create a Serverless VPC Access Connector to enable Serverless VPC Access.
Write a Pub/Sub event-driven function that uses the connector to store the message content in the Redis database.
Write an HTTP function to fetch data from the Redis database using the connector, and return the message data in an HTTP response.
Write an HTTP function to access a web server running on a VM instance in your VPC network.
Here's a high-level overview of the resources that you create in this lab:
Setup and requirements
Before you click the Start Lab button
Note: Read these instructions.
Labs are timed and you cannot pause them. The timer, which starts when you click Start Lab, shows how long Google Cloud resources will be made available to you.
This Qwiklabs hands-on lab lets you do the lab activities yourself in a real cloud environment, not in a simulation or demo environment. It does so by giving you new, temporary credentials that you use to sign in and access Google Cloud for the duration of the lab.
What you need
To complete this lab, you need:
Access to a standard internet browser (Chrome browser recommended).
Time to complete the lab.
Note: If you already have your own personal Google Cloud account or project, do not use it for this lab.
Note: If you are using a Pixelbook, open an Incognito window to run this lab.
Activate Google Cloud Shell
Google Cloud Shell is a virtual machine that is loaded with development tools. It offers a persistent 5GB home directory and runs on the Google Cloud.
Google Cloud Shell provides command-line access to your Google Cloud resources.
In Cloud console, on the top right toolbar, click the Open Cloud Shell button.
Click Continue.

It takes a few moments to provision and connect to the environment. When you are connected, you are already authenticated, and the project is set to your PROJECT_ID. For example:

gcloud is the command-line tool for Google Cloud. It comes pre-installed on Cloud Shell and supports tab-completion.
- You can list the active account name with this command:
gcloud auth list
Output:
Credentialed accounts:
 - @.com (active)
Example output:
Credentialed accounts:
 - google1623327_student@qwiklabs.net
- You can list the project ID with this command:
gcloud config list project
Output:
[core]
project =
Example output:
[core]
project = qwiklabs-gcp-44776a13dea667a6
Note: Full documentation of gcloud is available in the gcloud CLI overview guide .
Task 1. Enable APIs
Before you create Cloud Functions, you must enable the relevant APIs.
To set your
Project IDandRegionenvironment variables, activate Cloud Shell, and then run the following commands:PROJECT_ID=$(gcloud config get-value project) REGION=us-west1Run the following command to enable all necessary services:
 gcloud services enable \
   artifactregistry.googleapis.com \
   cloudfunctions.googleapis.com \
   cloudbuild.googleapis.com \
   eventarc.googleapis.com \
   run.googleapis.com \
   logging.googleapis.com \
   pubsub.googleapis.com \
   redis.googleapis.com \
   vpcaccess.googleapis.com
Task 2. Set up a Memorystore for Redis instance
Memorystore is a Google Cloud service that provides a fully managed, highly available, scalable, and secure in-memory cache solution for Redis and Memcached.
In this task, you set up a Memorystore for Redis instance in your Google Cloud project. This instance is used by the Cloud Function to store data which you will develop in a later task of the lab.
Create the Memorystore instance
Set an environment variable for the Memorystore instance name:
REDIS_INSTANCE=customerdbTo create a 2GiB Memorystore for Redis instance, run the following command:
 gcloud redis instances create $REDIS_INSTANCE \
  --size=2 --region=$REGION \
  --redis-version=redis_6_x
It will take a few minutes to create the Memorystore for Redis instance. You can proceed and complete Task 3 to set up Serverless VPC Access, and then return to complete the remaining steps in this task after the Redis instance is created.
To view the instance details after it is successfully created, run the following command:
gcloud redis instances describe $REDIS_INSTANCE --region=$REGION
Create environment variables
Save the host IP address of Memorystore instance in an environment variable
REDIS_IP=$(gcloud redis instances describe $REDIS_INSTANCE --region=$REGION --format="value(host)"); echo $REDIS_IPSave the port of the Memorystore instance in an environment variable:
REDIS_PORT=$(gcloud redis instances describe $REDIS_INSTANCE --region=$REGION --format="value(port)"); echo $REDIS_PORTYou'll use the host and port values in a subsequent task to connect to the instance.
Click Check my progress to verify the objective.
Set up a Memorystore for Redis instance
Check my progress
Task 3. Set up Serverless VPC Access
To send requests from Cloud Functions to resources in your VPC network and receive the corresponding responses without using the public internet, you must set up Serverless VPC Access.
Set up a Serverless VPC Access connector
In the Google Cloud console Navigation menu (), under Networking, click VPC network, and then select Serverless VPC access.
To create a Serverless VPC Access connector, click Create Connector.
For the connector Name, type test-connector
For Region, select
us-west1For Subnet, select Custom IP range.
For the IP range, type 10.8.0.0
Note: The IP range must be an unreserved internal /28 subnet specified in CIDR notation. This IP range must not overlap with any existing IP address reservations in your VPC network. This IP address range is used when scaling to create additional connector instances.
The Region specified for the connector must be the same region where your Cloud Functions are hosted.
Leave the other settings as their defaults, and Click Create.
A green check mark will appear next to the connector's name when it's ready to use.
To verify the connector details, in Cloud Shell, run the following command:
 gcloud compute networks vpc-access connectors \
   describe test-connector \
   --region $REGION
Click Check my progress to verify the objective.
Create a Serverless VPC Access connector
Check my progress
If you skipped ahead to complete this task while the Redis instance is being created, go back to complete the remaining steps in Task 2.
Task 4. Create an event-driven function for Pub/Sub
Now that the Serverless VPC Access connector is created, you can develop a function to access data in the Memorystore Redis instance using the connector.
In this task, you create a Pub/Sub event-driven function in Python to store and fetch data to and from the Memorystore instance.
Create a Pub/Sub topic
You must first create a topic that the function will listen for messages. Set an environment variable for the topic name:
TOPIC=add_redisTo create a topic, run the following command:
gcloud pubsub topics create $TOPIC
Write the function code
Run the following command to create the folder and files for the function and navigate to the folder:
 mkdir ~/redis-pubsub && cd $_
 touch main.py && touch requirements.txt
Click the Open Editor button on the toolbar of Cloud Shell. (You can switch between Cloud Shell and the code editor by using the Open Editor and Open Terminal icons as required).
In the Cloud Shell Editor, select the
redis-pubsubfolder.In the Editor, add the following code to the
redis-pubsub/main.pyfile:import os import base64 import json import redis import functions_framework redis_host = os.environ.get('REDISHOST', 'localhost') redis_port = int(os.environ.get('REDISPORT', 6379)) redis_client = redis.StrictRedis(host=redis_host, port=redis_port) # Triggered from a message on a Pub/Sub topic. @functions_framework.cloud_event def addToRedis(cloud_event): # The Pub/Sub message data is stored as a base64-encoded string in the cloud_event.data property # The expected value should be a JSON string. json_data_str = base64.b64decode(cloud_event.data["message"]["data"]).decode() json_payload = json.loads(json_data_str) response_data = "" if json_payload and 'id' in json_payload: id = json_payload['id'] data = redis_client.set(id, json_data_str) response_data = redis_client.get(id) print(f"Added data to Redis: {response_data}") else: print("Message is invalid, or missing an 'id' attribute")To specify the function code dependencies, add the following content to the
redis-pubsub/requirements.txtfile.functions-framework==3.2.0 redis==4.3.4
Deploy and test the function
To deploy the function, in Cloud Shell, run the following command:
 gcloud functions deploy python-pubsub-function \
  --runtime=python310 \
  --region=$REGION \
  --source=. \
  --entry-point=addToRedis \
  --trigger-topic=$TOPIC \
  --vpc-connector projects/$PROJECT_ID/locations/$REGION/connectors/test-connector \
  --set-env-vars REDISHOST=$REDIS_IP,REDISPORT=$REDIS_PORT
The function is deployed with a Pub/Sub trigger topic, the Serverless VPC Access connector, and environment variables that provide the function with the host IP address and port of the Memorystore Redis instance.
Note: If you see a permissions error, please wait a few minutes, and try the deployment again.
To test the function, publish a message to the topic:
gcloud pubsub topics publish $TOPIC --message='{"id": 1234, "firstName": "Lucas" ,"lastName": "Sherman", "Phone": "555-555-5555"}'
View the function logs
In Google Cloud console, navigate to the Cloud Functions overview page, and click the
python-pubsub-functionname.Click Logs.
Verify the log entry that indicates that the JSON data payload sent in the Pub/Sub message is added to Redis.

Click Check my progress to verify the objective.
Create an event-driven function for Pub/Sub
Check my progress
Task 5. Create an HTTP function
In this task, you create an HTTP function in Python to query the Memorystore for Redis instance and return data based on an identifier that is passed in the request.
Write the function code
Run the following command to create a folder and files for the HTTP function and navigate to the folder:
 mkdir ~/redis-http && cd $_
 touch main.py && touch requirements.txt
In the Cloud Shell toolbar, click Open Editor.
In the Cloud Shell Editor, select the
redis-httpfolder.In the editor, add the following code to the
redis-http/main.pyfile:import os import redis from flask import request import functions_framework redis_host = os.environ.get('REDISHOST', 'localhost') redis_port = int(os.environ.get('REDISPORT', 6379)) redis_client = redis.StrictRedis(host=redis_host, port=redis_port) @functions_framework.http def getFromRedis(request): response_data = "" if request.method == 'GET': id = request.args.get('id') try: response_data = redis_client.get(id) except RuntimeError: response_data = "" if response_data is None: response_data = "" return response_dataTo specify the function code dependencies, add the following lines to the
redis-http/requirements.txtfile:functions-framework==3.2.0 redis==4.3.4It's a good idea to separate your function's dependencies for each function so that only modules needed for your function are loaded at function instance startup time. This reduces function latency during cold starts.
Deploy and test the function
To deploy the function, in Cloud Shell, run the following command:
 gcloud functions deploy http-get-redis \
 --gen2 \
 --runtime python310 \
 --entry-point getFromRedis \
 --source . \
 --region $REGION \
 --trigger-http \
 --timeout 600s \
 --max-instances 1 \
 --vpc-connector projects/$PROJECT_ID/locations/$REGION/connectors/test-connector \
 --set-env-vars REDISHOST=$REDIS_IP,REDISPORT=$REDIS_PORT \
 --no-allow-unauthenticated
Note: If you see a permissions error, please wait a few minutes, and try the deployment again.
After the function is deployed, retrieve the HTTP URI of the function and store it in an environment variable:
FUNCTION_URI=$(gcloud functions describe http-get-redis --gen2 --region $REGION --format "value(serviceConfig.uri)"); echo $FUNCTION_URITo test the function, run the following
curlcommand:curl -H "Authorization: bearer $(gcloud auth print-identity-token)" "${FUNCTION_URI}?id=1234"Note: Pass the same id parameter value that was used when testing the Pub/Sub function trigger in the previous task.
Verify that the response from the HTTP function matches the JSON data that was previously stored in the Redis instance:
{"id": 1234, "firstName": "Lucas" ,"lastName": "Sherman", "Phone": "555-555-5555"}
Click Check my progress to verify the objective.
Create a HTTP function to connect to Redis
Check my progress
Task 6. Connect to a VM instance from an HTTP function
Connecting to resources in your VPC network from Cloud Functions requires the use of a Serverless VPC Access connector. In this task, you create a VM, and an HTTP function to connect to the VM instance.
Create a VM startup script
Before creating a VM, in Cloud Shell, download a startup script that installs and runs a simple web server:
gcloud storage cp gs://cloud-training/CBL492/startup.sh .To view the contents of the VM startup script, run:
cat startup.sh
Create a VM
Set an environment variable for the zone in which the VM will be created:
ZONE=us-west1-cTo create a VM with the startup script, run the following command:
 gcloud compute instances create webserver-vm \
 --image-project=debian-cloud \
 --image-family=debian-11 \
 --metadata-from-file=startup-script=./startup.sh \
 --machine-type e2-standard-2 \
 --tags=http-server \
 --scopes=https://www.googleapis.com/auth/cloud-platform \
 --zone $ZONE
Add a firewall rule to the VPC network to enable HTTP traffic to reach the VM:
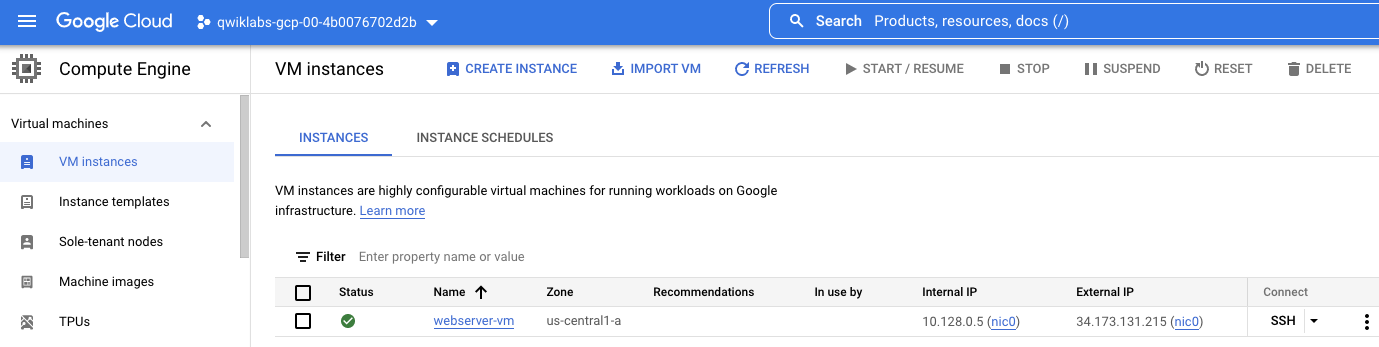
 gcloud compute --project=$PROJECT_ID \
  firewall-rules create default-allow-http \
  --direction=INGRESS \
  --priority=1000 \
  --network=default \
  --action=ALLOW \
  --rules=tcp:80 \
  --source-ranges=0.0.0.0/0 \
  --target-tags=http-server
To verify that the VM is created and running, in Google Cloud console, navigate to Compute Engine, and click VM instances.
There should be one VM listed with a green check to indicate that it is running:
Save the internal and external IP addresses of the VM in environment variables. These variables will be used later when testing the function.
VM_INT_IP=$(gcloud compute instances describe webserver-vm --format='get(networkInterfaces[0].networkIP)' --zone $ZONE); echo $VM_INT_IPVM_EXT_IP=$(gcloud compute instances describe webserver-vm --format='get(networkInterfaces[0].accessConfigs[0].natIP)' --zone $ZONE); echo $VM_EXT_IP
Write the function code
In this subtask, you write the HTTP function which when triggered connects to the VM that you created.
Run the following command to create a folder and files for the HTTP function code and navigate to the folder:
 mkdir ~/vm-http && cd $_
 touch main.py && touch requirements.txt
In the Cloud Shell toolbar, click Open Editor.
In the Cloud Shell Editor, select the
vm-httpfolder.In the editor, add the following code to the
vm-http/main.pyfile:import functions_framework import requests @functions_framework.http def connectVM(request): resp_text = "" if request.method == 'GET': ip = request.args.get('ip') try: response_data = requests.get(f"http://{ip}") resp_text = response_data.text except RuntimeError: print ("Error while connecting to VM") return resp_textThe function makes a GET HTTP request to the web server running on the VM. The web server's endpoint IP address is passed to the function as a query parameter in the function URL.
In the editor, add the following to the
vm-http/requirements.txtfile:functions-framework==3.2.0 Werkzeug==2.3.7 flask==2.1.3 requests==2.28.1
Deploy the function
To deploy the function, in Cloud Shell, run the following command:
 gcloud functions deploy vm-connector \
  --runtime python310 \
  --entry-point connectVM \
  --source . \
  --region $REGION \
  --trigger-http \
  --timeout 10s \
  --max-instances 1 \
  --no-allow-unauthenticated
After the function is deployed successfully, to extract the function's HTTP URL, run the following command:
FUNCTION_URI=$(gcloud functions describe vm-connector --region $REGION --format='value(httpsTrigger.url)'); echo $FUNCTION_URI
Test the function
Test the function by providing the VM's external IP address in the function URL:
curl -H "Authorization: bearer $(gcloud auth print-identity-token)" "${FUNCTION_URI}?ip=$VM_EXT_IP"The command should return the HTML response from the web server running on the VM:
<html><body><p>Linux startup script from a local file.</p></body></html>By default, Cloud Functions can access public external IPs or URLs. You can change this behavior by modifying the function's egress settings to route traffic from your function through your VPC network using a connector.
Repeat the test, providing the VM's internal IP address to the function URL:
curl -H "Authorization: bearer $(gcloud auth print-identity-token)" "${FUNCTION_URI}?ip=$VM_INT_IP"The function times out after approximately 10 seconds since by default your function cannot access the VM on its internal IP address.
An error is reported:
upstream request timeout
Use the VPC connector
To access the VM or other internal resources in your VPC network from your function, you must use a Serverless VPC Access connector.
Re-enable the Cloud Function API:
gcloud services disable cloudfunctions.googleapis.comgcloud services enable cloudfunctions.googleapis.comRedeploy the HTTP function setting the VPC connector that you created earlier in this lab:
 gcloud functions deploy vm-connector \
  --runtime python310 \
  --entry-point connectVM \
  --source . \
  --region $REGION \
  --trigger-http \
  --timeout 10s \
  --max-instances 1 \
  --no-allow-unauthenticated \
  --vpc-connector projects/$PROJECT_ID/locations/$REGION/connectors/test-connector
Note: If you see a permissions error, please wait a few minutes, and try the deployment again.
After the function is redeployed, test the internal connection to the VM:
curl -H "Authorization: bearer $(gcloud auth print-identity-token)" "${FUNCTION_URI}?ip=$VM_INT_IP"The function now returns the HTML response from the web server running on the VM:
<html><body><p>Linux startup script from a local file.</p></body></html>
Click Check my progress to verify the objective.
Solution of Lab
export ZONE=

curl -LO raw.githubusercontent.com/quiccklabs/Labs_solutions/master/Connecting%20Cloud%20Functions/quicklab.sh
sudo chmod +x quicklab.sh
./quicklab.sh


