
Create and Manage AlloyDB Databases - Challenge Lab
A passionate full-stack developer from @ePlus.DEV
In this challenge lab, lab you are given a set number of tasks to perform. These have all been covered in the quest Create and Manage AlloyDB Databases. You will not be given step-by-step instructions, but you will be given certain directives that you must follow, such as the naming of certain resources, or some guidelines about how you should solve the problems.
Task 1. Create a cluster and instance
Your first task is to create a cluster.
You may complete this step using the Cloud Console or the gcloud CLI. If you use the glcoud CLI you must refer to and use the GCP Region value that is provided on your lab launch page.
Your cluster must have following attributes. You can keep the default values for all other settings:
| Item | Value |
| Cluster ID | lab-cluster |
| Password | Change3Me |
| Network | peering-network |
Answer
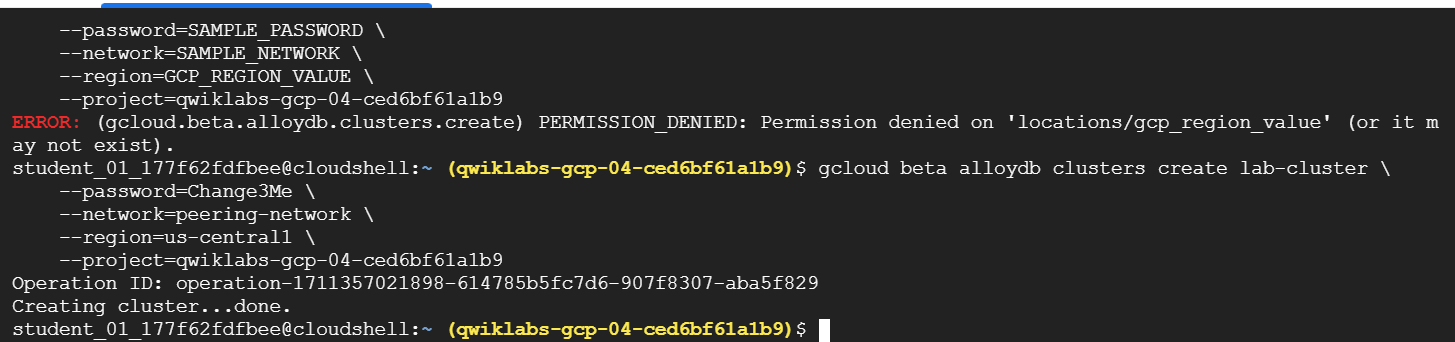
gcloud beta alloydb clusters create lab-cluster \
    --password=Change3Me \
    --network=peering-network \
    --region=us-central1 \
    --project=qwiklabs-gcp-04-ced6bf61a1b9
Note: The private services access connection option was configured for this project when you started the lab. This step was required to allow access to the AlloyDB cluster.
If you are using the gcloud CLI, an example command to create a cluster is as follows.
Note: You must substitute the required values or your configuration will be invalid and you will not pass this challenge lab.
gcloud beta alloydb clusters create SAMPLE-CLUSTER-ID \
    --password=SAMPLE_PASSWORD \
    --network=SAMPLE_NETWORK \
    --region=GCP_REGION_VALUE \
    --project=QWIKLABS_PROJECT_ID
- Next you must create an instance. If you following the Cloud Console wizard, your cluster's instance must have following attributes:
| Item | Value |
| Instance ID | lab-instance |
| Machine Type | 2 vCPU, 16 GB |
If you are using the gcloud CLI, an example command to create an instance is as follows.
Note: You must substitute the required values or your configuration will be invalid and you will not pass this challenge lab.
Answer
gcloud beta alloydb instances create lab-instance \
    --instance-type=PRIMARY \
    --cpu-count=2 \
    --region=us-central1  \
    --cluster=lab-cluster  \
    --project=qwiklabs-gcp-04-ced6bf61a1b9
When you are on the Overview page for the new cluster you created, please make note of the Private IP address in the instances section. Copy the Private IP address to a text file so that you can paste the value in a later step.
Click Check my progress to verify the objective.
Task 2. Create tables in your instance
Next you must create tables in your AlloyDB instance. A VM named, alloydb-client, containing the PostgreSQL client was provisioned for you at the start of the lab.
On the Navigation menu (), under Compute Engine click VM instances.
For the instance named alloydb-client, in the Connect column, click SSH to open a terminal window.
Set the following environment variable, replacing ALLOYDB_ADDRESS with the Private IP address of the AlloyDB instance from the previous task.
export ALLOYDB=ALLOYDB_ADDRESS
- Run the following command to store the Private IP address of the AlloyDB instance on the AlloyDB client VM so that it will persist throughout the challenge lab.
echo $ALLOYDB > alloydbip.txt
- Use the following command to launch the PostgreSQL (psql) client. You will be prompted to provide the postgres user's password (Change3Me) which you entered when you created the cluster.
psql -h $ALLOYDB -U postgres
Your database must have a total of three (3) tables - regions, countries, and departments.
The tables must be defined as listed below.
An example DDL command to create an AlloyDB table is as follows:
CREATE TABLE sample (
    sample_id bigint NOT NULL,
    sample_name varchar(25)
) ;
ALTER TABLE sample ADD PRIMARY KEY (sample_id);
Table: regions
Primary Key: region_id
| Column | Datatype |
| region_id | bigint NOT NULL |
| region_name | varchar(25) |
Table: countries
Primary Key: country_id
| Column | Datatype |
| country_id | char(2) NOT NULL |
| country_name | varchar(40) |
| region_id | bigint |
Table: departments
Primary Key: department_id
| Column | Datatype |
| department_id | smallint NOT NULL |
| department_name | varchar(30) |
| manager_id | integer |
| location_id | smallint |
Answer
CREATE TABLE regions (
    region_id bigint NOT NULL,
    region_name varchar(25)
) ;
ALTER TABLE regions ADD PRIMARY KEY (region_id);

CREATE TABLE countries (
    country_id char(2) NOT NULL,
    country_name varchar(40),
    region_id bigint
) ;
ALTER TABLE countries ADD PRIMARY KEY (country_id);

CREATE TABLE departments (
    department_id smallint NOT NULL,
    department_name varchar(30),
    manager_id integer,
    location_id smallint
) ;
ALTER TABLE departments ADD PRIMARY KEY (department_id);
Task 3. Load simple datasets into tables
Next load the tables you just created with the following simple, low-volume datasets.
You must use the psql client to load these tables. Use the alloydb-client VM as outlined in the previous task to access the psql client.
Note: The data elements provided are written in the order of the columns of the corresponding table.
An example DML command to load a single row into an AlloyDB table is as follows.
INSERT INTO Sample
VALUES
  (1, 'Sample Value');
Answer
INSERT INTO regions VALUES (1, 'Europe' ), (2, 'Americas'), (3, 'Asia'), (4, 'Middle East and Africa');
INSERT INTO countries VALUES ('IT', 'Italy', 1 ), ('JP', 'Japan', 3 ), ('US', 'United States of America', 2 ), ('CA', 'Canada', 2 ), ('CN', 'China', 3 ), ('IN', 'India', 3 ), ('AU', 'Australia', 3 ), ('ZW', 'Zimbabwe', 4 ), ('SG', 'Singapore', 3 );
INSERT INTO departments VALUES (10, 'Administration', 200, 1700), (20, 'Marketing', 201, 1800), (30, 'Purchasing', 114, 1700), (40, 'Human Resources', 203, 2400), (50, 'Shipping', 121, 1500), (60, 'IT', 103, 1400);
Table: regions
1, 'Europe'
2, 'Americas'
3, 'Asia'
4, 'Middle East and Africa'
Table: countries
'IT', 'Italy', 1
'JP', 'Japan', 3
'US', 'United States of America', 2
'CA', 'Canada', 2
'CN', 'China', 3
'IN', 'India', 3
'AU', 'Australia', 3
'ZW', 'Zimbabwe', 4
'SG', 'Singapore', 3
Table: departments
10, 'Administration', 200, 1700
20, 'Marketing', 201, 1800
30, 'Purchasing', 114, 1700
40, 'Human Resources', 203, 2400
50, 'Shipping', 121, 1500
60, 'IT', 103, 1400
- Click each Check my progress to verify the objectives.
Task 4. Create a Read Pool instance
Next create a Read Pool instance for your cluster. You may create the Read Pool instance using the Cloud Console or the gcloud CLI. If you use the glcoud CLI you must refer to and use the GCP Region value that is provided on your lab launch page.
Your Read Pool instance must have following attributes. You can keep the default values for all other settings:
| Item | Value |
| Read pool instance ID | lab-instance-rp1 |
| Node count | 2 |
| Machine Type | 2 vCPU, 16 GB |
If you are using the gcloud CLI, an example command to create a Read Pool instance is as follows.
Note: You must substitute the required values or your configuration will be invalid and you will not pass this challenge lab.
    gcloud beta alloydb instances create SAMPLE-READ-POOL-INSTANCE-ID \
    --instance-type=READ_POOL \
    --cpu-count=2 \
    --read-pool-node-count=2 \
    --region=GCP_REGION_VALUE  \
    --cluster=SAMPLE-CLUSTER-ID  \
    --project=QWIKLABS_PROJECT_ID
- Click Check my progress to verify the objective.
Answer
gcloud beta alloydb instances create lab-instance-rp1 \
--instance-type=READ_POOL \
--cpu-count=2 \
--read-pool-node-count=2 \
--region=us-central1  \
--cluster=lab-cluster  \
--project=qwiklabs-gcp-04-ced6bf61a1b9
Task 5. Create a backup
Next create an on-demand backup of your instance. You may create the backup using the Cloud Console or the gcloud CLI. If you use the glcoud CLI you must refer to and use the GCP Region value that is provided on your lab launch page.
On the Cloud Console Navigation menu (), under Databases click AlloyDB for PostgreSQL then Backups to launch the Backups page.
Your backup must be named lab-backup.
If you are using the gcloud CLI, an example command to create a backup is as follows.
Note: You must substitute the required values or your configuration will be invalid and you will not pass this challenge lab.
gcloud beta alloydb instances create lab-instance-rp1 \
--instance-type=READ_POOL \
--cpu-count=2 \
--read-pool-node-count=2 \
--region=us-central1  \
--cluster=lab-cluster  \
--project=qwiklabs-gcp-04-ced6bf61a1b9
- Click Check my progress to verify the objective.
Answer
gcloud beta alloydb backups create lab-backup \
--cluster=lab-cluster \
--region=us-central1 \
--project=qwiklabs-gcp-04-ced6bf61a1b9


