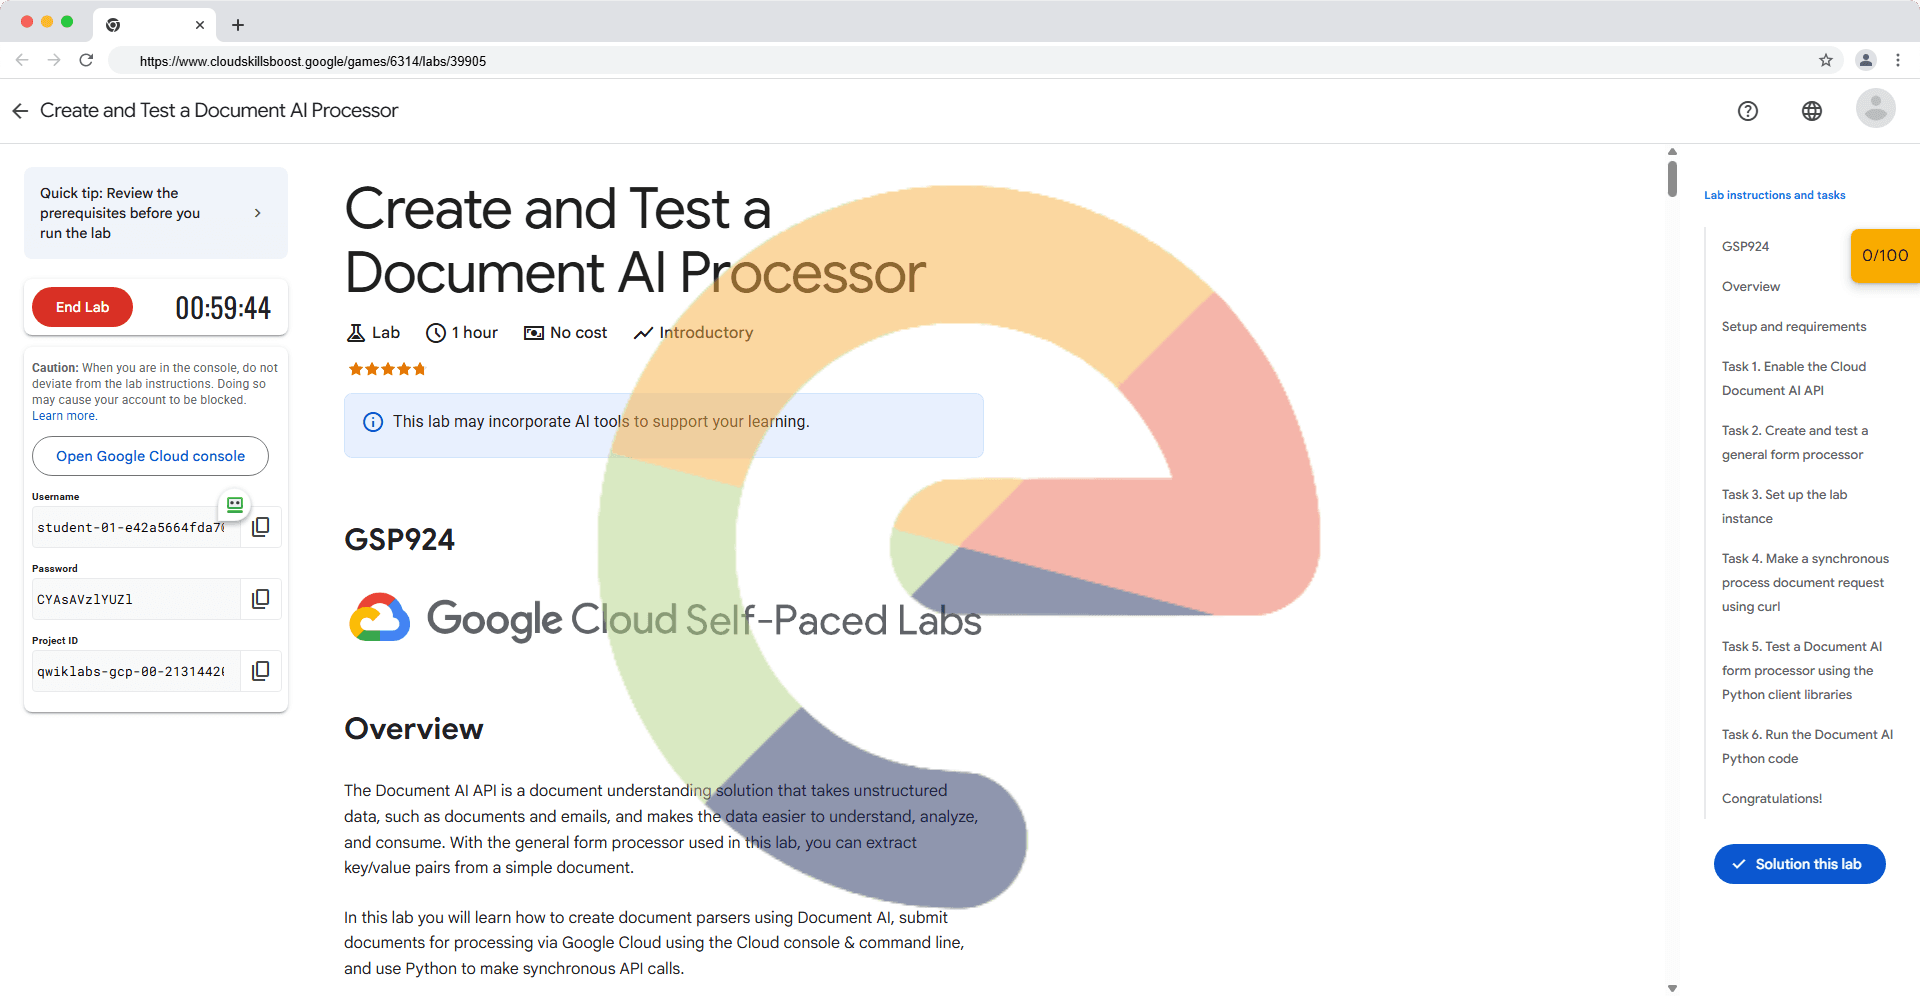
Create and Test a Document AI Processor - GSP924
A passionate full-stack developer from @ePlus.DEV
Overview
The Document AI API is a document understanding solution that takes unstructured data, such as documents and emails, and makes the data easier to understand, analyze, and consume. With the general form processor used in this lab, you can extract key/value pairs from a simple document.
In this lab you will learn how to create document parsers using Document AI, submit documents for processing via Google Cloud using the Cloud console & command line, and use Python to make synchronous API calls.
What you'll learn
You will learn how to perform the following tasks:
Create and test Document AI processor using the console.
Test Document AI processors using the command line.
Test Document AI synchronous API calls using Python.
Task 1. Enable the Cloud Document AI API
In this task you will enable the Document AI API and create and test a general form processor. The general form processor will process any type of document and extract all the text content it can identify in the document. It is not limited to printed text, it can handle handwritten text and text in any orientation, supports a number of languages, and understands how form data elements are related to each other so that you can extract key/value pairs for form fields that have text labels.
Enable the Cloud Document AI API
Before you can begin using Document AI, you must enable the API.
From the Navigation menu (), click APIs & services > Library.
Search for Cloud Document AI API, then click the Enable button to use the API in your Google Cloud project.
If the Cloud Document AI API is already enabled you will see the Manage button and you can continue with the rest of the lab.
Click Check my progress to verify the objectives.
Enabled Cloud Document AI API
Check my progress
Task 2. Create and test a general form processor
Next you will create a Document AI processor using the Document AI Form Parser.
Create a processor
In the console, from the Navigation menu (), click Document AI > Overview.
Click Explore processors.
Click Create Processor for Form Parser, which is a type of general processor.
Specify the processor name as
form-parserand select the region US (United States) from the list.Click Create to create the general
form-parserprocessor.
This will create the processor and return to the processor details page that will display the processor ID, status, and the prediction endpoint.
- Make a note of the Processor ID as you will use it with
curlto make a POST call to the API in a later task.
Download the sample form
In this task you will download the sample form from Cloud Storage. In order to upload this form in the next task, you first need to download it to your local machine.
- Download the form.pdf file to your local machine.
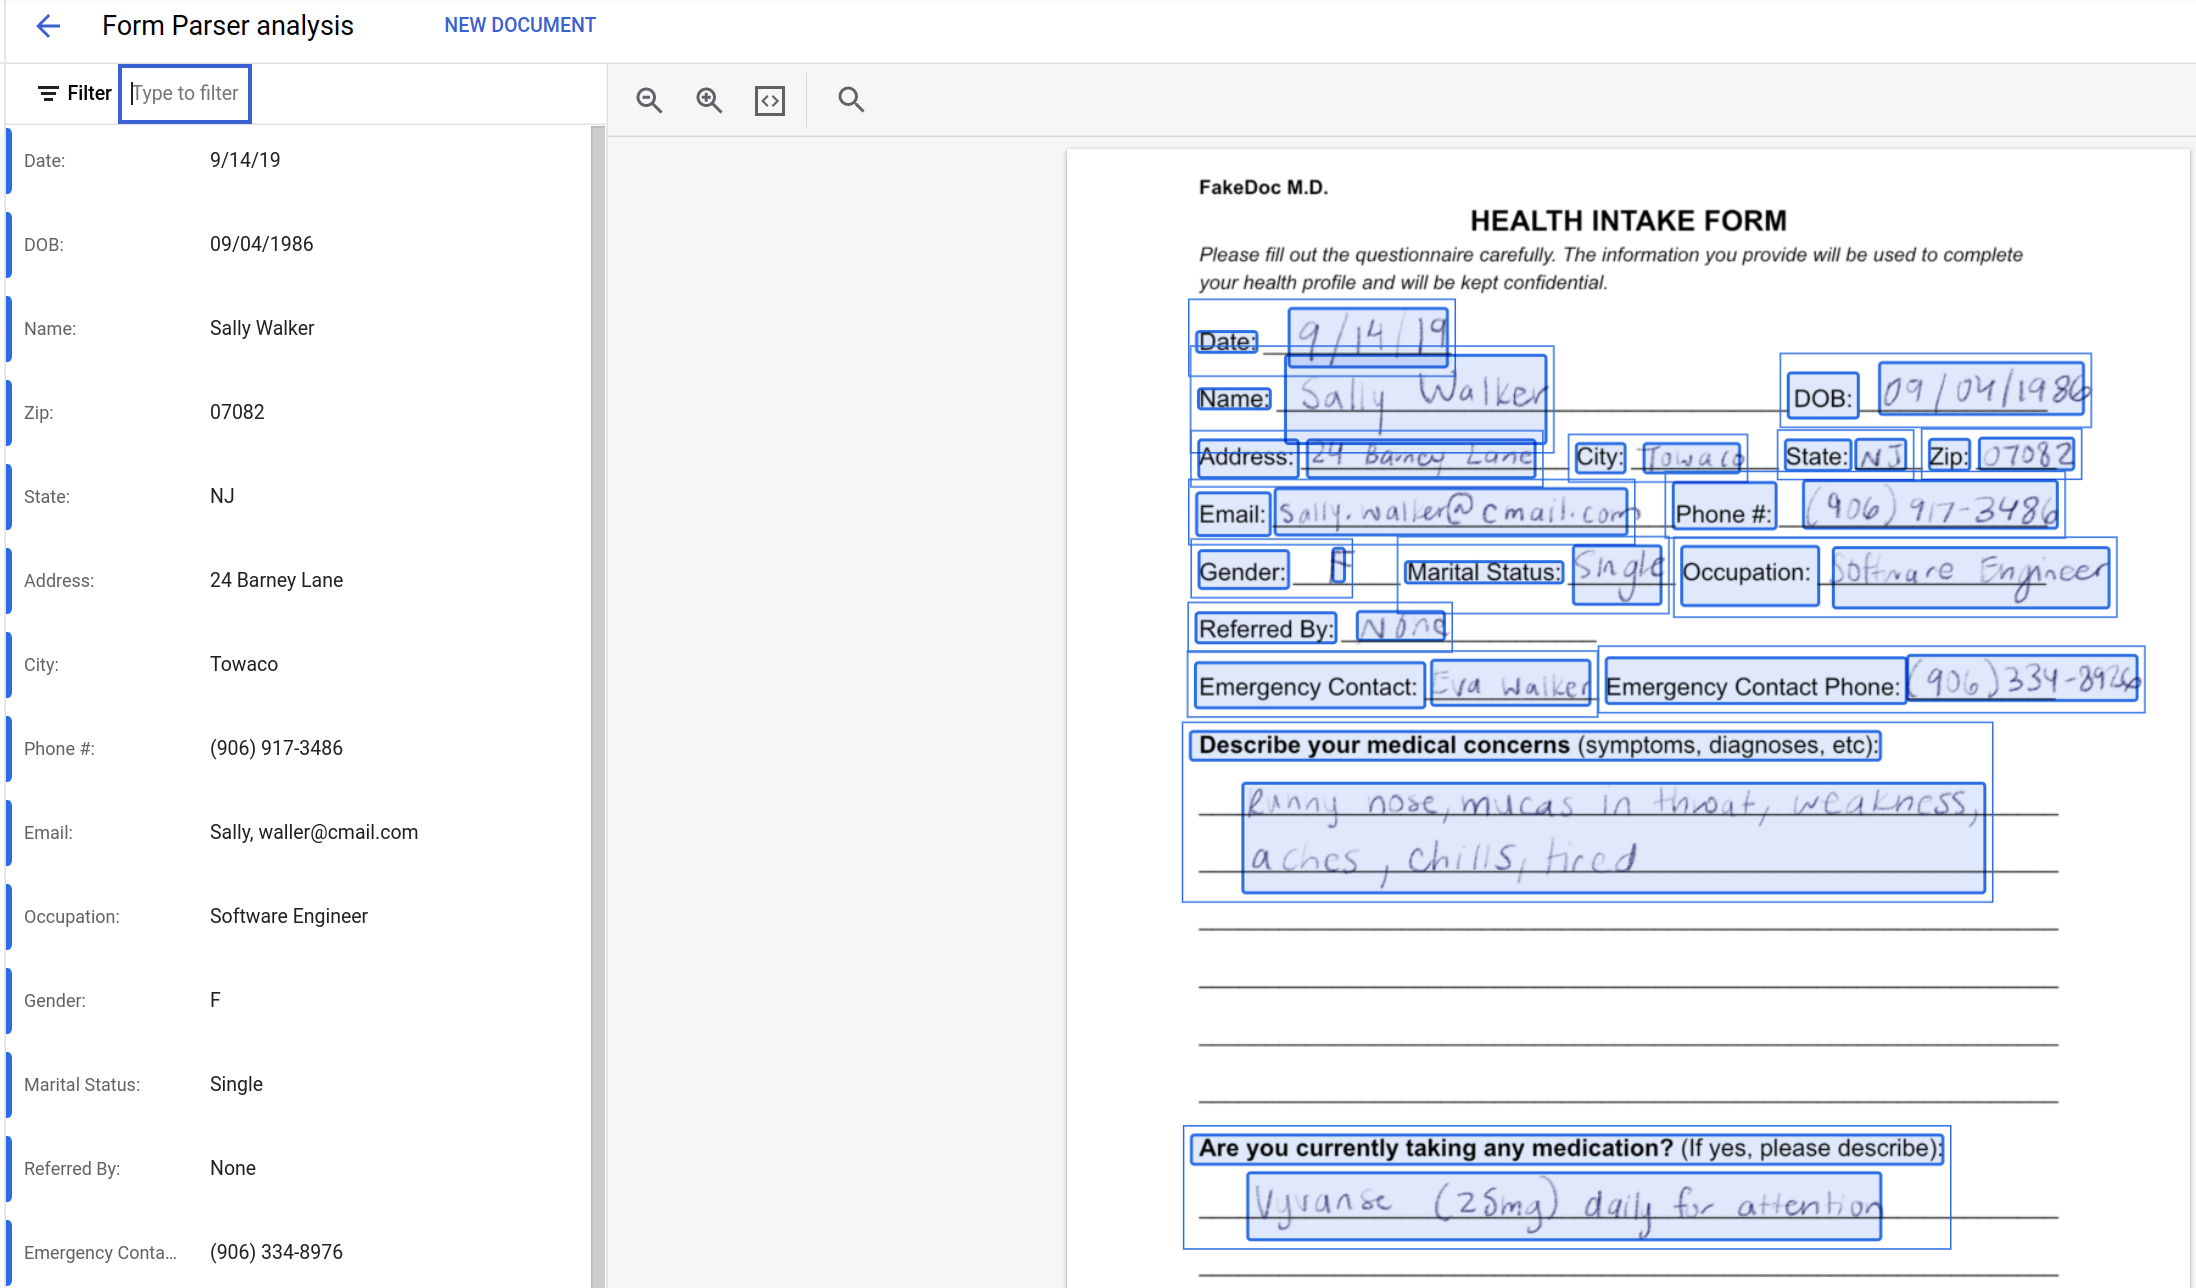
The file should download directly. If the file opens in your browser instead, then download the file using the file controls within your browser. The form.pdf file is a HEALTH INTAKE FORM with sample hand-written data.
Upload a form for Document AI processing
Next you will upload the sample form you downloaded to your form-parser processor. It will then be analyzed and the results displayed in the console.
- On the form-parser page, click the Upload Test Document button. A dialog will pop up - select the file you downloaded in the previous task for uploading.
A progress bar will indicate the level of completion of the analysis process and finally the results will be displayed. You will see that the general processor has captured the data on the form into a set of key/value pairs.
The key/value pairs parsed from the source document will be presented in the console. The left hand pane lists the data, and the right hand pane highlights with blue rectangles the source locations in the parsed document. Examine the output and compare the results with the source data.
In this task you will test a Document AI general form processor by making API calls from the command line.
Click Check my progress to verify the objectives.
Create and test a general form processor
Check my progress
Task 3. Set up the lab instance
In this section, you will set up the lab instance to use the Document AI API.
Connect to the lab VM instance using SSH
You will perform the remainder of the lab tasks in the lab VM called document-ai-dev.
From the Navigation menu (), click Compute Engine > VM Instances.
Click the SSH link for the VM Instance called document-ai-dev.
You will need the Document AI processor ID of the processor you created in Task 1 for this step. If you did not save it, then in the Cloud Console tab:
Open the Navigation menu (
).
Click Document AI > Processors .
Click the name of your processor to open the details page.
From here you can copy the processor ID.

- In the SSH session, create an environment variable to contain the Document AI processor ID. You must replace the placeholder for
[your processor id]:
export PROCESSOR_ID=[your processor id]
- In the SSH session confirm that the environment variable contains the Document AI processor ID:
echo Your processor ID is:$PROCESSOR_ID
- This should print out the Processor ID similar to the following:
Your processor ID is:4897d834d2f4415d
You will use this SSH session for the remaining tasks in this lab.
Authenticate API requests
In order to make requests to the Document AI API, you need to provide a valid credential. In this task create a service account, limit the permissions granted to that service account to those required for the lab, and then generate a credential for that account that can be used to authenticate Document AI API requests.
- Set an environment variable with your Project ID, which you will use throughout this lab:
export PROJECT_ID=$(gcloud config get-value core/project)
- Create a new service account to access the Document AI API by using:
export SA_NAME="document-ai-service-account"
gcloud iam service-accounts create $SA_NAME --display-name $SA_NAME
- Bind the service account to the Document AI API user role:
gcloud projects add-iam-policy-binding ${PROJECT_ID} \
--member="serviceAccount:$SA_NAME@${PROJECT_ID}.iam.gserviceaccount.com" \
--role="roles/documentai.apiUser"
- Create the credentials that will be used to log in as your new service account and save them in a JSON file called
key.jsonin your working directory:
gcloud iam service-accounts keys create key.json \
--iam-account  $SA_NAME@${PROJECT_ID}.iam.gserviceaccount.com
- Set the
GOOGLE_APPLICATION_CREDENTIALSenvironment variable, which is used by the library to find your credentials, to point to the credentials file:
export GOOGLE_APPLICATION_CREDENTIALS="$PWD/key.json"
- Check that the
GOOGLE_APPLICATION_CREDENTIALSenvironment variable is set to the full path of the credentials JSON file you created earlier:
echo $GOOGLE_APPLICATION_CREDENTIALS
This environment variable is used by the gcloud command line tool to specify which credentials to use when executing commands. To read more about this form authentication, see the Application Default Credentials guide.
Download the sample form to the VM instance
Now you can download a sample form and then base64 encode it for submission to the Document AI API.
- Enter the following command in the SSH window to download the sample form to your working directory:
gsutil cp gs://cloud-training/gsp924/health-intake-form.pdf .
- Create a JSON request file for submitting the base64 encoded form for processing:
echo '{"inlineDocument": {"mimeType": "application/pdf","content": "' > temp.json
base64 health-intake-form.pdf >> temp.json
echo '"}}' >> temp.json
cat temp.json | tr -d \\n > request.json
Click Check my progress to verify the objectives.
Authenticate API requests and download the sample form
Check my progress
Task 4. Make a synchronous process document request using curl
In this task you process the sample document by making a call to the synchronous Document AI API endpoint using curl.
- Submit a form for processing via
curl. The result will be stored inoutput.json:
export LOCATION="us"
export PROJECT_ID=$(gcloud config get-value core/project)
curl -X POST \
-H "Authorization: Bearer "$(gcloud auth application-default print-access-token) \
-H "Content-Type: application/json; charset=utf-8" \
-d @request.json \
https://${LOCATION}-documentai.googleapis.com/v1beta3/projects/${PROJECT_ID}/locations/${LOCATION}/processors/${PROCESSOR_ID}:process > output.json
- Make sure your
output.jsonfile contains the results of the API call:
cat output.json
If you receive an authentication error, make sure you have set the GOOGLE_APPLICATION_CREDENTIALS environment variable to point to the credentials JSON file you created earlier. You may need to wait a few minutes for the IAM policy to propagate, so try again if you receive an error.
The access token for the Cloud IAM service account is generated on the fly and passed to the API using the Authorization: HTTP header. The response contains JSON formatted data that is saved to the file output.json.
Extract the form entities
Next, explore some of the information extracted from the sample form.
- Extract the raw text detected in the document as follows:
sudo apt-get update
sudo apt-get install jq
cat output.json | jq -r ".document.text"
This lists all of the text detected in the uploaded document.
- Extract the list of form fields detected by the form processor:
cat output.json | jq -r ".document.pages[].formFields"
This lists the object data for all of the form fields detected in the document. The textAnchor.startIndex and textAnchor.endIndex values for each form can be used to locate the names of the detected forms in the document.text field. The Python script that you will use in the next task will do this mapping for you.
The JSON file is quite large as it includes the base64 encoded source document as well as all of the detected text and document properties. You can explore the JSON file by opening the file in a text editor or by using a JSON query tool like jq.
Check that a document has been processed by the Document AI API.
Check my progress
Task 5. Test a Document AI form processor using the Python client libraries
Make a synchronous call to the Document AI API using the Python Document AI client libraries.
Now you will process a document using the synchronous endpoint. For processing large amounts of documents at a time you can use the asynchronous API. To learn more about using the Document AI APIs, read the guide.
If you want to run Python scripts directly, you need to provide the appropriate credentials to those scripts, so that they can make calls to the API using a service account that has been configured with the correct permissions. To read more about how to configure this form of authentication, see the Authenticating as a service account documentation.
Configure your VM Instance to use the Document AI Python client
Now install the Python Google Cloud client libraries into the VM Instance.
- Enter the following command in the SSH terminal shell to import the lab files into your VM Instance:
gsutil cp gs://cloud-training/gsp924/synchronous_doc_ai.py .
- Enter the following command to install the Python client libraries required for Document AI and the other libraries required for this lab:
sudo apt install python3-pip
python3 -m pip install --upgrade google-cloud-documentai google-cloud-storage prettytable
You should see output indicating that the libraries have been installed successfully.
Review the Document AI API Python code
Take a minute to review the Python code in the sample file. You can use an editor of your choice, such as vi or nano, to review the code in the SSH session or you can use the command from the previous section to copy the example code into the Cloud Shell and use the Code Editor to view the source code if you prefer.
- The first two code blocks import the required libraries and parses parameters to initialize variables that identify the Document AI processor and input data.
import argparse
from google.cloud import documentai_v1beta3 as documentai
from google.cloud import storage
from prettytable import PrettyTable

parser = argparse.ArgumentParser() parser.add_argument("-P", "--project_id", help="Google Cloud Project ID") parser.add_argument("-D", "--processor_id", help="Document AI Processor ID") parser.add_argument("-F", "--file_name", help="Input file name", default="form.pdf") parser.add_argument("-L", "--location", help="Processor Location", default="us") args = parser.parse_args()
- The
process_documentfunction is used to make a synchronous call to a Document AI processor. The function creates a Document AI API client object.
The processor name required by the API call is created using the project_id,location, and processor_id parameters and the document to be processed is read in and stored in a mime_type structure.
The processor name and the document are then passed to the Document API client object and a synchronous call to the API is made. If the request is successful the document object that is returned will include properties that contain the data that has been detected by the Document AI processor.
def process_document(project_id, location, processor_id, file_path ):

    # Instantiates a client
    client = documentai.DocumentProcessorServiceClient()

    # The full resource name of the processor, e.g.:
    # projects/project-id/locations/location/processor/processor-id
    # You must create new processors in the Cloud Console first
    name = f"projects/{project_id}/locations/{location}/processors/{processor_id}"

    # Read the file into memory
    with open(file_path, "rb") as image:
        image_content = image.read()

    # Create the document object
    document = {"content": image_content, "mime_type": "application/pdf"}

    # Configure the process request
    request = {"name": name, "document": document}

    # Use the Document AI client synchronous endpoint to process the request
    result = client.process_document(request=request)

    return result.document
- The script then calls the
process_documentfunction with the required parameters and saves the response in thedocumentvariable.
document = process_document(args.project_id,args.location,args.processor_id,args.file_name )
- The final block of code prints the
.textproperty that contains all of the text detected in the document then displays the form information using the text anchor data for each of the form fields detected by the form parser.
print("Document processing complete.")
# print the raw text
print("Text: \n{}\n".format(document.text))

# Define a function to retrieve an object dictionary for a named element
def get_text(doc_element: dict, document: dict):
    """
    Document AI identifies form fields by their offsets
    in document text. This function converts offsets
    to text snippets.
    """
    response = ""
    # If a text segment spans several lines, it will
    # be stored in different text segments.
    for segment in doc_element.text_anchor.text_segments:
        start_index = (
            int(segment.start_index)
            if segment in doc_element.text_anchor.text_segments
            else 0
        )
        end_index = int(segment.end_index)
        response += document.text[start_index:end_index]
    return response

# Grab each key/value pair and their corresponding confidence scores.
document_pages = document.pages

print("Form data detected:\n")
# For each page fetch each form field and display fieldname, value and confidence scores
for page in document_pages:
    print("Page Number:{}".format(page.page_number))
    for form_field in page.form_fields:
        fieldName=get_text(form_field.field_name,document)
        nameConfidence = round(form_field.field_name.confidence,4)
        fieldValue = get_text(form_field.field_value,document)
        valueConfidence = round(form_field.field_value.confidence,4)
        print(fieldName+fieldValue +"  (Confidence Scores: (Name) "+str(nameConfidence)+", (Value) "+str(valueConfidence)+")\n")
Click Check my progress to verify the objectives.
Test a Document AI form processor
Check my progress
Task 6. Run the Document AI Python code
Execute the sample code and process the same file as before.
- Create environment variables for the Project ID and the IAM service account credentials file:
export PROJECT_ID=$(gcloud config get-value core/project)
export GOOGLE_APPLICATION_CREDENTIALS="$PWD/key.json"
- Call the
synchronous_doc_ai.pypython program with the parameters it requires:
python3 synchronous_doc_ai.py \
--project_id=$PROJECT_ID \
--processor_id=$PROCESSOR_ID \
--location=us \
--file_name=health-intake-form.pdf | tee results.txt
You will see the following block of text output:
FakeDoc M.D. HEALTH INTAKE FORM Please fill out the questionnaire carefully. The information you provide will be used to complete your health profile and will be kept confidential. Date: Sally Walker Name: 9/14/19 ...
The first block of text is a single text element containing all of the text in the document. This block of text does not include any awareness of form based data so some items, such as the Date and Name entries, are mixed together in this raw text value.
The code then outputs a more structured view of the data using the form data that the form-parser has inferred from the document structure. This structured output also includes the confidence score for the form field names and values. The output from this section gives a much more useful mapping between the form field names and the values, as can be seen with the link between the Date and Name form fields and their correct values.
Form data detected:

Page Number:1 Phone #: (906) 917-3486 (Confidence Scores: (Name) 1.0, (Value) 1.0) ... Date: 9/14/19 (Confidence Scores: (Name) 0.9999, (Value) 0.9999) ... Name: Sally Walker (Confidence Scores: (Name) 0.9973, (Value) 0.9973) ...
Click Check my progress to verify the objectives.
Solution of Lab
New solution
Step 1 Run in Cloud Shell
gcloud services enable documentai.googleapis.com
export ZONE=$(gcloud compute instances list document-ai-dev --format 'csv[no-heading](zone)')
gcloud compute ssh document-ai-dev --project=$DEVSHELL_PROJECT_ID --zone=$ZONE --quiet
Step 2 order_items
curl -LO raw.githubusercontent.com/ArcadeCrew/Google-Cloud-Labs/refs/heads/main/Create%20and%20Test%20a%20Document%20AI%20Processor/arcadecrew.sh
sudo chmod +x arcadecrew.sh
./arcadecrew.sh
Old solution
export PROCESSOR_ID=

curl -LO raw.githubusercontent.com/quiccklabs/Labs_solutions/master/Create%20and%20Test%20a%20Document%20AI%20Processor/quicklabgsp924.sh
sudo chmod +x quicklabgsp924.sh
./quicklabgsp924.sh