Deploy an Agent with Agent Development Kit (ADK): Challenge Lab - GENAI129

A passionate full-stack developer from @ePlus.DEV
Overview
In this lab, you will demonstrate your ability to author agents using Agent Development Kit (ADK), deploy those agents to Agent Runtime, and use them from a web app.
Objective
In this lab you:
Build an agent with Agent Development Kit (ADK) made up of a root agent and sub-agents
Enable agents with an Agent Search tool and Python functions used as tools
Store agent output in session state and retrieve values from session state for subsequent agent instructions
Deploy your agent to Agent Runtime
Query the agent deployed to Agent Runtime
Related learning materials
If you are looking for resources that will help you develop the skills required to complete this lab successfully, consider reviewing relevant sections from the following:
Setup and requirements
Before you click the Start Lab button
Read these instructions. Labs are timed and you cannot pause them. The timer, which starts when you click Start Lab, shows how long Google Cloud resources are made available to you.
This hands-on lab lets you do the lab activities in a real cloud environment, not in a simulation or demo environment. It does so by giving you new, temporary credentials you use to sign in and access Google Cloud for the duration of the lab.
To complete this lab, you need:
- Access to a standard internet browser (Chrome browser recommended).
Note: Use an Incognito (recommended) or private browser window to run this lab. This prevents conflicts between your personal account and the student account, which may cause extra charges incurred to your personal account.
- Time to complete the lab—remember, once you start, you cannot pause a lab.
Note: Use only the student account for this lab. If you use a different Google Cloud account, you may incur charges to that account.
How to start your lab and sign in to the Google Cloud console
Click the Start Lab button. If you need to pay for the lab, a dialog opens for you to select your payment method. On the right is the Lab setup pane with the following:
The Open Google Cloud console button
The temporary credentials that you must use for this lab
Other information, if needed, to step through this lab
In the Lab Setup section, right-click Open Google Cloud console and select Open link in new window (or alternatively right-click and select Open Link in Incognito Window if you are running the Chrome browser).
The lab spins up resources, and then opens another tab that shows the Sign in page.
Tip: Arrange the tabs in separate windows, side-by-side.
Note: If you see the Choose an account dialog, click Use Another Account.
If necessary, copy the Username below and paste it into the Sign in dialog.
student-03-73eb1e799716@qwiklabs.netCopied!
You can also find the Username in the Lab Setup pane.
Click Next.
Copy the Password below and paste it into the Welcome dialog.
fFVTKd5XRUVkCopied!
You can also find the Password in the Lab Setup pane.
Click Next.
Important: You must use the credentials the lab provides you. Do not use your Google Cloud account credentials.
Note: Using your own Google Cloud account for this lab may incur extra charges.
Click through the subsequent pages:
Accept the terms and conditions.
Do not add recovery options or two-factor authentication (because this is a temporary account).
Do not sign up for free trials.
After a few moments, the Google Cloud console opens in this tab.
Note: To access Google Cloud products and services, click the Navigation menu or type the service or product name in the Search field.

Challenge Scenario

Cymbal Shops is an American retail chain headquartered in Minneapolis that sells housewares, electronics, and clothing.
Cymbal Shops has expanded into Europe and launched a new Paint Department. It plans to use its new online presence to streamline the way people shop for paint for DIY home renovation projects.
A coworker of yours began to develop an agent, Paint Agent, to help the user:
select a paint product based on Cymbal Shops' paint product datasheets
choose a color from the selected product line
determine how much paint is needed by room dimensions
calculate the price based on the selected options
Your coworker, however, got stuck on a bug and left the organization.
You are a new ML Engineer with Cymbal Shops. You've been tasked with completing the deployment of Paint Agent. The agent is structured like this:
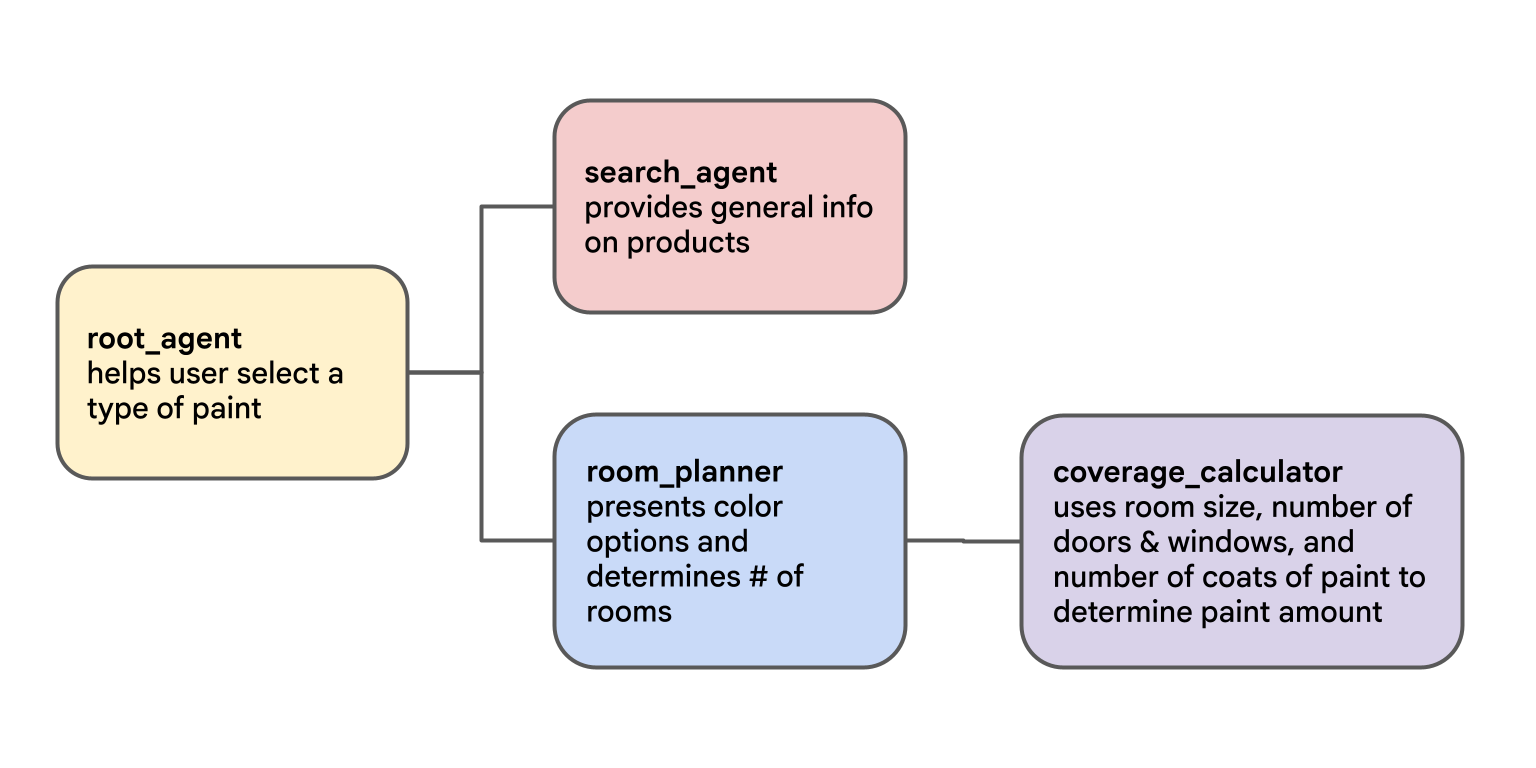
Task 1. Create an Agent Search app for paint product info
In this task, you will deploy an Agent Search data store. This data store will import a datasheet describing Cymbal Shops' paint (which you can preview in a tab in your Incognito window at https://storage.cloud.google.com/qwiklabs-gcp-02-8added80adf0-bucket/Cymbal_Shops_Paint_Datasheets.pdf. This datasheet will serve as the grounding data source for user queries about your paints.
A data store and search app allow your agent to quickly find your organization's content. It can then use that information to provide an appropriate response to the user based on your data.
In the Google Cloud Console, navigate to Agent Platform > Agents > Search.
Create an Agent search app with the following configuration:
Field Value App type Custom search (general) App name Paint Search Company name Cymbal Shops Location global Create an Agent Search data store with the following configuration:
Field Value Data source Cloud Storage Data type Documents Folder or File File File to import qwiklabs-gcp-02-8added80adf0-bucket/Cymbal_Shops_Paint_Datasheets.pdfLocation global Data store name Cymbal Paint Document parser Layout Parser Enable table annotation Enabled Include ancestor headings in chunks Enabled Select the Pricing Model as
Generalfor both the App and Data store.
Click Check my progress to verify the objective.
Create a data store and search app.
Task 2. Install ADK and set up your environment
In this lab environment, the Agent Platform API has been enabled for you. If you were to follow these steps in your own project, you would enable it by navigating to Agent Platform and following the prompt to enable it.
Prepare a Cloud Shell Editor tab
Click Activate Cloud Shell (
) in the Google Cloud console title bar.
Note: Alternatively, select the console browser tab and press G then S to open the Cloud Shell terminal.
Click Continue.
When prompted to authorize Cloud Shell, click Authorize.
In the upper right corner of the Cloud Shell Terminal panel, click the Open in new window button
.
Click the Open Editor pencil icon (
) at the top of the pane to view files.
At the top of the left-hand navigation menu, click the Explorer icon (
) to open your file explorer.
Click the Open Folder button.
In the Open Folder dialog that opens, click OK to select your Qwiklab student account's home folder.
Close any additional tutorial or Gemini panels that appear on the right side of the screen to save more of your window for your code editor.
Throughout the rest of this lab, you can work in this window as your IDE with the Cloud Shell Editor and Cloud Shell Terminal.


Download and install ADK and code samples for this lab
Paste the following command into the Cloud Shell Terminal to copy files from a Cloud Storage bucket, creating a project directory with code for this lab:
gcloud storage cp -r gs://qwiklabs-gcp-02-8added80adf0-bucket/adk_challenge_lab .Update your
PATHenvironment variable and install ADK and other lab requirements by running the following commands in the Cloud Shell Terminal.export PATH=$PATH:"/home/${USER}/.local/bin" python3 -m pip install -r adk_challenge_lab/requirements.txt python3 -m pip install chainlit==2.11.1Copy the following commands to a text file. Update the value of SEARCH_ENGINE_ID from YOUR_ID to the ID of the search engine you just created (it will look like paint-search_1756... and can be found in the list of Apps in Agent Platform > Agents > Search):
cd ~/adk\_challenge\_lab cat << EOF > .env GOOGLE\_GENAI\_USE\_VERTEXAI=TRUE GOOGLE\_CLOUD\_PROJECT=qwiklabs-gcp-02-8added80adf0 GOOGLE\_CLOUD\_LOCATION=us-central1 RESOURCES\_BUCKET=qwiklabs-gcp-02-8added80adf0-bucket MODEL=gemini-2.5-flash SEARCH\_ENGINE\_ID=YOUR\_ID EOFRun your edited commands in the Cloud Shell Terminal to create a .env file with model authentication and configuration variables. [Note: To view a hidden file (indicated by a file beginning with a period), you can use the Cloud Shell Editor menus to enable View > Toggle Hidden Files*]*
Copy the .env file to the agent directory to provide your agent with the necessary authentication configurations once it is deployed:
cp .env paint_agent/.env
Task 3. Debug the Paint Agent
A coworker of yours had begun work on the Paint Agent, but got stuck. You'll need to pick up where they left off -- including fixing a bug they left behind -- to complete and deploy the agent.
In the Cloud Shell Terminal, run the current version of the agent with:
adk run paint_agentWhen the
[user]:prompt appears, enter:helloCopied!
If the agent follows up asking if you'd like to learn more about Cymbal Shops' paints, reply:
yesCopied!
Expected output ends with:
...
google.genai.errors.ClientError: 400 INVALID_ARGUMENT. {'error': {'code': 400, 'message': 'Multiple tools are supported only when they are all search tools.', 'status': 'INVALID_ARGUMENT'}}
In the following steps, you will resolve this error.
Open the file adk_challenge_lab/paint_agent/agent.py and inspect the lists of sub-agents and tools that the root_agent utilizes. Notice that it includes sub-agents. Transferring to sub-agents invokes an implicit transfer_to_agent tool.
The root_agent's tool is not a search tool, so at least one of the sub-agents must invoke a search tool. Explore the sub-agents found in the sub_agents directory to find the search tool being used (in this case a VertexAiSearchTool):
While a search tool cannot be combined with other non-search tools in an agent (even by using it in a sub-agent as seen here), ADK does provide a tool named
AgentToolthat can wrap an isolated agent that uses a search tool. Then that agent-as-tool can be used with other tools.Back in the root_agent's file adk_challenge_lab/paint_agent/agent.py, add an
AgentTool()to the root_agent's list of tools. Provide theAgentTool()the following arguments:agentshould be set to search_agent (the sub-agent that uses the search tool you uncovered above).skip_summarizationshould be set toFalsebecause you would like the agent to report on what the search tool has returned.
Remove that sub-agent from the
sub_agentslist.Save the file.
Note: Continue only after your data store has been created and your document indexed. You can monitor this status in the Agent Platform > Agents > Search > Data Stores > Cymbal Paint data store on the Documents tab.
In practice, you will get more reliable output if you give it a few additional minutes after the status shows "Ready" before querying your agent.
In the Cloud Shell Terminal, run the agent again with:
adk run paint_agentCopied!
You should now be able to chat with the agent and get information on Cymbal Shops paint.
Get the agent to tell you the prices of EcoGreens and Forever Paint.
When you are finished chatting with the agent via the command-line interface, type
exitto end the conversation.
Task 4. Save and utilize shared state
Your root_agent imports and uses a set_session_value tool from adk_challenge_lab/paint_agent/tools.py. The intention is to collect information like SELECTED_PAINT and COVERAGE_RATE from the user, store it in the session, and use it in the multi-turn chat. However, it is not fully implemented.
Update the set_session_value function in the file adk_challenge_lab/paint_agent/tools.py to store key-value pairs in the ToolContext's state dictionary.
Update the function's response to return a status message of
f"stored '{value}' in '{key}'".Open the agent.py file associated with the coverage_calculator_agent (sub-agent of the room_planner, which is a sub-agent of your root_agent).
Notice that its instructions are not correctly loading values from the state dictionary. Update the instruction to replace terms in
ALL CAPSto instead use ADK's key templating to load state values into instructions. Use the optional syntax (e.g., {SELECTED_PAINT?}) to ensure the agent doesn't crash if it is invoked before a state key is populated.Test your agent with:
adk web --allow_origins "regex:https://.*\.cloudshell\.dev"Select paint_agent.
You should now be able to have the following conversation with your agent:
You Agent Response hello[Offers to share information about Cymbal Shops' paints] yes[Shares information about paint products, i.e. Project Paint, EcoGreens, SureCoverage, Forever Paint.] I'd like to use EcoGreens[The State tab should show updated state values. Asks how many rooms and their names.] Just one room, my office[Asks you to select a color for your office.] Deep Ocean[Asks you for the room dimensions.] 3m by 4m. 3m high. 1 door, 2 windows.[Confirms how many coats.] Two coats.[Calculates you will need coverage of 74 sq meters.] Note: To ensure product images display correctly, please enable Third-party cookies for this domain in your browser settings and refresh the page.
When you are finished chatting with your agent, you can close the Dev UI browser tab.
Task 5. Deploy to Agent Runtime
In Cloud Shell Terminal, make sure you are in the adk_challenge_lab directory:
cd ~/adk\_challenge\_labDeploy your agent to Agent Runtime using the
adk deploy agent_enginecommand. You must include the agent directory as the final positional argument (e.g., . if you are currently in the directory). Use the following argument:Parameter Argument --display_name"Paint Agent"Note: The deployment command can take 5-10 minutes to complete.
As the agent deploys, grant the Agent Platform User and Discovery Engine User IAM roles to the
service-360971874236@gcp-sa-aiplatform-re.iam.gserviceaccount.comservice account.Note that when deployment is complete, the deployed agent's resource name is printed to the console
Task 6. Query the deployed agent
In the file adk_challenge_lab/chainlit_ui/app.py, find and update the following line with your deployed agent's resource name to load your remote agent:
agent = client.agent\_engines.get(name='YOUR\_AGENT\_RESOURCE\_NAME')Run the UI with the following:
cd ~/adk_challenge_lab/chainlit_ui
chainlit run app.py
Copied!
Expected output:
2025-08-25 12:30:00 - Your app is available at http://localhost:8000Click the link for http://localhost:8000 to open it in a new browser tab.
Have the following conversation with your deployed agent:
You Agent Response hello[Offers to share information about Cymbal Shops’ paints] yes[Shares information about paint products, i.e. Project Paint, EcoGreens, SureCoverage, Forever Paint ] I'd like to use Forever Paint[Asks how many rooms and their names] Two rooms. The living room and a baby's room.[Asks you to select a color for your living room and baby's room.] "Sunlight through a canvas tent" for the baby's room and "Coffee Cream" for the living room.[Asks you for the room dimensions] The living room is 5m by 4m. 2.5m high. 1 door, 3 windows.[Asks number of coats.] Two coats.[Requests dimensions for baby's room.] The baby's room is 3m by 3m. 2.5m high. 1 door, 1 window.[Provides a one-coat estimate and confirms the number of coats.] Always two coats.[Calculates you will need coverage of 77 sq meters for the living room and 53 sq meters for the baby's room.] If you'd like to start a new conversation with your agent, you can click the icon in the upper left to Create a New Chat.
Solution of Lab
Quick
Task 1:
Go to Agent Platform → Agents → Search and create the following values exactly:
| Field | Value |
|---|---|
| App type | Custom search (general) |
| App name | Paint Search |
| Company name | Cymbal Shops |
| Location | global |
| Pricing Model | General |
| Data source | Cloud Storage |
| Data type | Documents |
| Folder or File | File |
| File | <PROJECT_ID>-bucket/Cymbal_Shops_Paint_Datasheets.pdf |
| Data store name | Cymbal Paint |
| Document parser | Layout Parser |
| Enable table annotation | Enabled |
| Include ancestor headings in chunks | Enabled |
| Data store Pricing Model | General |


Task 2 ->Task 6:
curl -LO raw.githubusercontent.com/ePlus-DEV/storage/refs/heads/main/labs/GENAI129/lab.sh
source lab.sh