Overview
Compute Engine lets you create and run virtual machines on Google infrastructure. There is a catalog of public application images available, including a variety of Microsoft SQL Server and Windows versions.
In this lab, you will learn how to create a virtual machine with Microsoft SQL Server installed. You'll create a Windows user and password, and learn how to connect to the Windows Server via remote desktop.
What you'll learn
How to stand up a virtual machine running Microsoft SQL Server on Compute Engine.
How to create a Windows user and password.
How to remote desktop into a Windows Server virtual machine.
Prerequisites
Basic familiarity with Microsoft SQL Server and RDP Connections
Either a Windows machine or a non-Windows machine with Chrome. Other RDP Clients should suffice but instructions for their use are not provided in this lab.
Task 1. Deploy Microsoft SQL Server
Create a new Compute Engine virtual machine instance running Microsoft SQL Server from the Cloud Console.
- In Cloud Console, click the Menu icon for Navigation menu in the top left of the screen:
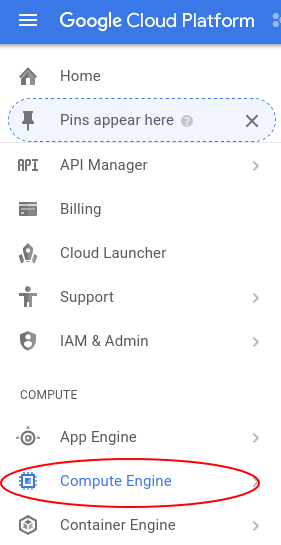
- Then click Compute Engine:
- Then, click CREATE INSTANCE.
Next, name the new instance
sqlserver-lab.Choose a zone as
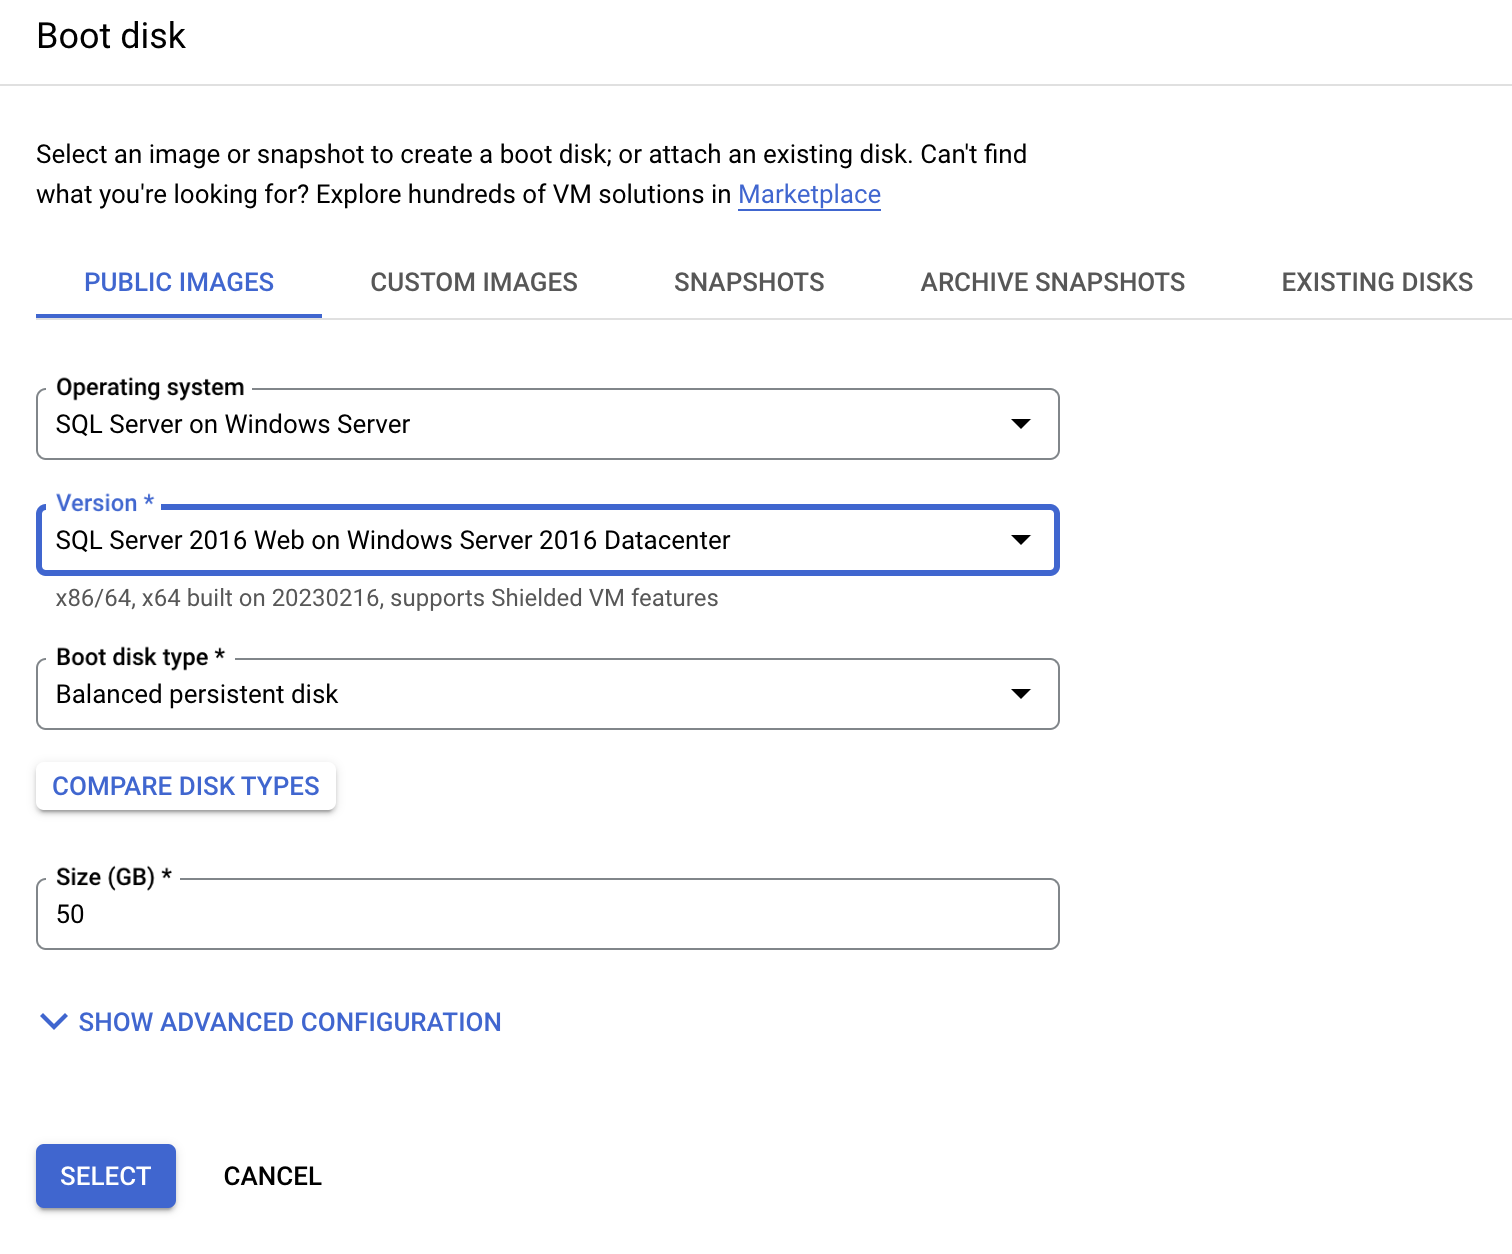
ZONE.Click Change to change the boot disk.
Remain in the Public images tab:
For the operating system, select SQL Server on Windows Server. For the version, select SQL Server 2016 Web on Windows Server 2016 Datacenter.
At the bottom of the window, click Select.
Click Create.
Note: You will see a warning about being billed for this instance. You will not be billed for these resources because you are using credentials provided to run this lab. It's good to keep in mind that any instances you create in your personal or work accounts will be billed to you.
This will take you to a new page where you can see the new instance being created. A checked green circle appears when the instance is ready.
You will be able to remote desktop (RDP) into the machine from this page after you create a Windows user and password.
Click Check my progress to verify the objective.
Deploy Microsoft SQL Server
Check my progress
Task 2. Create a Windows user and password
To RDP into the Windows instance, you must create a Windows user and password.
To create them, click the name of your instance, sqlserver-lab, to see the instance details.
Then, select Set Windows password.
This will open a new window where you create a user.
- Copy and save the default username for later use and select Set.
After a few seconds, you should have a New Windows password dialog with the newly created password.
- Click the rectangles alongside the password to copy the password.
Copy and paste with the RDP client
Once you are securely logged into your instance, you may find yourself copying and pasting commands from the lab manual.
To paste, hold the CTRL-V keys (if you are a Mac user, using CMND-V will not work.) If you are in a Powershell window, be sure that you have clicked into the window or else the paste shortcut won't work.
If you are pasting into putty, right click.
Click Check my progress to verify the objective.
Create a Windows user and password
Check my progress
Task 3. Remote desktop (RDP) into the Windows Server
It's time to RDP into the Windows Server. There are two different ways to do this, depending on whether or not you are on Windows. Let's go through them both.
Not running Windows
If you are not on Windows but are using Chrome, open Spark View extension page in normal window.
Click on Add to Chrome. Then, click Launch app button.
It opens up a login page, add your VM instance's External IP in Computer field.
Then enter your Windows user name and password and click Connect.
Running Windows
If you are on a Windows machine, download the RDP file by selecting it from the RDP dropdown menu.
Double click the RDP file and log in using the Windows user and password.
Task 4. Run Microsoft SQL Server Management Studio
Inside your remote desktop window, click the Start menu, and type Microsoft SQL.
Then right click Microsoft SQL Server Management Studio and
Run as administrator.
Note: If you are on a Mac trackpad, try placing two fingers on the trackpad and clicking with your thumb in order to emulate a right-click.
Note: If you do not run SQL Server Management Studio as administrator the connection will not work.
Microsoft SQL Server Management Studio launches, showing you a Connect to Server window.
Click Connect.
Then, use the Object Explorer window to examine your new database.
Solution of Lab
New solution
curl -LO raw.githubusercontent.com/Techcps/Google-Cloud-Skills-Boost/master/Deploy%20Microsoft%20SQL%20Server%20to%20Compute%20Engine/techcps031.sh
sudo chmod +x techcps031.sh
./techcps031.sh
Old solution
export ZONE=

curl -LO raw.githubusercontent.com/quiccklabs/Labs_solutions/master/Deploy%20Microsoft%20SQL%20Server%20to%20Compute%20Engine/quicklabgsp031.sh
sudo chmod +x quicklabgsp031.sh
./quicklabgsp031.sh


