Deploy, Scale, and Update Your Website on Google Kubernetes Engine - GSP663

A passionate full-stack developer from @ePlus.DEV
Overview
Running websites and applications is hard. Things go wrong when they shouldn't, servers crash, increase in demand causes more resources to be utilized, and making changes without downtime is complicated and stressful. With Kubernetes, you can do all this and even automate it!
In this lab you will assume the role of a developer at a fictional company, Fancy Store, running an ecommerce website. Due to problems with scaling and outages, you are tasked with deploying your application onto the Google Kubernetes Engine (GKE).
The exercises in this lab are ordered to reflect a common cloud developer experience:
Create a GKE cluster
Create a Docker container
Deploy the container to GKE
Expose the container via a service
Scale the container to multiple replicas
Modify the website
Rollout a new version with zero downtime
Architecture diagram
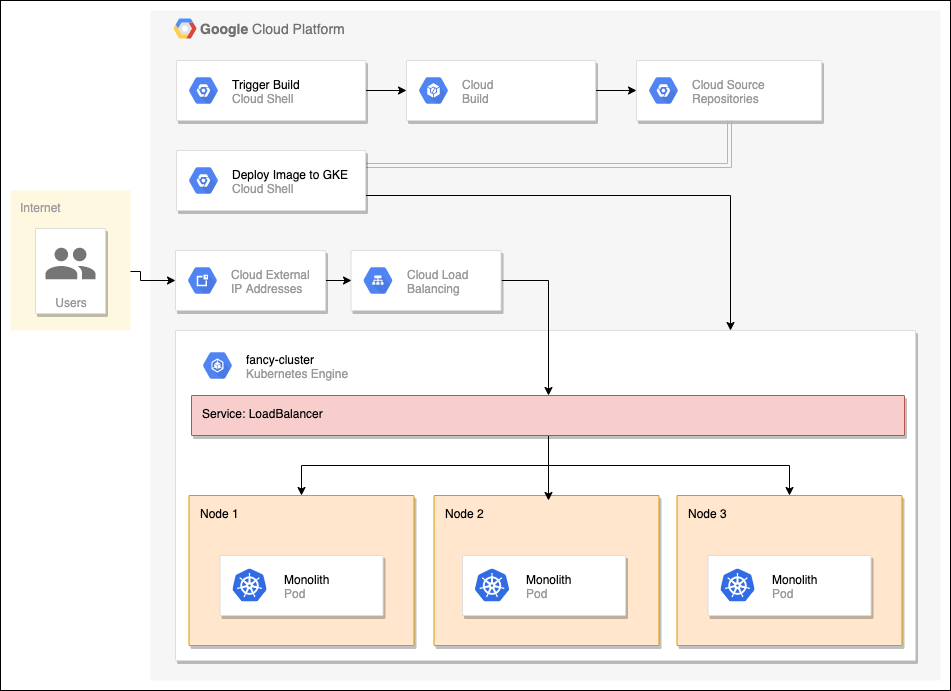
Prerequisites
- A basic understanding of Docker and Kubernetes is recommended to maximize your understanding.
Setup and requirements
Before you click the Start Lab button
Read these instructions. Labs are timed and you cannot pause them. The timer, which starts when you click Start Lab, shows how long Google Cloud resources are made available to you.
This hands-on lab lets you do the lab activities in a real cloud environment, not in a simulation or demo environment. It does so by giving you new, temporary credentials you use to sign in and access Google Cloud for the duration of the lab.
To complete this lab, you need:
- Access to a standard internet browser (Chrome browser recommended).
Note: Use an Incognito (recommended) or private browser window to run this lab. This prevents conflicts between your personal account and the student account, which may cause extra charges incurred to your personal account.
- Time to complete the lab—remember, once you start, you cannot pause a lab.
Note: Use only the student account for this lab. If you use a different Google Cloud account, you may incur charges to that account.
How to start your lab and sign in to the Google Cloud console
Click the Start Lab button. If you need to pay for the lab, a dialog opens for you to select your payment method. On the left is the Lab Details pane with the following:
The Open Google Cloud console button
Time remaining
The temporary credentials that you must use for this lab
Other information, if needed, to step through this lab
Click Open Google Cloud console (or right-click and select Open Link in Incognito Window if you are running the Chrome browser).
The lab spins up resources, and then opens another tab that shows the Sign in page.
Tip: Arrange the tabs in separate windows, side-by-side.
Note: If you see the Choose an account dialog, click Use Another Account.
If necessary, copy the Username below and paste it into the Sign in dialog.
student-04-305d46b98073@qwiklabs.netCopied!
You can also find the Username in the Lab Details pane.
Click Next.
Copy the Password below and paste it into the Welcome dialog.
fEgzMuaHYEW7Copied!
You can also find the Password in the Lab Details pane.
Click Next.
Important: You must use the credentials the lab provides you. Do not use your Google Cloud account credentials.
Note: Using your own Google Cloud account for this lab may incur extra charges.
Click through the subsequent pages:
Accept the terms and conditions.
Do not add recovery options or two-factor authentication (because this is a temporary account).
Do not sign up for free trials.
After a few moments, the Google Cloud console opens in this tab.
Note: To access Google Cloud products and services, click the Navigation menu or type the service or product name in the Search field.

Activate Cloud Shell
Cloud Shell is a virtual machine that is loaded with development tools. It offers a persistent 5GB home directory and runs on the Google Cloud. Cloud Shell provides command-line access to your Google Cloud resources.
Click Activate Cloud Shell
at the top of the Google Cloud console.
Click through the following windows:
Continue through the Cloud Shell information window.
Authorize Cloud Shell to use your credentials to make Google Cloud API calls.
When you are connected, you are already authenticated, and the project is set to your Project_ID,qwiklabs-gcp-02-6b5f22eaf567. The output contains a line that declares the Project_ID for this session:Your Cloud Platform project in this session is set to qwiklabs-gcp-02-6b5f22eaf567gcloudis the command-line tool for Google Cloud. It comes pre-installed on Cloud Shell and supports tab-completion.
(Optional) You can list the active account name with this command:

gcloud auth list
- Click Authorize.
Output:
ACTIVE: *
ACCOUNT: student-04-305d46b98073@qwiklabs.net

To set the active account, run:
    $ gcloud config set account `ACCOUNT`
- (Optional) You can list the project ID with this command:
gcloud config list project
Output:
[core]
project = qwiklabs-gcp-02-6b5f22eaf567
Note: For full documentation of gcloud, in Google Cloud, refer to the gcloud CLI overview guide.
Set the zone
- Set the default zone and project configuration:
gcloud config set compute/zone us-central1-a
Copied!
Learn more in the Regions & Zones documentation.
Task 1. Create a GKE cluster
ou need a Kubernetes cluster to deploy your website to. First, make sure the proper APIs are enabled.
- Run the following to create a GKE cluster named
fancy-clusterwith 3 nodes:
gcloud container clusters create fancy-cluster --num-nodes 3
Copied!
Note: If you get an error about region/zone not being specified, please see the environment setup section to make sure you set the default compute zone.
It will take a few minutes for the cluster to be created.
- Now run the following command and see the cluster's three worker VM instances:
gcloud compute instances list
Copied!
Output:
NAME: gke-fancy-cluster-default-pool-fb932da6-4sk6
ZONE: us-central1-f
MACHINE_TYPE: e2-medium
PREEMPTIBLE:
INTERNAL_IP: 10.128.0.3
EXTERNAL_IP: 34.172.106.173
STATUS: RUNNING

NAME: gke-fancy-cluster-default-pool-fb932da6-d6qc
ZONE: us-central1-f
MACHINE_TYPE: e2-medium
PREEMPTIBLE:
INTERNAL_IP: 10.128.0.4
EXTERNAL_IP: 34.133.99.176
STATUS: RUNNING

NAME: gke-fancy-cluster-default-pool-fb932da6-ztnh
ZONE: us-central1-f
MACHINE_TYPE: e2-medium
PREEMPTIBLE:
INTERNAL_IP: 10.128.0.5
EXTERNAL_IP: 34.136.180.45
STATUS: RUNNING
Find your Kubernetes cluster and related information in the console.
Click the Navigation menu (
) > Kubernetes Engine > Clusters.

You should see your cluster named fancy-cluster.
Click Check my progress to verify the objective.
Create a GKE cluster
Task 2. Clone source repository
Since this is an existing website, you just need to clone the source, so you can focus on creating Docker images and deploying to GKE.
- Run the following commands to clone the git repo to your Cloud Shell instance:
cd ~
Copied!
git clone https://github.com/googlecodelabs/monolith-to-microservices.git
Copied!
Change to the appropriate directory.
You will also install the NodeJS dependencies so you can test your application before deploying:
cd ~/monolith-to-microservices
Copied!
./setup.sh
Copied!
Wait a few minutes for this script to finish running.
- Ensure you are running Cloud Shell with the latest version of
npm:
nvm install --lts
Copied!
- Change to the appropriate directory and test the application by running the following command to start the web server:
cd ~/monolith-to-microservices/monolith
Copied!
npm start
Copied!
Output:
Monolith listening on port 8080!
- You can preview your application by clicking the web preview icon and selecting Preview on port 8080:
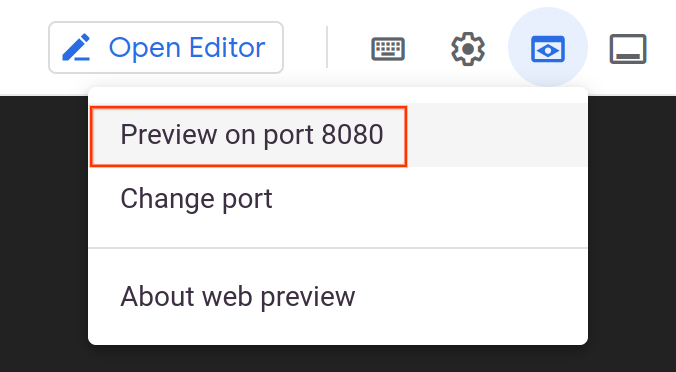
This opens a new window where you can see our Fancy Store in action!

Leave this tab open, you'll return to it later in the lab.
- To stop the web server process, press CTRL+C in Cloud Shell.
Task 3. Create Docker container with Cloud Build
Now that you have your source files ready to go, it is time to Dockerize your application!
Normally you would have to take a two step approach that entails building a docker container and pushing it to a registry to store the image for GKE to pull from. Cloud Build let's you build the Docker container and put the image in Artifact Registry with a single command!
Google Cloud Build will compress the files from the directory and move them to a Google Cloud Storage bucket. The build process will then take all the files from the bucket and use the Dockerfile to run the Docker build process. Since you specified the --tag flag with the host as gcr.io for the Docker image, the resulting Docker image will be pushed to the Artifact Registry.
- First, to make sure you have the Cloud Build API enable, run the following command:
gcloud services enable cloudbuild.googleapis.com
- Run the following to start the build process:
cd ~/monolith-to-microservices/monolith
gcloud builds submit --tag gcr.io/${GOOGLE_CLOUD_PROJECT}/monolith:1.0.0 .
- This process will take a few minutes. There will be output in the terminal similar to the following:
ID CREATE_TIME DURATION SOURCE IMAGES STATUS
1ae295d9-63cb-482c-959b-bc52e9644d53 2019-08-29T01:56:35+00:00 33S gs://<project_id>_cloudbuild/source/1567043793.94-abfd382011724422bf49af1558b894aa.tgz gcr.io/<project_id>/monolith:1.0.0 SUCCESS
</project_id></project_id>
To view your build history or watch the process in real time by clicking the Navigation menu and scrolling down to CI/CD section, then click Cloud Build > History. Here you can see a list of all your previous builds.
Click on the build name to see all the details for that build including the log output.
Optional: From the Build details page, click on the Build summary > Execution details > Image name in the build information section to see the container image:
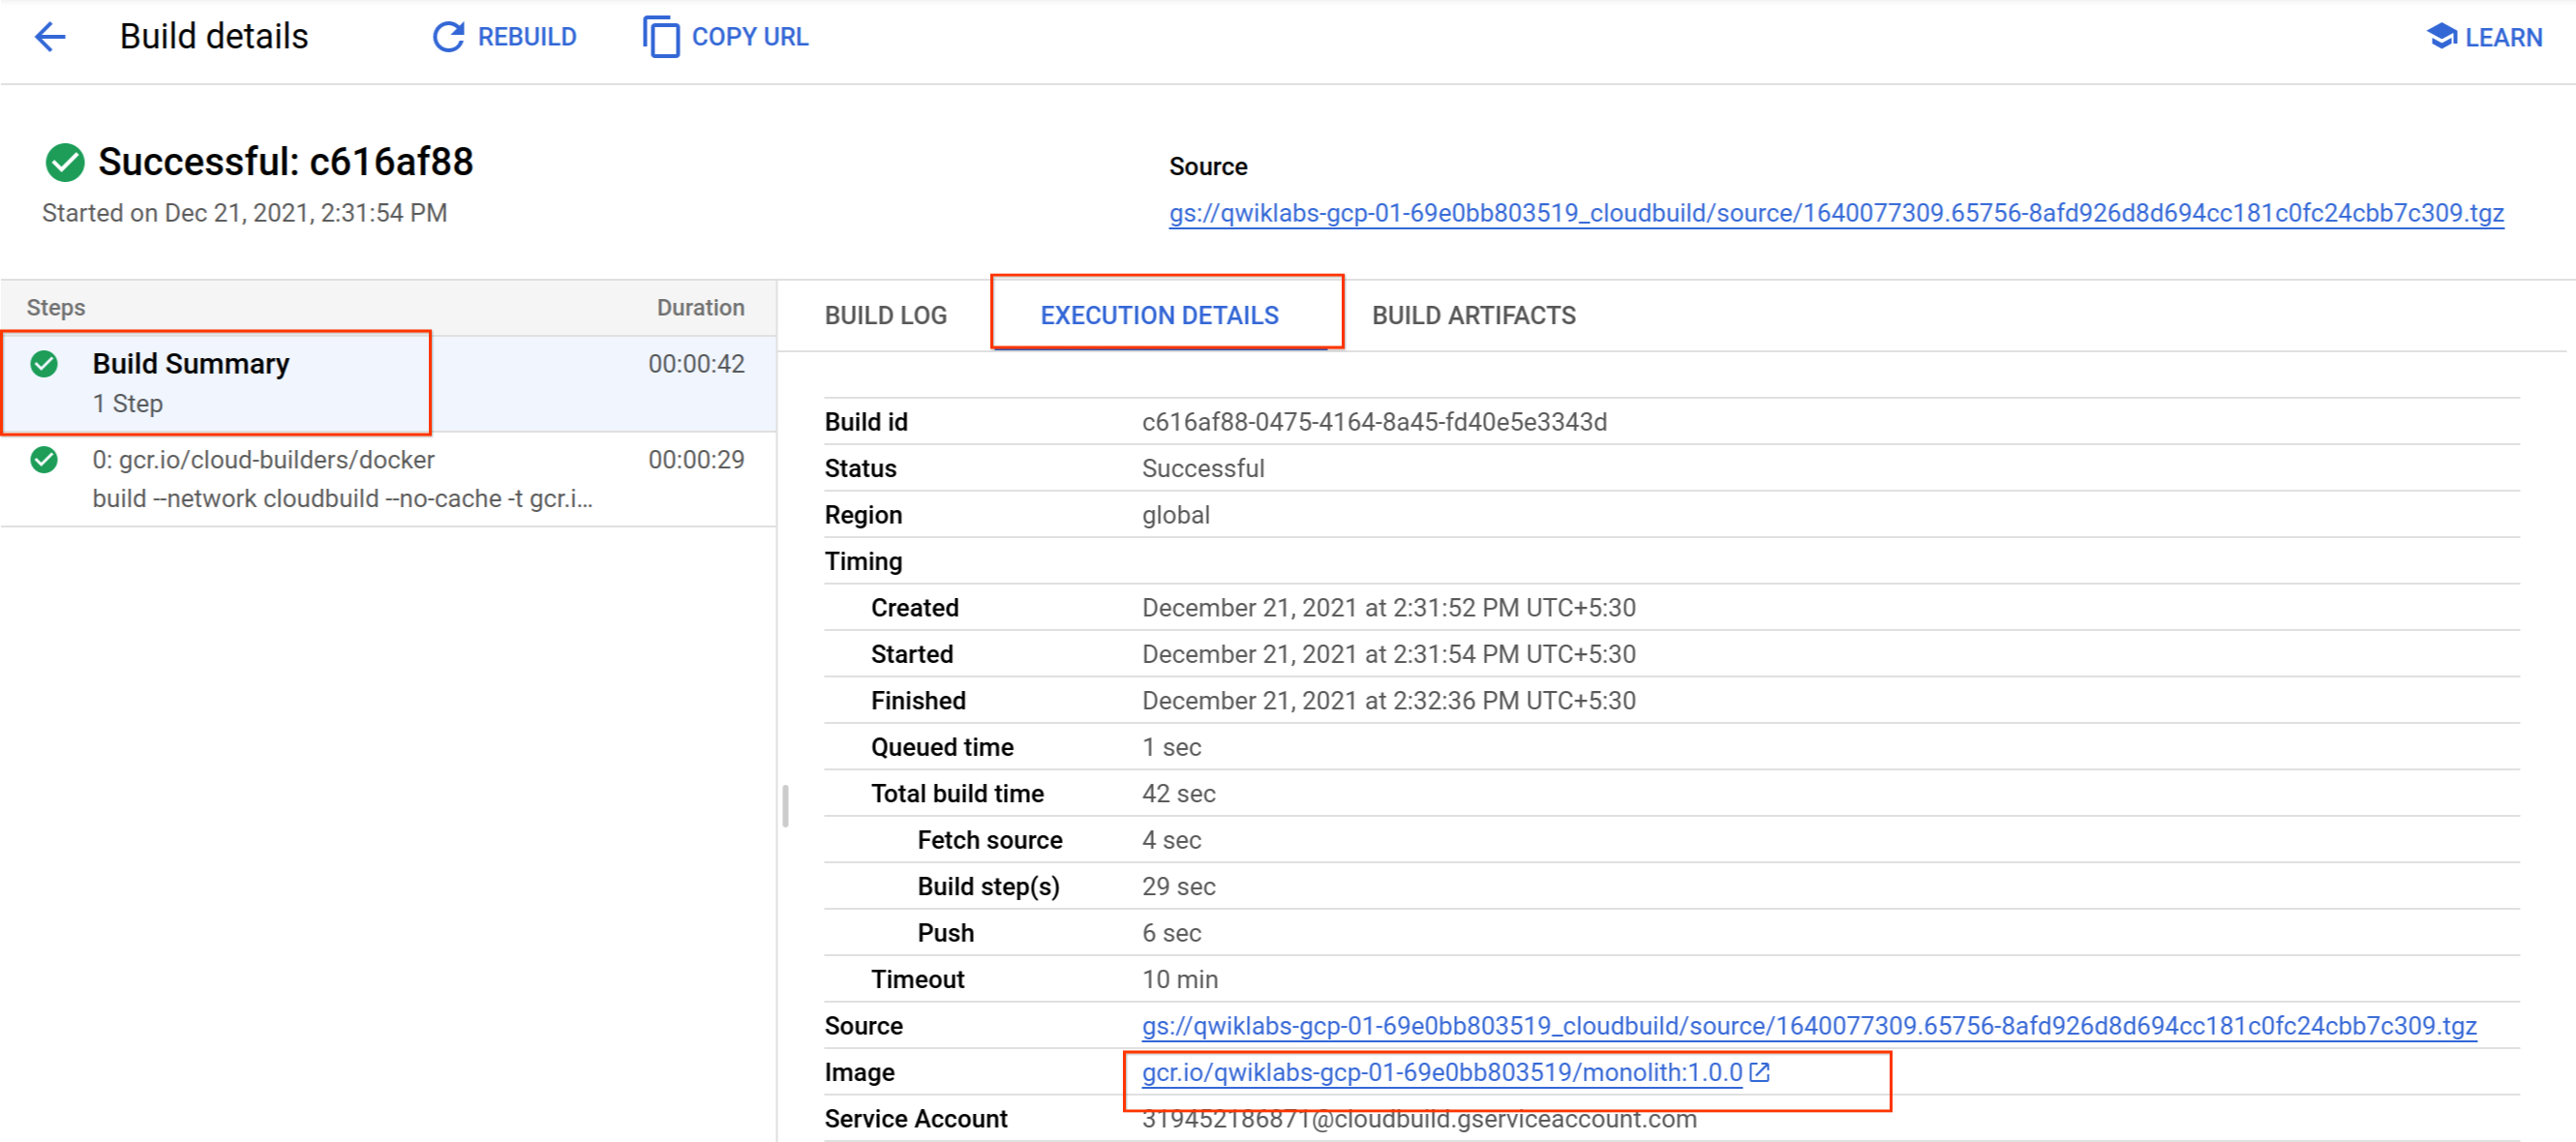
Click Check my progress to verify the objective.
Create Docker container with Cloud Build
Task 4. Deploy container to GKE
Now that you have containerized your website and pushed your container to Artifact Registry, it is time to deploy to Kubernetes!
To deploy and manage applications on a GKE cluster, you must communicate with the Kubernetes cluster management system. You typically do this by using the kubectl command-line tool.
Kubernetes represents applications as Pods, which are units that represent a container (or group of tightly-coupled containers). The Pod is the smallest deployable unit in Kubernetes. In this lab, each Pod contains only your monolith container.
To deploy your application, create a Deployment resource. The Deployment manages multiple copies of your application, called replicas, and schedules them to run on the individual nodes in your cluster. For this lab the Deployment will be running only one Pod of your application. Deployments ensure this by creating a ReplicaSet. The ReplicaSet is responsible for making sure the number of replicas specified are always running.
The kubectl create deployment command you'll use next causes Kubernetes to create a Deployment named monolith on your cluster with 1 replica.
- Run the following command to deploy your application:
kubectl create deployment monolith --image=gcr.io/${GOOGLE_CLOUD_PROJECT}/monolith:1.0.0
Copied!
Note: As a best practice, using YAML file and a source control system such as GitHub is recommended to store those changes. Learn more about these resources from the Deployments documentation.
Click Check my progress to verify the objective.
Deploy container to GKE
Verify deployment
- Verify the Deployment was created successfully:
kubectl get all
Output:
NAME                            READY   STATUS    RESTARTS   AGE
pod/monolith-7d8bc7bf68-htm7z   1/1     Running   0          6m21s

NAME TYPE CLUSTER-IP EXTERNAL-IP PORT(S) AGE
service/kubernetes ClusterIP 10.27.240.1 <none> 443/TCP 24h

NAME DESIRED CURRENT UP-TO-DATE AVAILABLE AGE
deployment.apps/monolith 1 1 1 1 20m

NAME DESIRED CURRENT READY AGE
replicaset.apps/monolith-7d8bc7bf68 1 1 1 20m
</none>
This output shows you several things:
The Deployment, which is current
The ReplicaSet with desired pod count of 1
The Pod, which is running
Looks like everything was created successfully!
Note: You can also view your Kubernetes deployments via the Console by opening the Navigation menu > Kubernetes Engine > Workloads.
Note: If you are seeing errors or statuses you do not expect, you can debug your resources with the following commands to see detailed information about them:
kubectl describe pod monolith
kubectl describe pod/monolith-7d8bc7bf68-2bxts
kubectl describe deployment monolith
kubectl describe deployment.apps/monolith
At the very end of the output, you will see a list of events that give errors and detailed information about your resources.
Optional: You can run commands to your deployments separately as well:
# Show pods
kubectl get pods

# Show deployments
kubectl get deployments

# Show replica sets
kubectl get rs

#You can also combine them
kubectl get pods,deployments
To see the full benefit of Kubernetes, simulate a server crash by deleting a pod and see what happens!
- Copy a pod name from the previous command, then use it when you run the following command to delete it:
kubectl delete pod/<POD_NAME>
You can watch the deletion from the Workloads page.
Click on the workload name (it will happen quickly).
If you are fast enough, you can run get all again, and you should see two pods: one terminating and the other creating or running:
kubectl get all
Output:
NAME                            READY   STATUS        RESTARTS   AGE
pod/monolith-7d8bc7bf68-2bxts   1/1     Running       0          4s
pod/monolith-7d8bc7bf68-htm7z   1/1     Terminating   0          9m35s

NAME TYPE CLUSTER-IP EXTERNAL-IP PORT(S) AGE
service/kubernetes ClusterIP 10.27.240.1 <none> 443/TCP 24h

NAME DESIRED CURRENT UP-TO-DATE AVAILABLE AGE
deployment.apps/monolith 1 1 1 1 24m

NAME DESIRED CURRENT READY AGE
replicaset.apps/monolith-7d8bc7bf68 1 1 1 24m
</none>
Why did this happen? The ReplicaSet saw that the pod was terminating and triggered a new pod to keep up the desired replica count. Later on you will see how to scale out to ensure there are several instances running, so if one goes down users won't see any downtime!
Task 5. Expose GKE deployment
You have deployed your application on GKE, but there isn't a way to access it outside of the cluster. By default, the containers you run on GKE are not accessible from the Internet because they do not have external IP addresses. You must explicitly expose your application to traffic from the Internet via a Service resource. A Service provides networking and IP support to your application's Pods. GKE creates an external IP and a Load Balancer for your application.
- Run the following command to expose your website to the Internet:
kubectl expose deployment monolith --type=LoadBalancer --port 80 --target-port 8080
Accessing the service
GKE assigns the external IP address to the Service resource, not the Deployment.
- If you want to find out the external IP that GKE provisioned for your application, you can inspect the Service with the
kubectl get servicecommand:
kubectl get service
Output:
NAME         CLUSTER-IP      EXTERNAL-IP     PORT(S)          AGE
monolith     10.3.251.122    203.0.113.0     80:30877/TCP     3d
Re-run the command until your service has an external IP address.
- Once you've determined the external IP address for your application, copy the IP address, then point your browser the URL (such as "http://203.0.113.0") to check if your application is accessible.
You should see the same website you tested earlier. You now have your website fully running on Kubernetes!
Task 6. Scale GKE deployment
Now that your application is running in GKE and is exposed to the internet, imagine your website has become extremely popular! You need a way to scale your application to multiple instances so it can handle all this traffic. Next you will learn how to scale the application up to 3 replicas.
- In Cloud Shell, run the following command to scale you deployment up to 3 replicas:
kubectl scale deployment monolith --replicas=3
- Verify the Deployment was scaled successfully:
kubectl get all
Output:
NAME                            READY   STATUS    RESTARTS   AGE
pod/monolith-7d8bc7bf68-2bxts   1/1     Running   0          36m
pod/monolith-7d8bc7bf68-7ds7q   1/1     Running   0          45s
pod/monolith-7d8bc7bf68-c5kxk   1/1     Running   0          45s

NAME TYPE CLUSTER-IP EXTERNAL-IP PORT(S) AGE
service/kubernetes ClusterIP 10.27.240.1 <none> 443/TCP 25h
service/monolith LoadBalancer 10.27.253.64 XX.XX.XX.XX 80:32050/TCP 6m7s

NAME DESIRED CURRENT UP-TO-DATE AVAILABLE AGE
deployment.apps/monolith 3 3 3 3 61m

NAME DESIRED CURRENT READY AGE
replicaset.apps/monolith-7d8bc7bf68 3 3 3 61m
</none>
You should now see 3 instances of your pod running. Notice that your deployment and replica set now have a desired count of 3.
Click Check my progress to verify the objective.
Scale GKE deployment
Task 7. Make changes to the website
Scenario: Your marketing team has asked you to change the homepage for your site. They think it should be more informative of who your company is and what you actually sell.
Task: You will add some text to the homepage to make the marketing team happy! It looks like one of the developers has already created the changes with the file name index.js.new. You can just copy this file to index.js and the changes should be reflected. Follow the instructions below to make the appropriate changes.
- Run the following commands copy the updated file to the correct file name:
cd ~/monolith-to-microservices/react-app/src/pages/Home
mv index.js.new index.js
- Print its contents to verify the changes:
cat ~/monolith-to-microservices/react-app/src/pages/Home/index.js
The resulting code should look like this:
/*
Copyright 2019 Google LLC
Licensed under the Apache License, Version 2.0 (the "License");
you may not use this file except in compliance with the License.
You may obtain a copy of the License at
https://www.apache.org/licenses/LICENSE-2.0
Unless required by applicable law or agreed to in writing, software
distributed under the License is distributed on an "AS IS" BASIS,
WITHOUT WARRANTIES OR CONDITIONS OF ANY KIND, either express or implied.
See the License for the specific language governing permissions and
limitations under the License.
\*/
import React from "react";
import { makeStyles } from "@material-ui/core/styles";
import Paper from "@material-ui/core/Paper";
import Typography from "@material-ui/core/Typography";
const useStyles = makeStyles(theme => ({
root: {
flexGrow: 1
},
paper: {
width: "800px",
margin: "0 auto",
padding: theme.spacing(3, 2)
}
}));
export default function Home() {
const classes = useStyles();
return (
<div classname="{classes.root}">
<paper classname="{classes.paper}">
<typography variant="h5">
Fancy Fashion & Style Online
</typography>
<br>
<typography variant="body1">
Tired of mainstream fashion ideas, popular trends and societal norms?
This line of lifestyle products will help you catch up with the Fancy trend and express your personal style.
Start shopping Fancy items now!
</typography>
</paper>
</div>
);
}
The React components were updated, but the React app needs to be built to generate the static files.
- Run the following command to build the React app and copy it into the monolith public directory:
cd ~/monolith-to-microservices/react-app
npm run build:monolith
Now that the code is updated, you need to rebuild the Docker container and publish it to the Artifact Registry. Use the same command as earlier, except this time update the version label.
- Run the following command to trigger a new cloud build with an updated image version of 2.0.0:
cd ~/monolith-to-microservices/monolith
gcloud builds submit --tag gcr.io/${GOOGLE_CLOUD_PROJECT}/monolith:2.0.0 .
In the next section you will use this image to update your application with zero downtime.
Task 8. Update website with zero downtime
The changes are completed and the marketing team is happy with your updates! It is time to update the website without interruption to the users.
GKE's rolling update mechanism ensures that your application remains up and available even as the system replaces instances of your old container image with your new one across all the running replicas.
- Tell Kubernetes that you want to update the image for your deployment to a new version with the following command:
kubectl set image deployment/monolith monolith=gcr.io/${GOOGLE_CLOUD_PROJECT}/monolith:2.0.0
Copied!
Verify deployment
- You can validate your deployment update by running the following command:
kubectl get pods
Copied!
Output:
NAME                        READY   STATUS              RESTARTS   AGE
monolith-584fbc994b-4hj68   1/1     Terminating         0          60m
monolith-584fbc994b-fpwdw   1/1     Running             0          60m
monolith-584fbc994b-xsk8s   1/1     Terminating         0          60m
monolith-75f4cf58d5-24cq8   1/1     Running             0          3s
monolith-75f4cf58d5-rfj8r   1/1     Running             0          5s
monolith-75f4cf58d5-xm44v   0/1     ContainerCreating   0          1s
Here you will see 3 new pods being created and your old pods getting shut down. You can tell by the age which are new and which are old. Eventually, you will only see 3 pods again which will be your 3 updated pods.
- Test the application by running the following command to start the web server:
npm start
Copied!
- To verify our changes, return to the app web page tab and refresh the page. Notice that your application has been updated.
Your website should now be displaying the text you just added to the homepage component!
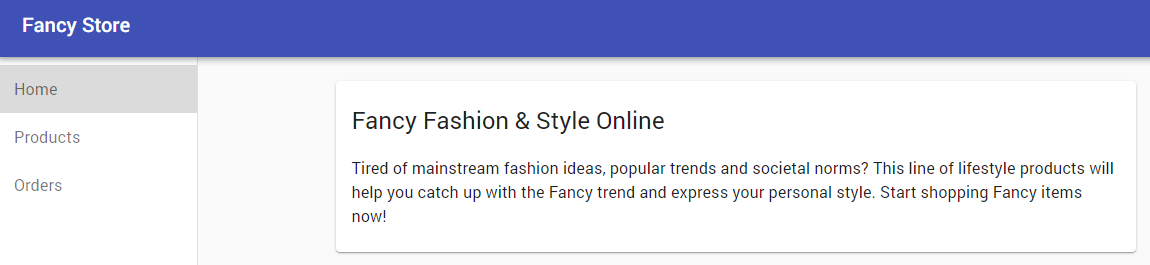
- To stop the web server process, press
CTRL+Cin Cloud Shell.
Task 9. Cleanup
Although all resources will be deleted when you complete this lab, in your own environment it's a good idea to remove resources you no longer need.
- Delete git repository:
cd ~
rm -rf monolith-to-microservices
- Delete Artifact Registry images:
# Delete the container image for version 1.0.0 of the monolith
gcloud container images delete gcr.io/${GOOGLE_CLOUD_PROJECT}/monolith:1.0.0 --quiet

# Delete the container image for version 2.0.0 of the monolith
gcloud container images delete gcr.io/${GOOGLE_CLOUD_PROJECT}/monolith:2.0.0 --quiet
- Delete Google Cloud Build artifacts from Google Cloud Storage:
# The following command will take all source archives from all builds and delete them from cloud storage

# Run this command to print all sources:
# gcloud builds list | awk 'NR > 1 {print $4}'

gcloud builds list | grep 'SOURCE' | cut -d ' ' -f2 | while read line; do gsutil rm $line; done
- Delete GKE Service:
kubectl delete service monolith
kubectl delete deployment monolith
- Delete GKE Cluster:
gcloud container clusters delete fancy-cluster us-central1
- Type
Yto confirm this action. This command may take a little while.
Solution of Lab
https://www.youtube.com/watch?v=ZN80_p7sOwI
curl -LO raw.githubusercontent.com/ePlus-DEV/storage/refs/heads/main/labs/GSP663/lab.sh
source lab.sh
Script Alternative
curl -LO https://raw.githubusercontent.com/Itsabhishek7py/GoogleCloudSkillsboost/refs/heads/main/Deploy%2C%20Scale%2C%20and%20Update%20Your%20Website%20on%20Google%20Kubernetes%20Engine/abhishek.sh
sudo chmod +x abhishek.sh
./abhishek.sh