
Develop Serverless Applications on Cloud Run: Challenge Lab - GSP328
A passionate full-stack developer from @ePlus.DEV
Overview
In a challenge lab you’re given a scenario and a set of tasks. Instead of following step-by-step instructions, you will use the skills learned from the labs in the course to figure out how to complete the tasks on your own! An automated scoring system (shown on this page) will provide feedback on whether you have completed your tasks correctly.
When you take a challenge lab, you will not be taught new Google Cloud concepts. You are expected to extend your learned skills, like changing default values and reading and researching error messages to fix your own mistakes.
To score 100% you must successfully complete all tasks within the time period!
This lab is recommended for students who have enrolled in the Develop Serverless Applications on Cloud Run course. Are you ready for the challenge?
Setup
Before you click the Start Lab button
Read these instructions. Labs are timed and you cannot pause them. The timer, which starts when you click Start Lab, shows how long Google Cloud resources will be made available to you.
This hands-on lab lets you do the lab activities yourself in a real cloud environment, not in a simulation or demo environment. It does so by giving you new, temporary credentials that you use to sign in and access Google Cloud for the duration of the lab.
To complete this lab, you need:
- Access to a standard internet browser (Chrome browser recommended).
Note: Use an Incognito or private browser window to run this lab. This prevents any conflicts between your personal account and the Student account, which may cause extra charges incurred to your personal account.
- Time to complete the lab---remember, once you start, you cannot pause a lab.
Note: If you already have your own personal Google Cloud account or project, do not use it for this lab to avoid extra charges to your account.
Challenge scenario
Pet Theory, a veterinary practice, is eager to adopt serverless architecture for modernizing their current systems.
In this challenge lab, as a member of the development team, your assignment is to transition a specific service to a serverless framework. It's crucial to follow the detailed instructions given to accomplish this task successfully.
Architecture overview
For this project, Pet Theory has selected their current monolithic Billing application to undergo transformation into a serverless model.
Throughout this lab, your responsibility is to execute this architectural upgrade, ensuring a seamless transition to the serverless design.

The development team will provide either the code or an image to be deployed as part of the solution.
Developing a minimal viable product (MVP)
You will build a prototype solution for Pet Theory that meets the following high level requirement specification:
| Ref | Definition of Done |
| 1 | Deploy Staging Architecture |
| 2 | Deploy Prod Architecture |
| 3 | Secure Access between components in the Prod Architecture |
Provision the lab environment
During the lab, ensure the environment is provisioned to support the deployment of the resources.
Open a Cloud Shell in an Incognito Browser Window.
Set the default project for the environment:
gcloud config set project \
$(gcloud projects list --format='value(PROJECT_ID)' \
--filter='qwiklabs-gcp')
- Set the region for the run deployments:
gcloud config set run/region us-west1
- Set the Cloud Run platform type:
gcloud config set run/platform managed
- Clone the repo with the Pet Theory code:
git clone https://github.com/rosera/pet-theory.git && cd pet-theory/lab07
Note: You have been given access to the development repository. Note the location and use the assets to build to the stated requirement.
Task 1. Enable a public service
Overview
- Set up a Rest API for the billing service. Use the information in the table below:
| FIELD | VALUE |
| Billing Image | billing-staging-api:0.1 |
| Billing Service | public-billing-service-461 |
| Authentication | unauthenticated |
| Code | pet-theory/lab07/unit-api-billing |
Architecture
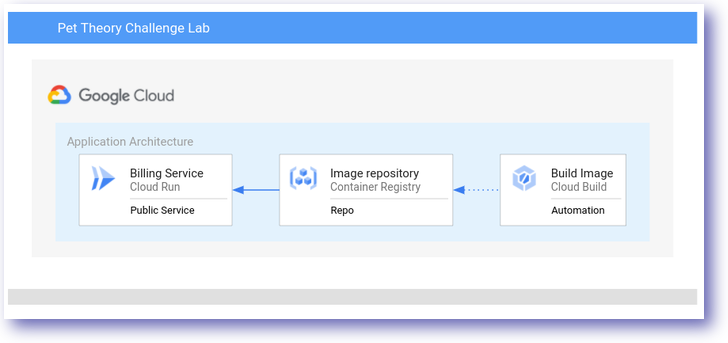
- Using the available code, deploy the Billing Service.
Assessment
To complete this task successfully, you are required to implement the following:
Build an image using Cloud Build.
Deploy a Cloud Run service as an unauthenticated service.
Test service responds when the endpoint is accessed.
Note: Activity Tracking can take some time to register. Wait 30 seconds before retrying.
Click Check my progress to verify that you've performed the above task.
Deploy a Public Billing Service
Check my progress
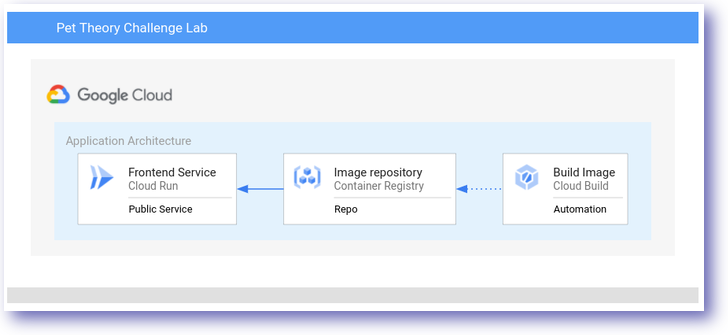
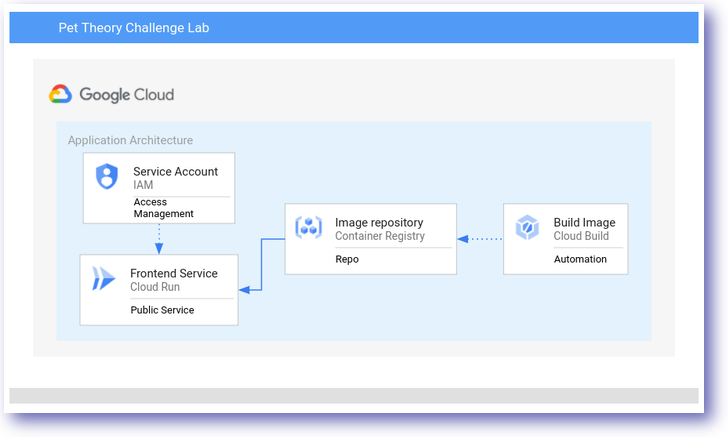
Task 2. Deploy a frontend service
Overview
- Set up a Frontend Service. Use the information in the table below:
| FIELD | VALUE |
| Image Name | frontend-staging:0.1 |
| Service Name | frontend-staging-service-105 |
| Authentication | unauthenticated |
| Code | pet-theory/lab07/staging-frontend-billing |
Architecture
Assessment
To complete this section successfully, you are required to implement the following tasks:
Build an image using Cloud Build.
Deploy the image to Cloud Run as an unauthenticated service.
Service should respond when the endpoint is accessed.
Click Check my progress to verify that you've performed the above task.
Deploy the Frontend Service
Check my progress
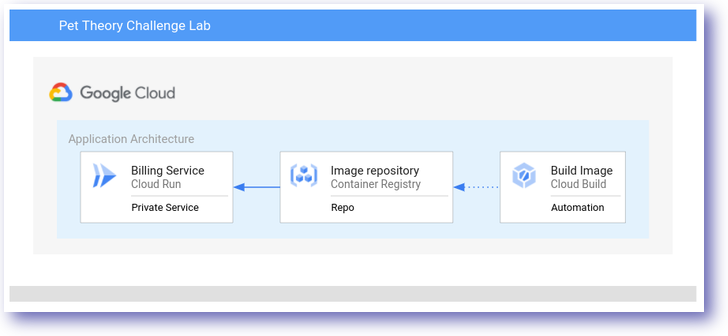
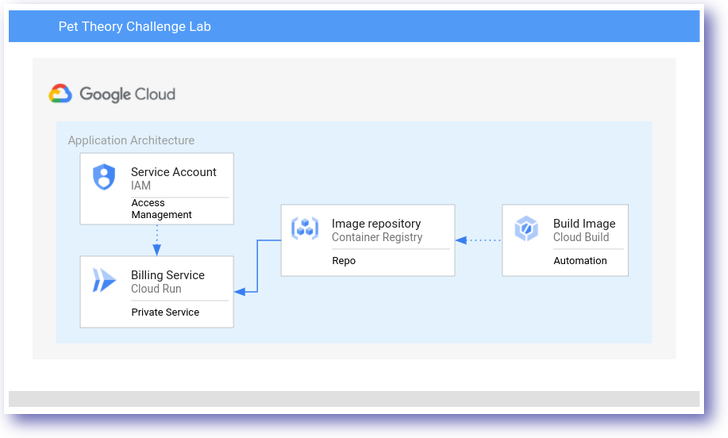
Task 3. Deploy a private service
Overview
- The development team updated their application and would like this deployed to the staging environment:
| FIELD | VALUE |
| Image Name | billing-staging-api:0.2 |
| Service Name | private-billing-service-949 |
| Repository | gcr.io |
| Authentication | authenticated |
| Code | pet-theory/lab07/staging-api-billing |
Architecture
Assessment: Cloud Run development
To complete this section successfully, you are required to implement the following tasks:
Delete the existing Billing Service.
Build an image using Cloud Build.
Deploy the image to Cloud Run requiring authentication.
Assign the SERVICE_URL to an environment variable.
Get the URL of the Billing Service:
BILLING_URL=$(gcloud run services describe private-billing-service-949 \
--platform managed \
--region us-west1 \
--format "value(status.url)")
- Service should respond when the endpoint is accessed
curl -X get -H "Authorization: Bearer $(gcloud auth print-identity-token)" $BILLING_URL
Click Check my progress to verify that you've performed the above task.
Deploy a Private Billing Service
Check my progress
Task 4. Create a billing service account
Overview
- In preparation for the deployment to production, you will need to create a Service Account for the Billing Service:
| FIELD | VALUE |
| Service Account | billing-service-sa-875 |
| Display Name | Billing Service Cloud Run |
| Service Name | billing-service |
| Role | N/A |
Architecture
Assessment: Service Account
To complete this section successfully, you are required to create a service account.
Click Check my progress to verify that you've performed the above task.
Create a Billing Service Account
Check my progress
Task 5. Deploy the billing service
Overview
- Associate the new Billing Service Account with Billing Service:
| FIELD | VALUE |
| Image Name | billing-prod-api:0.1 |
| Service Name | billing-prod-service-102 |
| Repository | gcr.io |
| Authentication | authenticated |
| Code | pet-theory/lab07/prod-api-billing |
| Service Account | billing-service-sa-875 |
Architecture
Assessment: Cloud Run development
To complete this section successfully, you are required to implement the following tasks:
Deploy the image to Cloud Run.
Enable Authentication.
Enable the Service Account.
Service should respond when the endpoint is accessed.
Get the URL of the Billing Service:
PROD_BILLING_URL=$(gcloud run services describe private-billing-service-949 \
--platform managed \
--region us-west1 \
--format "value(status.url)")
Access the deployed endpoint:
curl -X get -H "Authorization: Bearer \
$(gcloud auth print-identity-token)" \
$PROD_BILLING_URL
Click Check my progress to verify that you've performed the above task.
Deploy the Billing Service
Check my progress
Task 6. Frontend service account
Overview
- Create a new Service Account for the Frontend capable of invoking the Billing Service:
| FIELD | VALUE |
| Service Account | frontend-service-sa-304 |
| Display Name | Billing Service Cloud Run Invoker |
| Service Name | frontend-prod-service |
| Role | run.invoker |
Architecture
Assessment
To complete this section successfully, you are required to implement the following tasks:
Create a Service Account.
Apply Service Account for Frontend Service.
Give Service Account run.invoker permission.
Bind Account to Service.
Click Check my progress to verify that you've performed the above task.
Create the Frontend Service Account
Check my progress
Task 7. Redeploy the frontend service
Overview
- Use the new Service Account and redeploy the Frontend Service:
| FIELD | VALUE |
| Image Name | frontend-prod:0.1 |
| Service Name | frontend-prod-service-956 |
| Repository | gcr.io |
| Authentication | unauthenticated |
| Code | pet-theory/lab07/prod-frontend-billing |
| Service Account | frontend-service-sa-304 |
Architecture
Assessment: Cloud Run development
To complete this section successfully, you are required to implement the following tasks:
Deploy the image to Cloud Run.
Enable Authentication.
Enable Service Account.
Service should respond when the endpoint is accessed.
Click Check my progress to verify that you've performed the above task.
Deploy the Frontend Service
Check my progress
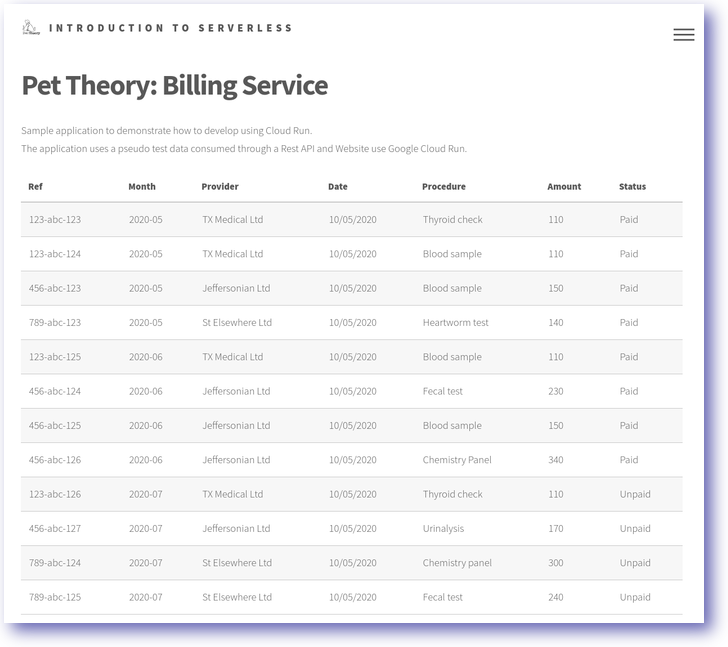
- Now access the production frontend service to display the user interface.
Information on screen is consumed from the private billing service using the service account.
Solution of Lab
export REGION=
export TASK_1_SERVICES_NAME=
export TASK_2_SERVICES_NAME=
export TASK_3_SERVICES_NAME=
export TASK_4_SERVICES_NAME=
export TASK_5_SERVICES_NAME=
export TASK_6_SERVICES_NAME=
export TASK_7_SERVICES_NAME=


curl -LO raw.githubusercontent.com/quiccklabs/Labs_solutions/master/Develop%20Serverless%20Applications%20on%20Cloud%20Run%20Challenge%20Lab/quicklabgsp328.sh
sudo chmod +x quicklabgsp328.sh
./quicklabgsp328.sh


