Filtering Explores with LookML - GSP892

A passionate full-stack developer from @ePlus.DEV
Overview
Looker is a modern data platform in Google Cloud that lets you analyze and visualize your data interactively. You can use Looker to do in-depth data analysis, integrate insights across different data sources, build actionable data-driven workflows, and create custom data applications.
Explores are data views that serve as the foundation for self-service exploration by the business users in Looker. In this lab, you learn how to take your Explores to the next level by applying filters to them.
What you'll do
In this lab, you learn how to:
Use the
sql_always_whereandsql_always_havingfiltersUse the
always_filterUse the
conditionally_filter
Setup and requirements
Before you click the Start Lab button
Read these instructions. Labs are timed and you cannot pause them. The timer, which starts when you click Start Lab, shows how long Google Cloud resources are made available to you.
This hands-on lab lets you do the lab activities yourself in a real cloud environment, not in a simulation or demo environment. It does so by giving you new, temporary credentials that you use to sign in and access Google Cloud for the duration of the lab.
To complete this lab, you need:
- Access to a standard internet browser (Chrome browser recommended).
Note: Use an Incognito or private browser window to run this lab. This prevents conflicts between your personal account and the Student account, which may cause extra charges incurred to your personal account.
- Time to complete the lab—remember, once you start, you cannot pause a lab.
Note: If you already have a personal Google Cloud account or project, do not use it for this lab to avoid extra charges to your account.
How to start your lab and sign in to Looker
When ready, click Start Lab.
The Lab Details pane appears with the temporary credentials that you must use for this lab.
If you need to pay for the lab, a pop-up opens for you to select your payment method.
Notice your lab credentials in the Lab details pane. You use them to sign in to the Looker instance for this lab.
Note: If you use other credentials, you will get errors or incur charges.
Click Open Looker.
Enter the provided Username and Password in the Email and Password fields.
Username:
looker-developer@qwiklabs.netPassword:
YyzQk8yhmFv01Oo37BLSHrLjW4Iparf49u9KUFmqPck=Important: You must use the credentials from the Lab Details pane on this page. Do not use your Google Cloud Skills Boost credentials. If you have a personal Looker account, do not use it for this lab.
Click Log In.
After a successful login, you see the Looker instance for this lab.
Types of Explore filters
To filter an Explore, you need to apply a default WHERE or HAVING clause to every SQL query that gets generated in that Explore. There are three principal ways to filter an Explore:
sql_always_whereandsql_always_having, which behave similarly and have the same use casealways_filterconditionally_filter
In the following sections, you learn about common use cases for each of these.
The sql_always_where and sql_always_having filters
Both sql_always_where and sql_always_having allow you to add filters to an Explore that cannot be modified. This is useful when you have certain rows of data you always want to exclude from the Explore results.
The sql_always_where filter is used to add a WHERE clause applied to dimensions in a SQL query, whereas sql_always_having is used to add a HAVING clause applied to measures in a SQL query. In addition to queries run explicitly by business users, the restriction will apply to dashboards, scheduled Looks, and embedded information that relies on that Explore.
There will be no indication of the filter in the user interface, so business users are not informed that the data are being filtered, unless they have permission to look at the generated SQL. This is useful if you want to filter out certain values of the Explore, such as test or internal data.
The always_filter
The always_filter enables you to require users to include a certain set of filters that you define. You also define a default value for the filters. Though users may change your default value for their query, they cannot remove the filter entirely. This is helpful when you want users to always filter by specific dimensions, such as always filtering by order status or user country, so that they do not request all of the possible data at one time.
The always_filter has a sub-parameter to define the specific filters using the same Looker filter expressions that are used to filter dimensions and measures. The dimensions provided in the filters sub-parameter identify the dimensions that users must provide values for, such as a value for order status or user country.
The specific values provided for in the filters sub-parameter are the default values which can be changed by the business user. For example, while the default order status is “Complete”, business users can change this value to say orders with a different status like “Returned”. For additional information, review the Looker filter expressions document.
The conditionally_filter
Similar to the always_filter, the conditionally_filter adds a filter to the Explore frontend that is accessible by business users. The conditionally_filter parameter enables you to define a set of default filters that users can override if they apply at least one filter from a second list that you define.
Although users can indeed change the filter operator and values, they cannot remove the filter itself unless they put a filter on a specific alternative field. This is helpful when you want to limit the amount of data that an business user requests, but you also want to give them a list of alternative dimensions that they can use to filter the data.
Conditionally_filter has a sub-parameter to define the specific filters as well as a sub-parameter to define the alternative dimensions that can be used to filter the data. For example, conditionally_filter can be used to create a filter that only returns data for the past 1 year, unless a filter is applied to a user ID or state dimension. This is typically used to prevent users from accidentally creating very large queries that may be too expensive to run on your database.
Task 1. Add an always_filter
In this section, you will add an always_filter to the Order Items Explore to require filtering on order status and user country, which are two key dimensions in the e-commerce dataset.
- First, on the bottom left of the Looker User Interface, click the toggle button to enter Development mode.

Next, click the Develop tab and then select the
qwiklabs-ecommerceLookML project.Navigate to the
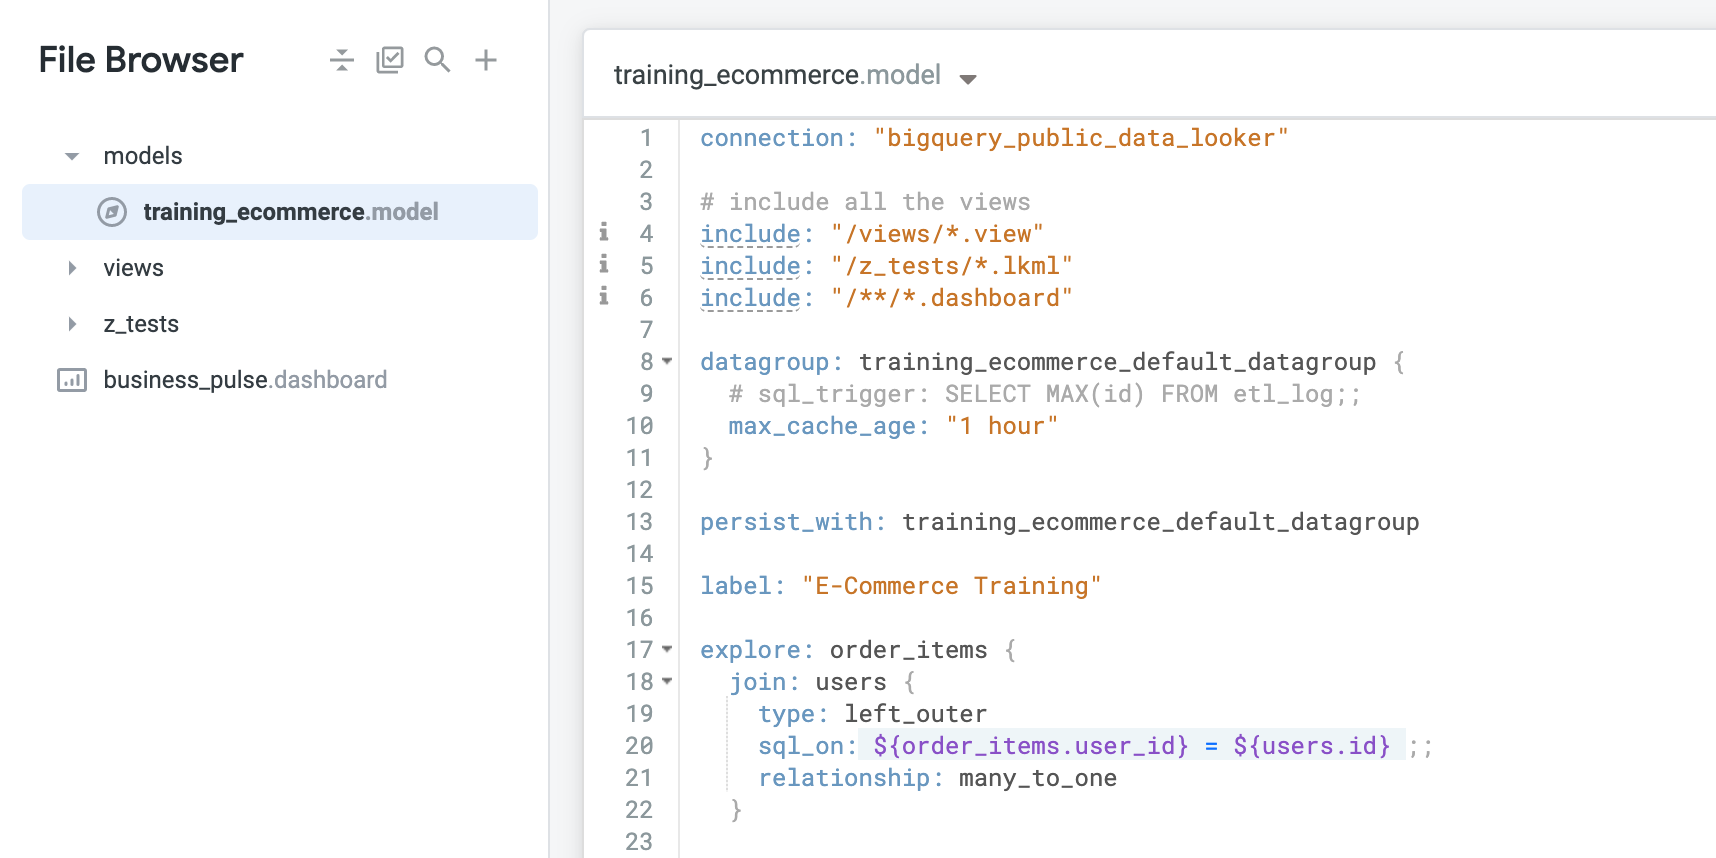
training_ecommerce.modelfile in theqwiklab_ecommerceproject. Notice that the Order Items Explore does not currently have any filters.
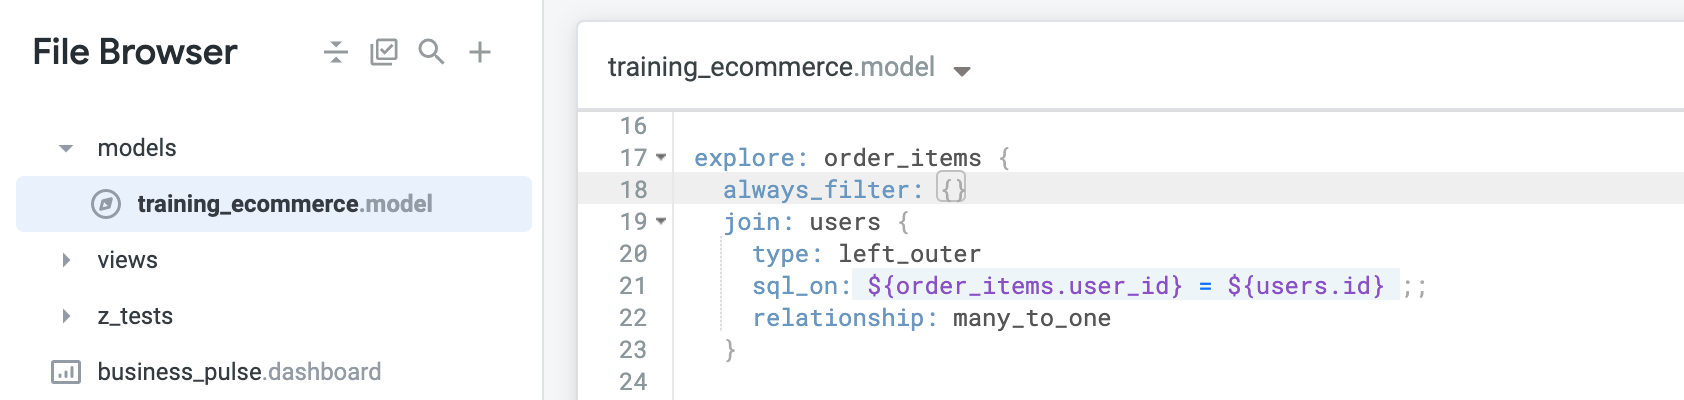
- Under the first line to define the Order Items Explore, add a new line and type
always_filterfollowed by a colon (:) and curly braces ({}):
always_filter: {}
You will add code within these curly braces to define the filter.
- Using the filters sub-parameter, define the filters to use status from the
order_itemstable with a default value of “Complete” and country from theuserstable with a default value of “USA” using:
filters: [order_items.status: "Complete", users.country: "USA"]
Note: Recall that while the a value for the filter is required, business users will be able to provide different values for these dimensions.
![The training_ecommerce.model data, with the addition of the line: 'filters: [order_items.status:"complete", users.country: "USA"]'](https://cdn.qwiklabs.com/PB53HjZzFZylHTjFWYrL2TMRY98zM9%2BC0iUVEwTj3uo%3D)
Click Save Changes.
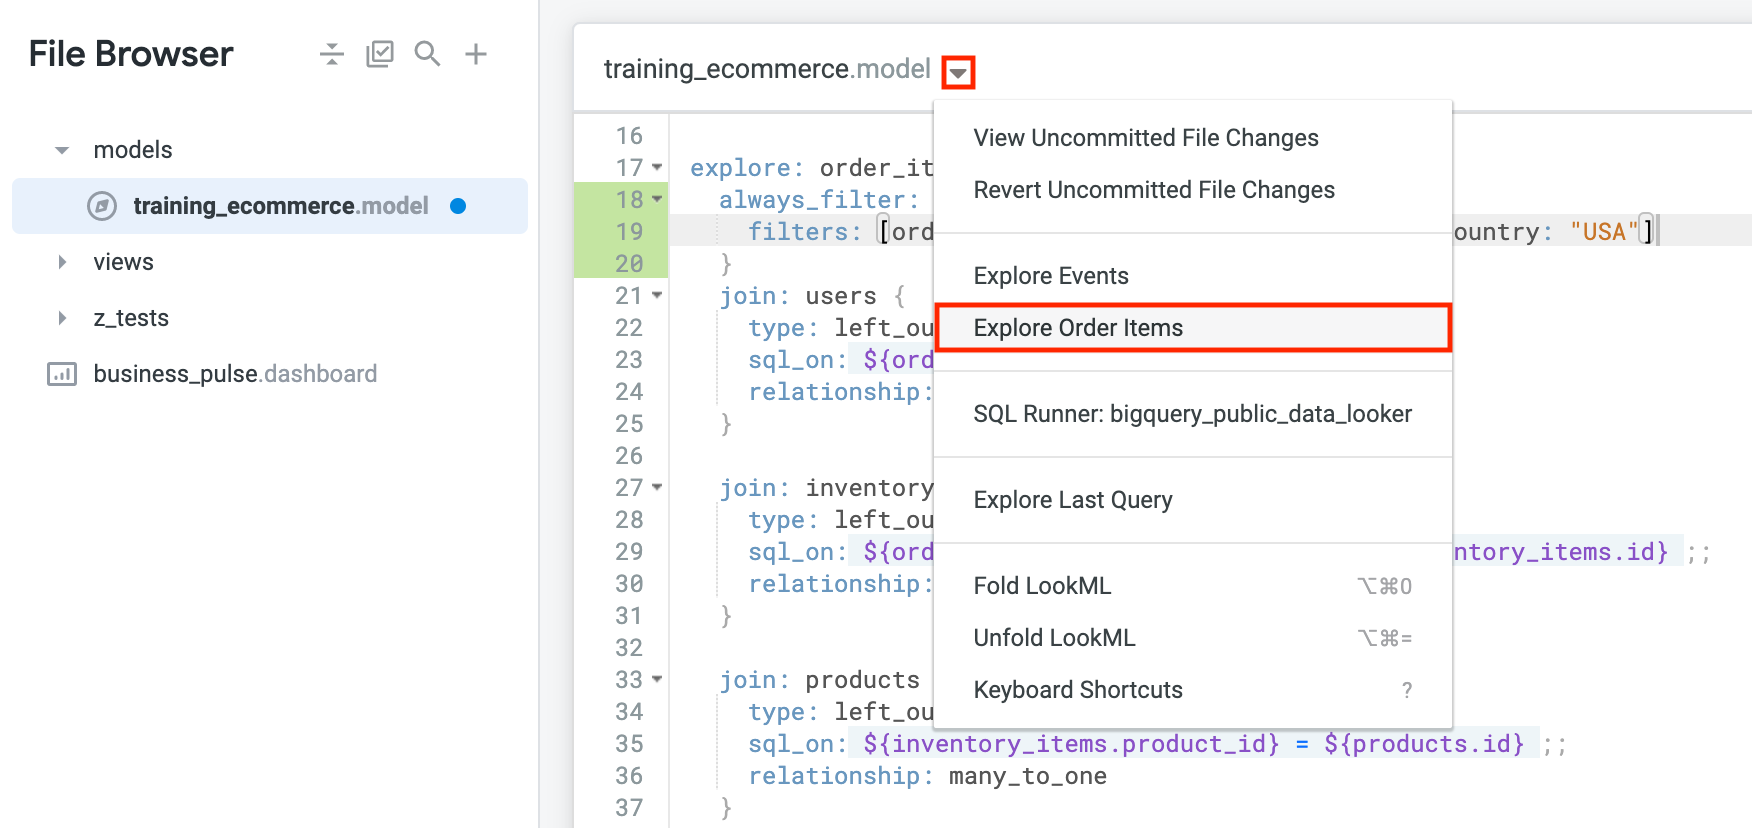
Click the caret next to the file title at the top of the IDE and then select Explore Order Items.
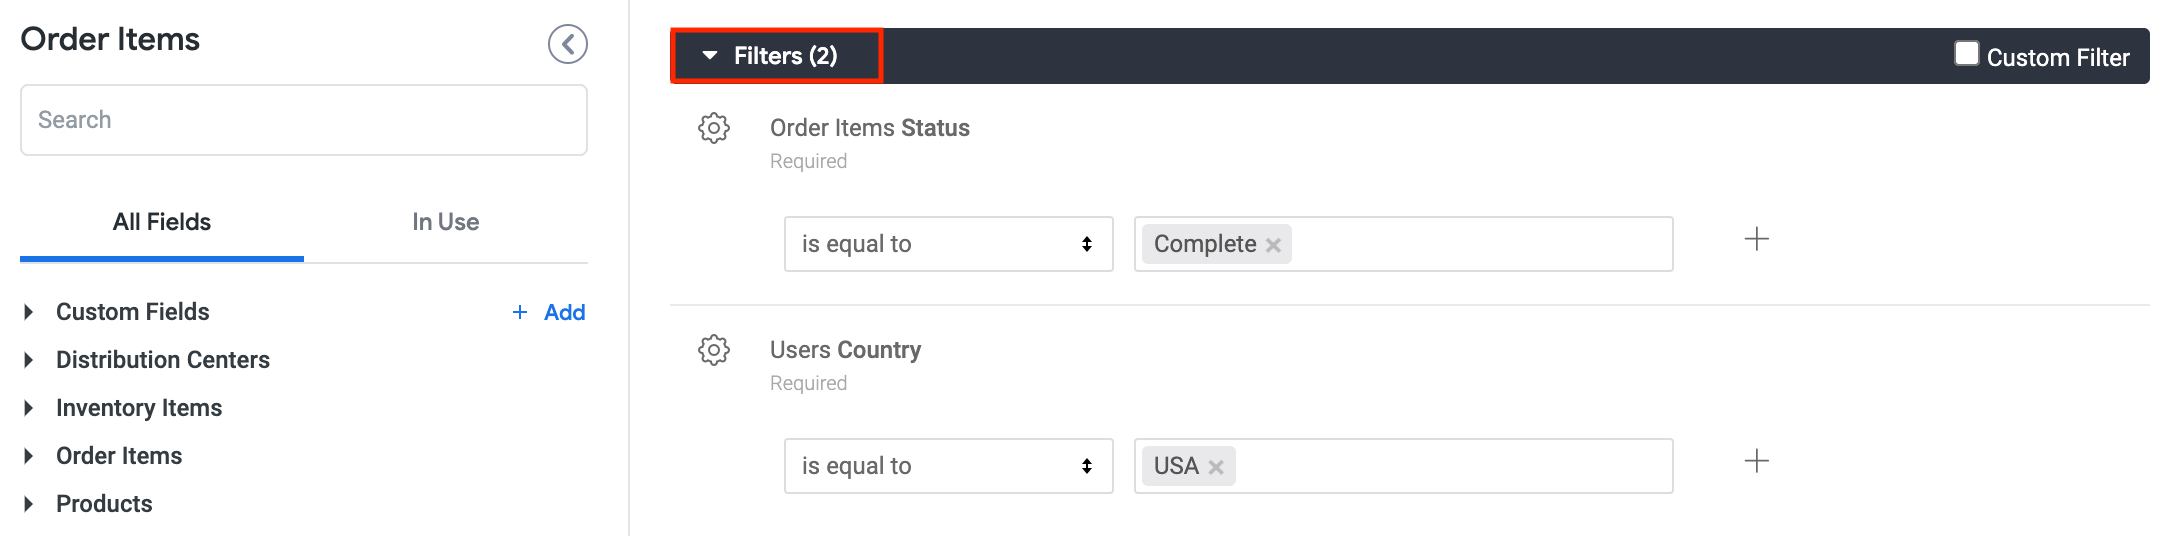
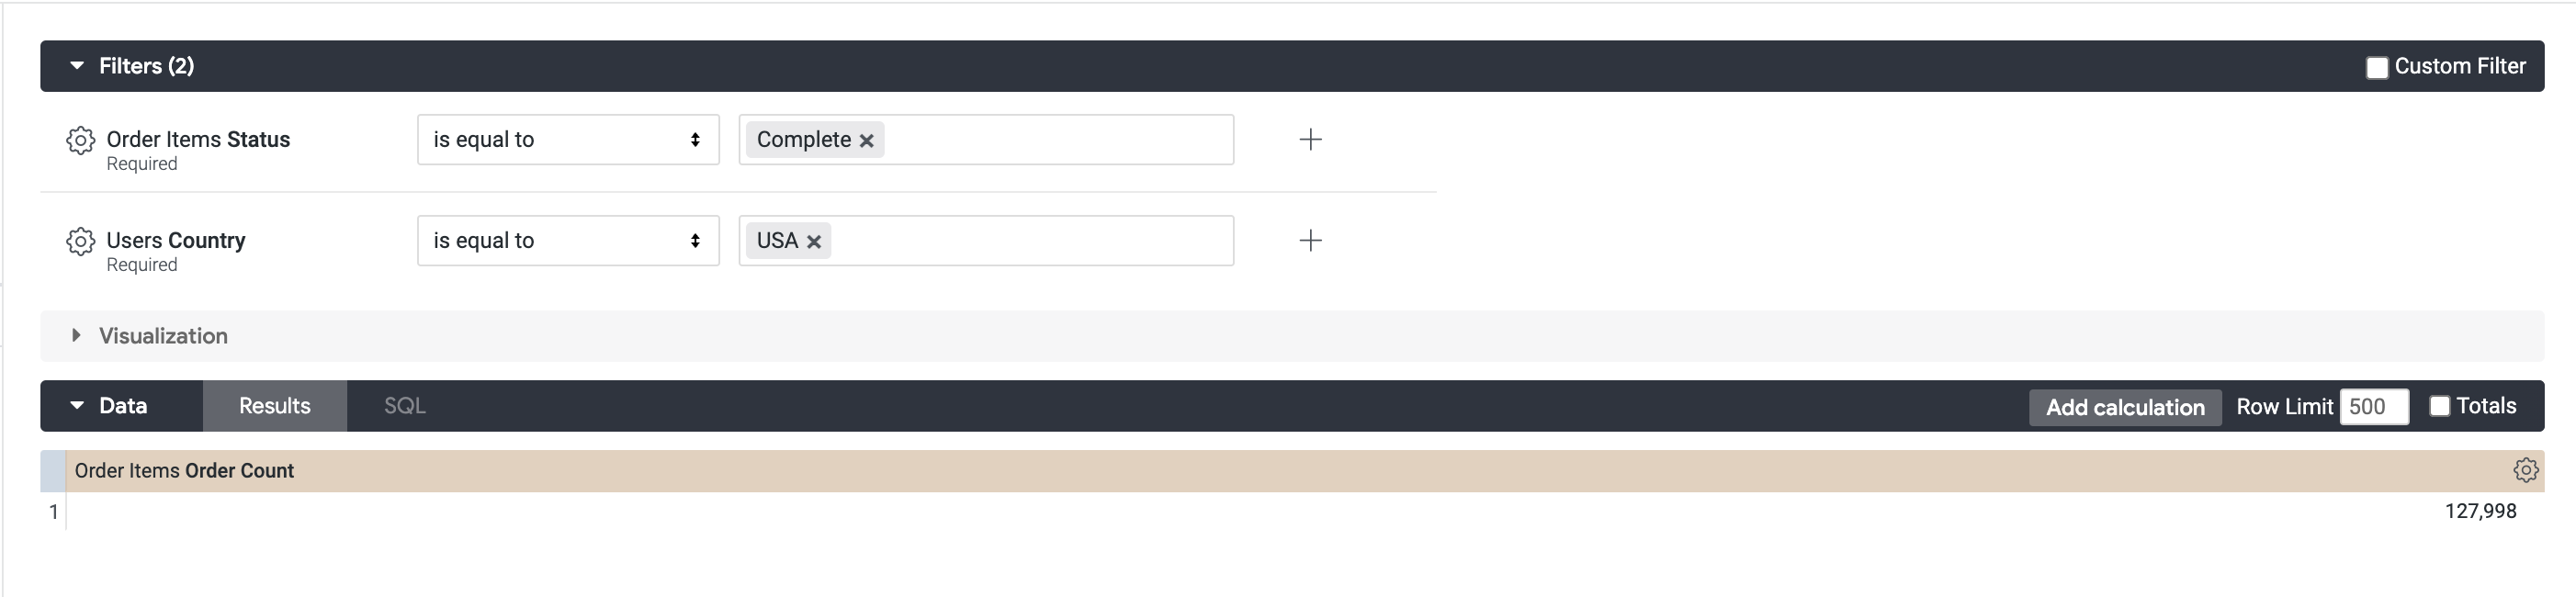
- Click on the arrow next to Filters to expand the window and see the two new filters with the default values:
Order Items Status with a default value of
CompleteUsers Country with a default value of
USA
Under Order Items > Measures, click Order Count.
Click Run. You should now see the number of completed order items within the USA. Notice how you cannot delete the filters, but you can modify them.
- Change the filters. For the Status filter, change it to
Processing. For the Country filter, change it to theUK.
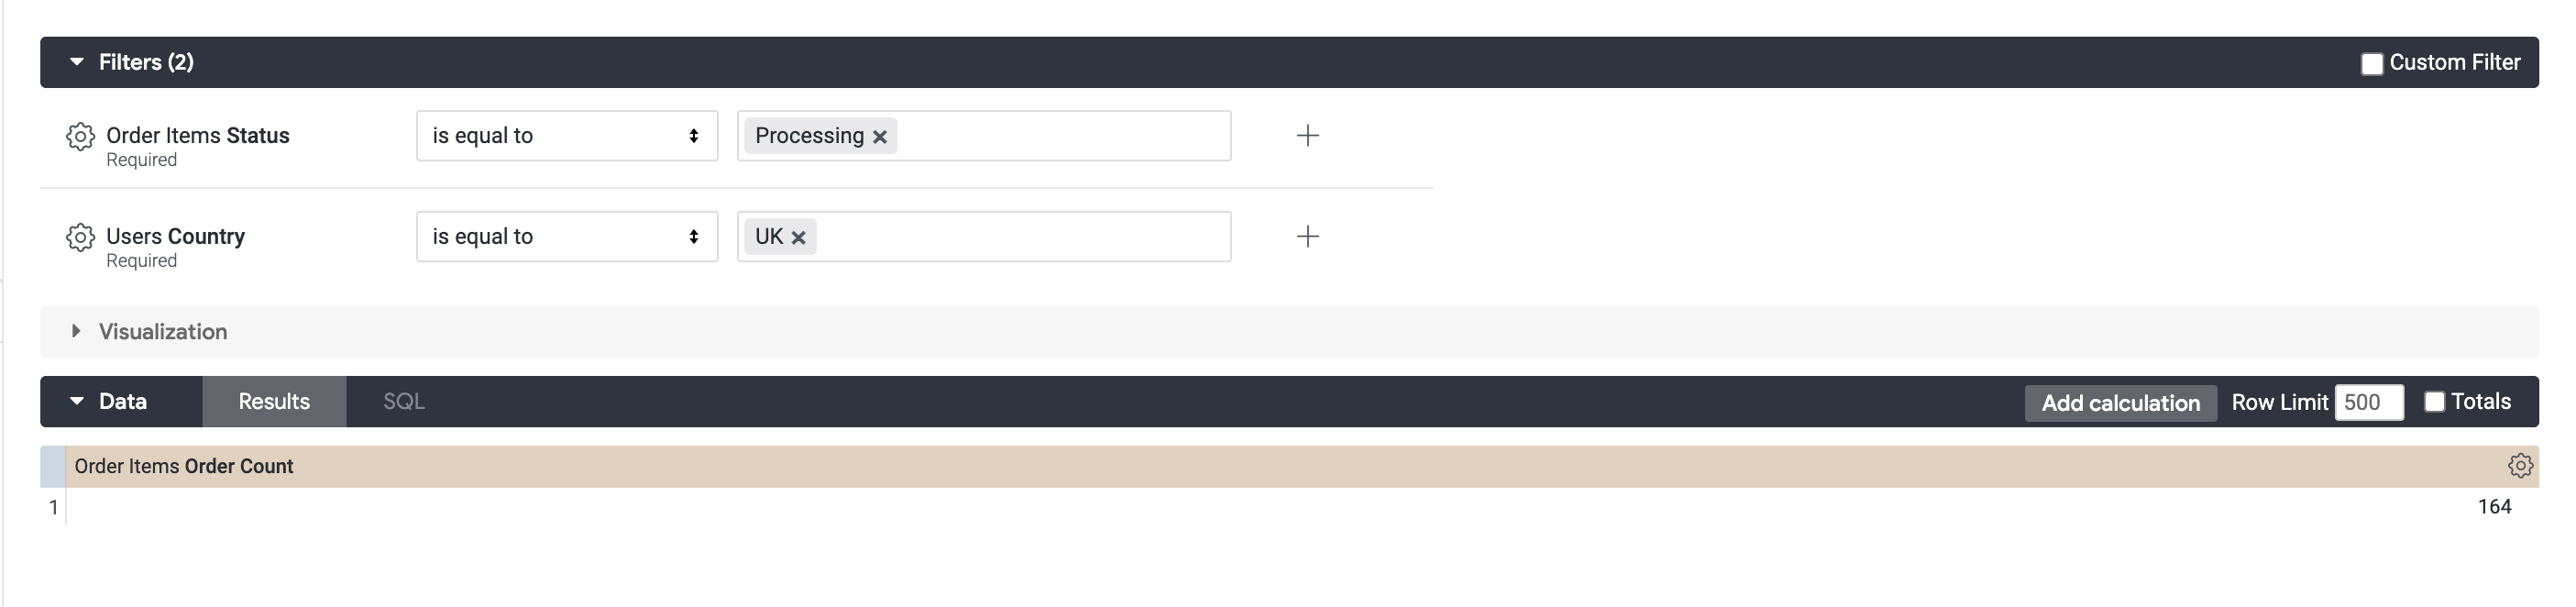
Click Run. Your order items count should be updated along with the filters!
Navigate back to the
training_ecommerce.modelfile.
Commit changes and deploy to production
Click Validate LookML and then click Commit Changes & Push.
Add a commit message and click Commit.
Lastly, click Deploy to Production.
Task 2. Add a sql_always_where filter
In this section, you will add a sql_always_where filter to the Order Items Explore to only include data from the year 2021 and later. This is helpful if you have a large database spanning many years and only want to perform queries on the data for the current year and future years.
Navigate back to the
training_ecommerce.modelfile in theqwiklab_ecommerceproject.Remove the filter you created in the previous section.
Under the first line to define the Order Items Explore, add a new line and type
sql_always_wherefollowed by a colon (:):
sql_always_where:
Next, you will define the filter to only include data from the year 2021 and later using the created_date table.
- Add the following to your filter:
sql_always_where: ${created_date} >= '2021-01-01' ;;
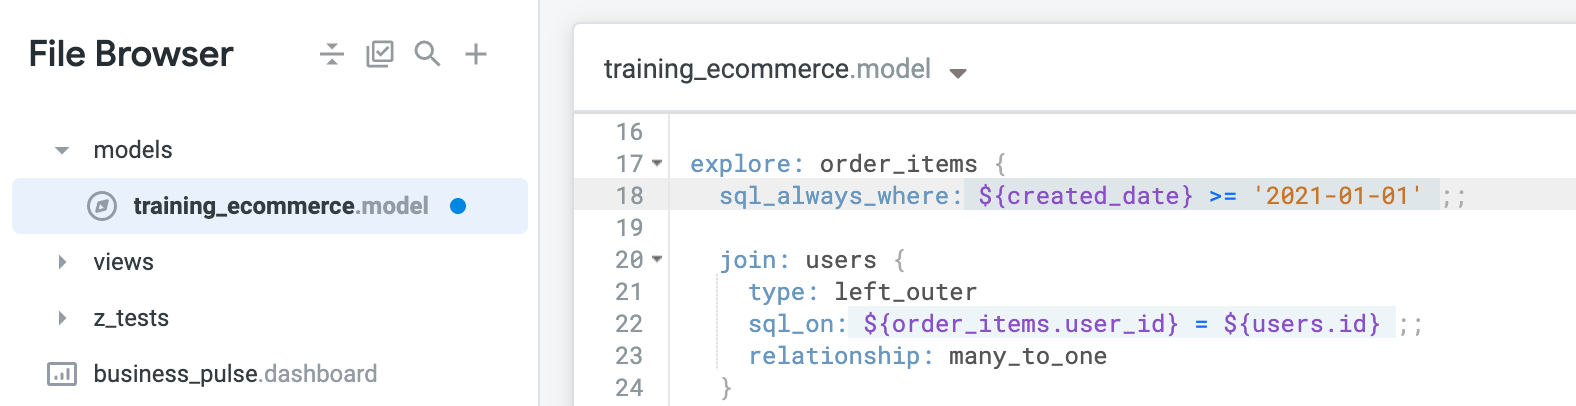
Click Save Changes.
Click the caret next to the file title at the top of the IDE and then select Explore Order Items.
Note: Note that you don't see any filters. A sql_always_where condition is not displayed to the user, unless they look at the underlying SQL of any queries that they create.
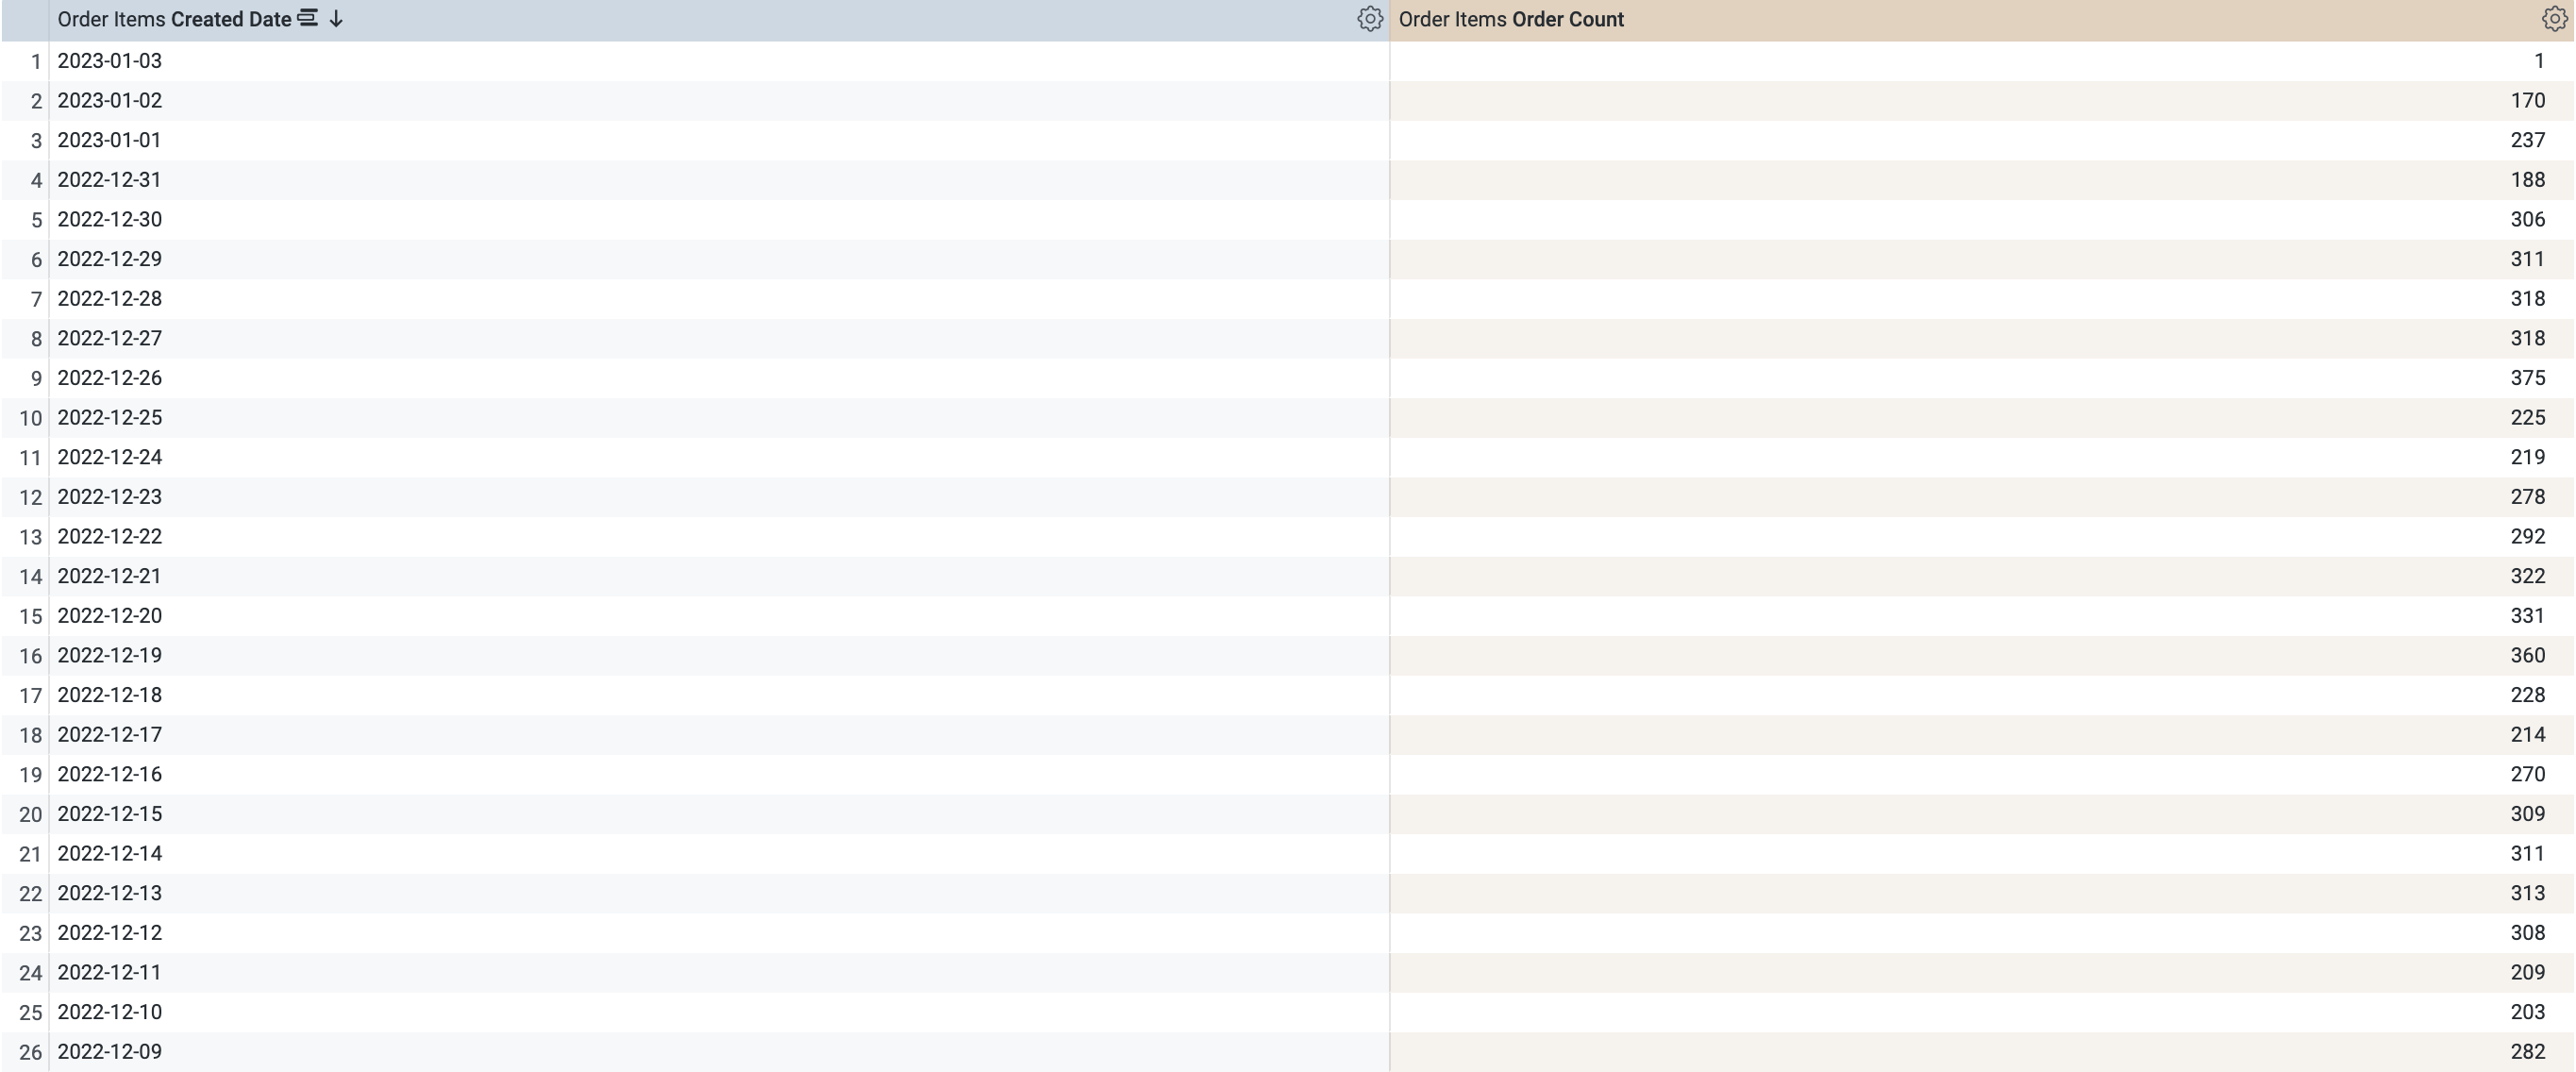
Under Order Items > Created Date, click Date.
Under Order Items > Measures, click Order Count.
Click Run. Notice that there are order items only from the date
2021-01-01and later!
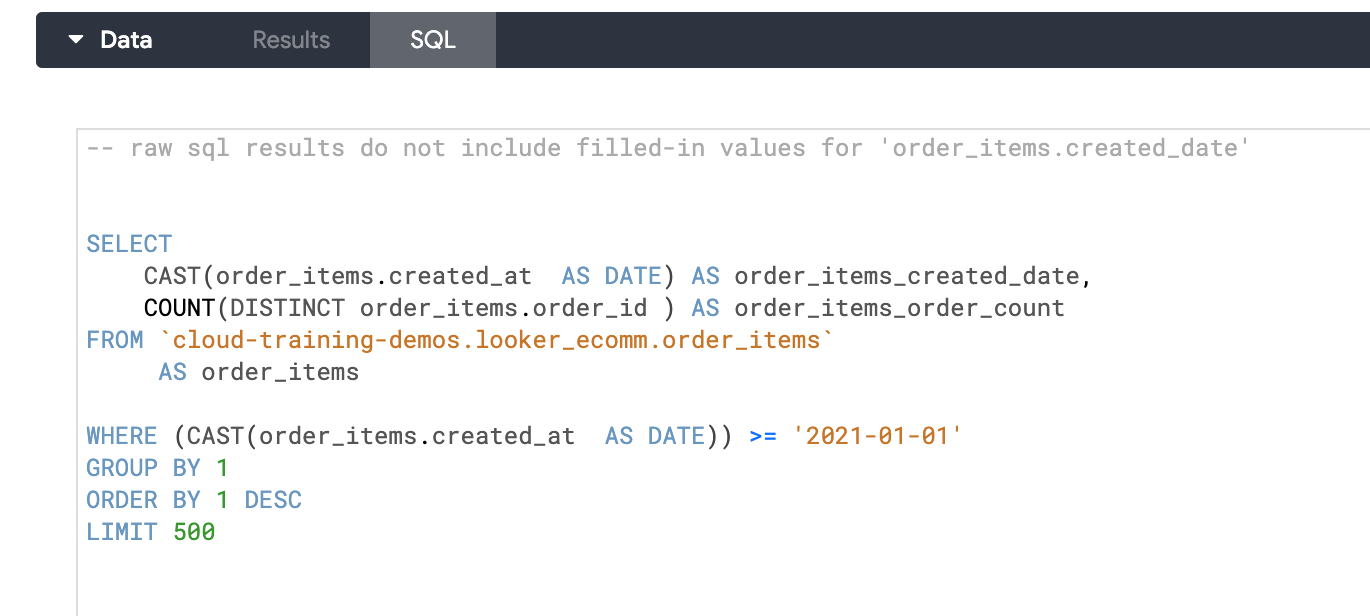
- On the Data bar, click the SQL tab. Notice there is the filter defined in the
WHEREclause for all of the data.
- Navigate back to the
training_ecommerce.modelfile.
Commit changes and deploy to production
Click Validate LookML and then click Commit Changes & Push.
Add a commit message and click Commit.
Lastly, click Deploy to Production.
Task 3. Add a sql_always_having filter
In this section, you will add a sql_always_having filter to the Order Items Explore to prevent users from looking at orders with more than one item. This will be used to omit any orders from the Explore that have multiple items in them.
Navigate back to the
training_ecommerce.modelfile in theqwiklab_ecommerceproject.Remove the filter you created in the previous section.
Under the first line to define the Order Items Explore, add a new line and type
sql_always_havingfollowed by a colon (:):
sql_always_having:
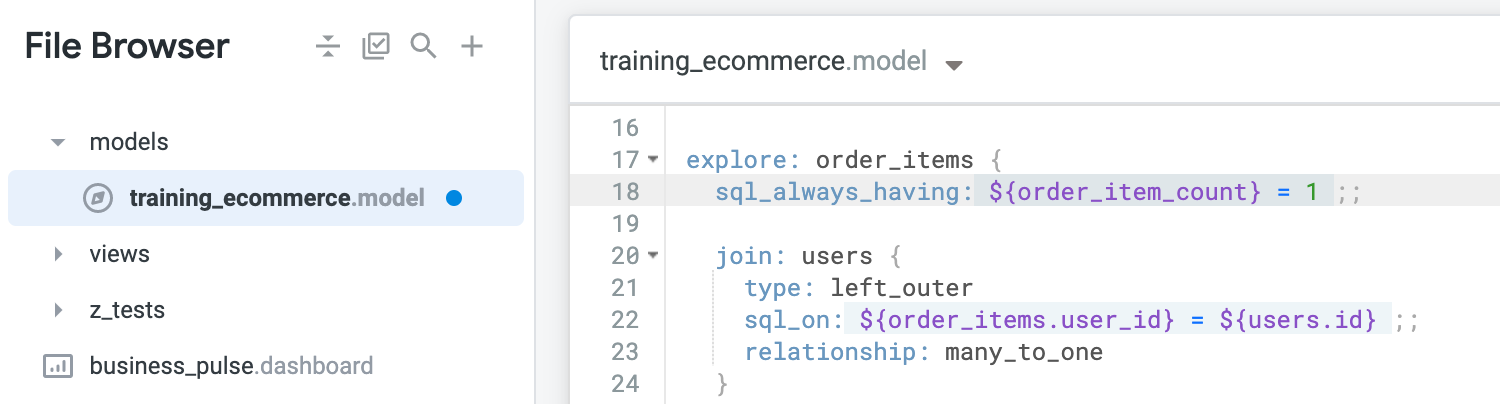
- Next, you will define the filter to only include the data with 1 order item, using the
order_item_countmeasure:
sql_always_having: ${order_item_count} = 1 ;;
Click Save Changes.
Click the caret next to the file title at the top of the IDE and then select Explore Order Items.
Note: Again, notice that you don't see any filters. A sql_always_having condition condition is not displayed to the user, unless they look at the underlying SQL of any queries that they create.
Under Order Items, click Order ID.
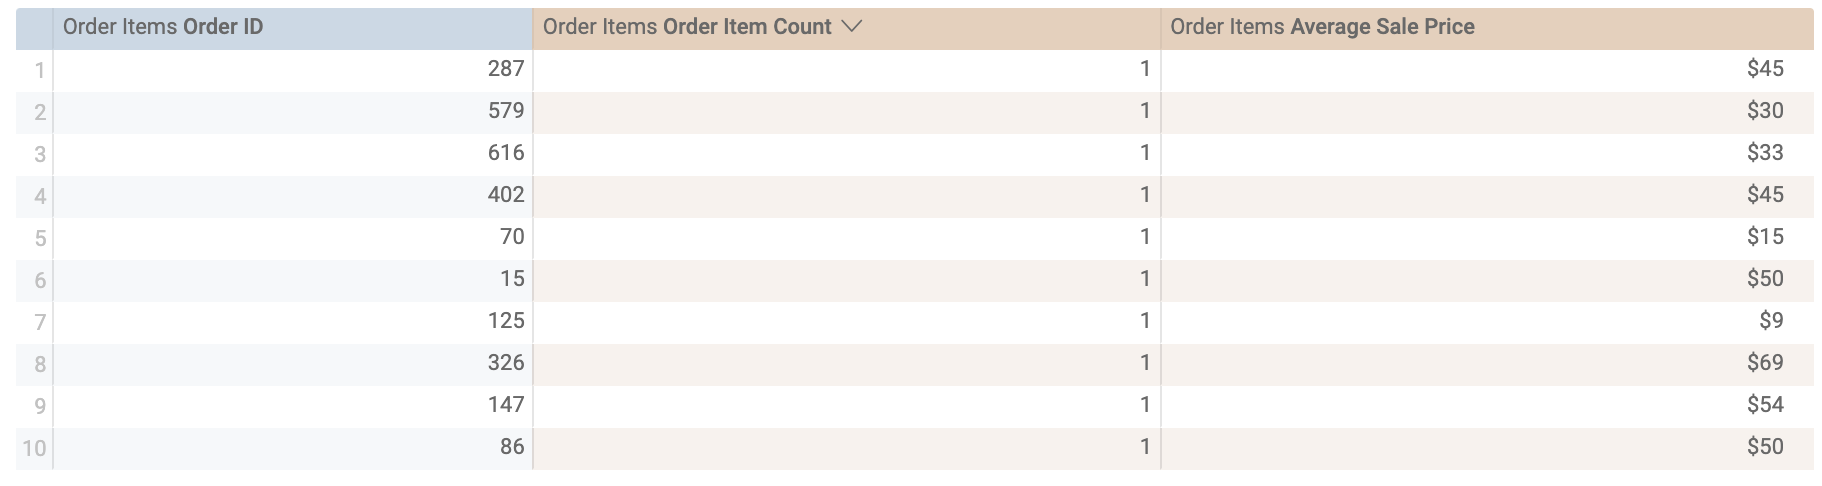
Under Order Items > Measures, click Average Sale Price and Order Item Count.
Click Run. You should see the different orders and their respective average sale prices. As you can see, the items count is always equal to 1!
- Navigate back to the
training_ecommerce.modelfile.
Commit changes and deploy to production
Click Validate LookML and then click Commit Changes & Push.
Add a commit message and click Commit.
Lastly, click Deploy to Production.
Task 4. Add a conditionality_filter
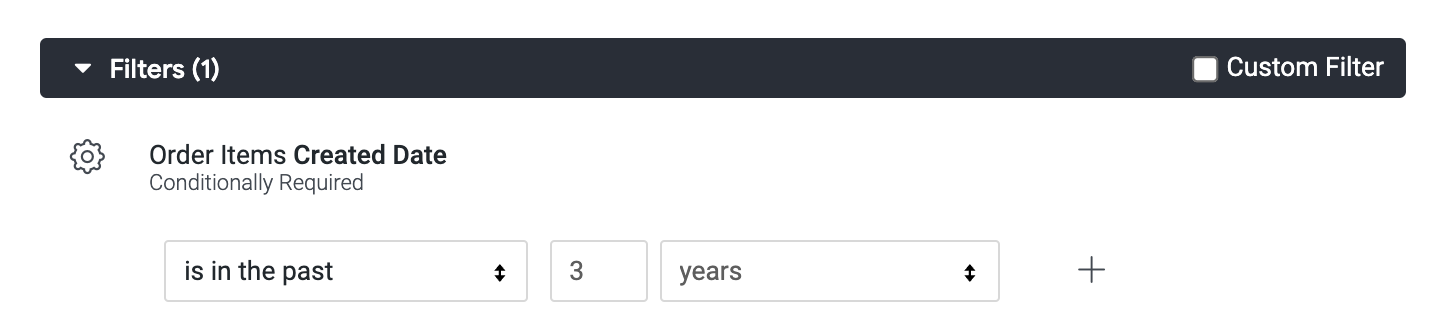
In this section, you will add a conditionality_filter filter to the Order Items Explore to only return data for the past 3 years, unless a filter is applied to a user ID or state dimension.
Navigate back to the
training_ecommerce.modelfile in theqwiklab_ecommerceproject.Remove the filter you created in the previous section.
Under the first line to define the Order Items Explore, add a new line and type
conditionally_filterfollowed by a colon (:) and curly braces ({}):
conditionally_filter: {}
You will add code within these curly braces to define the filter.
- Add the
filterssub-parameter to define this filter.
Here, you want the order created date to be in the past 3 years. You will also define the unless sub-parameter as an alternative dimension that can be used as a filter. For this, you will use the user ID and state dimensions:
filters: [created_date: "3 years"]
unless: [users.id, users.state]
![The filters used within the training_ecommerce model: 'filters: [created_date: "3 years"]' and 'unless: [users.id, users.state]'](https://cdn.qwiklabs.com/gTNGS7dsBq4oQBtYePLYTcE%2BRBBJymK2%2BbPvhdgIvKE%3D)
Click Save Changes.
Click the caret next to the file title at the top of the IDE and then select Explore Order Items.
Click on the arrow next to Filters to expand the window and see the conditional filter you created. Success!
Next, under Order Items, click Order ID.
Under Order Items > Created Date, click Year.
Under Order Items > Measures, click Average Sale Price.
Click Run.
You can now see your created date is filtered in the past year in your Explore.
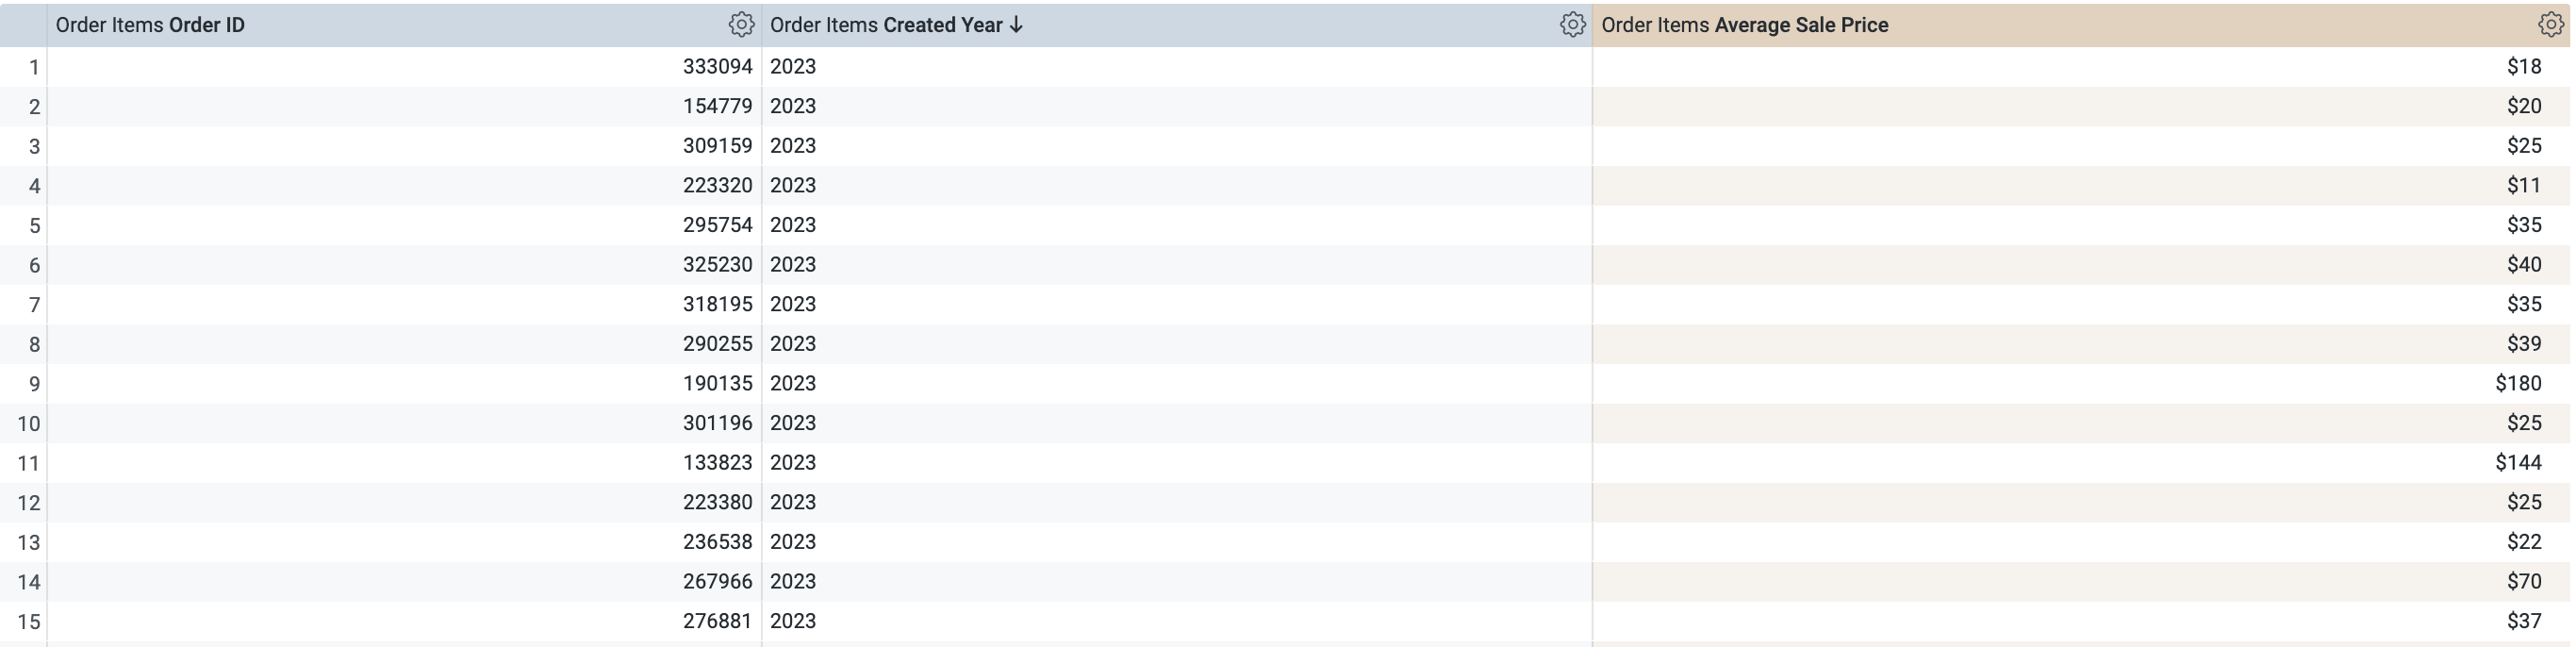
- You will now test the conditionality of the filter. Under Users, hover over State and click the filter button.
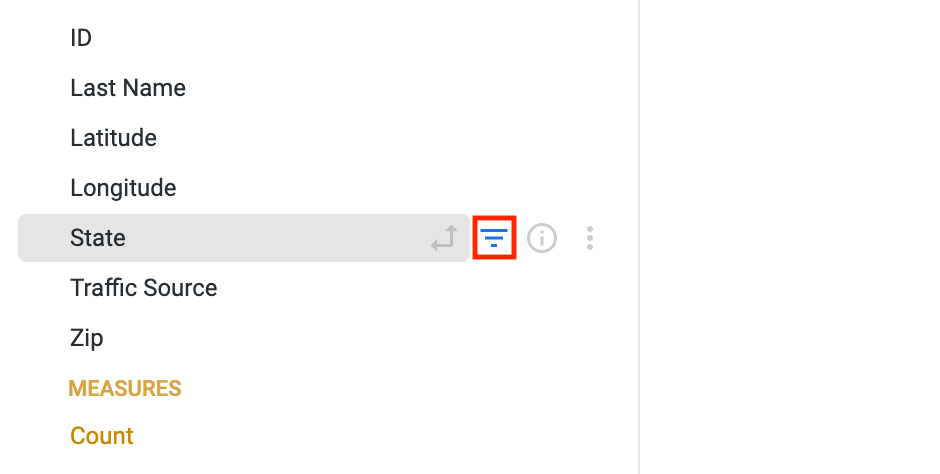
In the filter window, set the State filter to:
California.Click the X next to the other filter to delete it.
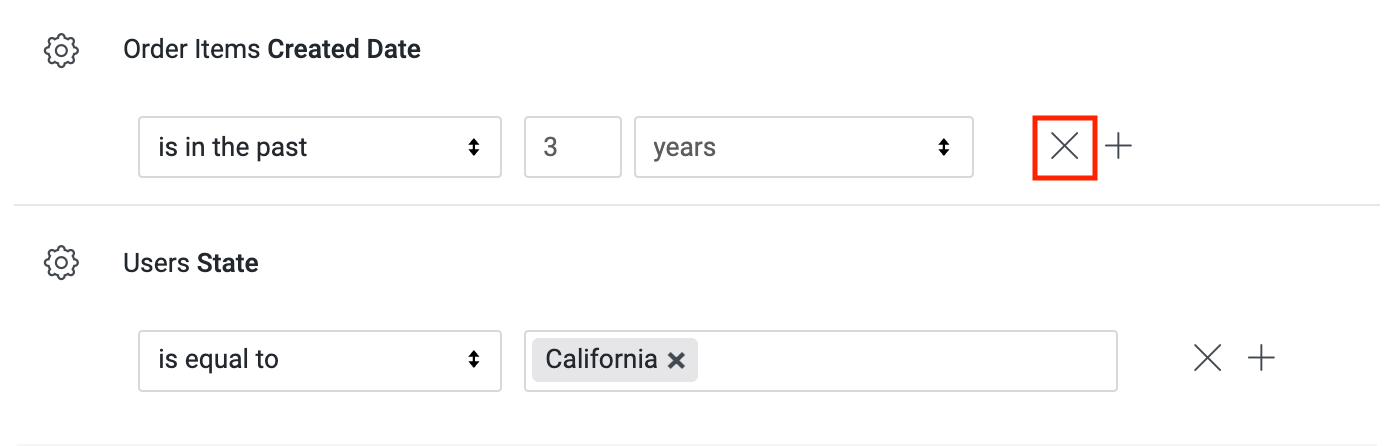
- Click Run again.
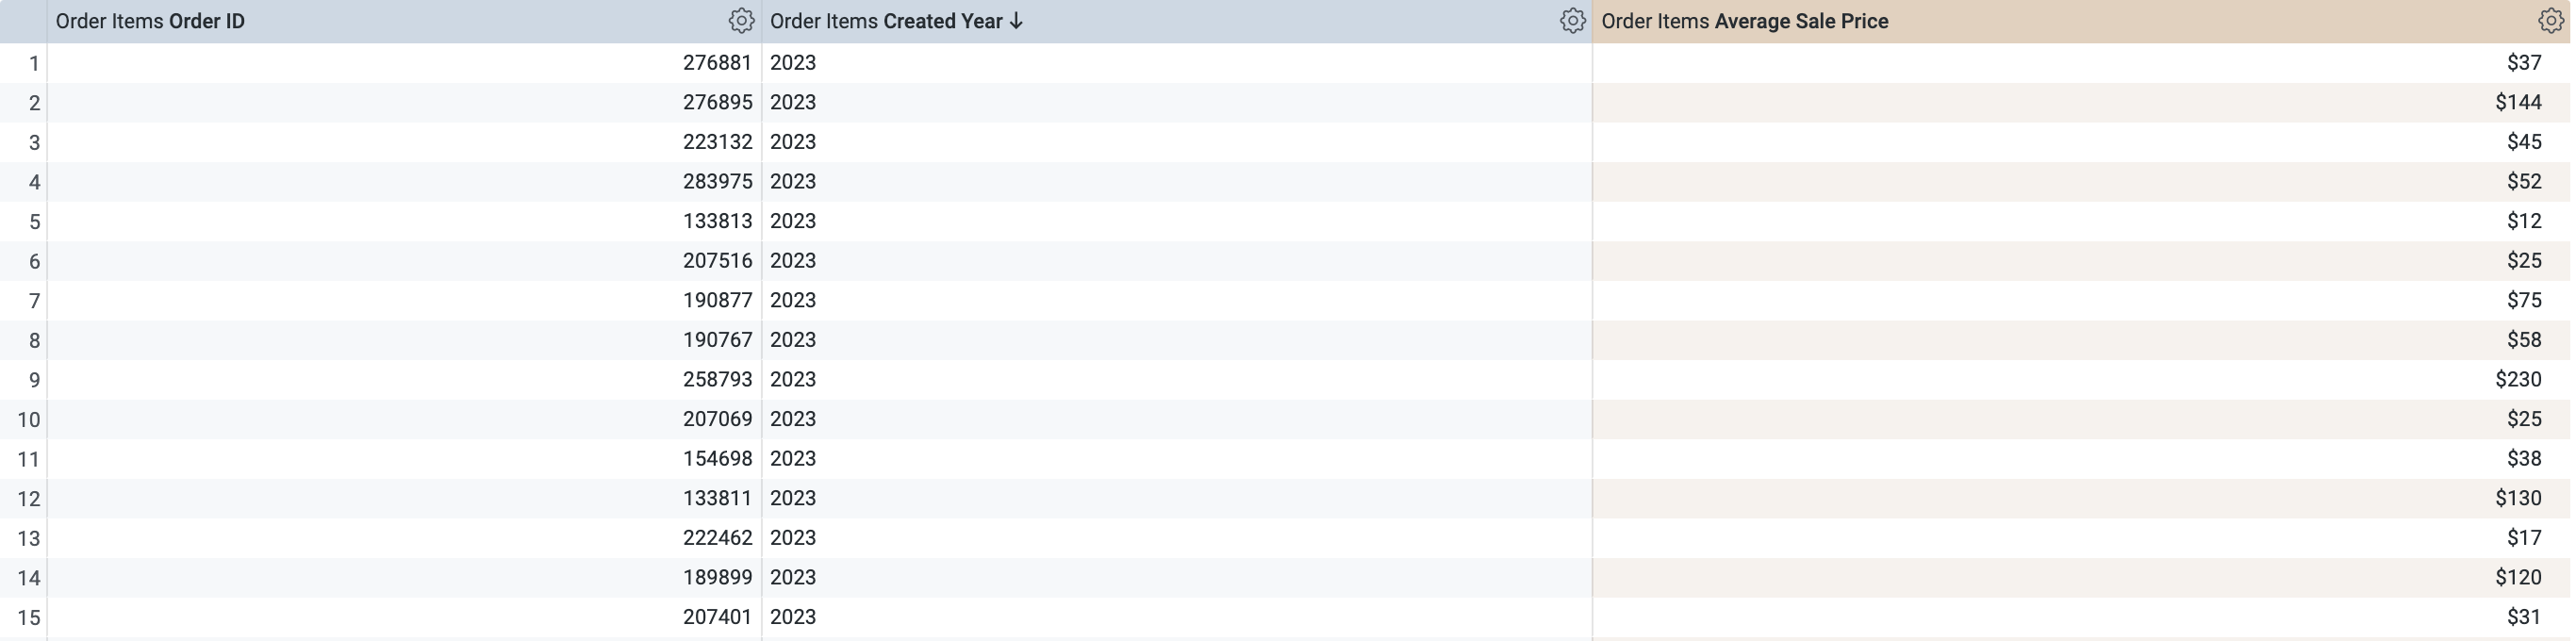
- Lastly, remove the State filter by clicking the X next to it to delete it. You will see the Created Date filter automatically appears again.
Great! You just explored how conditional filters work. While you can change the default value that you set, you cannot completely remove the filter unless you apply at least one of the filters you specified in the unless sub-parameter.
- Navigate back to the
training_ecommerce.modelfile.
Commit changes and deploy to production
Click Validate LookML and then click Commit Changes & Push.
Add a commit message and click Commit.
Lastly, click Deploy to Production.
Click Check my progress to verify the objective.
Solution of Lab
Manual
Click the Develop tab and then select the qwiklabs-ecommerce LookML project.
training_ecommerce.model
connection: "bigquery_public_data_looker"

# include all the views
include: "/views/*.view"
include: "/z_tests/*.lkml"
include: "/**/*.dashboard"

datagroup: training_ecommerce_default_datagroup {
  # sql_trigger: SELECT MAX(id) FROM etl_log;;
  max_cache_age: "1 hour"
}

persist_with: training_ecommerce_default_datagroup

label: "E-Commerce Training"

explore: order_items {
  conditionally_filter: {filters: [created_date: "3 years"]

  unless: [users.id, users.state]}
  join: users {
    type: left_outer
    sql_on: ${order_items.user_id} = ${users.id} ;;
    relationship: many_to_one
  }

  join: inventory_items {
    type: left_outer
    sql_on: ${order_items.inventory_item_id} = ${inventory_items.id} ;;
    relationship: many_to_one
  }

  join: products {
    type: left_outer
    sql_on: ${inventory_items.product_id} = ${products.id} ;;
    relationship: many_to_one
  }

  join: distribution_centers {
    type: left_outer
    sql_on: ${products.distribution_center_id} = ${distribution_centers.id} ;;
    relationship: many_to_one
  }
}

explore: events {
  join: event_session_facts {
    type: left_outer
    sql_on: ${events.session_id} = ${event_session_facts.session_id} ;;
    relationship: many_to_one
  }
  join: event_session_funnel {
    type: left_outer
    sql_on: ${events.session_id} = ${event_session_funnel.session_id} ;;
    relationship: many_to_one
  }
  join: users {
    type: left_outer
    sql_on: ${events.user_id} = ${users.id} ;;
    relationship: many_to_one
  }
}

Quick
Task 2. Add an always_filter
training_ecommerce.model
connection: "bigquery_public_data_looker"

# include all the views
include: "/views/*.view"
include: "/z_tests/*.lkml"
include: "/**/*.dashboard"

datagroup: training_ecommerce_default_datagroup {
  # sql_trigger: SELECT MAX(id) FROM etl_log;;
  max_cache_age: "1 hour"
}

persist_with: training_ecommerce_default_datagroup

label: "E-Commerce Training"

explore: order_items {
  always_filter: {
    filters: [order_items.status: "Complete", users.country: "USA"]
  }
  join: users {
    type: left_outer
    sql_on: ${order_items.user_id} = ${users.id} ;;
    relationship: many_to_one
  }

  join: inventory_items {
    type: left_outer
    sql_on: ${order_items.inventory_item_id} = ${inventory_items.id} ;;
    relationship: many_to_one
  }

  join: products {
    type: left_outer
    sql_on: ${inventory_items.product_id} = ${products.id} ;;
    relationship: many_to_one
  }

  join: distribution_centers {
    type: left_outer
    sql_on: ${products.distribution_center_id} = ${distribution_centers.id} ;;
    relationship: many_to_one
  }
}

explore: events {
  join: event_session_facts {
    type: left_outer
    sql_on: ${events.session_id} = ${event_session_facts.session_id} ;;
    relationship: many_to_one
  }
  join: event_session_funnel {
    type: left_outer
    sql_on: ${events.session_id} = ${event_session_funnel.session_id} ;;
    relationship: many_to_one
  }
  join: users {
    type: left_outer
    sql_on: ${events.user_id} = ${users.id} ;;
    relationship: many_to_one
  }
}
Task 3. Add a sql_always_where filter
training_ecommerce.model
connection: "bigquery_public_data_looker"

# include all the views
include: "/views/*.view"
include: "/z_tests/*.lkml"
include: "/**/*.dashboard"

datagroup: training_ecommerce_default_datagroup {
  # sql_trigger: SELECT MAX(id) FROM etl_log;;
  max_cache_age: "1 hour"
}

persist_with: training_ecommerce_default_datagroup

label: "E-Commerce Training"

explore: order_items {
  sql_always_where: ${created_date} >= '2021-01-01' ;;

  join: users {
    type: left_outer
    sql_on: ${order_items.user_id} = ${users.id} ;;
    relationship: many_to_one
  }

  join: inventory_items {
    type: left_outer
    sql_on: ${order_items.inventory_item_id} = ${inventory_items.id} ;;
    relationship: many_to_one
  }

  join: products {
    type: left_outer
    sql_on: ${inventory_items.product_id} = ${products.id} ;;
    relationship: many_to_one
  }

  join: distribution_centers {
    type: left_outer
    sql_on: ${products.distribution_center_id} = ${distribution_centers.id} ;;
    relationship: many_to_one
  }
}

explore: events {
  join: event_session_facts {
    type: left_outer
    sql_on: ${events.session_id} = ${event_session_facts.session_id} ;;
    relationship: many_to_one
  }
  join: event_session_funnel {
    type: left_outer
    sql_on: ${events.session_id} = ${event_session_funnel.session_id} ;;
    relationship: many_to_one
  }
  join: users {
    type: left_outer
    sql_on: ${events.user_id} = ${users.id} ;;
    relationship: many_to_one
  }
}
Task 4. Add a sql_always_having filter
training_ecommerce.model
connection: "bigquery_public_data_looker"

# include all the views
include: "/views/*.view"
include: "/z_tests/*.lkml"
include: "/**/*.dashboard"

datagroup: training_ecommerce_default_datagroup {
  # sql_trigger: SELECT MAX(id) FROM etl_log;;
  max_cache_age: "1 hour"
}

persist_with: training_ecommerce_default_datagroup

label: "E-Commerce Training"

explore: order_items {
  sql_always_having: ${order_item_count} = 1 ;;

  join: users {
    type: left_outer
    sql_on: ${order_items.user_id} = ${users.id} ;;
    relationship: many_to_one
  }

  join: inventory_items {
    type: left_outer
    sql_on: ${order_items.inventory_item_id} = ${inventory_items.id} ;;
    relationship: many_to_one
  }

  join: products {
    type: left_outer
    sql_on: ${inventory_items.product_id} = ${products.id} ;;
    relationship: many_to_one
  }

  join: distribution_centers {
    type: left_outer
    sql_on: ${products.distribution_center_id} = ${distribution_centers.id} ;;
    relationship: many_to_one
  }
}

explore: events {
  join: event_session_facts {
    type: left_outer
    sql_on: ${events.session_id} = ${event_session_facts.session_id} ;;
    relationship: many_to_one
  }
  join: event_session_funnel {
    type: left_outer
    sql_on: ${events.session_id} = ${event_session_funnel.session_id} ;;
    relationship: many_to_one
  }
  join: users {
    type: left_outer
    sql_on: ${events.user_id} = ${users.id} ;;
    relationship: many_to_one
  }
}
Task 5. Add a conditionality_filter
training_ecommerce.model
connection: "bigquery_public_data_looker"

# include all the views
include: "/views/*.view"
include: "/z_tests/*.lkml"
include: "/**/*.dashboard"

datagroup: training_ecommerce_default_datagroup {
  # sql_trigger: SELECT MAX(id) FROM etl_log;;
  max_cache_age: "1 hour"
}

persist_with: training_ecommerce_default_datagroup

label: "E-Commerce Training"

explore: order_items {
  conditionally_filter: {
    filters: [created_date: "3 years"]
    unless: [users.id, users.state]
  }

  join: users {
    type: left_outer
    sql_on: ${order_items.user_id} = ${users.id} ;;
    relationship: many_to_one
  }

  join: inventory_items {
    type: left_outer
    sql_on: ${order_items.inventory_item_id} = ${inventory_items.id} ;;
    relationship: many_to_one
  }

  join: products {
    type: left_outer
    sql_on: ${inventory_items.product_id} = ${products.id} ;;
    relationship: many_to_one
  }

  join: distribution_centers {
    type: left_outer
    sql_on: ${products.distribution_center_id} = ${distribution_centers.id} ;;
    relationship: many_to_one
  }
}

explore: events {
  join: event_session_facts {
    type: left_outer
    sql_on: ${events.session_id} = ${event_session_facts.session_id} ;;
    relationship: many_to_one
  }
  join: event_session_funnel {
    type: left_outer
    sql_on: ${events.session_id} = ${event_session_funnel.session_id} ;;
    relationship: many_to_one
  }
  join: users {
    type: left_outer
    sql_on: ${events.user_id} = ${users.id} ;;
    relationship: many_to_one
  }
}