
Generate Personalized Email Content with BigQuery Continuous Queries and Gemini - GSP1284
A passionate full-stack developer from @ePlus.DEV
Overview
Building a customer engagement system is often complex and can require specialized tooling. But what if you could do this with something as easy as a SQL statement? This is now possible with BigQuery continuous queries.
Imagine this: You have attracted potential customers to your fantastic website, and they have even added items to their shopping cart. However, then they vanish without completing the purchase. One solution? Real-time engagement that rekindles their interest with a custom email made possible with BigQuery continuous queries and Gemini.

BigQuery continuous queries are SQL statements that run continuously, allowing you to analyze incoming data in BigQuery in real time. You can use continuous queries to perform time sensitive tasks, such as creating and immediately acting on insights, applying real time machine learning (ML) inference and using generated content, and replicating data into other platforms. This lets you use BigQuery as an event-driven data processing engine for your application's decision logic. By leveraging BigQuery continuous queries, you can unlock real-time AI use cases such as using Generative AI models like Gemini to generate personalized text based on customer selections.
In this lab, you learn how to generate and send personalized email content with BigQuery continuous queries, Gemini models, Pub/Sub, and Application Integration triggers. Specifically, you create a BigQuery continuous query that monitors a BigQuery table for abandoned shopping cart records and sends new abandoned cart information to Gemini to generate a tailored promotional email for that customer. The personalized email content is then exported from BigQuery to a Pub/Sub topic, and the Application Integration trigger that you have configured sends an email for each Pub/Sub message received.
What you'll learn
In this lab, you learn how to:
Create and configure a BigQuery ML remote model (Gemini 2.0 Flash)
Grant a custom service account access to BigQuery and Pub/Sub resources
Create and configure an Application Integration trigger
Create a continuous query in BigQuery that generates email text with Gemini
Add data to the abandoned carts table to test the continuous query
Setup and requirements
Before you click the Start Lab button
Read these instructions. Labs are timed and you cannot pause them. The timer, which starts when you click Start Lab, shows how long Google Cloud resources are made available to you.
This hands-on lab lets you do the lab activities in a real cloud environment, not in a simulation or demo environment. It does so by giving you new, temporary credentials you use to sign in and access Google Cloud for the duration of the lab.
To complete this lab, you need:
- Access to a standard internet browser (Chrome browser recommended).
Note: Use an Incognito (recommended) or private browser window to run this lab. This prevents conflicts between your personal account and the student account, which may cause extra charges incurred to your personal account.
- Time to complete the lab—remember, once you start, you cannot pause a lab.
Note: Use only the student account for this lab. If you use a different Google Cloud account, you may incur charges to that account.
How to start your lab and sign in to the Google Cloud console
Click the Start Lab button. If you need to pay for the lab, a dialog opens for you to select your payment method. On the left is the Lab Details pane with the following:
The Open Google Cloud console button
Time remaining
The temporary credentials that you must use for this lab
Other information, if needed, to step through this lab
Click Open Google Cloud console (or right-click and select Open Link in Incognito Window if you are running the Chrome browser).
The lab spins up resources, and then opens another tab that shows the Sign in page.
Tip: Arrange the tabs in separate windows, side-by-side.
Note: If you see the Choose an account dialog, click Use Another Account.
If necessary, copy the Username below and paste it into the Sign in dialog.
student-04-8ee99f86a41c@qwiklabs.netYou can also find the Username in the Lab Details pane.
Click Next.
Copy the Password below and paste it into the Welcome dialog.
SVOoS1XZ1OvmYou can also find the Password in the Lab Details pane.
Click Next.
Important: You must use the credentials the lab provides you. Do not use your Google Cloud account credentials.
Note: Using your own Google Cloud account for this lab may incur extra charges.
Click through the subsequent pages:
Accept the terms and conditions.
Do not add recovery options or two-factor authentication (because this is a temporary account).
Do not sign up for free trials.
After a few moments, the Google Cloud console opens in this tab.
Note: To access Google Cloud products and services, click the Navigation menu or type the service or product name in the Search field.

Task 1. Create and configure a BigQuery ML remote model
For this task, several resources have been pre-created for you including a BigQuery dataset named continuous_queries and table named abandoned_carts for the abandoned shopping carts.
In this task, you create and configure additional BigQuery resources including a BigQuery ML remote model with Gemini 2.0 Flash as the endpoint to generate the personalized email content for your workflow.
Create a BigQuery remote connection
In the Google Cloud console, click on the Navigation menu () > BigQuery.
In the Explorer pane, click + Add, and then click Connections to external data sources.
Note: Alternatively, if you do not see the option for + Add followed by Connections to external data sources, you can click + Add data, and then use the search bar for data sources to search for Vertex AI. Click on the result for Vertex AI.
For Connection type, select Vertex AI remote models, remote functions and BigLake (Cloud Resource).
For Connection ID, enter: continuous-queries-connection
For Location type, select Region >
us-east1.Click Create connection, and then click Go to connection (in the message at the bottom at the page).
On the Connection info page, copy the Service account ID for use in the next section.
For example: bqcx-1054723899402-whbp@gcp-sa-bigquery-condel.iam.gserviceaccount.com
Grant IAM role for Vertex AI to the BigQuery service account
In the Google Cloud console, on the Navigation menu (), select IAM & Admin > IAM.
Click Grant access.
For New principals, enter the service account ID you copied in the previous section (such as
bqcx-1054723899402-whbp@gcp-sa-bigquery-condel.iam.gserviceaccount.com).For Select a role, select Vertex AI > Vertex AI User.
Click Save.
Create a BigQuery ML remote model
In the Google Cloud console, click on the Navigation menu () > BigQuery.
Click on Untitled query to access a blank query window.
Copy and paste the following query to create a BigQuery ML model, and click Run.
# Create a BigQuery ML remote model named gemini_2_0_flash
CREATE MODEL `qwiklabs-gcp-03-3a3edcbccf3f.continuous_queries.gemini_2_0_flash`
REMOTE WITH CONNECTION `us-east1.continuous-queries-connection`
OPTIONS(endpoint = 'gemini-2.0-flash-001');
Note: If you receive an error related to the service account permissions (which you assigned in the previous section), wait a few minutes, and then run the query again.
Click Check my progress to verify the objective.
Create and configure a BigQuery ML remote model.
Check my progress
Task 2. Grant a custom service account access to BigQuery and Pub/Sub resources
For this task, several resources have been pre-created for you including a Pub/Sub topic named recapture_customer and a custom service account named bq-continuous-query-sa@qwiklabs-gcp-03-3a3edcbccf3f.iam.gserviceaccount.com.
In this task, you grant the custom service account access to the BigQuery dataset and remote model and the Pub/Sub topic, all of which are used in later tasks to generate and send the personalized email.
Grant the custom service account access to BigQuery dataset and remote model
In the Google Cloud console, click on the Navigation menu () > BigQuery.
In the Explorer pane, expand the arrow next to
qwiklabs-gcp-03-3a3edcbccf3f.Expand External connections, and click on
us-east1.continuous-queries-connection.On the Connection info page, click Share.
Click Add principal.
For New principals, enter the custom service account ID: bq-continuous-query-sa@
qwiklabs-gcp-03-3a3edcbccf3f.iam.gserviceaccount.comFor Select a role, select BigQuery > BigQuery Connection User.
Click Save, and then click Close.
In the Explorer pane, click on the name for the dataset containing the table for abandoned carts: continuous_queries
On the Dataset info page, click Sharing, and select Permissions.
Click Add principal.
For New principals, enter the custom service account ID: bq-continuous-query-sa@
qwiklabs-gcp-03-3a3edcbccf3f.iam.gserviceaccount.comFor Select a role, select BigQuery > BigQuery Data Editor.
Click Save, and then click Close.
Grant Pub/Sub Viewer and Pub/Sub Publisher roles to the custom service account
In the Google Cloud console, click on the Navigation menu () > View All Products. Under Analytics, click on Pub/Sub.
On the row for recapture_customer, click on More Actions (three vertical dots), and select View permissions.
Click Add principal.
For New principals, enter the custom service account ID: bq-continuous-query-sa@
qwiklabs-gcp-03-3a3edcbccf3f.iam.gserviceaccount.comFor Select a role, select Pub/Sub > Pub/Sub Viewer.
Click Add another role.
For Select a role, select Pub/Sub > Pub/Sub Publisher.
Click Save.
Click Check my progress to verify the objective.
Please grant the custom service account access to BigQuery dataset and remote model.
Grant a custom service account access to BigQuery and Pub/Sub resources.
Check my progress
Please grant the custom service account access to BigQuery dataset and remote model.
Task 3. Create and configure an Application Integration trigger
Application Integration is an Integration-Platform-as-a-Service (iPaaS) solution in Google Cloud that offers a set of tools to connect and manage multiple applications and data that need to be integrated to support a specific business operation, which is referred to as an integration. A trigger is an external event that initiates a task, or sequence of tasks, in an integration, such as a Pub/Sub trigger based on events in a Pub/Sub topic. You can think of a trigger as an entry point to your integration and the event tied to the trigger causes the tasks associated with the trigger to run.
In this task, you create and configure an Application Integration trigger that runs the integration when a new message is sent to your Pub/Sub topic. The output of the integration is an email that is sent to the customer of the abandoned shopping cart.
Create a Pub/Sub trigger
In the Google Cloud Console, type Application Integration into the search bar (top of page), and then click on Application Integration in the results list.
For Region on the Get started with Application Integration page, select
us-east1.Click Quick setup to enable the neccessary APIs.
Click Create integration, and provide the following name for your integration: abandoned-shopping-carts-integration
Click CREATE.
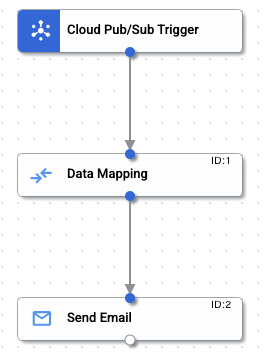
On the page for abandoned-shopping-carts-integration, click Triggers (top of page).
Select Cloud Pub/Sub, and click on the canvas to add the Pub/Sub trigger.
In the trigger details pane, for Trigger Input > Pub/Sub topic, add the path to the pre-created Pub/Sub topic:
projects/qwiklabs-gcp-03-3a3edcbccf3f/topics/recapture_customer
- For Service account, select the custom service account ID: bq-continuous-query-sa@
qwiklabs-gcp-03-3a3edcbccf3f.iam.gserviceaccount.com
If you do not see it in the list, click Refresh list.
If you see a warning that says Grant the necessary roles, click Grant.
Configure data mapping variables for Pub/Sub trigger
At the top of the canvas, click Tasks (next to Triggers).
In the search bar, enter: Data Mapping
Select Data Mapping from the results, and click on the canvas to add the data mapping task below Cloud Pub/Sub Trigger.
Click on the bottom connection dot for Cloud Pub/Sub Trigger, and drag your cursor to connect it to the top connection dot for Data Mapping.
There should now be an arrow flowing from the bottom of Cloud Pub/Sub Trigger to the top of Data Mapping.
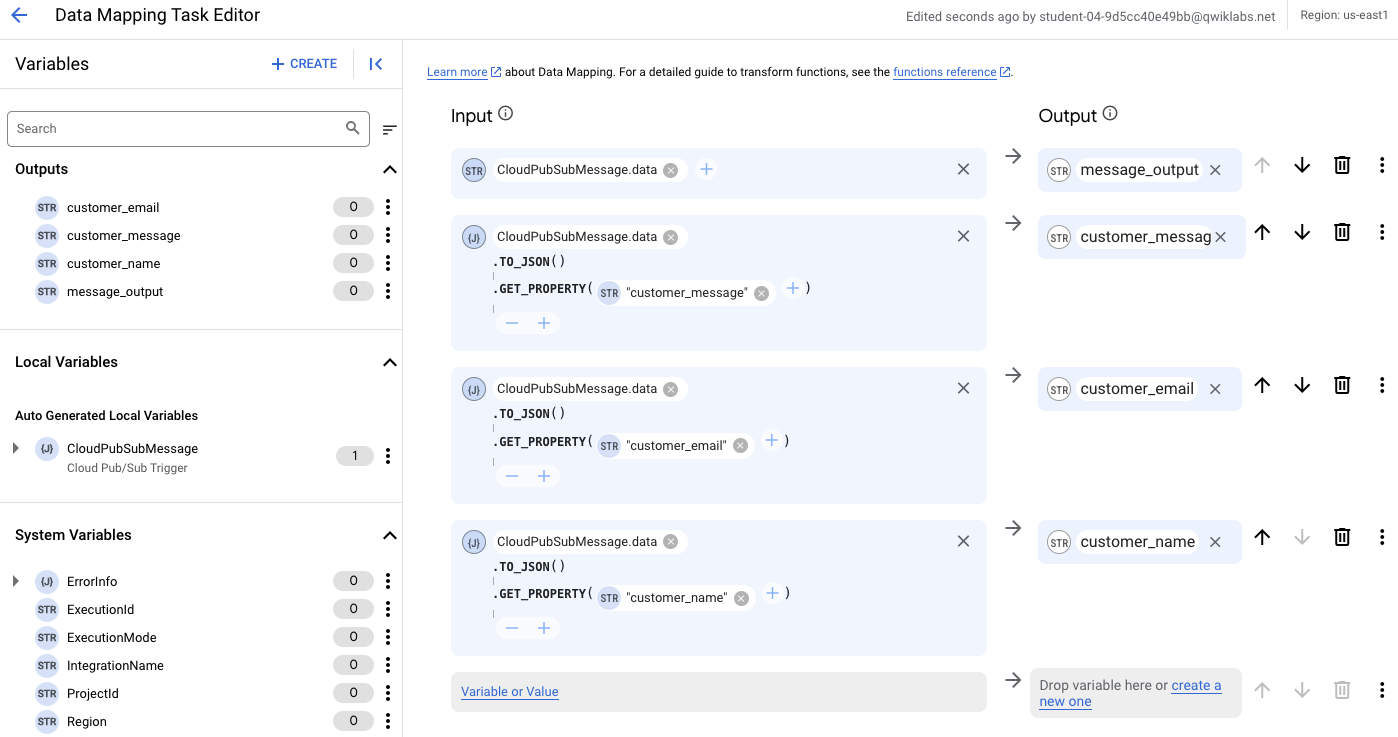
- Click on the Data Mapping item on your canvas, and click Open Data Mapping Editor.
In the next steps, you create four input variables, each of the type CloudPubSubMessage.data.
Variable 1. message_output
Under Input, click Variable or Value.
Select Variable, and then select CloudPubSubMessage.data. Click Save.
Under Output, click Create a new one.
For Name, enter: message_output
For Variable type, select Output from integration.
For Data type, select String.
For Blank default value means, enable Empty string.
Click Create.
Variable 2. customer_message
You just created one variable that does not have functions included in Input.
Now, you create another variable that has two functions included in Input.
Under Input, click Variable or Value.
Select Variable, and then select CloudPubSubMessage.data. Click Save.
Click Add a function (+ icon) next to the second variable, and select TO_JSON() -> JSON.
Click Add a function (+ icon) for the second variable again, and select GET_PROPERTY(String) -> JSON.
Next to .GET_PROPERTY, click Variable or Value.
Select Value, and enter: customer_message
Remain on the same row for this variable, and under Output, click Create a new one.
For Name, enter: customer_message
For Variable type, select Output from integration.
For Data type, select String.
Note: The default is JSON because of the added function for JSON, so be sure to change the data type to String as instructed.
For Blank default value means, enable Empty string.
Click Create.
Variables 3 and 4. customer_email and customer_name
- Repeat steps 1 to 12 in the previous section to create two more variables with the following information:
| Value for GET_PROPERTY() | Output name |
| customer_email | customer_email |
| customer_name | customer_name |
Note: Recall that the default data type for Output is JSON because of the added function for JSON, so be sure to change the data type for Output to String for both of these variables.
There are now four data mapping variables configured for this Application Integration trigger: message_output, customer_message, customer_email, and customer_name.
Add task to send email
At the top of screen, click the back arrow (<-) next to Data Mapping Task Editor to return to the canvas.
At the top of the canvas, click Tasks (next to Triggers).
In the search bar, enter: Send Email
Select Send Email from the results, and click on the canvas to add the send email task below Data Mappings.
Click on the bottom connection dot for Data Mapping, and drag your cursor to connect it to the top connection dot for Send Email.
In addition to the first arrow connecting Cloud Pub/Sub Trigger to Data Mapping, there is now a second arrow flowing from the bottom of Data Mapping to the top of Send Email.
Click on the Send Email item on your canvas to see the details.
For To Recipient(s), click Variable. Enter customer_email, and select that variable from the search results.
If you see a red warning, ensure that you have selected the variable from the search results before you proceed.
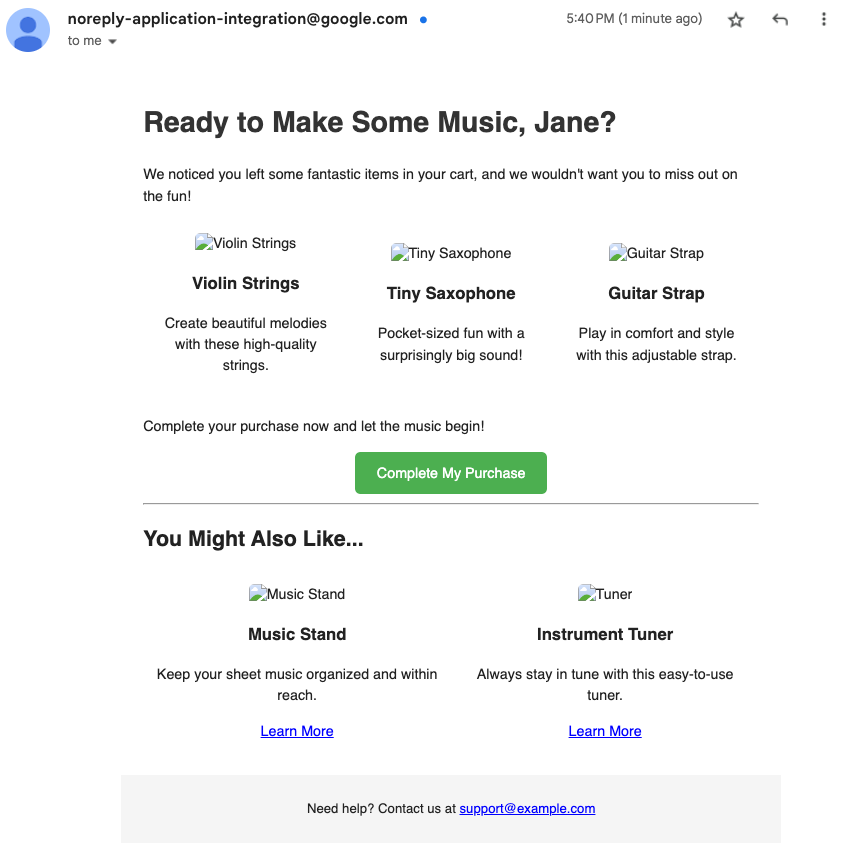
For Subject, enter: Don't forget the items in your cart
For Body Format, select HTML.
For Body in HTML, click Variable. Enter customer_message, and select that variable from the search results.
If you see a red warning, ensure that you have selected the variable from the search results before you proceed.
- At the top right of the abandoned-shopping-carts-integration page, click Publish.
Click Check my progress to verify the objective.
Create and configure an Application Integration trigger.
Check my progress
Task 4. Create a continuous query in BigQuery that generates email text with Gemini
In the previous tasks, you created and configured various components needed for the integration such as the BigQuery ML remote model and the Application Integration trigger for Pub/Sub.
In this task, you create the final piece of the workflow: the continuous query that monitors the BigQuery table for abandoned shopping cart records, sends a request to Gemini to generate a tailored promotional email for that customer, and writes the personalized email content to the Pub/Sub topic.
Create a BigQuery Enterprise reservation
In the Google Cloud console, click on the Navigation menu () > BigQuery > Capacity Management (under Administration).
Click Create reservation.
For reservation name enter: bq-continuous-queries-reservation
For Location, select
us-east1.For Edition, select Enterprise.
For Max reservation size selector, select Extra Small (50 slots).
For Baseline slots, enter: 50
Click Save.
Create an assignment
After the reservation is created, identify the row for the reservation named bq-continuous-queries-reservation in the slot reservations table.
Under Actions, click Reservation actions (three vertical dots), and select Create assignment.
For Select an organization, folder or project, click Browse, and select this project:
qwiklabs-gcp-03-3a3edcbccf3fFor Job type, select Continuous.
Click Create.
You can expand the arrow next to the reservation named bq-continuous-queries-reservation to see the new assignment, which appears as projects/qwiklabs-gcp-03-3a3edcbccf3f.
Create the continuous query in BigQuery
In the left side menu for BigQuery, click Studio.
Click on Untitled query to access a blank query window.
Copy and paste the following query to create a continuous query, but do not click run yet.
EXPORT DATA
 OPTIONS (format = CLOUD_PUBSUB,
 uri = "https://pubsub.googleapis.com/projects/qwiklabs-gcp-03-3a3edcbccf3f/topics/recapture_customer")
AS (SELECT
   TO_JSON_STRING(
     STRUCT(
       customer_name AS customer_name,
       customer_email AS customer_email, REGEXP_REPLACE(REGEXP_EXTRACT(ml_generate_text_llm_result,r"(?im)\<html\>(?s:.)*\<\/html\>"), r"(?i)\[your name\]", "Your friends at AI Megastore") AS customer_message)),
 FROM ML.GENERATE_TEXT( MODEL `qwiklabs-gcp-03-3a3edcbccf3f.continuous_queries.gemini_2_0_flash`,
     (SELECT
       customer_name,
       customer_email,
       CONCAT("Write an email to customer ", customer_name, ", explaining the benefits and encouraging them to complete their purchase of: ", products, ". Also show other items the customer might be interested in. Provide the response email in HTML format.") AS prompt
     FROM
          APPENDS(TABLE `qwiklabs-gcp-03-3a3edcbccf3f.continuous_queries.abandoned_carts`,
            -- Configure the APPENDS TVF start_timestamp to specify when you want to
            -- Start processing data using your continuous query.
            -- Here we process data as ten minutes before the current time.
            CURRENT_TIMESTAMP() - INTERVAL 10 MINUTE)),
   STRUCT( 1024 AS max_output_tokens,
     0.2 AS temperature,
     1 AS candidate_count,
     TRUE AS flatten_json_output)))
- Above the query window, click More actions (three vertical dots) > More (gear icon), and select Continuous query under Choose query mode.
If prompted, click Confirm.
Click More actions (three vertical dots) > More (gear icon) again, and select Query settings.
Under Continuous query, for Service account, select the custom service account: bq-continuous-query-sa@
qwiklabs-gcp-03-3a3edcbccf3f.iam.gserviceaccount.comClick Save to exit the query settings.
In the query window, click Run to start the continuous query.
It may take a few minutes for the continuous query to start.
When you see the status Job running continously at the top of the query window, you can proceed to the final task.
Click Check my progress to verify the objective.
Create a continuous query in BigQuery that generates email text with Gemini.
Check my progress
Task 5. Add data to the abandoned carts table to test the continuous query
In this final task, you test the continuous query by adding some data to the abandoned_carts table to initiate the integration that sends the personalized email to the customer.
In BigQuery, click on the + icon (SQL query to the right of Untitled query) to open a new query window.
Copy and paste the following query to insert details for an abandoned shopping cart to the table, and click Run.
If desired, you can replace Name with your name. You can also replace student-04-8ee99f86a41c@qwiklabs.net with your own email address if you want to access the generated email.
If you use the lab username (student-04-8ee99f86a41c@qwiklabs.net) as included in the query below, you will not be able to access the generated email.
# Insert details for an abandoned shopping cart to the table
INSERT INTO `continuous_queries.abandoned_carts`(customer_name, customer_email,products)
VALUES ("Name","student-04-8ee99f86a41c@qwiklabs.net","Violin Strings, Tiny Saxophone, Guitar Strap")
When you see the message This statement added 1 row to abandoned_carts in the Results, you have completed this task.
By inserting a new row into the table for abandoned carts, you have initiated the workflow to send a custom email to the provided user about their abandoned cart items.
If you provided an email address that you can access now, wait a few minutes, and then check your email to see the custom message about the abandoned cart.
Click Check my progress to verify the objective.
Add data to the abandoned carts table to test the continuous query.
Solution of Lab
Task 1:
curl -LO raw.githubusercontent.com/Techcps/Google-Cloud-Skills-Boost/master/Generate%20Personalized%20Email%20Content%20with%20BigQuery%20Continuous%20Queries%20and%20Gemini/techcps1284.sh
sudo chmod +x techcps1284.sh
./techcps1284.sh
Task 2:


Task 3:


