Getting Started with Firebase Cloud Firestore - GSP1136
A passionate full-stack developer from @ePlus.DEV
Overview
In this lab you will learn the fundamentals of Firebase Cloud Firestore development for the web. If you are new to Firebase development or looking for an overview of how to get started, you are in the right place. Read on to learn about the specifics of this lab and areas that you will get hands-on practice with.
The following lab is based on the Firebase Fundamentals YouTube Series:
Getting started with Cloud Firestore for the web
In this lab learn how to create a basic web application using webpack.
Installing Firebase
Creating a Firebase Application
Using the Firebase Emulator
Creating a Cloud Firestore Database
Writing content to the database
Reading content from the database
Prerequisites
Over the course of this lab the following elements are required:
Understanding of Webpack
Understanding of Node.js
Task 1. Setting Database Security Rules
Before the database can be used, the security rules need to be configured. In this lab Cloud Firestore will be used in development mode.
Note:
To learn more about how to setup Firebase security rules visit Get started with Cloud Firestore Security Rules
Right click on the Cloud Shell link
Select Open link in an incognito window
Use gcloud to set the project configuration
gcloud config set project qwiklabs-gcp-04-8e39579dfff4
- Make a new firebase-project folder
mkdir firebase-project && cd $_
- Create a file named firebase.json
cat << EOF > firebase.json
{
  "firestore": {
    "rules": "firestore.rules",
    "indexes": "firestore.indexes.json"
  }
}
EOF
- Create a file named firestore.rules
cat << EOF > firestore.rules
rules_version = '2';
service cloud.firestore {
  match /databases/{database}/documents {
    match /{document=**} {
      allow read, write: if true;
    }
  }
}
EOF
- Create a file named firestore.indexes.json
cat << EOF > firestore.indexes.json
{
  "indexes": [],
  "fieldOverrides": []
}
EOF
- The folder will now contain the following files:
.
├── firebase.json
├── firestore.indexes.json
└── firestore.rules
- Deploy the Firebase database rules for the project
firebase deploy --only firestore:rules --project qwiklabs-gcp-04-8e39579dfff4
Note:
The above command will update the Cloud Firestore security rules. If this is the first Cloud Shell API command, you may be required to authorize the command. Select AUTHORIZE when presented with this option.
- The Security Rules deploy will be similar to below:
Example Output
=== Deploying to 'qwiklabs-gcp-04-8e39579dfff4'...

i  deploying firestore
i  firestore: reading indexes from firestore.indexes.json...
i  cloud.firestore: checking firestore.rules for compilation errors...
✔  cloud.firestore: rules file firestore.rules compiled successfully
i  firestore: uploading rules firestore.rules...
✔  firestore: released rules firestore.rules to cloud.firestore
✔  Deploy complete!

Project Console: https://console.firebase.google.com/project/qwiklabs-gcp-04-8e39579dfff4/overview
The Firestore database can now be accessed by the application. The default security rules setting does not permit read/write access to the database. Ensure the security rules reflect the desired access, to learn more on this subject visit Get started with Cloud Firestore Security Rules | Firebase.
With the database security rules in place, the next step is to configure the environment. Learn more about it in the next section.
Task 2. Configuring the Firebase Environment
Before you can add Firebase to your JavaScript app, you need to create a Firebase project and register your app with that project. When you register your app with Firebase, you'll get a Firebase configuration object that you'll use to connect your app with your Firebase project resources.
Note:
Before installing the Firebase packages ensure the host device has a valid Node.js installation.
Set up the environment ready for the Firebase application.
- Create a default npm project
npm init -y
- Install the Firebase SDK package
npm i firebase
At this point you will have a folder complete with entries for node_modules and package.json. In addition the firebase configuration files:
| File | Description |
|---|---|
| firebase.json | Provides the configuration for the available Firebase components. In our example, auth and ui elements will be contained within this file together with port information. |
| .firebaserc | Provides the linked project configuration information. |
The Firebase environment has now been successfully initialized. Next, learn how to create a Firebase application.
Task 3. Creating a Firebase Application
The following section creates the elements required to perform Firebase Authentication using an email/password combination on the web.
Firebase Cloud Firestore information can be accessed via the Firebase site.
| Service | Import Statement | Description |
|---|---|---|
| Firestore | import { getFirestore } from ‘firebase/firestore' | Returns the existing default Firestore instance that is associated with the provided FirebaseApp. If no instance exists, initializes a new instance with default settings. |
| Firestore | import { initializeFirestore } from ‘firebase/firestore' | Initializes a new instance of Cloud Firestore with the provided settings. Can only be called before any other functions, including getFirestore(). If the custom settings are empty, this function is equivalent to calling getFirestore(). |
| Firestore | import { collection } from ‘firebase/firestore' | Gets a CollectionReference instance that refers to the collection at the specified absolute path.. |
| Firestore | import { doc } from ‘firebase/firestore' | Gets a DocumentReference instance that refers to the document at the specified absolute path. |
- Make a src folder within the firebase-project
mkdir src
- Create a src/index.js file with the following content:
import { initializeApp } from 'firebase/app'

// Add your web app's Firebase configuration
const firebaseConfig = {
  apiKey: "AIzaSyBdTqTDqi_b8GuAay5jrGgpFmiODX67QJM",
  authDomain: "qwiklabs-gcp-04-8e39579dfff4.firebaseapp.com",
  projectId: "qwiklabs-gcp-04-8e39579dfff4",
  storageBucket: "qwiklabs-gcp-04-8e39579dfff4.firebasestorage.app",
  messagingSenderId: "905127920742",
  appId: "1:905127920742:web:9b197216d98ece4b0659a7",
  measurementId: ""
};

// Initialize Firebase
const firebaseApp = initializeApp(firebaseConfig);

console.log('Hello, Firestore!')
- Create src/index.html file with the following content:
<!DOCTYPE html>
<html lang="en">
<head>
<meta charset="UTF-8">
<meta http-equiv="X-UA-Compatible" content="IE=edge">
<meta name="viewport" content="width=device-width, initial-scale=1.0">
<title>Getting Started with Firebase Cloud Firestore</title>
<script src="https://cdn.tailwindcss.com"></script>
</head>
<body class="bg-gray-100 flex flex-col items-center justify-center min-h-screen p-4">
<div class="bg-white p-8 rounded-lg shadow-md max-w-md w-full">
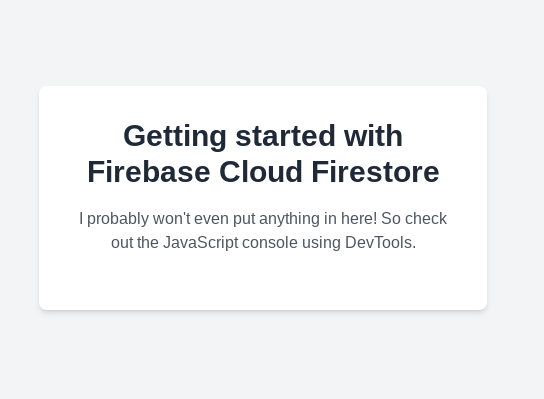
<h1 class="text-3xl font-bold text-gray-800 mb-4 text-center">Getting started with Firebase Cloud Firestore</h1>
<p class="text-gray-600 mb-6 text-center">
I probably won't even put anything in here! So check out the JavaScript console using DevTools.
</p>
<p id="dbTitle" class="text-lg font-semibold text-blue-600 mb-2"></p>
<p id="dbDescription" class="text-gray-700"></p>
</div>
<script src="main.js"></script>
</body>
</html>
The next step is to enhance the application to support webpack. Configure webpack in the next section to handle the build process for the application.
Task 4. Adding a Webpack configuration
Webpack is a common method of bundling web code and assets.
- Create a webpack.config.js file
const path = require('path');
const HtmlWebpackPlugin = require('html-webpack-plugin')

module.exports = {
  mode: 'development',
  devtool: 'eval-source-map',
  entry: path.resolve(__dirname, '/src/index.js'),
  output: {
    path: path.resolve(__dirname, 'dist'),
    filename: '[name].js',
    assetModuleFilename: '[name][ext]',
  },
  watch: false,
  plugins: [
    new HtmlWebpackPlugin({
      template: 'src/index.html',
      filename: 'index.html',
      inject: false
    })
  ],
}
- Install webpack packages using npm
npm install webpack webpack-cli --save-dev
- Install html-webpack-plugin
npm install --save-dev html-webpack-plugin
Edit the package.json file
Replace the "main": "index.js" entry with the following line in the package.json
"private": "true",
- Remove the "type": "commonjs" entry from the package.json
"type": "commonjs",
Note:
The type property may have been added, in which case removed from the package.json.
- Add a build script to the package.json
  "scripts": {
    "test": "echo \"Error: no test specified\" && exit 1",
    "build": "webpack"
  },
- The package.json should now look similar to the following:
Example Output
{
  "name": "firebase-project",
  "version": "1.0.0",
  "description": "",
  "private": "true",
  "scripts": {
    "test": "echo \"Error: no test specified\" && exit 1",
    "build": "webpack"
  },
  "keywords": [],
  "author": "",
  "license": "ISC",
  "dependencies": {
    "firebase": "^9.19.1"
  },
  "devDependencies": {
    "webpack": "^5.79.0",
    "webpack-cli": "^5.0.1"
  }
}
- Run the build for the application from the command line
npm run build
Note:
The build command will generate a webpack dist folder containing the code to access the Firebase Cloud Function application.
- Serve the dist directory on port 8080
python3 -m http.server 8080 --directory dist
- Open the Cloud Shell web preview on port 8080
Example Output
- Cancel the Cloud Shell web preview (Press CTRL-C)
At this point the backend Firebase project is being referenced. Proceed to the next section to learn how to write information to the database.
Task 5. Writing to a Firestore Document
Update the Cloud Firestore firestore configuration to write information to the database.
To add content to the linked Firebase project, use the getFirestore call. Update the src/index.js code created earlier to write to the project Firestore database.
Edit src/index.js
Add an import statement to src/index.js:
import { getFirestore, doc, setDoc } from 'firebase/firestore'
- Add a call to getFirestore in src/index.js after the initializeApp call:
const firestore = getFirestore()
Copied!
- Add a writeFirestoreDemo function to write to the Cloud Firestore database
const firestoreIntroDb = doc(firestore, 'firestoreDemo/lab-demo-0001')

function writeFirestoreDemo() {
 const docData = {
   title: 'Firebase Fundamentals Demo',
   description: 'Getting started with Cloud Firestore',
 }

 setDoc(firestoreIntroDb, docData)
}

writeFirestoreDemo()
Copied!
- The src/index.js file should look similar to below:
Example Output
import { initializeApp } from 'firebase/app'
import { getFirestore, doc, setDoc } from 'firebase/firestore'

// Add your web app's Firebase configuration
const firebaseConfig = {
  apiKey: "AIzaSyBdTqTDqi_b8GuAay5jrGgpFmiODX67QJM",
  authDomain: "qwiklabs-gcp-04-8e39579dfff4.firebaseapp.com",
  projectId: "qwiklabs-gcp-04-8e39579dfff4",
  storageBucket: "qwiklabs-gcp-04-8e39579dfff4.firebasestorage.app",
  messagingSenderId: "905127920742",
  appId: "1:905127920742:web:9b197216d98ece4b0659a7",
  measurementId: ""
};
// Initialize Firebase
const firebaseApp = initializeApp(firebaseConfig);
const firestore = getFirestore()
const firestoreIntroDb = doc(firestore, 'firestoreDemo/lab-demo-0001')

function writeFirestoreDemo() {
 const docData = {
   title: 'Firebase Fundamentals Demo',
   description: 'Getting started with Cloud Firestore',
 }
 setDoc(firestoreIntroDb, docData)
}
writeFirestoreDemo()

console.log('Hello, Firestore!')
Copied!
- Run the build for the application from the command line
npm run build
- Serve the dist directory in the browser on port 8080
python3 -m http.server 8080 --directory dist
Open the Cloud Shell web preview on port 8080
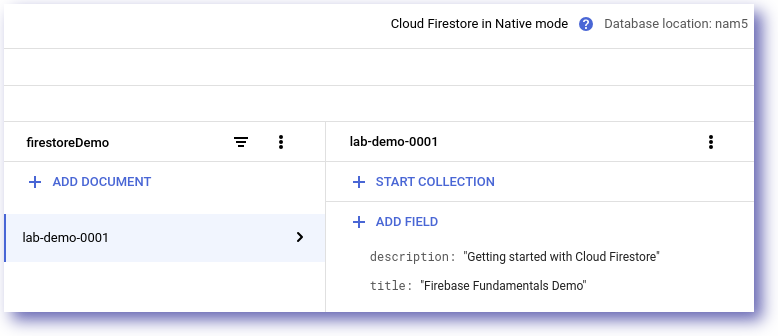
In the Cloud console, select the Firestore menu option to view the Firestore data
Note:
It may be necessary to refresh the Firestore page to see the updated database content.
Data is now being written to the Firestore database. The next step is to be able to read information from the database.
Task 6. Reading a Firestore Document
Update the Cloud Firestore firestore configuration to read information from the database.
To access document information from the linked Firebase project, add the getDoc call. Update the src/index.js code created earlier to enable the application to read from the project Firestore database.
Edit src/index.js
Update the import statement to include getDoc:
import { getFirestore, doc, setDoc, getDoc } from 'firebase/firestore'

const titleControl = document.querySelector('#dbTitle')
const descriptionControl = document.querySelector('#dbDescription')
titleControl.textContent = ''
descriptionControl.textContent = ''
- Add a function readASingleDocument to read from the Firebase database
async function readASingleDocument() {
  const mySnapshot = await getDoc(firestoreIntroDb)
  if (mySnapshot.exists()) {
    const docData = mySnapshot.data()
    const dbJSON = await JSON.stringify(docData)
    console.log(`Data: ${dbJSON}`)
    const dbOBJ = await JSON.parse(dbJSON)
    console.log(`Title: ${dbOBJ.title}`)

    titleControl.textContent = "Title: " + dbOBJ.title
    descriptionControl.textContent = "Description: " + dbOBJ.description
  }
}

readASingleDocument()
Note:
Do not forget to comment out the writeFirestoreDemo function. If you are unsure how to do this, take a look at the example solution shown below.
- The src/index.js file should look similar to below:
Example Output
import { initializeApp } from 'firebase/app'
import { getFirestore, doc, setDoc, getDoc } from 'firebase/firestore'
const titleControl = document.querySelector('#dbTitle')
const descriptionControl = document.querySelector('#dbDescription')

// Initialize html elements
titleControl.textContent = ''
descriptionControl.textContent = ''

// Add your web app's Firebase configuration
const firebaseConfig = {
  apiKey: "AIzaSyBdTqTDqi_b8GuAay5jrGgpFmiODX67QJM",
  authDomain: "qwiklabs-gcp-04-8e39579dfff4.firebaseapp.com",
  projectId: "qwiklabs-gcp-04-8e39579dfff4",
  storageBucket: "qwiklabs-gcp-04-8e39579dfff4.firebasestorage.app",
  messagingSenderId: "905127920742",
  appId: "1:905127920742:web:9b197216d98ece4b0659a7",
  measurementId: ""
};

// Initialize Firebase
const firebaseApp = initializeApp(firebaseConfig);
const firestore = getFirestore()
const firestoreIntroDb = doc(firestore, 'firestoreDemo/lab-demo-0001')

// Write to Firestore Database
function writeFirestoreDemo() {
 const docData = {
   title: 'Firebase Fundamentals Demo',
   description: 'Getting started with Cloud Firestore',
 }
 setDoc(firestoreIntroDb, docData)
}

// Read from Firestore Database
async function readASingleDocument() {
  const mySnapshot = await getDoc(firestoreIntroDb)
  if (mySnapshot.exists()) {
    const docData = mySnapshot.data()
    const dbJSON = await JSON.stringify(docData)
    console.log(`Data: ${dbJSON}`)
    const dbOBJ = await JSON.parse(dbJSON)
    console.log(`Title: ${dbOBJ.title}`)
    titleControl.textContent = "Title: " + dbOBJ.title
    descriptionControl.textContent = "Description: " + dbOBJ.description
  }
}

// writeFirestoreDemo()
readASingleDocument()
console.log('Hello, Firestore!')
- Run the build for the application from the command line
npm run build
- Serve the dist directory in the browser on port 8080
python3 -m http.server 8080 --directory dist
- Open the Cloud Shell web preview on port 8080
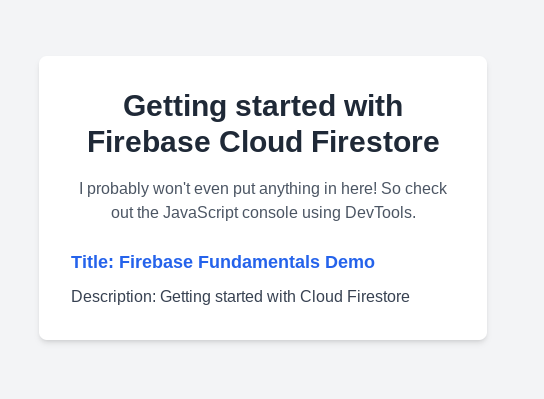
In the application output, the information written to the Firestore database is output using HTML. The title and description fields are shown as defined in the original code.
Feel free to make changes to the code to update the application to include different text using the read and write functions provided.
Solution of Lab
https://www.youtube.com/watch?v=lM3vAENNsQ0