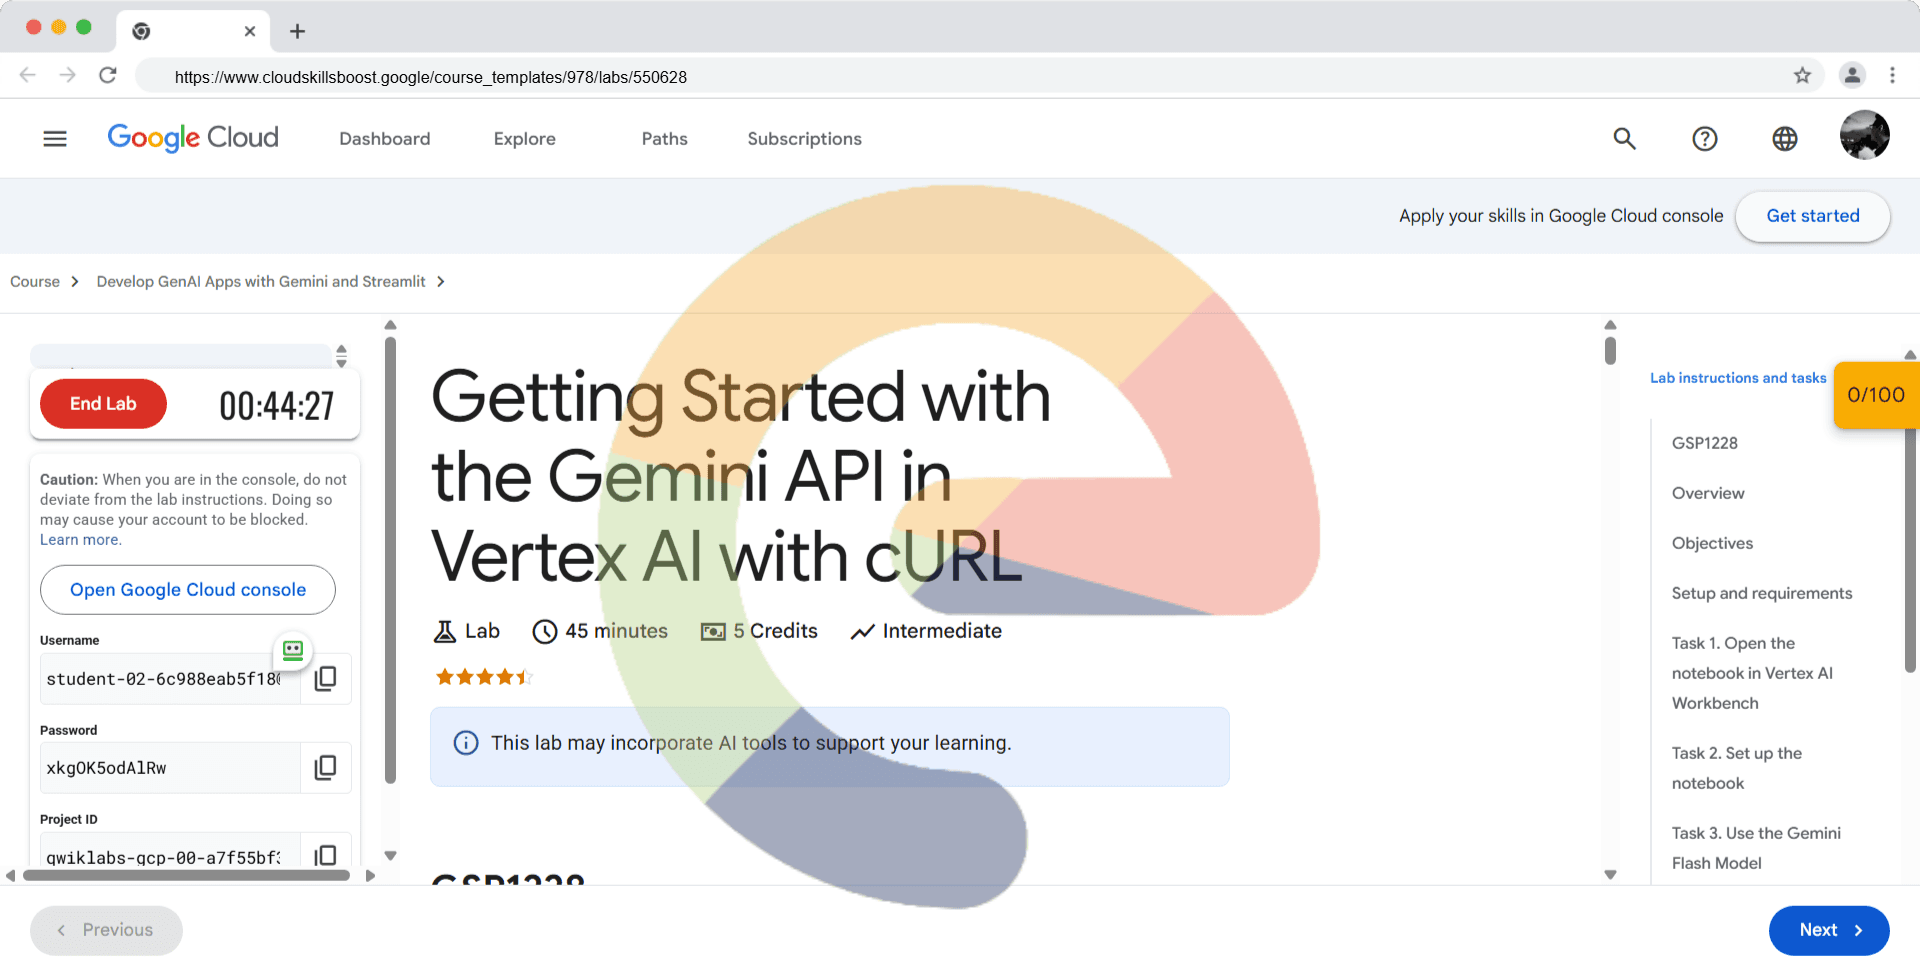
Getting Started with the Gemini API in Vertex AI with cURL - GSP1228
A passionate full-stack developer from @ePlus.DEV
Overview
In this lab, you learn how to use the Gemini API in Vertex AI with cURL commands to interact with the Gemini 2.0 Flash (gemini-2.0-flash) model. You will learn how to generate text from a prompt, add model parameters, chat, and generate text from images and video.
Gemini
Gemini is a family of powerful generative AI models developed by Google DeepMind, capable of understanding and generating various forms of content, including text, code, images, audio, and video.
Gemini API in Vertex AI
The Gemini API in Vertex AI provides a unified interface for interacting with Gemini models. This allows developers to easily integrate these powerful AI capabilities into their applications. For the most up-to-date details and specific features of the latest versions, please refer to the official Gemini documentation.
Gemini Models
Gemini Pro: Designed for complex reasoning, including:
Analyzing and summarizing large amounts of information.
Sophisticated cross-modal reasoning (across text, code, images, etc.).
Effective problem-solving with complex codebases.
Gemini Flash: Optimized for speed and efficiency, offering:
Sub-second response times and high throughput.
High quality at a lower cost for a wide range of tasks.
Enhanced multimodal capabilities, including improved spatial understanding, new output modalities (text, audio, images), and native tool use (Google Search, code execution, and third-party functions).
Prerequisites
Before starting this lab, you should be familiar with:
Basic Python programming.
General API concepts.
Running Python code in a Jupyter notebook on Vertex AI Workbench.
Objectives
In this lab, you will learn how to perform the following tasks:
Install the Python SDK
Use the Gemini API in Vertex AI to interact with each model
Use the Gemini 2.0 Flash (
gemini-2.0-flash) model to generate text from image(s), text prompts and video
Setup and requirements
Before you click the Start Lab button
Read these instructions. Labs are timed and you cannot pause them. The timer, which starts when you click Start Lab, shows how long Google Cloud resources are made available to you.
This hands-on lab lets you do the lab activities in a real cloud environment, not in a simulation or demo environment. It does so by giving you new, temporary credentials you use to sign in and access Google Cloud for the duration of the lab.
To complete this lab, you need:
- Access to a standard internet browser (Chrome browser recommended).
Note: Use an Incognito (recommended) or private browser window to run this lab. This prevents conflicts between your personal account and the student account, which may cause extra charges incurred to your personal account.
- Time to complete the lab—remember, once you start, you cannot pause a lab.
Note: Use only the student account for this lab. If you use a different Google Cloud account, you may incur charges to that account.
How to start your lab and sign in to the Google Cloud console
Click the Start Lab button. If you need to pay for the lab, a dialog opens for you to select your payment method. On the left is the Lab Details pane with the following:
The Open Google Cloud console button
Time remaining
The temporary credentials that you must use for this lab
Other information, if needed, to step through this lab
Click Open Google Cloud console (or right-click and select Open Link in Incognito Window if you are running the Chrome browser).
The lab spins up resources, and then opens another tab that shows the Sign in page.
Tip: Arrange the tabs in separate windows, side-by-side.
Note: If you see the Choose an account dialog, click Use Another Account.
If necessary, copy the Username below and paste it into the Sign in dialog.
student-02-6c988eab5f18@qwiklabs.netCopied!
You can also find the Username in the Lab Details pane.
Click Next.
Copy the Password below and paste it into the Welcome dialog.
xkgOK5odAlRwCopied!
You can also find the Password in the Lab Details pane.
Click Next.
Important: You must use the credentials the lab provides you. Do not use your Google Cloud account credentials.
Note: Using your own Google Cloud account for this lab may incur extra charges.
Click through the subsequent pages:
Accept the terms and conditions.
Do not add recovery options or two-factor authentication (because this is a temporary account).
Do not sign up for free trials.
After a few moments, the Google Cloud console opens in this tab.
Note: To access Google Cloud products and services, click the Navigation menu or type the service or product name in the Search field.

Task 1. Open the notebook in Vertex AI Workbench
In the Google Cloud console, on the Navigation menu (), click Vertex AI > Workbench.
Find the
vertex-ai-jupyterlabinstance and click on the Open JupyterLab button.
The JupyterLab interface for your Workbench instance opens in a new browser tab.
Note: If you do not see notebooks in JupyterLab, please follow these additional steps to reset the instance:
1. Close the browser tab for JupyterLab, and return to the Workbench home page.
2. Select the checkbox next to the instance name, and click Reset.
3. After the Open JupyterLab button is enabled again, wait one minute, and then click Open JupyterLab.
Task 2. Set up the notebook
Open the
intro_gemini_curlfile.In the Select Kernel dialog, choose Python 3 from the list of available kernels.
Run through the Getting Started and the Import libraries sections of the notebook.
- For Project ID, use
qwiklabs-gcp-00-a7f55bf368a4, and for Location, useus-west1.
- For Project ID, use
Note: You can skip any notebook cells that are noted Colab only. If you experience a 429 response from any of the notebook cell executions, wait 1 minute before running the cell again to proceed.
In the following sections, you will run through the notebook cells to see how to use the Gemini API in Vertex AI with cURL commands to interact with the Gemini 2.0 Flash (gemini-2.0-flash) model.
Task 3. Use the Gemini Flash Model
Gemini 2.0 Flash (gemini-2.0-flash) model is tailored for natural language tasks such as classification, summarization, extraction, and writing. In this task, you will learn how to use the Gemini 2.0 Flash to generate text from a prompt.
- In this task, run through the notebook cells to see how to use the Gemini Flash model to generate text from a text prompt.
Note: Save the notebook file before clicking on the Check my progress button for every task.
Click Check my progress to verify the objective.
Generate text from the text prompt
Generate multi-turn conversations from the chat prompt
Run Function calling cell in the notebook
Task 4. Multimodal input
The Gemini 2.0 Flash (gemini-2.0-flash) is a multimodal model that supports adding images and videos in text or chat prompts for a text response.
- In this task, run through the notebook cells to see how to use the Gemini 2.0 Flash model to generate text from an image from a local file, an image from Google Cloud Storage, and a video file.
Click Check my progress to verify the objective.
Generate text from the image file
Generate text from the video file
Solution of Lab

Quick
Open: https://console.cloud.google.com/vertex-ai/workbench


rm intro_gemini_curl-v2.0.0.ipynb
curl -LO raw.githubusercontent.com/ePlus-DEV/storage/refs/heads/main/labs/GSP1228/intro_gemini_curl-v2.0.0.ipynb
Script Alternative
rm intro_gemini_curl-v2.0.0.ipynb
curl -LO raw.githubusercontent.com/prateekrajput08/Arcade-Google-Cloud-Labs/refs/heads/main/Getting%20Started%20with%20the%20Gemini%20API%20in%20Vertex%20AI%20with%20cURL/intro_gemini_curl-v2.0.0.ipynb


press Shift+Enter