
Google Chat Bot - Apps Script - GSP250
A passionate full-stack developer from @ePlus.DEV
Overview
Google Chat bots provide easy-to-use access points to your organization's data and services. Users can converse with bots within a chat experience.
One way to create a Google Chat bot is to use Google Apps Script. This also gives you easy access to other Google services like Drive, Gmail, Calendar, Docs, Sheets, and much more.
In this lab, you use Google Apps Script to create a simple Google Chat bot, which you'll name "Attendance Bot". The bot integrates with Gmail to set a user's vacation responder and integrates with Calendar to put a meeting on the user's calendar.
What you'll do
In this lab, you perform the following tasks:
Create a chat app from a template with pre-populated event handlers.
Configure and publish the chat bot.
Add new handlers for events raised in Google Chat.
Parse event objects sent from Google Chat.
Respond to Google Chat with card-formatted responses.
Define and react to custom actions for button clicks in cards.
Setup and requirements
Before you click the Start Lab button
Read these instructions. Labs are timed and you cannot pause them. The timer, which starts when you click Start Lab, shows how long Google Cloud resources will be made available to you.
This hands-on lab lets you do the lab activities yourself in a real cloud environment, not in a simulation or demo environment. It does so by giving you new, temporary credentials that you use to sign in and access Google Cloud for the duration of the lab.
To complete this lab, you need:
- Access to a standard internet browser (Chrome browser recommended).
Note: Use an Incognito or private browser window to run this lab. This prevents any conflicts between your personal account and the Student account, which may cause extra charges incurred to your personal account.
- Time to complete the lab---remember, once you start, you cannot pause a lab.
Note: If you already have your own personal Google Cloud account or project, do not use it for this lab to avoid extra charges to your account.
How to start your lab and sign in to the Google Cloud console
Click the Start Lab button. If you need to pay for the lab, a pop-up opens for you to select your payment method. On the left is the Lab Details panel with the following:
The Open Google Cloud console button
Time remaining
The temporary credentials that you must use for this lab
Other information, if needed, to step through this lab
Click Open Google Cloud console (or right-click and select Open Link in Incognito Window if you are running the Chrome browser).
The lab spins up resources, and then opens another tab that shows the Sign in page.
Tip: Arrange the tabs in separate windows, side-by-side.
Note: If you see the Choose an account dialog, click Use Another Account.
If necessary, copy the Username below and paste it into the Sign in dialog.
student-04-6632f896e3e2@qwiklabs.netYou can also find the Username in the Lab Details panel.
Click Next.
Copy the Password below and paste it into the Welcome dialog.
yIzX1e8GZg7HYou can also find the Password in the Lab Details panel.
Click Next.
Important: You must use the credentials the lab provides you. Do not use your Google Cloud account credentials.
Note: Using your own Google Cloud account for this lab may incur extra charges.
Click through the subsequent pages:
Accept the terms and conditions.
Do not add recovery options or two-factor authentication (because this is a temporary account).
Do not sign up for free trials.
After a few moments, the Google Cloud console opens in this tab.
Note: To view a menu with a list of Google Cloud products and services, click the Navigation menu at the top-left.

Task 1. Create a chat app from a template
To implement your bot, create a new Google Apps Script project using the Chat App template.
Note: Signing into Google Cloud console sets your project and credentials. Before you click the Google Apps Script editor link in Step 1, be sure you have signed into the Google Cloud console.
Click this Google Apps Script homepage link to open the Google Apps Script online editor.
Scroll down to the bottom of the page, and click on Chat App.
Click Untitled project (the current name).
In the Edit project name dialog, rename the project to
Attendance Bot, and then click Rename.
Events in Google Chat
Most Apps Script bot interactions with Google Chat are event-driven. The interaction between the user, the bot, and Google Chat typically follows a sequence.
A user initiates an action, like adding a bot to a room, starting a direct message (DM) with a bot, or removing the bot from a room.
The action raises an event aimed at the bot in Google Chat.
Google Chat calls the corresponding event handler defined in the bot's script.
Google Chat raises four events that your Apps Script bot can listen for:
ADDED_TO_SPACE: This event occurs when a human user adds a bot to a room or a DM. In Apps Script, you define anonAddToSpace()function to handle this event.REMOVED_FROM_SPACE: This event occurs when a user removes the bot from a room or DM. This event does not post a response back to Google Chat. In Apps Script, you define anonRemoveFromSpace()function to handle this event.MESSAGE: This event occurs when a user messages the bot, either directly in a DM or as an @mention in a room. In Apps Script, you define anonMessage()function to respond to this event.CARD_CLICKED: This event occurs when the user clicks a button with a custom action assigned to it. In Apps Script, you define anonCardClick()function to respond to this event.
Update the code for the MESSAGE event handler
The Chat App template pre-populates the code file containing the event handlers.
- Click on the
Code.gsfile to see the pre-populated event handlers.
Notice the event handlers for the MESSAGE, ADDED_TO_SPACE and REMOVE_FROM_SPACE events. (You will add a handler for the CARD_CLICKED events later in this lab.)
- On line 38, align the cursor to the line below it (a single tab indentation like line 39), and then copy and paste the following code line to prompt logging of the event:
console.log('Attendance Bot added in ', event.space.name);
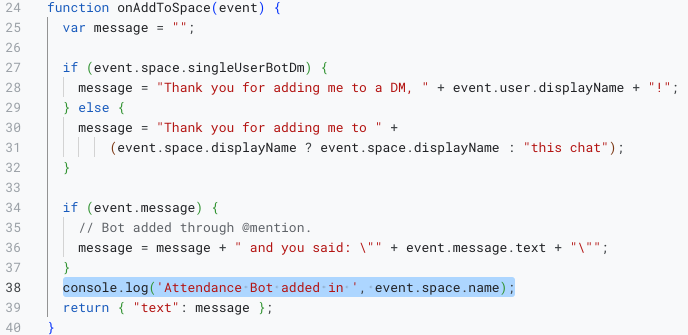
Click Save (
) to save the change to the
Code.gsfile.

Task 2. Publish the bot
Before you can run and test the bot, the Google Chat API must be enabled for your Google Cloud project, and your bot must be published to Google Chat.
Configure the Google Cloud project and update the script to use it
Go to the Google Cloud console, click the Navigation menu () in the upper left and navigate to APIs & Services > OAuth consent screen.
Set User Type to Internal, and click Create.
On the next page, (the OAuth consent screen), configure the following:
| Field | Value |
| App name | Attendance Bot |
| User support email | Select the email ID student-04-6632f896e3e2@qwiklabs.net from the drop-down. This is also your User Email in the left panel of the lab instructions. |
| Developer contact information | student-04-6632f896e3e2@qwiklabs.net |
Click Save and Continue.
On the next page (Scopes), leave all the fields empty, and then click Save and Continue.
As shown in the next page (Summary), the OAuth Consent Screen is now created for your app.
Click Back to Dashboard at the bottom of the page.
Click the More icon () in the upper right to expand the menu, and select Project settings.
Record the Project number to use in the next step to configure your project.
Return to the App Script editor, and navigate to the Project Settings for the Attendance Bot project ().
Under Google Cloud Platform (GCP) Project, click Change project.
For GCP Project number, enter the project number that you copied earlier. Then, click Set project.
Configure and publish the chat bot
In the Apps Script editor, get the Head Deployment ID for the test deployment by clicking on Deploy > Test Deployments (top-right of the screen), and then clicking Copy next to Head Deployment ID.
In the Google Cloud console, navigate to Navigation Menu () > APIs & Services > Library.
In the Library, search for
Google Chat API. Select the API from the list of results.The Google Chat API is already enabled in this project. If it is not enabled, click Enable.
Click Manage, and then click the Configuration tab under the Google Chat API section.
In the Configuration dialog, set the fields with the following values:
| Field | Value |
| App name | Attendance Bot |
| Avatar URL | https://goo.gl/kv2ENA |
| Description | Apps Script lab bot |
| Functionality | Select Receive 1:1 messages and Join spaces and group conversations |
| Connection settings | Check Apps Script project, and then paste the Head Deployment ID that you copied in step 1 into the Deployment ID field. |
| Visibility | student-04-6632f896e3e2@qwiklabs.net |
Click SAVE.
After the changes are saved, scroll to the top of the Configuration dialog to update the App Status to
LIVE – available to users.
You may have to refresh the page to see the App Status field.
- Click SAVE again.
Test the bot
To test your bot in Google Chat, do the following:
Click the Google Chat link to open Google Chat.
Select Start a chat () in the Chat section.
Search for
Attendance bot.From the results, select the Attendance Bot, Apps Script lab bot that you created, and click Start chat.
When the direct message thread opens, you should see a message from the bot thanking you for adding it to a DM.
Note: It can take a few minutes for the progress check below to return a successful completion mark for this task. If not successful, wait a few mins and try again.
Click Check my progress to verify the objective.
Publish and test the bot
Check my progress
Task 3. Define a card-formatted response
In the previous task, your bot responded to Google Chat events with a simple text response. In this task, you update your bot to respond with cards.
Card responses
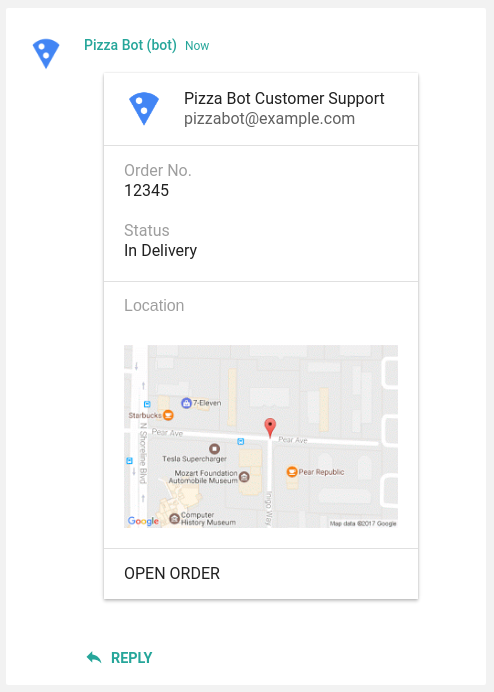
Google Chat supports the use of cards for responses. Cards are visual containers that allow you to group sets of user interface widgets together. Cards can display headers, text paragraphs, sets of buttons, images, and key/value text. Your bot can define one or many cards in its JSON response to Google Chat, which then translates your response into the corresponding UI elements.
The following image shows an example card response with three sections that includes a header, a key/value widget, an image widget, and a text button.
In Apps Script, click Editor (), and open the
Code.gsfile.Locate the existing code for
function onMessage(event)at the top ofCode.gsfile, and delete code lines 1 to 17.
You replace these code lines for function onMessage(event) with new code in the next step.
- Copy the following code, and paste these lines at the top of the
Code.gsfile:
Code.gs
var DEFAULT_IMAGE_URL = 'https://goo.gl/bMqzYS';
var HEADER = {
  header: {
    title : 'Attendance Bot',
    subtitle : 'Log your vacation time',
    imageUrl : DEFAULT_IMAGE_URL
  }
};

/**
 * Creates a card-formatted response.
 * @param {object} widgets the UI components to send
 * @return {object} JSON-formatted response
 */
function createCardResponse(widgets) {
  return {
    cards: [HEADER, {
      sections: [{
        widgets: widgets
      }]
    }]
  };
}

/**
 * Responds to a MESSAGE event triggered
 * in Google Chat.
 *
 * @param event the event object from Google Chat
 * @return JSON-formatted response
 */
function onMessage(event) {
  var userMessage = event.message.text;

  var widgets = [{
    "textParagraph": {
      "text": "You said: " + userMessage
    }
  }];

  console.log('You said:', userMessage);

  return createCardResponse(widgets);
}
Click Save (
) to save the
Code.gsfile.
By replacing the onMessage() function and adding the createCardResponse() function, you accomplish the following:
The
onMessage()function reads the user's original message and constructs a response as a simple TextParagragh widget.The
onMessage()function then callscreateCardResponse(), which places the TextParagraph widget within a section of a single card.The bot returns the JavaScript object constructed with the card response to Google Chat.
Test the bot
- To retest this bot, return to your direct message chat with the bot in Google Chat, and type any message, such as "Hello".
The Attendance bot should respond with a Log your vacation time card.
Note: The onMessage() event handler parses the event object passed to it by Google Chat to extract the user's original message. You can also get other types of information about the event, including the name of the user that initiated the event, their email address, the name of the room that the event occurred in, and much more.
For more information about the structure of the event objects sent by Google Chat, you can refer to the Event formats reference guide.
Note: It can take a few minutes for the progress check below to return a successful completion mark for this task. If not successful, wait a few mins and try again.
Click Check my progress to verify the objective.
Test the bot in card-formatted response
Check my progress
Task 4. React to button clicks in cards
In the previous step, your bot responded to a message from a user—a MESSAGE event—with a simple card that contained a TextParagragh widget. In this step, you will create a response that includes buttons, where each button has a custom action defined for it.
Interactive cards
Card responses can contain one of two types of buttons: TextButton widgets, which display text-only buttons; and ImageButton widgets, which display a button with a simple icon or image without text.
Both TextButton and ImageButton widgets support one of two onClick behaviors (as defined in the JSON response sent back to Google Chat): either openLink or action. As the name implies, openLink opens a specified link in a new browser tab.
The action object, however, specifies a custom action for the button to perform. You can specify several arbitrary values in the action object, including a unique actionMethodName and a set of key / value parameter pairs.
Specifying an action object for the button creates an interactive card. When the user clicks the button in the message, Google Chat raises a CARD_CLICKED event and sends a request back to the bot that sent the original message. The bot then needs to handle the event raised from Google Chat and return a response back to the space.
Add buttons to the card
Return to Apps Script, and click Editor() in the Files panel.
In
Code.gs, remove theonMessage()function again by deleting lines 25-44.Copy the following code, and paste at line 25.
This code creates two buttons, a Set vacation in Gmail and a Block out day in Calendar button in the card sent to Google Chat.
Code.gs
var REASON = {
  SICK: 'Out sick',
  OTHER: 'Out of office'
};
/**
 * Responds to a MESSAGE event triggered in Google Chat.
 * @param {object} event the event object from Google Chat
 * @return {object} JSON-formatted response
 */
function onMessage(event) {
  console.info(event);
  var reason = REASON.OTHER;
  var name = event.user.displayName;
  var userMessage = event.message.text;

  // If the user said that they were 'sick', adjust the image in the
  // header sent in response.
  if (userMessage.indexOf('sick') > -1) {
    // Hospital material icon
    HEADER.header.imageUrl = 'https://goo.gl/mnZ37b';
    reason = REASON.SICK;
  } else if (userMessage.indexOf('vacation') > -1) {
    // Spa material icon
    HEADER.header.imageUrl = 'https://goo.gl/EbgHuc';
  }

  var widgets = [{
    textParagraph: {
      text: 'Hello, ' + name + '.<br>Are you taking time off today?'
    }
  }, {
    buttons: [{
      textButton: {
        text: 'Set vacation in Gmail',
        onClick: {
          action: {
            actionMethodName: 'turnOnAutoResponder',
            parameters: [{
              key: 'reason',
              value: reason
            }]
          }
        }
      }
    }, {
      textButton: {
        text: 'Block out day in Calendar',
        onClick: {
          action: {
            actionMethodName: 'blockOutCalendar',
            parameters: [{
              key: 'reason',
              value: reason
            }]
          }
        }
      }
    }]
  }];
  return createCardResponse(widgets);
}
- To handle the
CARD_CLICKEDevent, add theonCardClick()function to the end of theCode.gsfile.
Code.gs
/**
 * Responds to a CARD_CLICKED event triggered in Google Chat.
 * @param {object} event the event object from Google Chat
 * @return {object} JSON-formatted response
 * @see https://developers.google.com/chat/reference/message-formats/events
 */
function onCardClick(event) {
  console.info(event);
  var message = '';
  var reason = event.action.parameters[0].value;
  if (event.action.actionMethodName == 'turnOnAutoResponder') {
    turnOnAutoResponder(reason);
    message = 'Turned on vacation settings.';
  } else if (event.action.actionMethodName == 'blockOutCalendar') {
    blockOutCalendar(reason);
    message = 'Blocked out your calendar for the day.';
  } else {
    message = "I'm sorry; I'm not sure which button you clicked.";
  }
  return { text: message };
}
In responding to user clicks, now the bot does one of two things: It sets the user's vacation responder in Gmail to an "out of office" message; or it schedules an all-day meeting on the user's Calendar. To accomplish these tasks, the bot calls the Gmail advanced service and the Calendar Apps Script API.
- To integrate the bot with Gmail and Calendar, add the following code to the end of the
Code.gsfile.
Code.gs
var ONE_DAY_MILLIS = 24 * 60 * 60 * 1000;
/**
 * Turns on the user's vacation response for today in Gmail.
 * @param {string} reason the reason for vacation, either REASON.SICK or REASON.OTHER
 */
function turnOnAutoResponder(reason) {
  var currentTime = (new Date()).getTime();
  Gmail.Users.Settings.updateVacation({
    enableAutoReply: true,
    responseSubject: reason,
    responseBodyHtml: "I'm out of the office today; will be back on the next business day.<br><br><i>Created by Attendance Bot!</i>",
    restrictToContacts: true,
    restrictToDomain: true,
    startTime: currentTime,
    endTime: currentTime + ONE_DAY_MILLIS
  }, 'me');
}

/**
 * Places an all-day meeting on the user's Calendar.
 * @param {string} reason the reason for vacation, either REASON.SICK or REASON.OTHER
 */
function blockOutCalendar(reason) {
  CalendarApp.createAllDayEvent(reason, new Date(), new Date(Date.now() + ONE_DAY_MILLIS));
}
Click Save () to save the
Code.gsfile.In the left-side menu, next to Services, click Add a service (), and select Gmail API from the list.
Click Add.
Check that the Gmail API is enabled
Make sure that the Gmail Advanced Service is enabled in this project. To check the Gmail API status, do the following:
In the Google Cloud console, navigate to Navigation Menu () and select > APIs & Services > Library.
In the Library, search for
Gmail API. Select the API from the list of results.The Gmail API is already enabled in this project. If it is not, click Enable.
Test the bot
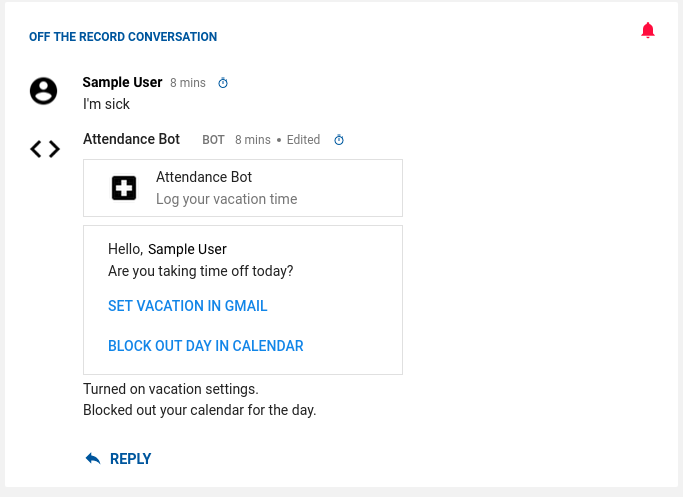
- Return to the DM in Google Chat, and type
I'm sick.
The bot should respond with a card similar to the image below that prompts you to configure the bot.
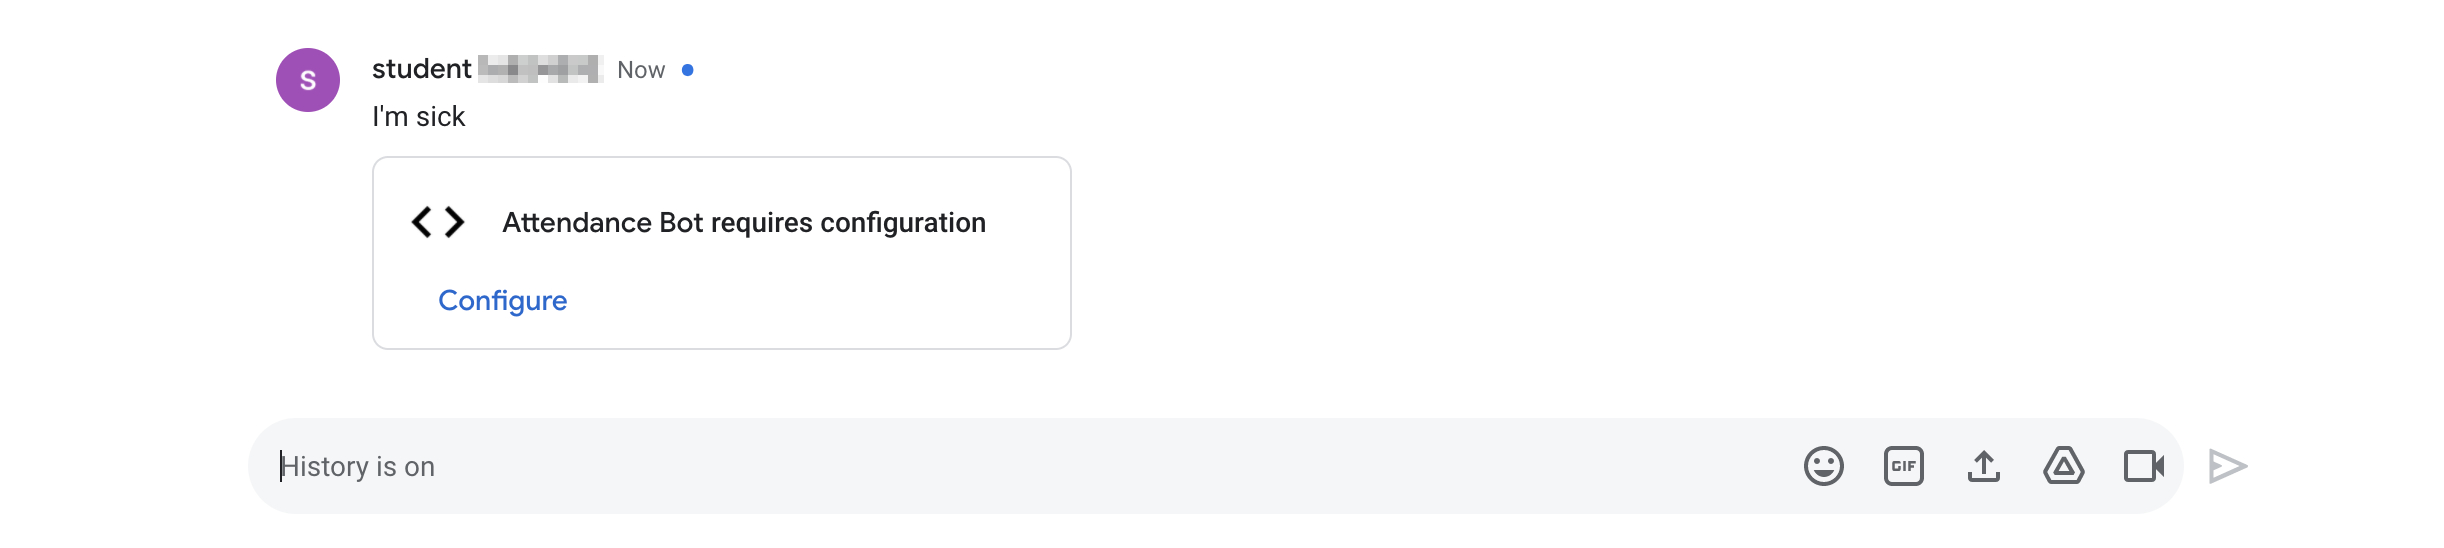
- To configure the Attendance Bot, click Configure, choose your user account, click ALLOW, and then close the page when you see the message "You may close this page now".
Now the bot displays the available options.
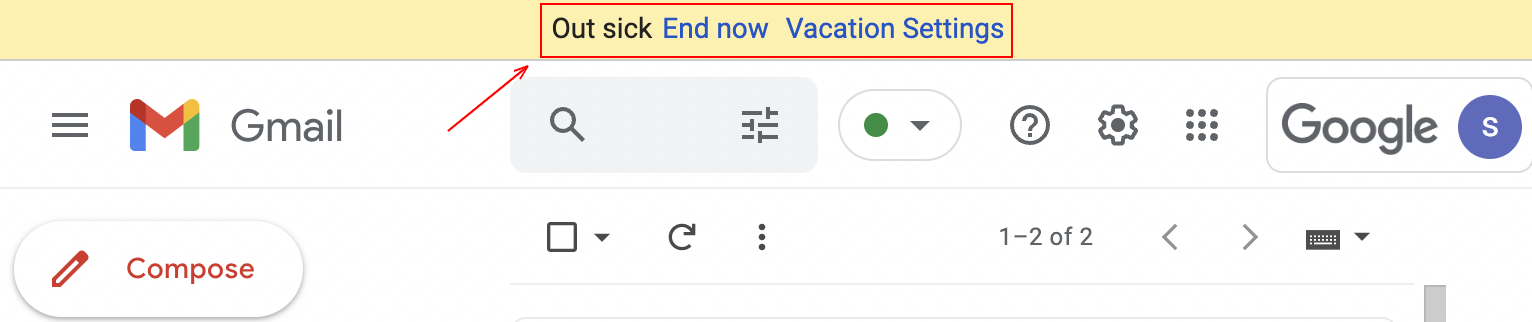
Click SET VACATION IN GMAIL. You should see the message "Turned on vacation settings."
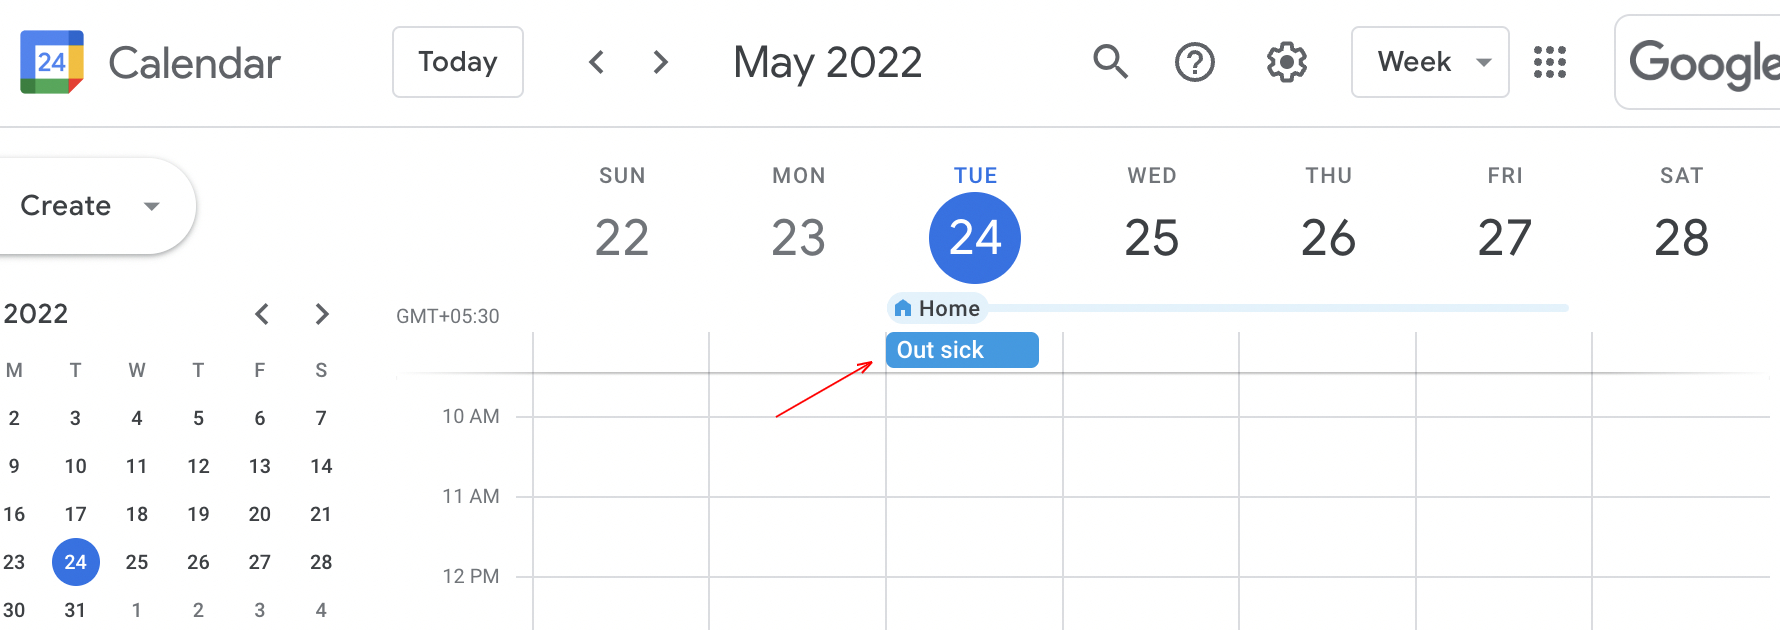
Click BLOCK OUT DAY IN CALENDAR. You should see the message "Blocked out your calendar for the day."
- Click the Google Apps icon to access and check the Gmail and Calendar associated with this account.

You should see the Vacation Setting in Gmail.
You should also see a day blocked out in the Calendar.
Note: It can take a few minutes for the progress check below to return a successful completion mark for this task. If not successful, wait a few mins and try again.
Click Check my progress to verify the objective.
Test the bot by button clicking in cards
Check my progress
Solution of Lab
🔐 Set Up OAuth Consent Screen
Go to the OAuth consent screen from here.
Fill in the following fields:
| Field | Value |
| App name | Attendance Bot |
| User support email | Select your email ID from the dropdown |
| Developer contact information | Your email address |
🛠️ Google Chat API Configuration
Go to the Google Chat API Configuration from here.
Fill in the following fields:
| Field | Value |
| App name | Attendance Bot |
| Avatar URL | https://goo.gl/kv2ENA |
| Description | Apps Script lab bot |
| Functionality | Select Receive 1:1 messages and Join spaces and group conversations |
| Connection settings | Check Apps Script project and paste the Head Deployment ID into the Deployment ID field |
| Visibility | Your email address |
| App Status | LIVE – Available to users |
💬 Task: Create and Publish an Apps Script Chat Bot
- Create a new Apps Script Chat App from here.
| Property | Value |
| Project name | Attendance Bot |
- Replace the following code in Code.gs:
var DEFAULT_IMAGE_URL = 'https://goo.gl/bMqzYS';
var HEADER = {
  header: {
    title : 'Attendance Bot',
    subtitle : 'Log your vacation time',
    imageUrl : DEFAULT_IMAGE_URL
  }
};

/**
 * Creates a card-formatted response.
 * @param {object} widgets the UI components to send
 * @return {object} JSON-formatted response
 */
function createCardResponse(widgets) {
  return {
    cards: [HEADER, {
      sections: [{
        widgets: widgets
      }]
    }]
  };
}

/**
 * Responds to a MESSAGE event triggered
 * in Google Chat.
 *
 * @param event the event object from Google Chat
 * @return JSON-formatted response
 */
function onMessage(event) {
  var userMessage = event.message.text;

  var widgets = [{
    "textParagraph": {
      "text": "You said: " + userMessage
    }
  }];

  console.log('You said:', userMessage);

  return createCardResponse(widgets);
}

/**
 * Responds to an ADDED_TO_SPACE event in Google Chat.
 *
 * @param {Object} event the event object from Google Chat
 */
function onAddToSpace(event) {
  var message = "";

  if (event.space.singleUserBotDm) {
    message = "Thank you for adding me to a DM, " + event.user.displayName + "!";
  } else {
    message = "Thank you for adding me to " +
        (event.space.displayName ? event.space.displayName : "this chat");
  }

  if (event.message) {
    // Bot added through @mention.
    message = message + " and you said: \"" + event.message.text + "\"";
  }
  console.log('Attendance Bot added in ', event.space.name);
  return { "text": message };
}

/**
 * Responds to a REMOVED_FROM_SPACE event in Google Chat.
 *
 * @param {Object} event the event object from Google Chat
 */
function onRemoveFromSpace(event) {
  console.info("Bot removed from ",
      (event.space.name ? event.space.name : "this chat"));
}
💡 Testing the Attendance Bot
You can test your Attendance Bot here.
Now Check The Score Of Task 3 Then Go Ahead.
💡 Update The Code.gs For TASK 4
/**
* Responds to an ADDED_TO_SPACE event in Google Chat.
* @param {object} event the event object from Google Chat
* @return {object} JSON-formatted response
* @see https://developers.google.com/chat/reference/message-formats/events
*/

function onAddToSpace(event) {
  console.info(event);
  var message = 'Thank you for adding me to ';
  if (event.space.type === 'DM') {
    message += 'a DM, ' + event.user.displayName + '!';
  } else {
    message += event.space.displayName;
  }
  console.log('Attendance Bot added in ', event.space.name);
  return { text: message };
}

/**
* Responds to a REMOVED_FROM_SPACE event in Google Chat.
* @param {object} event the event object from Google Chat
* @see https://developers.google.com/chat/reference/message-formats/events
*/
function onRemoveFromSpace(event) {
  console.info(event);
  console.log('Bot removed from ', event.space.name);
}

var DEFAULT_IMAGE_URL = 'https://goo.gl/bMqzYS';
var HEADER = {
  header: {
    title : 'Attendance Bot',
    subtitle : 'Log your vacation time',
    imageUrl : DEFAULT_IMAGE_URL
  }
};

/**
 * Creates a card-formatted response.
 * @param {object} widgets the UI components to send
 * @return {object} JSON-formatted response
 */
function createCardResponse(widgets) {
  return {
    cards: [HEADER, {
      sections: [{
        widgets: widgets
      }]
    }]
  };
}

var REASON = {
  SICK: 'Out sick',
  OTHER: 'Out of office'
};
/**
 * Responds to a MESSAGE event triggered in Google Chat.
 * @param {object} event the event object from Google Chat
 * @return {object} JSON-formatted response
 */
function onMessage(event) {
  console.info(event);
  var reason = REASON.OTHER;
  var name = event.user.displayName;
  var userMessage = event.message.text;

  // If the user said that they were 'sick', adjust the image in the
  // header sent in response.
  if (userMessage.indexOf('sick') > -1) {
    // Hospital material icon
    HEADER.header.imageUrl = 'https://goo.gl/mnZ37b';
    reason = REASON.SICK;
  } else if (userMessage.indexOf('vacation') > -1) {
    // Spa material icon
    HEADER.header.imageUrl = 'https://goo.gl/EbgHuc';
  }

  var widgets = [{
    textParagraph: {
      text: 'Hello, ' + name + '.<br>Are you taking time off today?'
    }
  }, {
    buttons: [{
      textButton: {
        text: 'Set vacation in Gmail',
        onClick: {
          action: {
            actionMethodName: 'turnOnAutoResponder',
            parameters: [{
              key: 'reason',
              value: reason
            }]
          }
        }
      }
    }, {
      textButton: {
        text: 'Block out day in Calendar',
        onClick: {
          action: {
            actionMethodName: 'blockOutCalendar',
            parameters: [{
              key: 'reason',
              value: reason
            }]
          }
        }
      }
    }]
  }];
  return createCardResponse(widgets);
}

/**
 * Responds to a CARD_CLICKED event triggered in Google Chat.
 * @param {object} event the event object from Google Chat
 * @return {object} JSON-formatted response
 * @see https://developers.google.com/chat/reference/message-formats/events
 */
function onCardClick(event) {
  console.info(event);
  var message = '';
  var reason = event.action.parameters[0].value;
  if (event.action.actionMethodName == 'turnOnAutoResponder') {
    turnOnAutoResponder(reason);
    message = 'Turned on vacation settings.';
  } else if (event.action.actionMethodName == 'blockOutCalendar') {
    blockOutCalendar(reason);
    message = 'Blocked out your calendar for the day.';
  } else {
    message = "I'm sorry; I'm not sure which button you clicked.";
  }
  return { text: message };
}

var ONE_DAY_MILLIS = 24 * 60 * 60 * 1000;
/**
 * Turns on the user's vacation response for today in Gmail.
 * @param {string} reason the reason for vacation, either REASON.SICK or REASON.OTHER
 */
function turnOnAutoResponder(reason) {
  var currentTime = (new Date()).getTime();
  Gmail.Users.Settings.updateVacation({
    enableAutoReply: true,
    responseSubject: reason,
    responseBodyHtml: "I'm out of the office today; will be back on the next business day.<br><br><i>Created by Attendance Bot!</i>",
    restrictToContacts: true,
    restrictToDomain: true,
    startTime: currentTime,
    endTime: currentTime + ONE_DAY_MILLIS
  }, 'me');
}

/**
 * Places an all-day meeting on the user's Calendar.
 * @param {string} reason the reason for vacation, either REASON.SICK or REASON.OTHER
 */
function blockOutCalendar(reason) {
  CalendarApp.createAllDayEvent(reason, new Date(), new Date(Date.now() + ONE_DAY_MILLIS));
}
* In the Library, search for Gmail API. Select the API from the list of results.
* Return to the DM in Google Chat, and type I'm sick
💡 Testing the Attendance Bot
You can test your Attendance Bot here.


