
Interacting with Vault Policies - GSP1004
A passionate full-stack developer from @ePlus.DEV
Overview
Vault uses policies to govern the behavior of clients and instrument Role-Based Access Control (RBAC) by specifying access privileges (authorization). Policies provide a declarative way to grant or forbid access to certain paths and operations. In this hands-on lab you'll learn how to write and use Vault policies.
Objectives
In this lab, you will:
Create Vault policies
Manage Vault policies
Associate Vault policies
Verify and test Vault policies
Setup and requirements
Before you click the Start Lab button
Read these instructions. Labs are timed and you cannot pause them. The timer, which starts when you click Start Lab, shows how long Google Cloud resources are made available to you.
This hands-on lab lets you do the lab activities in a real cloud environment, not in a simulation or demo environment. It does so by giving you new, temporary credentials you use to sign in and access Google Cloud for the duration of the lab.
To complete this lab, you need:
- Access to a standard internet browser (Chrome browser recommended).
Note: Use an Incognito (recommended) or private browser window to run this lab. This prevents conflicts between your personal account and the student account, which may cause extra charges incurred to your personal account.
- Time to complete the lab—remember, once you start, you cannot pause a lab.
Note: Use only the student account for this lab. If you use a different Google Cloud account, you may incur charges to that account.
How to start your lab and sign in to the Google Cloud console
Click the Start Lab button. If you need to pay for the lab, a dialog opens for you to select your payment method. On the left is the Lab Details pane with the following:
The Open Google Cloud console button
Time remaining
The temporary credentials that you must use for this lab
Other information, if needed, to step through this lab
Click Open Google Cloud console (or right-click and select Open Link in Incognito Window if you are running the Chrome browser).
The lab spins up resources, and then opens another tab that shows the Sign in page.
Tip: Arrange the tabs in separate windows, side-by-side.
Note: If you see the Choose an account dialog, click Use Another Account.
If necessary, copy the Username below and paste it into the Sign in dialog.
student-03-997fcd6e75dd@qwiklabs.netYou can also find the Username in the Lab Details pane.
Click Next.
Copy the Password below and paste it into the Welcome dialog.
c4kiQs468y8NYou can also find the Password in the Lab Details pane.
Click Next.
Important: You must use the credentials the lab provides you. Do not use your Google Cloud account credentials.
Note: Using your own Google Cloud account for this lab may incur extra charges.
Click through the subsequent pages:
Accept the terms and conditions.
Do not add recovery options or two-factor authentication (because this is a temporary account).
Do not sign up for free trials.
After a few moments, the Google Cloud console opens in this tab.
Note: To access Google Cloud products and services, click the Navigation menu or type the service or product name in the Search field.

Activate Cloud Shell
Cloud Shell is a virtual machine that is loaded with development tools. It offers a persistent 5GB home directory and runs on the Google Cloud. Cloud Shell provides command-line access to your Google Cloud resources.
Click Activate Cloud Shell at the top of the Google Cloud console.
Click through the following windows:
Continue through the Cloud Shell information window.
Authorize Cloud Shell to use your credentials to make Google Cloud API calls.
When you are connected, you are already authenticated, and the project is set to your Project_ID, qwiklabs-gcp-03-5c1b11a47496. The output contains a line that declares the Project_ID for this session:
Your Cloud Platform project in this session is set to qwiklabs-gcp-03-5c1b11a47496
gcloud is the command-line tool for Google Cloud. It comes pre-installed on Cloud Shell and supports tab-completion.
- (Optional) You can list the active account name with this command:
gcloud auth list
- Click Authorize.
Output:
ACTIVE: *
ACCOUNT: student-03-997fcd6e75dd@qwiklabs.net

To set the active account, run:
    $ gcloud config set account `ACCOUNT`
- (Optional) You can list the project ID with this command:
gcloud config list project
Output:
[core]
project = qwiklabs-gcp-03-5c1b11a47496
Note: For full documentation of gcloud, in Google Cloud, refer to the gcloud CLI overview guide.
Task 1. Install Vault
- In Cloud Shell, add the HashiCorp GPG key:
curl -fsSL https://apt.releases.hashicorp.com/gpg | sudo apt-key add -
Note: Ignore the warning if any.
- Add the official HashiCorp Linux repository:
sudo apt-add-repository "deb [arch=amd64] https://apt.releases.hashicorp.com $(lsb_release -cs) main"
- Update and install Vault:
sudo apt-get update
sudo apt-get install vault
Verify the installation
After installing Vault, verify the installation worked by checking that the Vault binary is available.
- Execute the
vaultcommand to verify the installation:
vault
You should see help output similar to the following:
Usage: vault <command> [args]

Common commands:
    read        Read data and retrieves secrets
    write       Write data, configuration, and secrets
    delete      Delete secrets and configuration
    list        List data or secrets
    login       Authenticate locally
    agent       Start a Vault agent
    server      Start a Vault server
    status      Print seal and HA status
    unwrap      Unwrap a wrapped secret

Other commands:
    audit          Interact with audit devices
    auth           Interact with auth methods
    debug          Runs the debug command
    kv             Interact with Vault's Key-Value storage
    lease          Interact with leases
    monitor        Stream log messages from a Vault server
    namespace      Interact with namespaces
    operator       Perform operator-specific tasks
    path-help      Retrieve API help for paths
    plugin         Interact with Vault plugins and catalog
    policy         Interact with policies
    print          Prints runtime configurations
    secrets        Interact with secrets engines
    ssh            Initiate an SSH session
    token          Interact with tokens
Task 2. Start the Vault server
With Vault installed, the next step is to start a Vault server.
Vault operates as a client/server application. The Vault server is the only piece of the Vault architecture that interacts with the data storage and backends. All operations done via the Vault CLI interact with the server over a TLS connection.
In this lab, you will start and interact with the Vault server running in development mode.
This dev-mode server requires no further setup, and your local vault CLI will be authenticated to talk to it. This makes it easy to experiment with Vault or start a Vault instance for development. Every feature of Vault is available in "dev" mode. The -dev flag just short-circuits a lot of setup to insecure defaults.
Warning: Never run a "dev" mode server in production. It is insecure and will lose data on every restart (since it stores data in-memory). It is only made for development or experimentation.
Starting the dev server
First, start a Vault dev server. The dev server is a built-in, pre-configured server that is not very secure but useful for playing with Vault locally.
- To start the Vault dev server, run:
vault server -dev
You should see output relating to your Vault server configuration. Notice that Unseal Key and Root Token values are displayed:
==> Vault server configuration:

             Api Address: http://127.0.0.1:8200
                     Cgo: disabled
         Cluster Address: https://127.0.0.1:8201
              Listener 1: tcp (addr: "127.0.0.1:8200", cluster address: "127.0.0.1:8201", max_request_duration: "1m30s", max_request_size: "33554432", tls: "disabled")
               Log Level: info
                   Mlock: supported: false, enabled: false
           Recovery Mode: false
                 Storage: inmem
                 Version: Vault v1.4.1

WARNING! dev mode is enabled! In this mode, Vault runs entirely in-memory
and starts unsealed with a single unseal key. The root token is already
authenticated to the CLI, so you can immediately begin using Vault.

You may need to set the following environment variable:

    $ export VAULT_ADDR='http://127.0.0.1:8200'

The unseal key and root token are displayed below in case you want to
seal/unseal the Vault or re-authenticate.

Unseal Key: 1+yv+v5mz+aSCK67X6slL3ECxb4UDL8ujWZU/ONBpn0=
Root Token: s.XmpNPoi9sRhYtdKHaQhkHP6x

Development mode should NOT be used in production installations!
Note: The dev server stores all its data in-memory (but still encrypted), listens on localhost without TLS, and automatically unseals and shows you the unseal key and root access key.
Note: Insecure operation
Do not run a Vault dev server in production! This approach is only used here to simplify the unsealing process for this demonstration.
Now that you have the Vault development server running, you can continue setting up access to it.
Open a new Cloud Shell tab.
Copy and run the export
VAULT_ADDR ... command from the terminal output. This will configure the Vault client to talk to the dev server:
export VAULT_ADDR='http://127.0.0.1:8200'
The Vault CLI determines which Vault servers to send requests using the VAULT_ADDR environment variable.
Verify the server is running
- Verify the server is running by running the
vault statuscommand:
vault status
If it ran successfully, the output should look like the following:
$ vault status

Key             Value
---             -----
Seal Type       shamir
Initialized     true
Sealed          false
Total Shares    1
Threshold       1
Version         1.13.2
Build Date      2023-04-25T13:02:50z
Storage Type    inmem
Cluster Name    vault-cluster-e2392b81
Cluster ID      48d7aba0-5416-a36b-2c27-0b256b222f57
HA Enabled      false
Great! You've started your first Vault development server. You can now continue on to the next section, where you will learn how to write Vault policies.
Task 3. Vault policies
Vault creates a root policy during initialization. The root policy is capable of performing every operation for all paths. This policy is assigned to the root token that displays when initialization completes. This provides an initial superuser to enable secrets engines, define policies, and configure authentication methods.
Vault also creates a default policy. The default policy defines a common set of capabilities that enable a token the ability to reflect and manage itself. This policy is also assigned to the root token, and is attached to all tokens by default.
Policy syntax
Policies are written in HCL or JSON and describe which paths in Vault a user or machine is allowed to access. A policy defines a list of paths. Each path expresses the capabilities that are allowed. Capabilities for a path must be granted, as Vault defaults to denying capabilities to paths to ensure that it is secure by default.
The basic format of a policy is as follows:
path "<path>" {
    capabilities = ["list of capabilities"]
}
Here is a very simple policy which grants read capabilities to the path "secret/foo":
path "secret/foo" {
  capabilities = ["read"]
}
When this policy is assigned to a token, the token can read from "secret/foo". However, the token cannot update or delete "secret/foo", since the capabilities do not allow it. Because policies are deny by default, the token would have no other access in Vault. This means that an empty Vault policy grants no permission in the system.
Capabilities
A policy defines one or more paths and a list of permitted capabilities. Each path must define one or more capabilities which provide fine-grained control over permitted (or denied) operations. As you'll see in the examples below, capabilities are always specified as a list of strings, even if there is only one capability. Most of these capabilities map to the HTTP verbs supported by the Vault API. The list of capabilities are:
| Policy Capability | Associated HTTP Verbs |
|---|---|
| create | POST/PUT |
| read | GET |
| update | POST/PUT |
| delete | DELETE |
| list | LIST |
| patch | PATCH |
| sudo | - |
| deny | - |
The sudo capability allows access to paths that are root-protected (refer to the Root protected endpoints tutorial section). The deny capability disables access to the path. When combined with other capabilities it always takes precedence.
Policy examples
A more detailed policy to grant all access on "secret/*" could be defined as follows:
path "secret/*" {
  capabilities = ["create", "read", "update", "delete", "list"]
}
If you want to define further restrictions, this could be accomplished by adding the following deny capability:
path "secret/*" {
  capabilities = ["create", "read", "update", "delete", "list"]
}

path "secret/super-secret" {
  capabilities = ["deny"]
}
Even though you allowed secret/*, this additional line above explicitly denies secret/super-secret. This takes denial precedence.
Policies can also specify allowed, disallowed, and required parameters. Here the key "secret/restricted" can only contain "foo" (any value) and "bar" (one of "zip" or "zap").
path "secret/restricted" {
  capabilities = ["create"]
  allowed_parameters = {
    "foo" = []
    "bar" = ["zip", "zap"]
  }
}
Policies use path-based matching to test the set of capabilities against a request. A policy path may specify an exact path to match, or it could specify a glob pattern which instructs Vault to use a prefix match.
For example, this policy permits reading only "secret/foo" or "secret/foo/bar".
path "secret/foo" {
  capabilities = ["read"]
}
Moreover, this policy permits reading everything under "secret/bar". An attached token could read "secret/bar/zip", "secret/bar/zip/zap", but not "secret/bars/zip".
path "secret/bar/*" {
  capabilities = ["read"]
}
In addition, this policy would permit reading everything prefixed with "zip-". An attached token could read "secret/zip-zap" or "secret/zip-zap/zong", but not "secret/zip/zap.
path "secret/zip-*" {
  capabilities = ["read"]
}
Lastly, a + can be used to denote any number of characters bounded within a single path segment. The following would permit reading the "teamb" path under any top-level path under secret/.
path "secret/+/teamb" {
  capabilities = ["read"]
}
And this one would permit reading secret/foo/bar/teamb, secret/bar/foo/teamb, etc.
path "secret/+/+/teamb" {
  capabilities = ["read"]
}
As you can see, Vault's architecture is similar to a filesystem. Every action in Vault has a corresponding path and capability - even Vault's internal core configuration endpoints live under the "sys/" path. Policies define access to these paths and capabilities, which controls a token's access to credentials in Vault.
Templated policies
The policy syntax allows for doing variable replacement in some policy strings with values available to the token. Currently identity information can be injected, and currently the path keys in policies allow injection. For now, you don't need to worry about entities or aliases—this is simply included for reference later.
Parameters
| Name | Description |
|---|---|
identity.entity.id |
The entity's ID |
identity.entity.name |
The entity's name |
identity.entity.metadata.<metadata key> |
Metadata associated with the entity for the given key |
identity.entity.aliases.<mount accessor>.id |
Entity alias ID for the given mount |
identity.entity.aliases.<mount accessor>.name |
Entity alias name for the given mount |
identity.entity.aliases.<mount accessor>.metadata.<metadata key> |
Metadata associated with the alias for the given mount and metadata key |
identity.entity.aliases.<mount accessor>.custom_metadata.<custom_metadata key> |
Custom metadata associated with the alias for the given mount and custom metadata key |
identity.groups.ids.<group id>.name |
The group name for the given group ID |
identity.groups.names.<group name>.id |
The group ID for the given group name |
identity.groups.ids.<group id>.metadata.<metadata key> |
Metadata associated with the group for the given key |
identity.groups.names.<group name>.metadata.<metadata key> |
Metadata associated with the group for the given key |
Examples
The following policy creates a section of the KVv2 Secret Engine to a specific user:
path "secret/data/{{identity.entity.id}}/*" {
  capabilities = ["create", "update", "read", "delete"]
}

path "secret/metadata/{{identity.entity.id}}/*" {
  capabilities = ["list"]
}
For more information on templated policies, you can check out the Templated Policies documentation.
Note: When developing templated policies, use IDs wherever possible. Each ID is unique to the user, whereas names can change over time and can be reused. This ensures that if a given user or group name is changed, the policy will be mapped to the intended entity or group.
Verify built-in policy capabilities
Now that you've seen how policies are written, let's quickly check out the capabilities of the root and default policies.
- In your open Cloud Shell tab, execute the following command to log in to Vault with your root token:
vault login token=<your root token>
You should see the following output:
Success! You are now authenticated. The token information displayed below is already stored in the token helper. You do NOT need to run "vault login" again. Future Vault requests will automatically use this token.

Key                  Value
---                  -----
token                s.mCWmZyVNi6ZDU7HSq7vQXwvj
token_accessor       nFDgTnm7FYCHNLSERwiVsbWf
token_duration       ∞
token_renewable      false
token_policies       ["root"]
identity_policies    []
policies             ["root"]
Note: Notice that the policy attached is the root policy.
- Since the root policy allows you to do anything in Vault, run a basic command to verify that this is the case:
vault secrets list
Your output should resemble the following:
Path          Type         Accessor              Description
----          ----         --------              -----------
cubbyhole/    cubbyhole    cubbyhole_f0f2e28e    per-token private secret storage
identity/     identity     identity_a554d41f     identity store
secret/       kv           kv_ca28f047           key/value secret storage
sys/          system       system_1a7dcf93       system endpoints..
Now you'll try to run the same command as a user with only the default policy attached.
- Start by enabling the
userpassauth method and creating a new user:
vault auth enable userpass
vault write auth/userpass/users/example-user password=password!
- Next, log in to Vault with the new user you created:
vault login -method=userpass username=example-user password=password!
You should receive the following:
Success! You are now authenticated. The token information displayed below is already stored in the token helper. You do NOT need to run "vault login" again. Future Vault requests will automatically use this token.

Key                    Value
---                    -----
token                  s.Ov9GkScxp5AYDjzmbdHNN4r0
token_accessor         UewGCCotUMjccmD1EjssgHqf
token_duration         768h
token_renewable        true
token_policies         ["default"]
identity_policies      []
policies               ["default"]
token_meta_username    example-user
Note: Notice that the policy attached is the default policy.
- Run the same command from earlier to check the policy capabilities:
vault secrets list
You should receive the following error:
Error listing secrets engines: Error making API request.

URL: GET http://127.0.0.1:8200/v1/sys/mounts
Code: 403. Errors:

* 1 error occurred:
        * permission denied
As you can see here, Vault is making a GET API request to the path sys/mounts. Since you're receiving a permission denied error, you can't access the path and list the secrets engines. Now it's time to write your first policy to get access to this path and list the secrets engines!
Task 4. Create a policy
Since Vault centrally secures, stores, and controls access to secrets across distributed infrastructure and applications, it is critical to control permissions before any user or machine can gain access.
The solution to this is to restrict the use of root policy, and write fine-grained policies to practice least privileged. For example, if an app gets Google Cloud credentials from Vault, write policy grants to read from Google Cloud secrets engine but not to delete, etc.
Policies are attached to tokens and roles to enforce client permissions on Vault. Now that you've seen how policies are defined syntactically, it's time to write your first Vault policy.
Log in to the Vault web UI
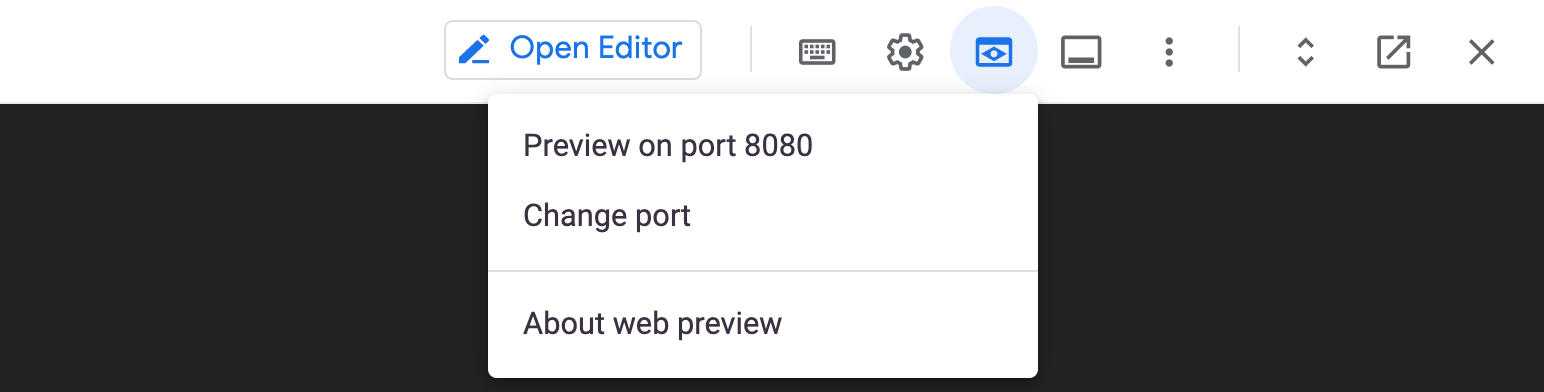
- First, click on the web preview icon on the toolbar of Cloud Shell.
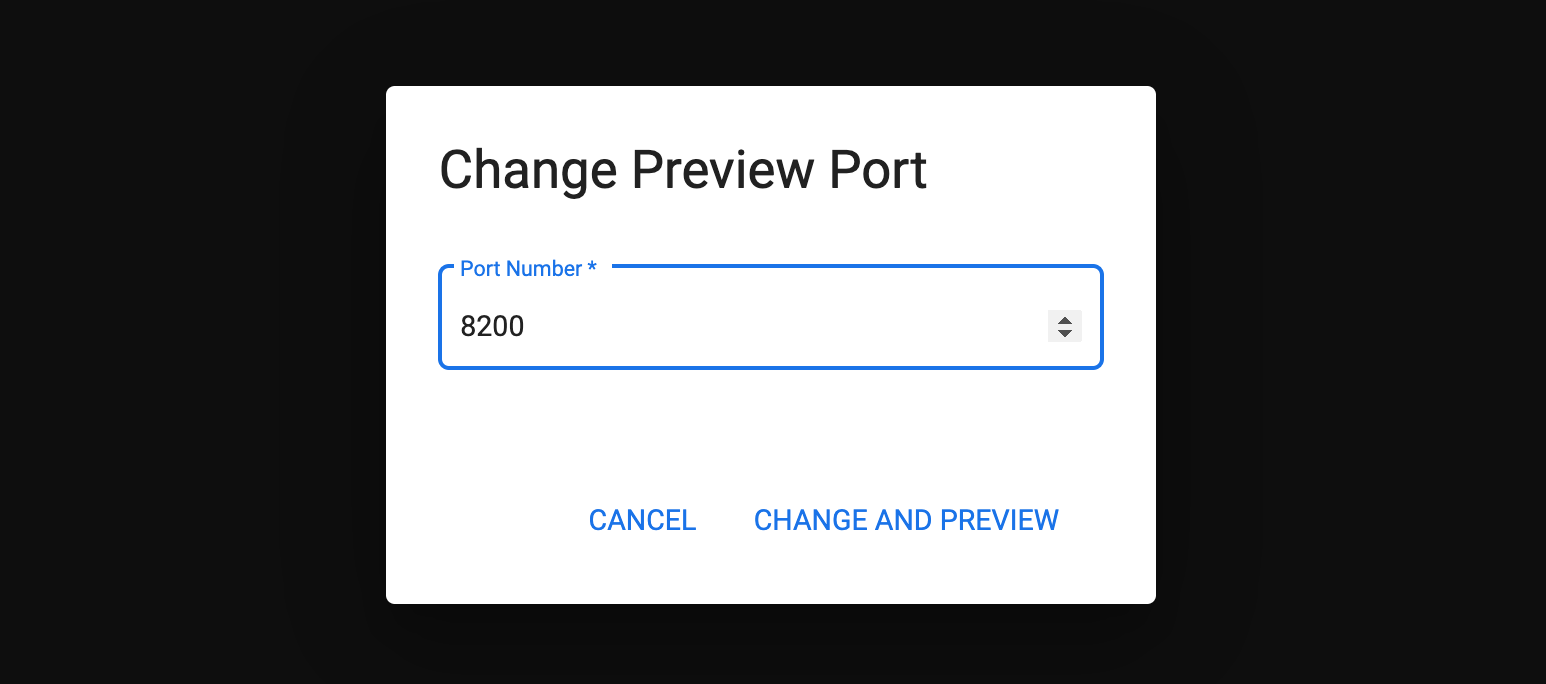
Click Change port.
Change the Port Number to
8200and click Change and Preview.
- You should be redirected to the Vault sign in page.
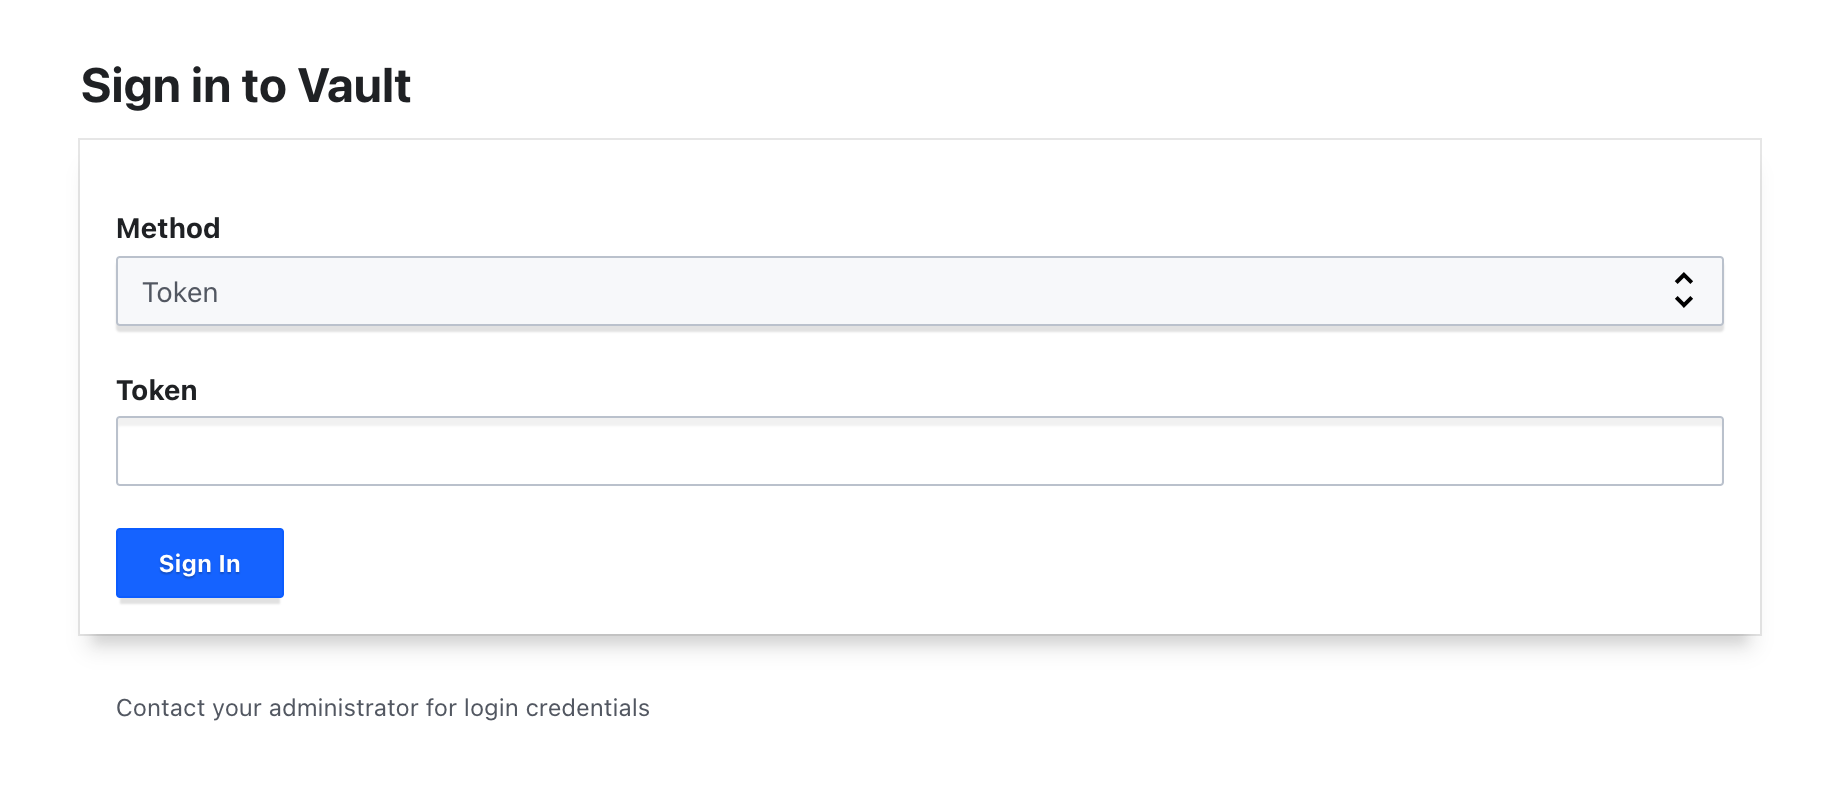
- Enter your Root Token that you saved earlier in the lab and click Sign In.
Your Vault development server should resemble the following.
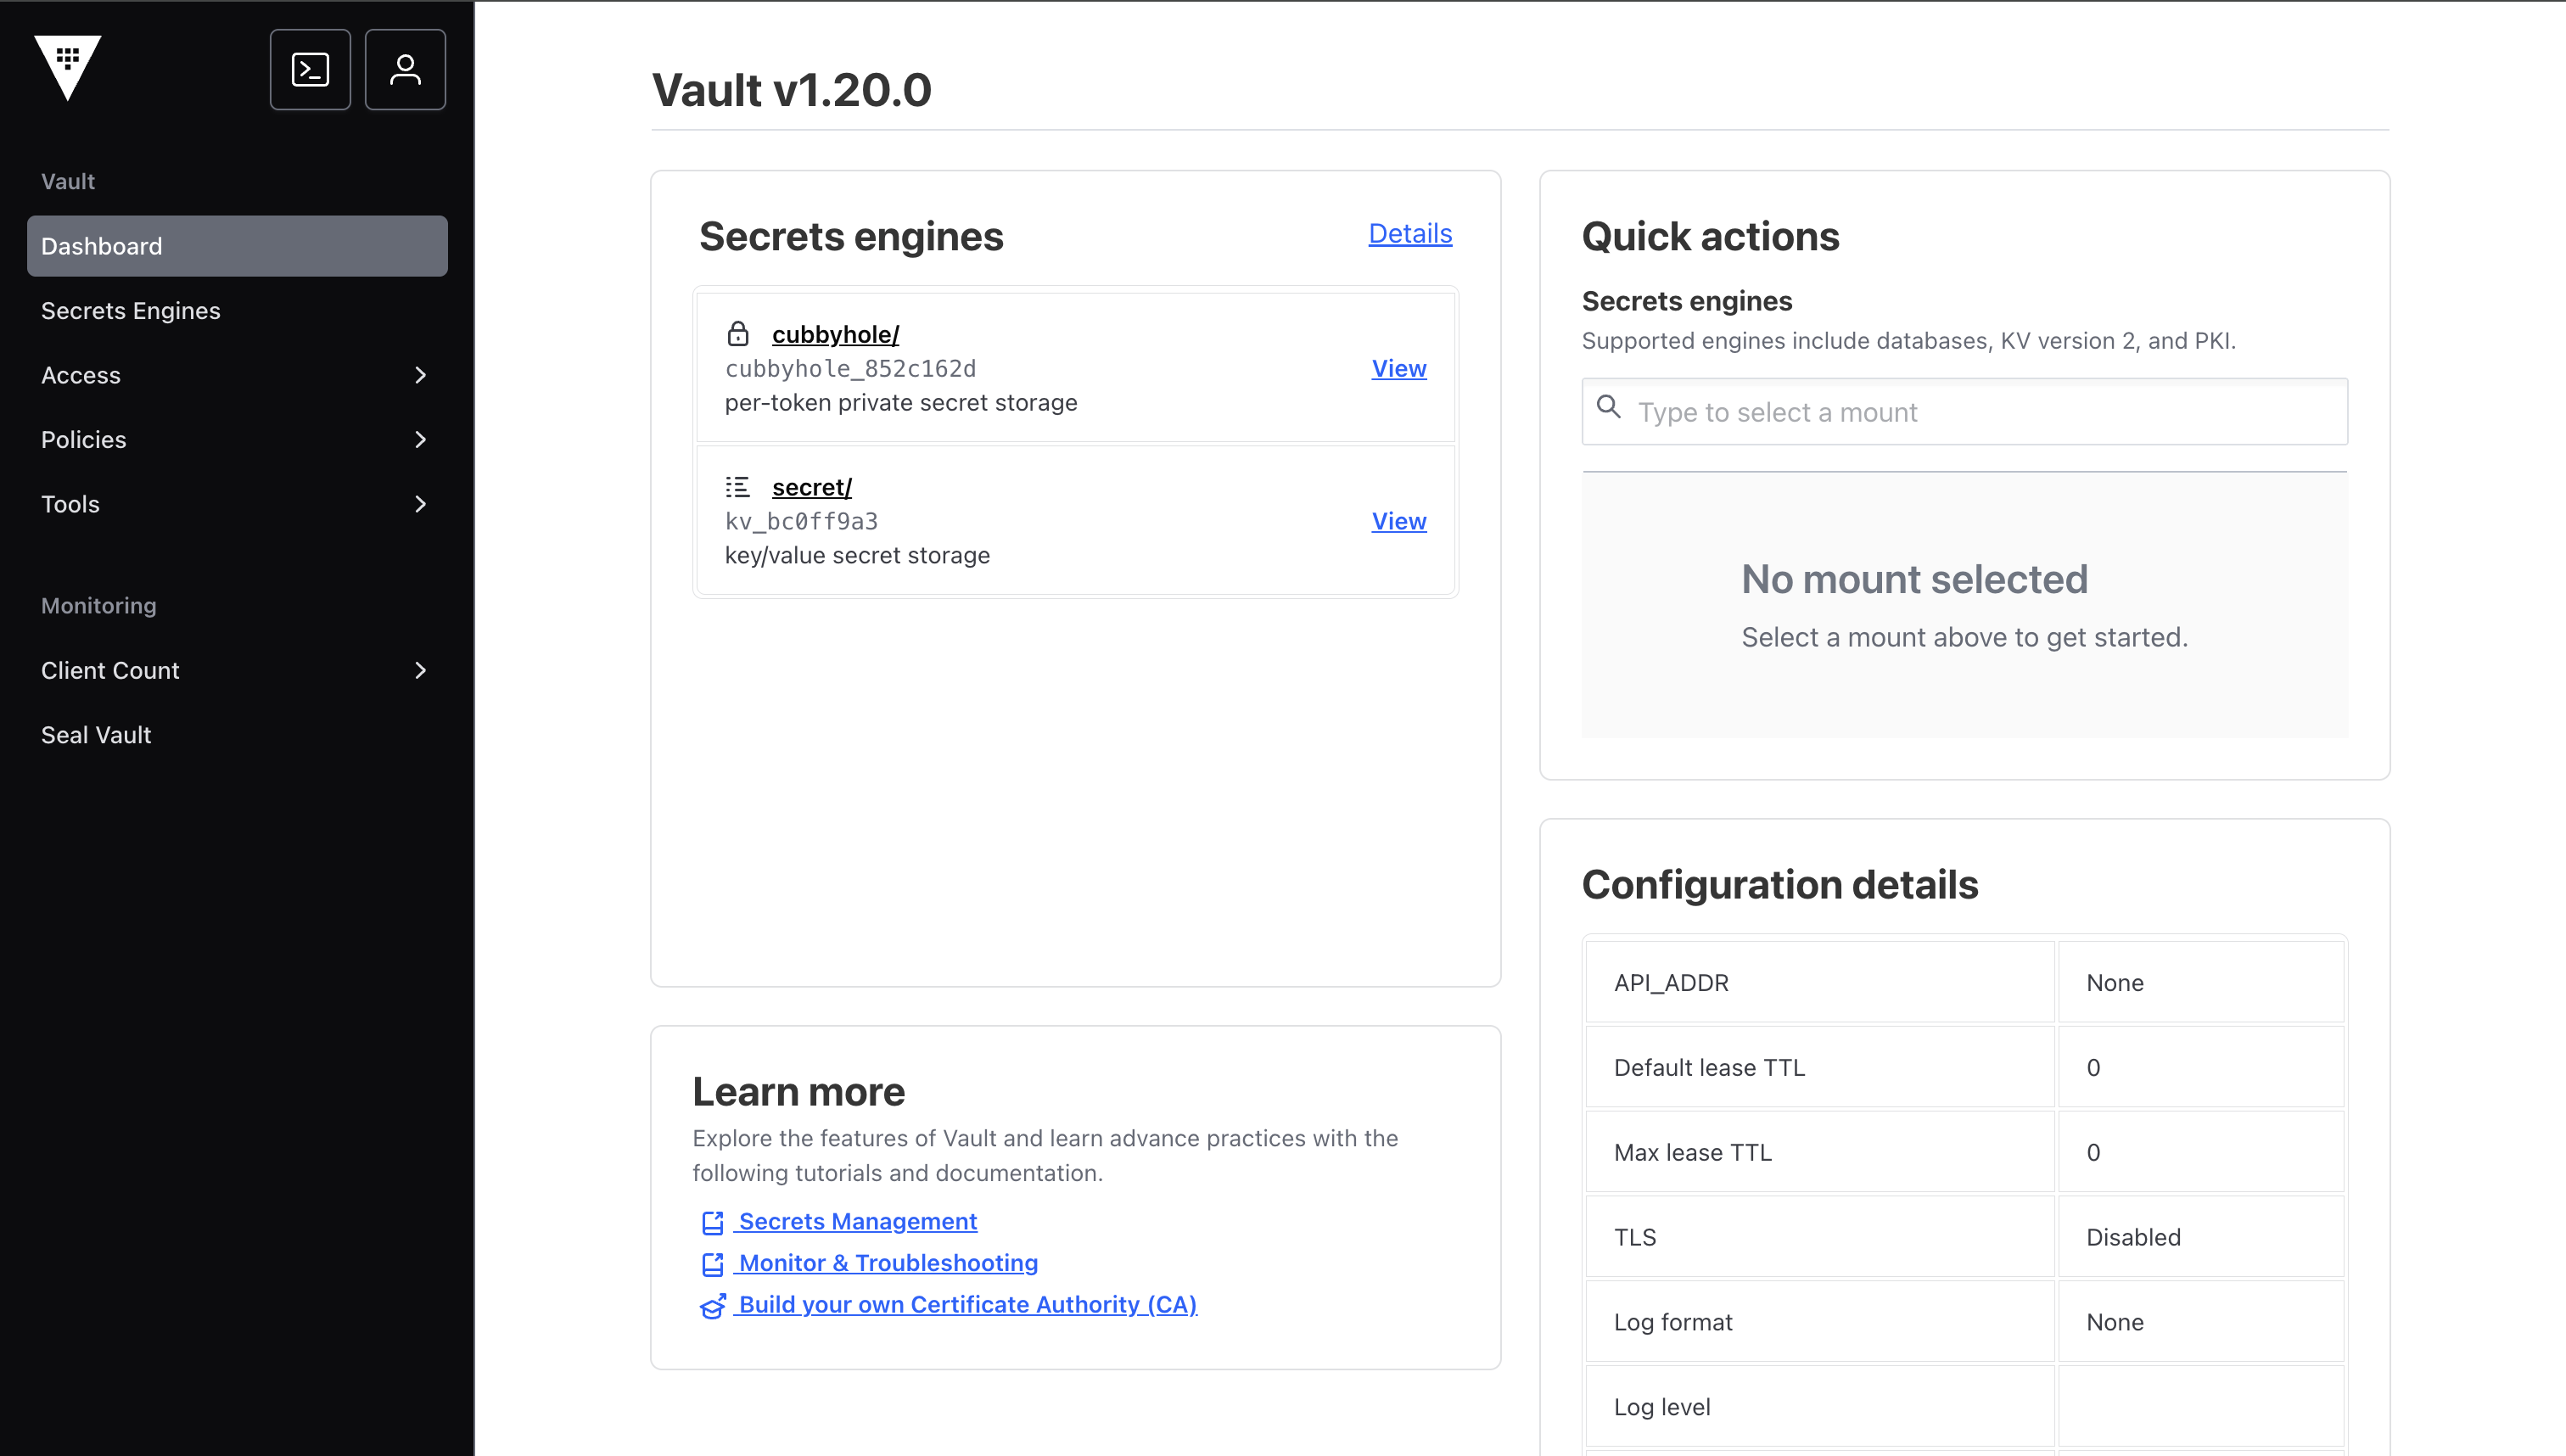
Now that you're logged in to the development server web UI, you can continue on to the next section.
Create a new policy
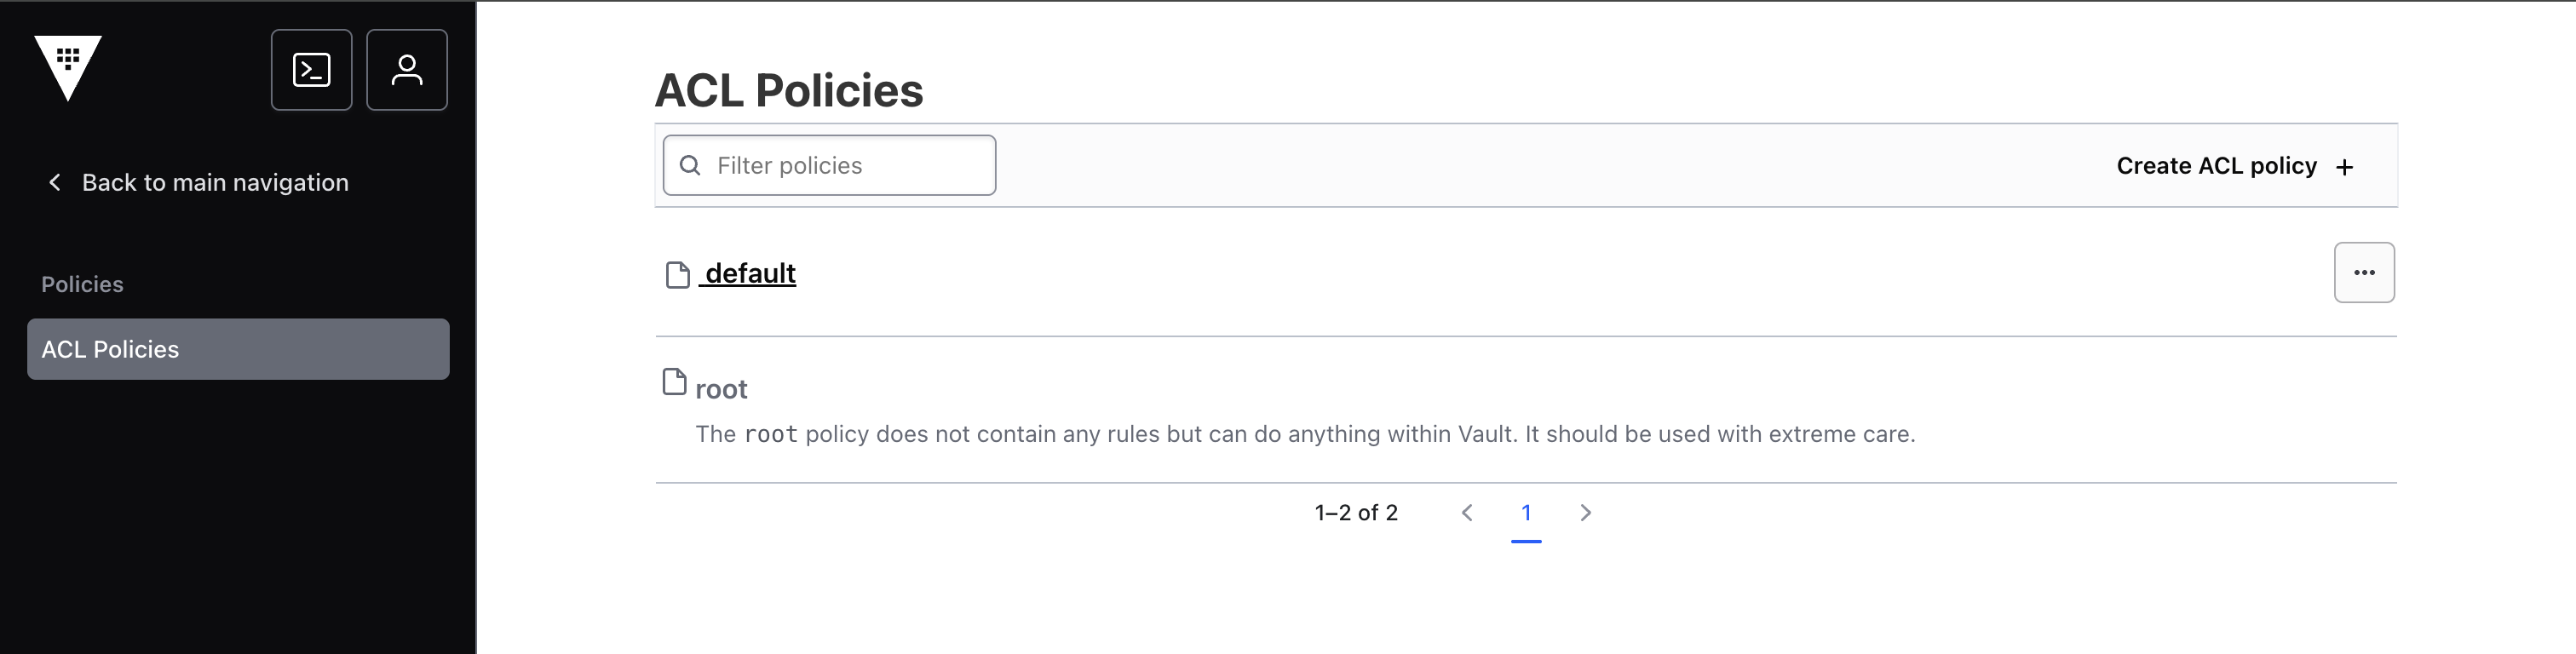
- Click Policies from the home page. You should see the
defaultandrootACL policies.
Click Create ACL policy.
Start by naming your policy
demo-policy.
You can now start writing your policy. Recall in the previous section, you were unable to access the sys/mounts path to read the secrets engines. You'll go ahead and add that now.
- In the Policy box, add the following placeholder code:
path "path" {
    capabilities = [""]
}
- Now, let's first update the
pathto thesys/mountspath you were trying to access earlier:
path "sys/mounts" {
    capabilities = [""]
}
- Next, you'll add a capability. Since Vault is attempting to make a GET API call on this path, you'll need to have the
readcapability. Addreadto the capabilities list:
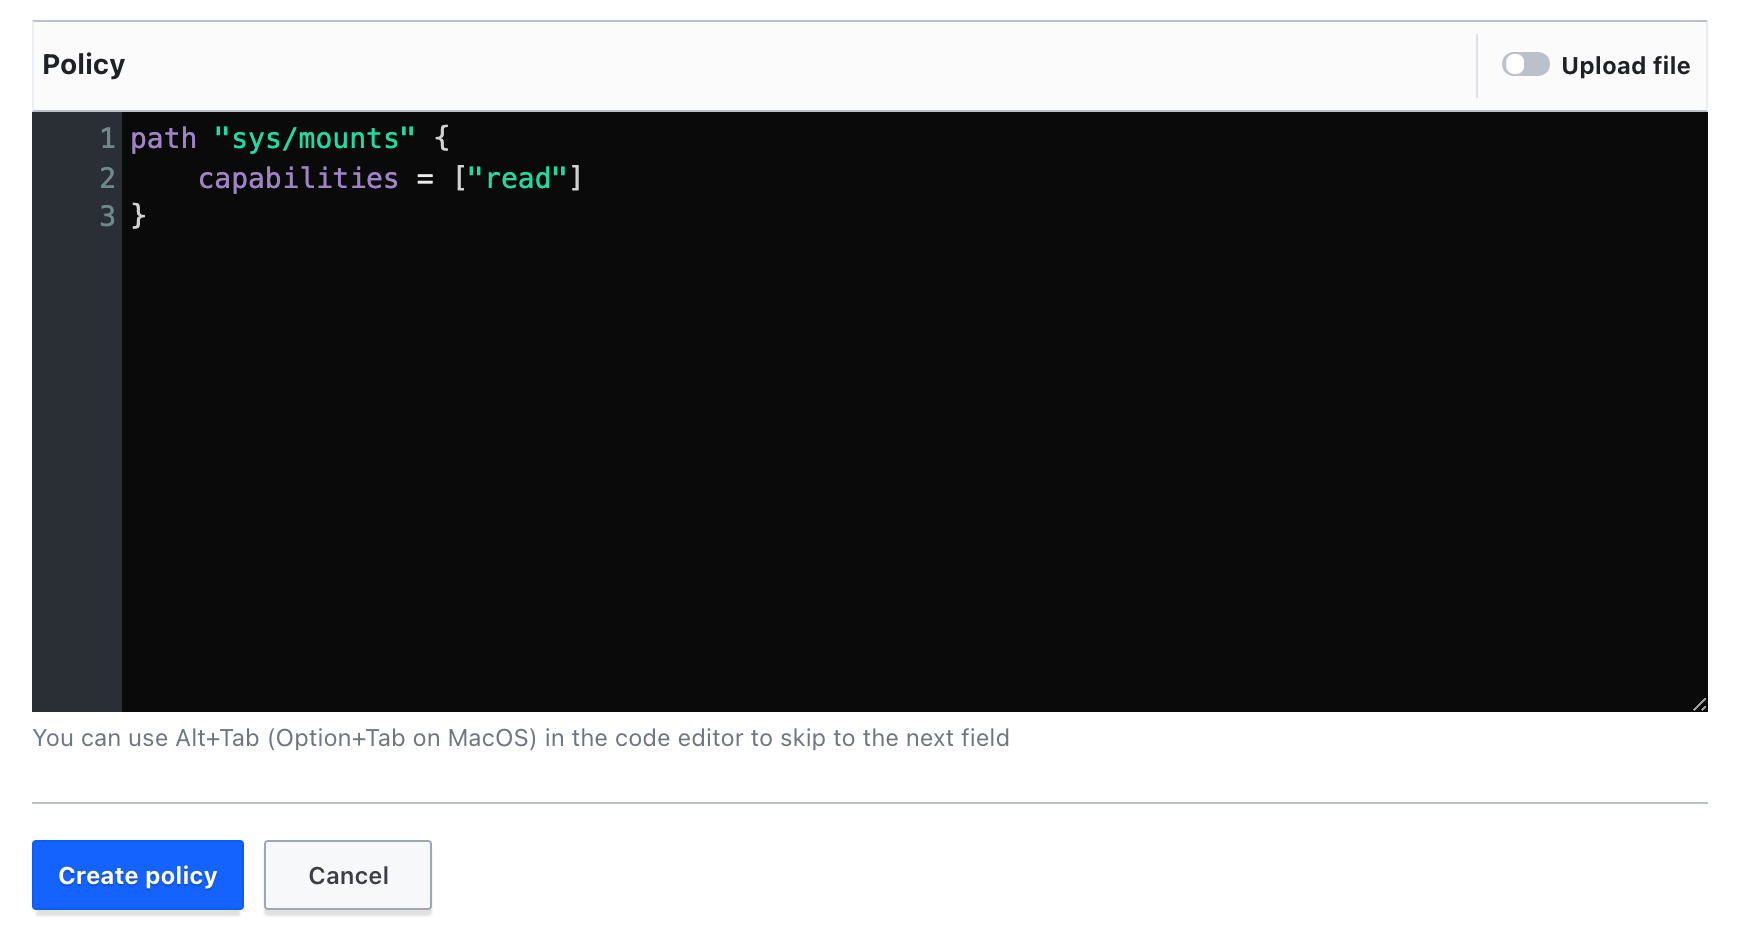
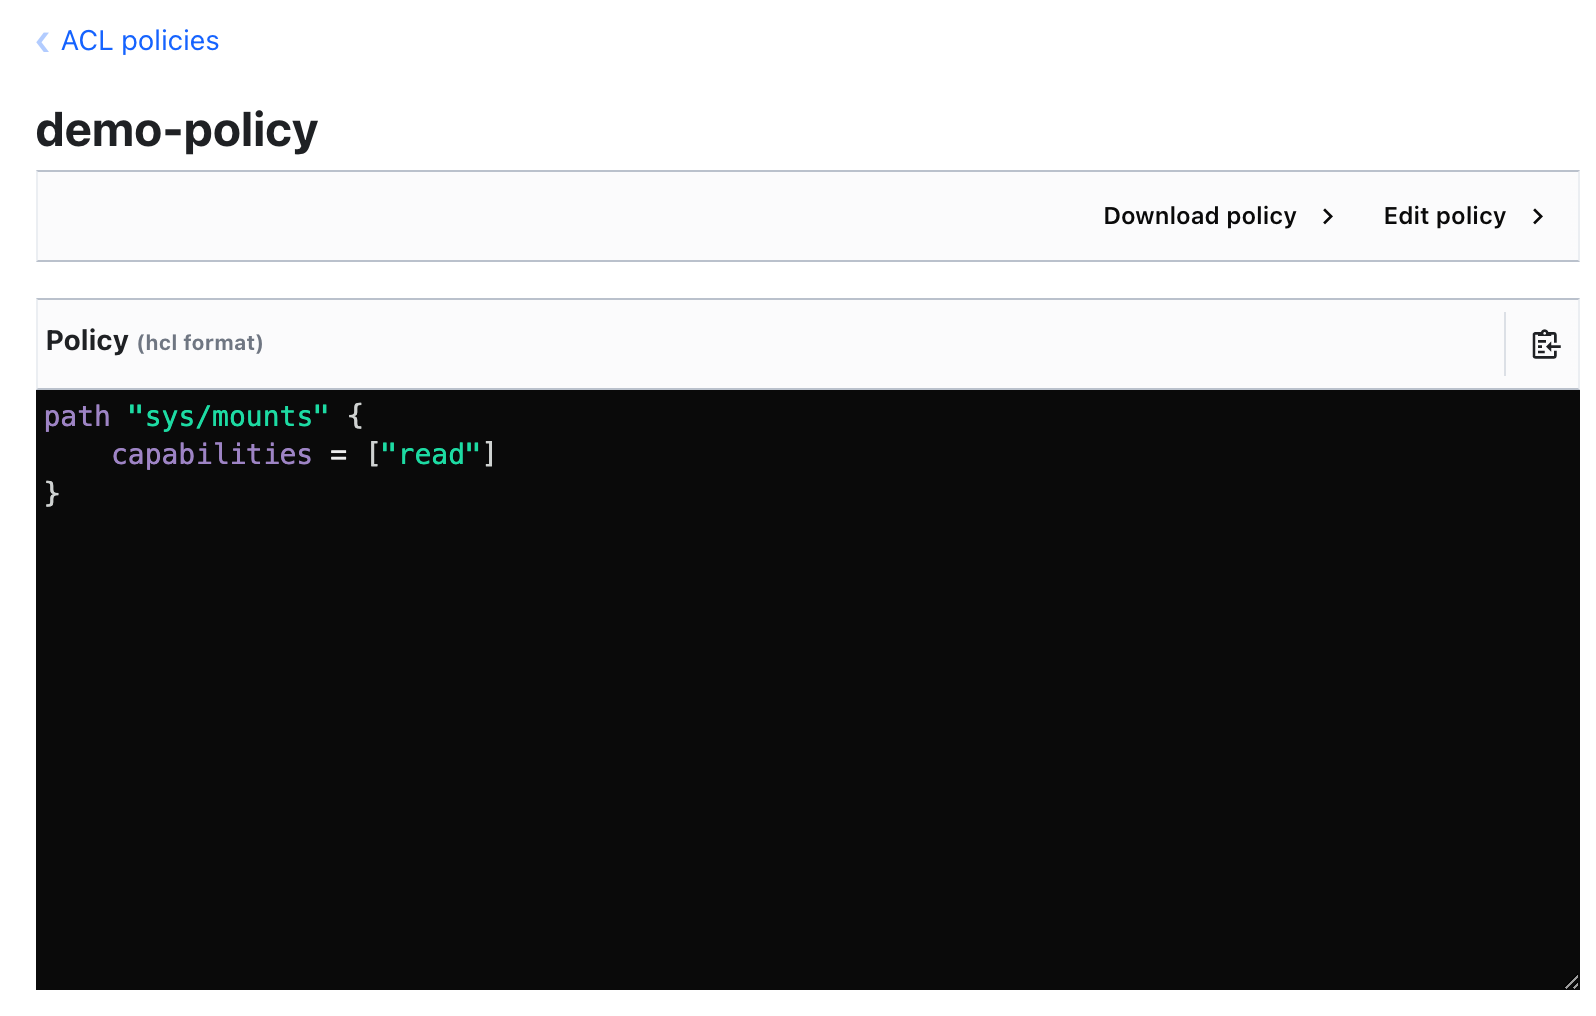
path "sys/mounts" {
    capabilities = ["read"]
}
Your policy should resemble the following:
- Click Create policy.
Now, you'll need to associate this policy with the example-user you created earlier.
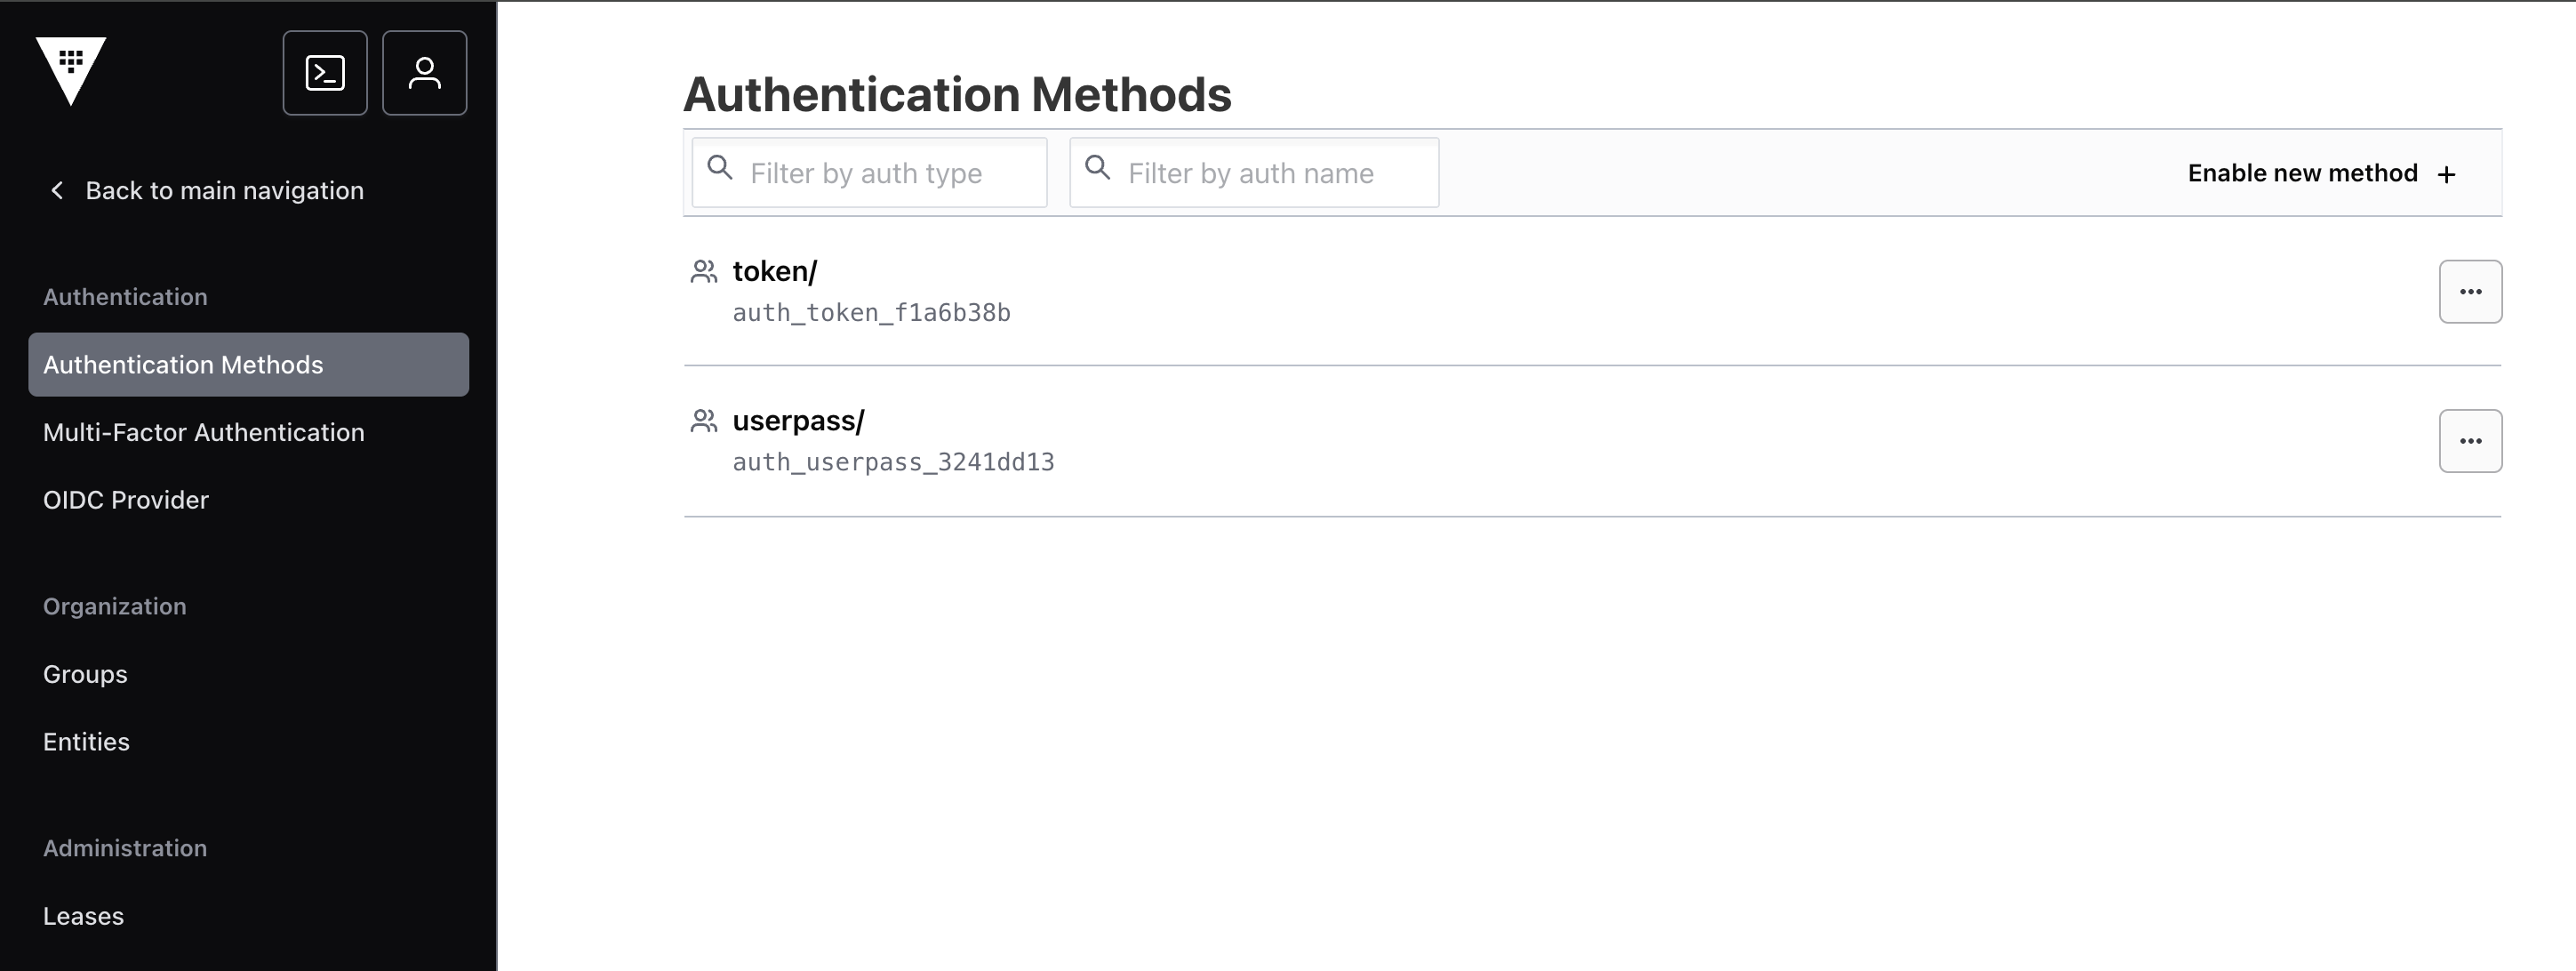
Click Back to main navigation.
Click the Access from the left pane and then click on the
userpassauthentication method.
- Click on the three dots next to the
example-useruser and select Edit user.
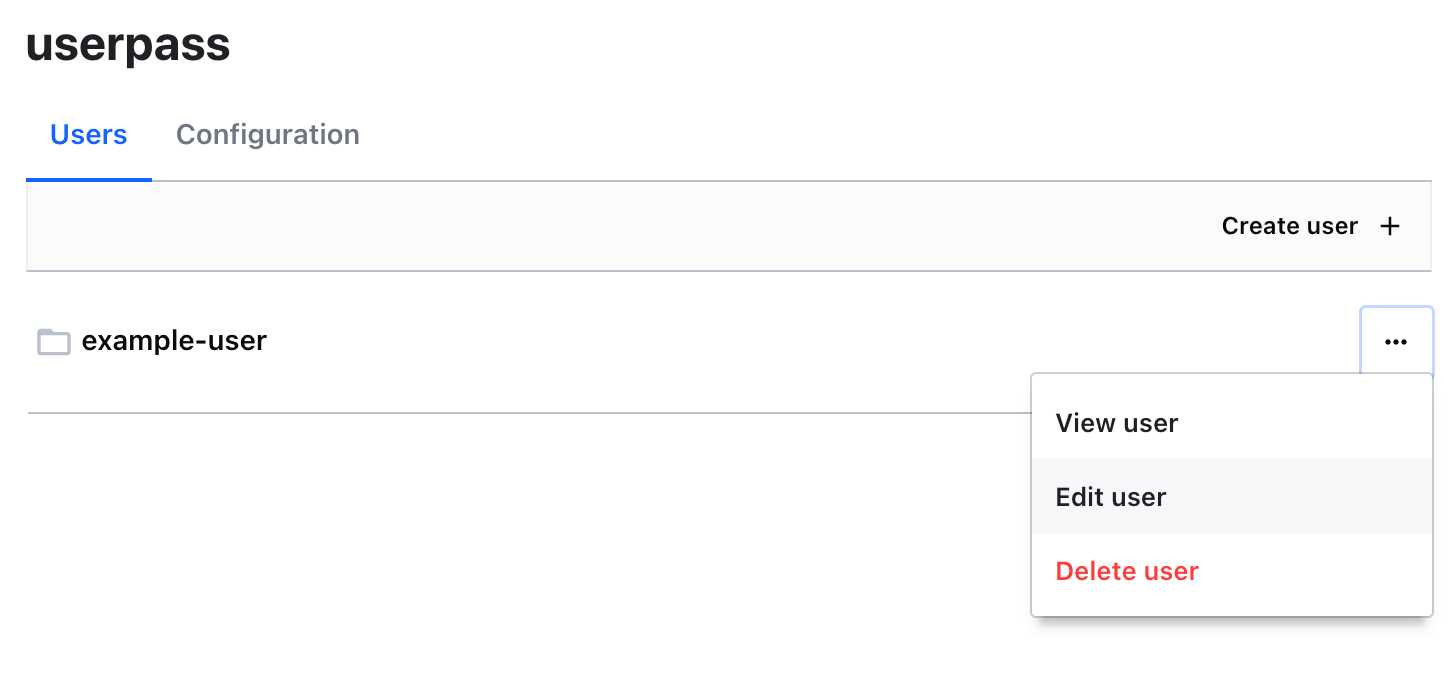
Under the password field, click Tokens to open up the submenu.
Under Generated Token's Policies, add the policy you just created (
demo-policy) and click Add.
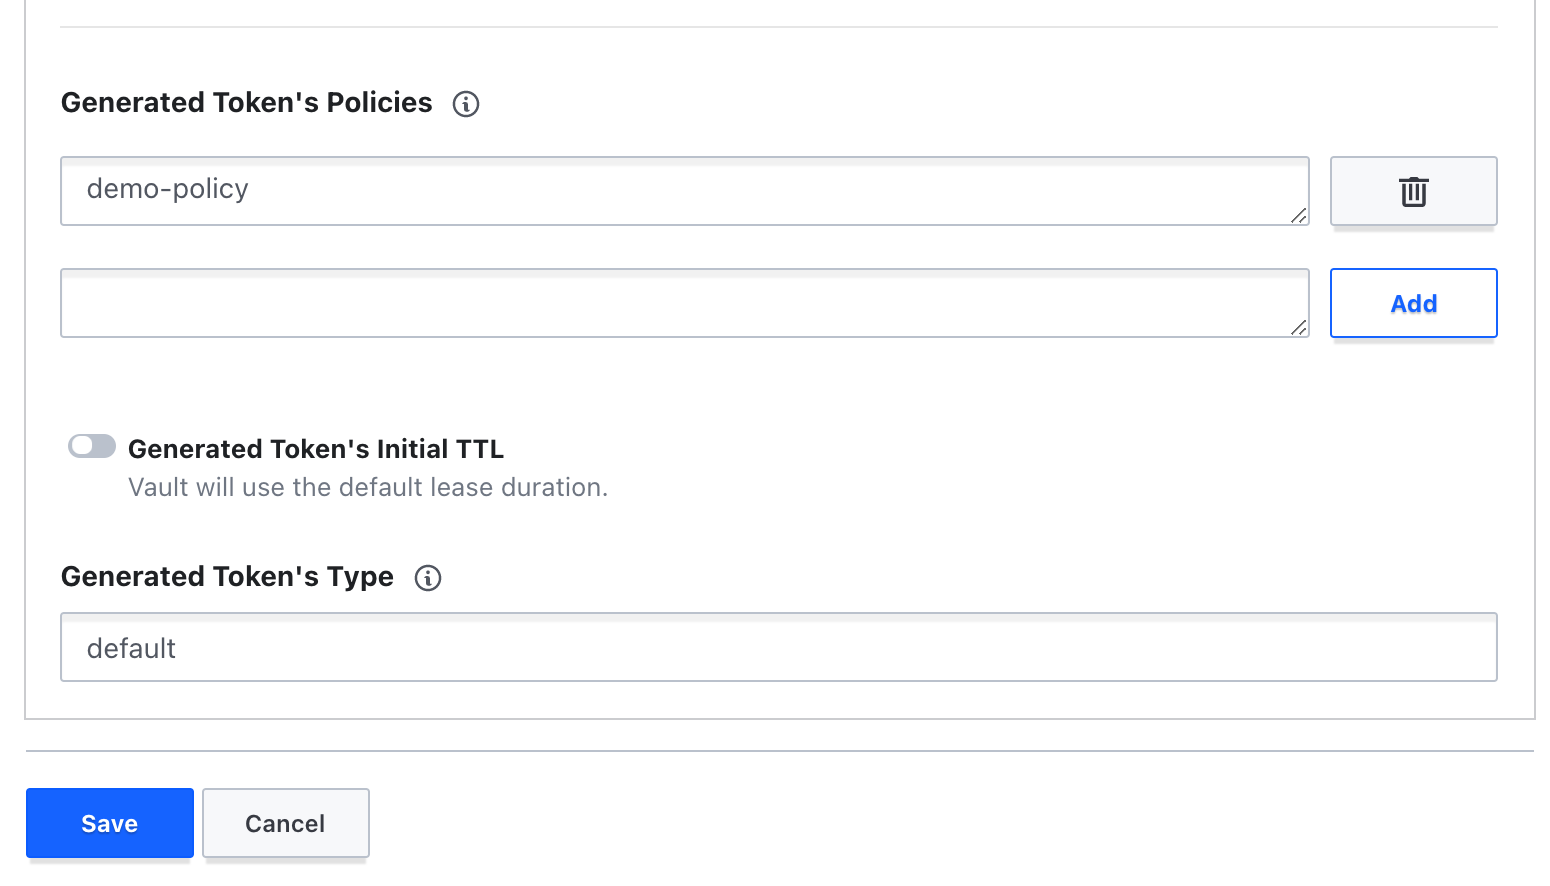
- Click Save.
Great! You've created a new policy and associated it with the example-user.
- Navigate back to Cloud Shell and run the following command again:
vault secrets list
You'll notice the same error as before:
Error listing secrets engines: Error making API request.

URL: GET http://127.0.0.1:8200/v1/sys/mounts
Code: 403. Errors:

* 1 error occurred:
        * permission denied
Why did it error after you've added the policy to the user? This is because once you associate a new policy with a user, that policy won't be associated with the existing token for that user. To fix this, you'll need to generate a new token for that user so that new policy can be attached to that token.
- Run the following command to log in and generate a new token for
example-user:
vault login -method=userpass username=example-user password=password!
Note: You should receive a new token on output. Notice that you now have the default policy and demo-policy attached.
Success! You are now authenticated. The token information displayed below is already stored in the token helper. You do NOT need to run "vault login" again. Future Vault requests will automatically use this token.

Key                    Value
---                    -----
token                  s.7AVelOPORi1zhjH5iLototw7
token_accessor         H1ee2gTXzTXUU9ptpU3ailnJ
token_duration         768h
token_renewable        true
token_policies         ["default" "demo-policy"]
identity_policies      []
policies               ["default" "demo-policy"]
token_meta_username    example-user
- Now, try listing the secrets engines one more time:
vault secrets list
Your output should now resemble the following:
Path          Type         Accessor              Description
----          ----         --------              -----------
cubbyhole/    cubbyhole    cubbyhole_76cb59ae    per-token private secret storage
identity/     identity     identity_7fa27e52     identity store
secret/       kv           kv_f6e83366           key/value secret storage
sys/          system       system_414d50aa       system endpoints..
- You can also check the capabilities of the token by using the
vault token capabilitiescommand. Run the following to verify your policy on thesys/mountspath:
vault token capabilities <your token> sys/mounts
You should get the following output:
read
- Next, check the token capabilities for the
sys/policies/aclpath:
vault token capabilities <your token> sys/policies/acl
You should get the following output:
deny
- To verify this, try to run the following command to list the policies:
vault policy list
You should receive the following error:
Error listing policies: Error making API request.

URL: GET http://127.0.0.1:8200/v1/sys/policies/acl?list=trueCode: 403. Errors:

* 1 error occurred:
        * permission denied
As you can see here, you're getting a permission denied error for a GET API request on the sys/policies/acl path. Also notice the additional list=true on the path; you will need to add this capability as well. Let's fix this by updating the existing policy.
- Navigate back to the
demo-policyyou created in the Vault UI.
Click Edit policy.
In the Policy box, add the following placeholder code under the existing policy you wrote:
path "path" {
    capabilities = [""]
}
- Again, let's first update the
pathto thesys/policies/aclpath you were trying to access:
path "sys/policies/acl" {
    capabilities = [""]
}
- Now you'll add the capability. Since Vault is attempting to make a GET API call on this path, you'll need to add the
readcapability again. Additionally, the attempt passed in thelist=trueto the URL, so you'll need to add this capability as well.
path "sys/policies/acl" {
    capabilities = ["read", "list"]
}
Your updated policy should now resemble the following:

Click Save.
Navigate back to Cloud Shell and run the following command again:
vault policy list
Your output should now resemble:
default
demo-policy
root
- Run the following command to copy the values of the policies to a text file:
vault policy list > policies.txt
- Lastly, check the token capabilities again for the
sys/policies/aclpath:
vault token capabilities <your token> sys/policies/acl
You should get the following output:
list, read
- Run the following command to copy the values of the policies to a text file. Make sure to replace
<your token>with the value of your token:
vault token capabilities <your token> sys/policies/acl > token_capabilities.txt
- Run the following commands to copy both the
policiesandtoken_capabilitiestext files to a pre-created Cloud Storage bucket to track your progress:
export PROJECT_ID=$(gcloud config get-value project)
gsutil cp *.txt gs://$PROJECT_ID
As you can see, when you modified the existing policy associated with the user, the changes were reflected without generating a new token. This is because the contents of policies are parsed in real-time whenever the token is used. As a result, if a policy is modified, the modified rules will be enforced the next time a token, with that policy attached, is used to make a call to Vault.
Great! You successfully created a policy that granted read access to the sys/mounts path and associated it with a user. You then added an additional policy to grant read and list access to the sys/policies path.
Click Check my progress to verify the objective.
Create policies
Task 5. Managing policies
Policies are authored (written) in your editor of choice. They can be authored in HCL or JSON, and the syntax is described in detail above. Once saved, policies must be uploaded to Vault before they can be used.
In the previous section, you used the UI to write and manage a a policy. This section will cover the CLI commands to manage policies.
- First, make sure to run the following in Cloud Shell to log in to Vault with your root token:
vault login <your root token>
Listing policies
- Run the following command to list all registered policies in Vault:
vault read sys/policy
You should see the following output:
Key         Value
---         -----
keys        [default demo-policy root]
policies    [default demo-policy root
Creating policies
Policies can be created (uploaded) via the CLI, UI, or via the API. In the previous section, you simply used the UI to create the HCL file.
To create a new policy in Vault, you would use the following command:
vault policy write policy-name policy-file.hcl
- You can test this out by first creating a basic policy file with the following command:
tee example-policy.hcl <<EOF
# List, create, update, and delete key/value secrets
path "secret/*"
{
  capabilities = ["create", "read", "update", "delete", "list", "sudo"]
}

# Manage secrets engines
path "sys/mounts/*"
{
  capabilities = ["create", "read", "update", "delete", "list", "sudo"]
}

# List existing secrets engines.
path "sys/mounts"
{
  capabilities = ["read"]
}
EOF
- Check that your file was created correctly:
cat example-policy.hcl
- Now, create a new policy named
example-policywith thevault policy writecommand:
vault policy write example-policy example-policy.hcl
If it was successful, you should see the following output:
Success! Uploaded policy: example-policy
In this example, the name of the policy is "example-policy". You can think of this name as a pointer or symlink to the policy ACLs. Tokens are attached policies by name, which are then mapped to the set of rules corresponding to that name.
Updating policies
Existing policies may be updated to change permissions via the CLI or via the API. To update an existing policy in Vault, you will follow the same steps as creating a policy, but use an existing policy name.
- First, run the following command to update and overwrite your existing policy file to be able to list auth methods:
tee example-policy.hcl <<EOF
# List, create, update, and delete key/value secrets
path "secret/*"
{
  capabilities = ["create", "read", "update", "delete", "list", "sudo"]
}

# Manage secrets engines
path "sys/mounts/*"
{
  capabilities = ["create", "read", "update", "delete", "list", "sudo"]
}

# List existing secrets engines.
path "sys/mounts"
{
  capabilities = ["read"]
}

# List auth methods
path "sys/auth"
{
  capabilities = ["read"]
}
EOF
- Check that your file was created correctly:
cat example-policy.hcl
- Update your policy:
vault write sys/policy/example-policy policy=@example-policy.hcl
Great! You've successfully updated a policy using the CLI.
- Run the following command to copy the policy file to a pre-created Cloud Storage bucket to track your progress:
gsutil cp example-policy.hcl gs://$PROJECT_ID
Click Check my progress to verify the objective.
Create and manage policies using CLI commands
Deleting policies
Existing policies may be deleted via the CLI, UI, or API. To delete a policy, you would run the following:
vault delete sys/policy/policy-name
- Let's try this in practice. Run the following command to delete the policy you just created:
vault delete sys/policy/example-policy
If it was successful, you should have seen the following output:
Success! Data deleted (if it existed) at: sys/policy/example-policy
- List your policies with the following command:
vault policy list
You should see the following output:
default
demo-policy
root
Great! You've successfully deleted the example-policy.
Note: This is an idempotent operation. Vault will not return an error when deleting a policy that does not exist.
Task 6. Associating policies
Vault can automatically associate a set of policies to a token based on an authorization. This configuration varies significantly between authentication backends. For simplicity, this example will use Vault's built-in userpass auth method.
- Run the following command to create the user
firstname-lastnamein Vault with a list of associated policies:
vault write auth/userpass/users/firstname-lastname \
    password="s3cr3t!" \
    policies="default, demo-policy"
Success! Data written to: auth/userpass/users/firstname-lastname
This creates an authentication mapping to the policy such that, when the user authenticates successfully to Vault, they will be given a token which has the list of policies attached.
- Authenticate with Vault by running the following:
vault login -method="userpass" username="firstname-lastname" password="s3cr3t!"
You should see the following output:
Key                    Value
---                    -----
token                  s.XnRsinhsokVUiN7XbsnyCOEC
token_accessor         JFErk5Rgb7vtW47CJjY2OCsF
token_duration         768h
token_renewable        true
token_policies         ["default" "demo-policy"]
identity_policies      []
policies               ["default" "demo-policy"]
token_meta_username    firstname-lastname
Since the provided information is correct, Vault will generate a token, assign the list of configured policies to the token, and return that token to the authenticated user.
Tokens
Tokens have two sets of policies: identity policies, which are computed based on the entity and its groups, and token policies, which are either defined based on the login method or, in the case of explicit token creates via the API, are an input to the token creation. What follows concerns token policies exclusively: a token's identity policies cannot be controlled except by modifying the underlying entities, groups, and group memberships.
- First, log back in to Vault with your root token:
vault login <your root token>
- Tokens are associated with their policies at creation time. Run the following to create a token with the
dev-readonlyandlogspolicies:
vault token create -policy=dev-readonly -policy=logs
You should see the following output:
Key                  Value
---                  -----
token                s.gKRV6vzFmpdJ9iwvPfzNjAuI
token_accessor       S4jfdYvy8jQP7GGDa947CBlT
token_duration       768h
token_renewable      true
token_policies       ["default" "dev-readonly" "logs"]
identity_policies    []
policies             ["default" "dev-readonly" "logs"]
Note: You can ignore the warnings that the policies don't exist, since you haven't created them.
Normally the only policies that may be specified are those which are present in the current token's (i.e. the new token's parent's) token policies. However, root users can assign any policies.
There is no way to modify the policies associated with a token once the token has been issued. The token must be revoked and a new one acquired to receive a new set of policies.
However, the contents of policies are parsed in real-time whenever the token is used. As a result, if a policy is modified, the modified rules will be enforced the next time a token, with that policy attached, is used to make a call to Vault.
Task 7. Policies for secrets
In this section, you'll create Vault policies to grant users different levels of access within Vault and test them.
- In Cloud Shell, start by creating a few different users with different policies:
vault write auth/userpass/users/admin \
    password="admin123" \
    policies="admin"
vault write auth/userpass/users/app-dev \
    password="appdev123" \
    policies="appdev"
vault write auth/userpass/users/security \
    password="security123" \
    policies="security"
Now that you've created some new users, you'll create the policies that you've already associated with them. You'll first start with the admin policy, which should be able to have full access to all the secrets in Vault.
Create the admin policy
For the purposes of this lab, an admin user must be able to:
Read system health check
Create and manage ACL policies broadly across Vault
Enable and manage authentication methods broadly across Vault
Manage the Key-Value secrets engine enabled at
secret/path
Navigate to Policies from the left pane in the Vault UI. You should see the
default,demo-policy, androotpolicies.Click Create ACL policy.
Start by naming your policy
admin.In the Policy box, add the following policy code:
# Read system health check
path "sys/health"
{
  capabilities = ["read", "sudo"]
}

# Create and manage ACL policies broadly across Vault

# List existing policies
path "sys/policies/acl"
{
  capabilities = ["list"]
}

# Create and manage ACL policies
path "sys/policies/acl/*"
{
  capabilities = ["create", "read", "update", "delete", "list", "sudo"]
}

# Enable and manage authentication methods broadly across Vault

# Manage auth methods broadly across Vault
path "auth/*"
{
  capabilities = ["create", "read", "update", "delete", "list", "sudo"]
}

# Create, update, and delete auth methods
path "sys/auth/*"
{
  capabilities = ["create", "update", "delete", "sudo"]
}

# List auth methods
path "sys/auth"
{
  capabilities = ["read"]
}

# Enable and manage the key/value secrets engine at `secret/` path

# List, create, update, and delete key/value secrets
path "secret/*"
{
  capabilities = ["create", "read", "update", "delete", "list", "sudo"]
}

# Manage secrets engines
path "sys/mounts/*"
{
  capabilities = ["create", "read", "update", "delete", "list", "sudo"]
}

# List existing secrets engines.
path "sys/mounts"
{
  capabilities = ["read"]
}
Your policy should resemble the following:

- Click Create policy.
Create the appdev policy
For the purposes of this lab, an appdev user must be able to:
Create, read, and update secrets engines
Manage the Key-Value secrets engine enabled at
secret/appdev/path
Navigate back to the ACL Policies page.
Click Create ACL policy.
Start by naming your policy
appdev.In the Policy box, add the following policy code:
# List, create, update, and delete key/value secrets
path "secret/+/appdev/*"
{
  capabilities = ["create", "read", "update", "delete", "list", "sudo"]
}

# Create, read, and update secrets engines
path "sys/mounts/*"
{
  capabilities = ["create", "read", "update"]
}

# List existing secrets engines.
path "sys/mounts"
{
  capabilities = ["read"]
}
- Click Create policy.
Create the security policy
For the purposes of this lab, a security user must be able to:
Create and manage ACL policies broadly across Vault
Manage secrets engines
Manage the Key-Value secrets engine enabled at
secret/pathNot have access to read or list secrets on the
secret/adminpath
Navigate back to the ACL Policies page.
Click Create ACL policy.
Start by naming your policy
security.In the Policy box, add the following policy code:
# List existing policies
path "sys/policies/acl"
{
  capabilities = ["list"]
}

# Create and manage ACL policies
path "sys/policies/acl/*"
{
  capabilities = ["create", "read", "update", "delete", "list", "sudo"]
}

# Manage secrets engines
path "sys/mounts/*"
{
  capabilities = ["create", "read", "update", "delete", "list", "sudo"]
}

# List existing secrets engines.
path "sys/mounts"
{
  capabilities = ["read"]
}

# List, create, update, and delete key/value secrets
path "secret/*"
{
  capabilities = ["create", "read", "update", "delete", "list", "sudo"]
}

# Deny access to secret/admin
path "secret/data/admin" {
    capabilities = ["deny"]
}
path "secret/data/admin/*" {
    capabilities = ["deny"]
}

# Deny list access to secret/admin
path "secret/metadata/admin" {
    capabilities = ["deny"]
}
path "secret/metadata/admin/*" {
    capabilities = ["deny"]
}
- Click Create policy.
Create secrets
Now that you've created the different policies, it's time to create some secrets.
- Navigate back to Cloud Shell and run the following commands to create some secrets in the
secret/securitypath:
vault kv put secret/security/first username=password
vault kv put secret/security/second username=password
- Create some secrets in the
secret/appdevpath:
vault kv put secret/appdev/first username=password
vault kv put secret/appdev/beta-app/second username=password
- Create some secrets in the
secret/adminpath:
vault kv put secret/admin/first admin=password
vault kv put secret/admin/supersecret/second admin=password
Verify security for appdev
Now that you've created some secrets, let's verify that these policies are being enforced. You'll first log in as the app-dev user and see what you have access to.
- Run the following command to log in as
app-devuser:
vault login -method="userpass" username="app-dev" password="appdev123"
- Now, try to fetch the
appdev/firstsecret:
vault kv get secret/appdev/first
You should see the following output:
======= Metadata =======
Key                Value
---                -----
created_time       2022-01-12T18:58:13.18635501Z
custom_metadata    <nil>
deletion_time      n/a
destroyed          false
version            1

====== Data ======
Key         Value
---         -----
username    password
- Fetch the secret located at
secret/appdev/beta-app/second:
vault kv get secret/appdev/beta-app/second
You should see the following output:
======= Metadata =======
Key                Value
---                -----
created_time       2022-01-12T18:58:13.829274247Z
custom_metadata    <nil>
deletion_time      n/a
destroyed          false
version            1

====== Data ======
Key         Value
---         -----
username    password
- Create a new secret:
vault kv put secret/appdev/appcreds credentials=creds123
- Destroy the secret:
vault kv destroy -versions=1 secret/appdev/appcreds
- Attempt to get a secret from
secret/security:
vault kv get secret/security/first
You should receive the following error:
Error reading secret/data/security/first: Error making API request.

URL: GET http://127.0.0.1:8200/v1/secret/data/security/first
Code: 403. Errors:

* 1 error occurred:
        * permission denied
- Attempt to list all the secrets at
secret/:
vault kv list secret/
You should again receive an error:
Error listing secret/metadata: Error making API request.

URL: GET http://127.0.0.1:8200/v1/secret/metadata?list=true
Code: 403. Errors:

* 1 error occurred:
        * permission denied
Great! You were able to fetch and create secrets in the secret/appdev path, and verified that you were not able to access secrets outside of it.
Verify policy for security
- Run the following command to log in as
securityuser:
vault login -method="userpass" username="security" password="security123"
- Now, try to fetch the
security/firstsecret:
vault kv get secret/security/first
You should see the following output:
======= Metadata =======
Key                Value
---                -----
created_time       2022-01-12T18:58:04.299036073Z
custom_metadata    <nil>
deletion_time      n/a
destroyed          false
version            1

====== Data ======
Key         Value
---         -----
username    password
- Fetch the secret located at
secret/security/second:
vault kv get secret/security/second
You should see the following output:
======= Metadata =======
Key                Value
---                -----
created_time       2022-01-12T18:58:13.829274247Z
custom_metadata    <nil>
deletion_time      n/a
destroyed          false
version            1

====== Data ======
Key         Value
---         -----
username    password
- Create a new secret in
secret/security/supersecure:
vault kv put secret/security/supersecure/bigsecret secret=idk
- Destroy the secret:
vault kv destroy -versions=1 secret/security/supersecure/bigsecret
- Attempt to read a secret from
secret/appdev:
vault kv get secret/appdev/first
You should receive the following output:
======= Metadata =======
Key                Value
---                -----
created_time       2022-01-12T18:58:13.18635501Z
custom_metadata    <nil>
deletion_time      n/a
destroyed          false
version            1

====== Data ======
Key         Value
---         -----
username    password
- Attempt to list all of the secrets at
secret/:
vault kv list secret/
You should receive the following output:
Keys
----
admin/
appdev/
security/
- Enable a new secrets engine:
vault secrets enable -path=supersecret kv
Success! Enabled the kv secrets engine at: supersecret/
- Attempt to look at the
secret/admin/firstsecret:
vault kv get secret/admin/first
You should receive the following error:
Error reading secret/data/admin/first: Error making API request.

URL: GET http://127.0.0.1:8200/v1/secret/data/admin/first
Code: 403. Errors:

* 1 error occurred:
        * permission denied
- Attempt to list the secrets at
secret/admin:
vault kv list secret/admin
Again, you should receive an error:
Error listing secret/metadata/admin: Error making API request.

URL: GET http://127.0.0.1:8200/v1/secret/metadata/admin?list=true
Code: 403. Errors:

* 1 error occurred:
        * permission denied
Great! You are able to fetch and create secrets in the secret/ path, enable a secrets engine, and were denied access to the secret/admin path as specified in the policy.
Verify policy for admin
- Run the following command to log in as
adminuser:
vault login -method="userpass" username="admin" password="admin123"
- Now, try to fetch the
admin/firstsecret:
vault kv get secret/admin/first
You should see the following output:
======= Metadata =======
Key                Value
---                -----
created_time       2022-01-12T18:58:18.521925218Z
custom_metadata    <nil>
deletion_time      n/a
destroyed          false
version            1

==== Data ====
Key      Value
---      -----
admin    password
- Fetch a secret located at
secret/security/first:
vault kv get secret/security/first
You should see the following output:
======= Metadata =======
Key                Value
---                -----
created_time       2022-01-12T18:58:04.299036073Z
custom_metadata    <nil>
deletion_time      n/a
destroyed          false
version            1

====== Data ======
Key         Value
---         -----
username    password
- Create a new secret:
vault kv put secret/webserver/credentials web=awesome
- Destroy the secret:
vault kv destroy -versions=1 secret/webserver/credentials
- Attempt to get secrets from the
secret/appdev:
vault kv get secret/appdev/first
You should receive the following output:
======= Metadata =======
Key                Value
---                -----
created_time       2022-01-12T18:58:13.18635501Z
custom_metadata    <nil>
deletion_time      n/a
destroyed          false
version            1

====== Data ======
Key         Value
---         -----
username    password
- Attempt to list all of the secrets at
secret/appdev:
vault kv list secret/appdev/
You should receive the following output:
Keys
----
appcreds
beta-app/
first
- List all of the policies:
vault policy list
You should receive the following output:
admin
appdev
default
demo-policy
security
root
- Run the following command to copy the values of the policies to a text file and upload it to the Cloud Storage bucket:
vault policy list > policies-update.txt
gsutil cp policies-update.txt gs://$PROJECT_ID
- Enable the
gcpauth method:
vault auth enable gcp
- Lastly, list the authentication methods enabled:
vault auth list
Path         Type        Accessor                  Description
----         ----        --------                  -----------
gcp/         gcp         auth_gcp_faa3d15f         n/a
token/       token       auth_token_066c5ebd       token based credentials
userpass/    userpass    auth_userpass_929fe9bd    n/a
Great, you have verified that you have the admin priviledges associated with the policy you wrote.
Click Check my progress to verify the objective.
Policies for Secrets
Paths
As you may have seen in the policy code that was provided for the security user, there were a couple topics introduced that you haven't seen before: data/ and metadata/.
The metadata/ path endpoint returns a list of key names at the specified location. Furthermore, the values themselves are not accessible with this command. Writing and reading versions are prefixed with data/. Listing, reading, and destroying are as follows:
Writing and Reading Versions -
data/Listing Keys -
metadata/Reading versions -
metadata/Destroy Versions of Secret -
destroy/Destroy all versions of metadata for a key -
metadata/
For example, if you are trying to deny access to a secret at secret/example, you would need to format it with the following data/:
path "secret/data/example" {
    capabilities = ["deny"]
}
If you want to deny list access to secret/examples, you would need format with the following metadata/:
path "secret/metadata/examples/*" {
    capabilities = ["deny"]
}
Task 8. Fine-grained control
In addition to the standard set of capabilities, Vault offers finer-grained control over permissions at a given path. The capabilities associated with a path take precedence over permissions on parameters.
Parameter constraints
In Vault, data is represented as key=value pairs. Vault policies can optionally further restrict paths based on the keys and data at those keys when evaluating the permissions for a path. The optional finer-grained control options are:
required_parameters- A list of parameters that must be specified.allowed_parameters- A list of keys and values that are permitted on the given path.denied_parameters- Denylists a list of parameter and values. Any values specified here take precedence overallowed_parameters
For more information on fine-grained control, you can check out the Fine-Grained Control documentation.
Solution of Lab
Quick
curl -LO raw.githubusercontent.com/ePlus-DEV/storage/refs/heads/main/labs/GSP1004/lab.sh
source lab.sh
New Solution
Task 1:
curl -LO raw.githubusercontent.com/ePlus-DEV/storage/refs/heads/main/labs/GSP1004/TechCode1.sh
source TechCode1.sh
Script Alternative
curl -LO raw.githubusercontent.com/prateekrajput08/Arcade-Google-Cloud-Labs/refs/heads/main/Interacting%20with%20Vault%20Policies/TechCode1.sh
sudo chmod +x TechCode1.sh
./TechCode1.sh
Task 2:
run() {
  echo -e "\n\033[1;36m▶ $*\033[0m"
  "$@"
  echo -e "\n\033[1;33mPress ENTER to continue...\033[0m"
  read
}

export VAULT_ADDR='http://127.0.0.1:8200'
run vault status
printf "\033[1;32mEnter Vault Token: \033[0m"
read -s ROOT_TOKEN
echo
run vault login token="$ROOT_TOKEN"
run vault secrets list
run vault auth enable userpass
run vault write auth/userpass/users/example-user password='password!'
run vault login -method=userpass username=example-user password='password!'
run vault secrets list
echo -e "\n\033[1;32mAll commands completed. Shell will stay open.\033[0m"
exec bash
Task 3:
path "sys/mounts" {
    capabilities = ["read"]
}
Task 4:
run() {
  echo -e "\n\033[1;36m▶ $*\033[0m"
  "$@"
  echo -e "\n\033[1;33mPress ENTER to continue...\033[0m"
  read
}

run vault secrets list
run vault login -method=userpass username=example-user password='password!'
run vault secrets list
printf "\033[1;32mEnter Vault Token: \033[0m"
read -s YOUR_TOKEN
echo
run vault token capabilities "$YOUR_TOKEN" sys/mounts
run vault token capabilities "$YOUR_TOKEN" sys/policies/acl
run vault policy list
Task 5:
path "sys/policies/acl" {
    capabilities = ["read", "list"]
}
Task 6:
run() {
  echo -e "\n\033[1;36m▶ $*\033[0m"
  "$@"
  echo -e "\n\033[1;33mPress ENTER to continue...\033[0m"
  read
}

run vault policy list
vault policy list > policies.txt
echo "policies.txt created"
run vault token capabilities "$YOUR_TOKEN" sys/policies/acl
vault token capabilities "$YOUR_TOKEN" sys/policies/acl > token_capabilities.txt
echo "token_capabilities.txt created"
export PROJECT_ID=$(gcloud config get-value project)
run gsutil cp policies.txt token_capabilities.txt "gs://$PROJECT_ID"
Task 7:
curl -LO raw.githubusercontent.com/prateekrajput08/Arcade-Google-Cloud-Labs/refs/heads/main/Interacting%20with%20Vault%20Policies/TechCode2.sh
sudo chmod +x TechCode2.sh
./TechCode2.sh
Task 8:
curl -LO raw.githubusercontent.com/prateekrajput08/Arcade-Google-Cloud-Labs/refs/heads/main/Interacting%20with%20Vault%20Policies/TechCode3.sh
sudo chmod +x TechCode3.sh
./TechCode3.sh
Manual
curl -fsSL https://apt.releases.hashicorp.com/gpg | sudo apt-key add -
sudo apt-add-repository "deb [arch=amd64] https://apt.releases.hashicorp.com $(lsb_release -cs) main"
sudo apt-get update
sudo apt-get install vault -y
vault
vault server -dev

export VAULT_ADDR='http://127.0.0.1:8200'
vault status

vault login token=<your root token>

vault secrets list
vault auth enable userpass
vault write auth/userpass/users/example-user password=password!
vault login -method=userpass username=example-user password=password!
vault secrets list

8200


demo-policy
path "sys/mounts" {
    capabilities = ["read"]
}

demo-policy

vault secrets list
vault login -method=userpass username=example-user password=password!
vault secrets list

vault token capabilities <your token> sys/mounts
vault token capabilities <your token> sys/mounts
vault policy list
path "sys/policies/acl" {
    capabilities = ["read", "list"]
}

vault policy list
vault policy list > policies.txt
vault token capabilities <your token> sys/policies/acl
vault token capabilities <your token> sys/policies/acl > token_capabilities.txt
export PROJECT_ID=$(gcloud config get-value project)
gsutil cp *.txt gs://$PROJECT_ID

vault login <your root token>

vault read sys/policy
tee example-policy.hcl <<EOF
# List, create, update, and delete key/value secrets
path "secret/*"
{
  capabilities = ["create", "read", "update", "delete", "list", "sudo"]
}

# Manage secrets engines
path "sys/mounts/*"
{
  capabilities = ["create", "read", "update", "delete", "list", "sudo"]
}

# List existing secrets engines.
path "sys/mounts"
{
  capabilities = ["read"]
}
EOF
cat example-policy.hcl
vault policy write example-policy example-policy.hcl
tee example-policy.hcl <<EOF
# List, create, update, and delete key/value secrets
path "secret/*"
{
  capabilities = ["create", "read", "update", "delete", "list", "sudo"]
}

# Manage secrets engines
path "sys/mounts/*"
{
  capabilities = ["create", "read", "update", "delete", "list", "sudo"]
}

# List existing secrets engines.
path "sys/mounts"
{
  capabilities = ["read"]
}

# List auth methods
path "sys/auth"
{
  capabilities = ["read"]
}
EOF
cat example-policy.hcl
vault write sys/policy/example-policy policy=@example-policy.hcl
gsutil cp example-policy.hcl gs://$PROJECT_ID

vault delete sys/policy/example-policy
vault policy list
vault write auth/userpass/users/firstname-lastname \
    password="s3cr3t!" \
    policies="default, demo-policy"
vault login -method="userpass" username="firstname-lastname" password="s3cr3t!"
vault login <your root token>
vault token create -policy=dev-readonly -policy=logs
vault write auth/userpass/users/admin \
    password="admin123" \
    policies="admin"
vault write auth/userpass/users/app-dev \
    password="appdev123" \
    policies="appdev"
vault write auth/userpass/users/security \
    password="security123" \
    policies="security"
admin
# Read system health check
path "sys/health"
{
  capabilities = ["read", "sudo"]
}

# Create and manage ACL policies broadly across Vault

# List existing policies
path "sys/policies/acl"
{
  capabilities = ["list"]
}

# Create and manage ACL policies
path "sys/policies/acl/*"
{
  capabilities = ["create", "read", "update", "delete", "list", "sudo"]
}

# Enable and manage authentication methods broadly across Vault

# Manage auth methods broadly across Vault
path "auth/*"
{
  capabilities = ["create", "read", "update", "delete", "list", "sudo"]
}

# Create, update, and delete auth methods
path "sys/auth/*"
{
  capabilities = ["create", "update", "delete", "sudo"]
}

# List auth methods
path "sys/auth"
{
  capabilities = ["read"]
}

# Enable and manage the key/value secrets engine at `secret/` path

# List, create, update, and delete key/value secrets
path "secret/*"
{
  capabilities = ["create", "read", "update", "delete", "list", "sudo"]
}

# Manage secrets engines
path "sys/mounts/*"
{
  capabilities = ["create", "read", "update", "delete", "list", "sudo"]
}

# List existing secrets engines.
path "sys/mounts"
{
  capabilities = ["read"]
}

appdev
# List, create, update, and delete key/value secrets
path "secret/+/appdev/*"
{
  capabilities = ["create", "read", "update", "delete", "list", "sudo"]
}

# Create, read, and update secrets engines
path "sys/mounts/*"
{
  capabilities = ["create", "read", "update"]
}

# List existing secrets engines.
path "sys/mounts"
{
  capabilities = ["read"]
}


vault kv put secret/security/first username=password
vault kv put secret/security/second username=password
vault kv put secret/appdev/first username=password
vault kv put secret/appdev/beta-app/second username=password
vault kv put secret/admin/first admin=password
vault kv put secret/admin/supersecret/second admin=password
vault login -method="userpass" username="app-dev" password="appdev123"
vault kv get secret/appdev/first
vault kv get secret/appdev/beta-app/second
vault kv put secret/appdev/appcreds credentials=creds123
vault kv destroy -versions=1 secret/appdev/appcreds
vault kv get secret/security/first
vault kv list secret/
vault login -method="userpass" username="security" password="security123"
vault kv get secret/security/first
vault kv get secret/security/second
vault kv put secret/security/supersecure/bigsecret secret=idk
vault kv destroy -versions=1 secret/security/supersecure/bigsecret
vault kv get secret/appdev/first
vault kv list secret/
vault secrets enable -path=supersecret kv
vault kv get secret/admin/first
vault kv list secret/admin
vault login -method="userpass" username="admin" password="admin123"
vault kv get secret/admin/first
vault kv get secret/security/first
vault kv put secret/webserver/credentials web=awesome
vault kv destroy -versions=1 secret/webserver/credentials
vault kv get secret/appdev/first
vault kv list secret/appdev/
vault policy list
vault policy list > policies-update.txt
gsutil cp policies-update.txt gs://$PROJECT_ID
vault auth enable gcp
vault auth list


