
Interconnecting Networks - Challenge Lab (Solution)
A passionate full-stack developer from @ePlus.DEV
Overview
There are a number of cloud-native methods to allow inter-VPC communication in Google Cloud Platform (GCP). In this lab, you will create multiple Virtual Private Clouds (VPCs) deployed in a “hub and spoke” typology. You will deploy a hub resource (VM running a simple web service) as well as VMs in 4 different spoke VPCs. You will then connect each spoke VPC to the hub VPC to access that resource using three different methods: VPC Peering, Private Service Connect (PSC), and HA-VPN.
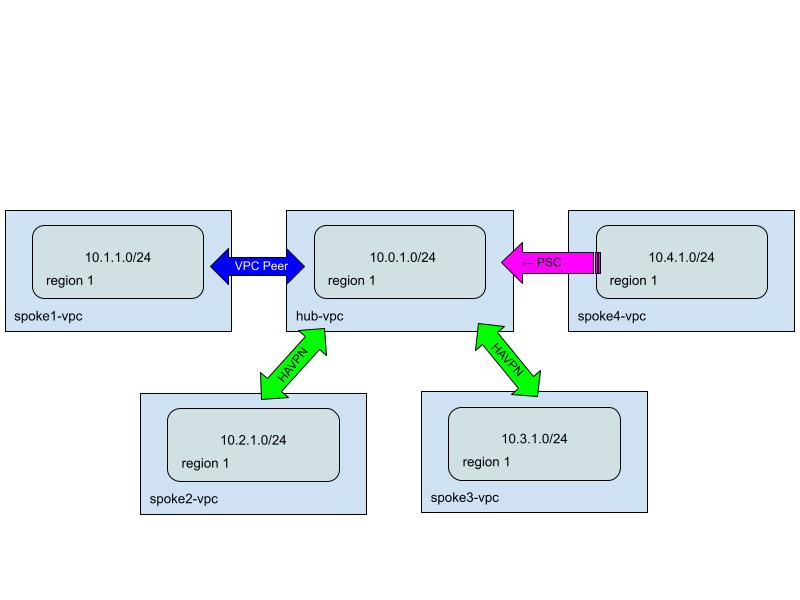
In addition, this lab will demonstrate how the Network Connectivity Center (NCC) can be used to connect some of the spokes using a centralized management plane. Lastly, to complete this lab, you will test connectivity using both active Virtual Machines (VMs) as well as simulated tests using Connectivity Tests through Network Intelligence Center.
Setup
Before you click the Start Lab button
Read these instructions. Labs are timed and you cannot pause them. The timer, which starts when you click Start Lab, shows how long Google Cloud resources will be made available to you.
This Qwiklabs hands-on lab lets you do the lab activities yourself in a real cloud environment, not in a simulation or demo environment. It does so by giving you new, temporary credentials that you use to sign in and access Google Cloud for the duration of the lab.
What you need
To complete this lab, you need:
Access to a standard internet browser (Chrome browser recommended)
Time to complete the lab
Note: If you already have your own personal Google Cloud account or project, do not use the same account/project for this lab to avoid incurring charges.
Note: If you are using a Pixelbook, open an Incognito window to run this lab.
How to start your lab and sign in to the Google Cloud console
Click the Start Lab button. If you need to pay for the lab, a pop-up opens for you to select your payment method. On the left is the Lab details pane, which is populated with the temporary credentials that are needed for this lab.
Copy the Password and then click Open Google Cloud console. The lab spins up resources, then opens another tab that shows the Sign in page.
Tip: Open the tabs in separate windows, side by side.
Note: If you see the Choose an account page, click Use another account.
On the Sign in page, verify that the username from the Lab details pane is auto-filled. Click Next.
Paste the password in the Enter your password field. Click Next.
Important: Use the credentials from the Lab details pane. Using your personal Google Cloud account may incur charges to your account.
Click through the subsequent pages:
Understand your account management.
Accept the terms and conditions.
After a few moments, the console opens.
Note: You can view the menu with a list of Google Cloud products and services by clicking the Navigation menu in the top left.

Activate Cloud Shell
Cloud Shell is a virtual machine (VM) that is loaded with development tools. It offers a persistent 5GB home directory and runs on the Google Cloud. Cloud Shell provides command-line access to your Google Cloud resources.
- In the Cloud Console, in the top-right toolbar, click the Activate Cloud Shell button.

- Click Continue.

It takes a few moments to provision and connect to the environment. When you are connected, you are already authenticated, and the project is set to your PROJECT_ID. For example:

gcloud is the command-line tool for Google Cloud. It comes pre-installed on Cloud Shell and supports tab-completion.
- You can list the active account name with this command:
gcloud auth list
Output:
Credentialed accounts:
 - <myaccount>@<mydomain>.com (active)
Example output:
Credentialed accounts:
 - google1623327_student@qwiklabs.net
- You can list the project ID with this command:
gcloud config list project
Output:
[core]
project = <project_ID>
Example output:
[core]
project = qwiklabs-gcp-44776a13dea667a6
Note: For full documentation of gcloud see the gcloud command-line tool overview.
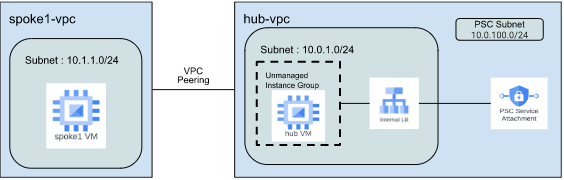
Task 1: Create the Hub Resources
Once you complete all the steps in this task, your GCP setup should look similar to the diagram below.
Step 1:
Delete the default Virtual Private Cloud (VPC) Network.
- Select the default VPC and Delete it.
Step 2:
- In this step, you need to create the hub-vpc and the required resources within the hub-vpc. You should create a Virtual Private Cloud (VPC) Network, Subnet, Firewall rules, Virtual Machine (VM) instance, and Internal load balancer (ILB).
Create a Virtual Private Cloud (VPC) Network and Subnet
Create the hub-vpc VPC network and the subnet. To make sure that there are no IP overlaps and conflicts, we recommend using the IP range listed in the table below.
| Service | Value |
| VPC Network Name | hub-vpc |
| Subnet Name | hub-subnet |
| Region | us-central1 |
| IP Range | 10.0.1.0/24 |
Create a Firewall Rule
Create the firewall rules to allow inbound ICMP and port 80 traffic from all IPs. You also need to create a firewall rule to allow ssh traffic from Identity Aware Proxy (IAP).
| Service | Value |
| Firewall Rule 1 | |
| Name | hub-firewall1 |
| Network | hub-vpc |
| Targets | All instances in the network |
| Source IPV4 ranges | 0.0.0.0/0 |
| Ports and Protocols | icmp, tcp 80 |
| Firewall Rule 2 | |
| Name | hub-firewall2 |
| Network | hub-vpc |
| Targets | All instances in the network |
| Source IPV4 ranges | 35.235.240.0/20 |
| Ports and Protocols | tcp 22 |
Create a Virtual Machine (VM) Instance
Create the hub VM and install a web server on the instance.
| Service | Value |
| VM instance Name | hub-vm |
| Region | us-central1 |
| Zone | us-central1-a |
| Machine Type | e2-medium |
| Network Interface | hub-vpc |
- Once the VM is up and running SSH into the VM via IAP and install web service. The command may vary depending on the Linux distribution that you use. Below is an example command.
$ sudo apt-get install apache2
Click Check my progress
Check VPC, Subnet, VM instance, and Firewall rules.
Check my progress
Create Unmanaged Instance Group
Once the web server is up and running. Create an unmanaged instance group and add the hub VM to that instance group.
| Service | Value |
| Instance Group | hub-group |
| Region | us-central1 |
| Zone | us-central1-a |
| Network | hub-vpc |
| VM Instances | hub-vm |
Create Internal Load Balancer(ILB)
Create an Internal TCP/UDP load balancer. Register the unmanaged instance group as a backend service on the load balancer. The goal is to access the web server via the Internal TCP/UDP load balancer.
| Service | Value |
| Internal Load Balancing |
"Only between my VMs"
"Pass-through" | hub-ilb |
| Region | us-central1 |
| Network | hub-vpc |
| Instance Group | hub-group |
| Health Check | Create a new Health check
Use default settings |
| Frontend | Subnet: hub-subnet
Port: 80 |
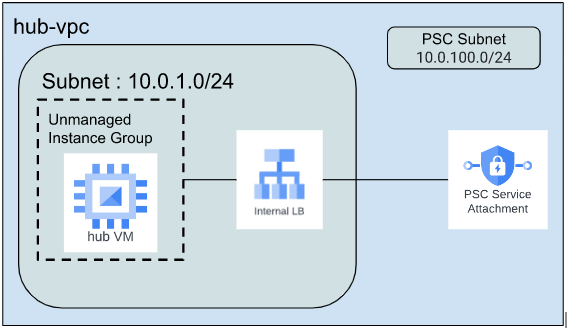
Create a Private Service Connect (PSC) Subnet
Later in the lab, you will use PSC to access the web service from one of the spokes. Create a subnet with the purpose of Private Service Connect.
| Service | Value |
| Subnet Name | pscsubnet |
| Network Name | hub-vpc |
| Region | us-central1 |
| Purpose | Private Service Connect |
| IP Range | 10.0.100.0/24 |
NOTE: This will be used in a later task.
Create a Published Service for PSC Service Attachment Using Forwarding Rule of ILB
Create a PSC service attachment to expose the web service to consumers outside hub VPC. Later in the lab, you will use PSC to access the web service from a spoke.
| Service | Value |
| Load Balancer Type | Internal TCP/UDP load balancer |
| Internal Load Balancer | hub-ilb |
| Service Name | pscservice |
| Network | hub-vpc |
| Subnets | pscsubnet |
| Connection Preference | Automatically accept all connections |
NOTE: This will be used in a later task.
Click Check my progress
Check Instance Group, Subnet, and Published Service using Internal Load Balancing.
Check my progress
Task 2: Create Spoke1 VPC and Peering Connections
Once you complete all the steps in task 2, your GCP setup should look similar to the diagram below.
Step 1:
- In this step, you need to create the Spoke1 VPC and the required resources within the Spoke1 VPC. You should create a Virtual Private Cloud (VPC) Network, Subnet, Firewall rules, and Virtual Machine (VM) instance.
Create a Virtual Private Cloud (VPC) Network and Subnet
Create the spoke1-vpc VPC network and the subnet. To make sure that there are no IP overlaps and conflicts, we recommend using the IP range listed in the table below.
| Service | Value |
| VPC Network name | spoke1-vpc |
| Subnet | spoke1-subnet |
| Region | us-central1 |
| IP Range | 10.1.1.0/24 |
Create a Firewall Rule
Create the firewall rules to allow inbound ICMP traffic from all IPs. You also need to create a firewall rule to allow ssh traffic from Identity Aware Proxy (IAP).
| Service | Value |
| Firewall Rule 1 | |
| Name | spoke1-firewall1 |
| Network | spoke1-vpc |
| Targets | All instances in the network |
| Source IPV4 ranges | 0.0.0.0/0 |
| Ports and Protocols | icmp |
| Firewall Rule 2 | |
| Name | spoke1-firewall2 |
| Network | spoke1-vpc |
| Targets | All instances in the network |
| Source IPV4 ranges | 35.235.240.0/20 |
| Ports and Protocols | tcp 22 |
Create a Virtual Machine (VM) Instance
Create the spoke1-vm instance. Later in the lab, you will use this VM to test connectivity to the hub-vpc network.
| Service | Value |
| VM instance name | spoke1-vm |
| Region | us-central1 |
| Zone | us-central1-a |
| Machine Type | e2-medium |
| Network Interface | spoke1-vpc |
Click Check my progress
Check VPC, Subnet, VM instance, and Firewall rules.
Check my progress
Step 2:
Now that you have 2 different VPC networks (hub-vpc and spoke1-vpc), you need to connect the two VPCs using VPC peering.
| Service | Local VPC Name | Peered VPC Name |
| VPC Peering | hub | hub-spoke1 |
| VPC Peering | spoke1 | spoke1-hub |
Click Check my progress
Check Peering connections.
Check my progress
Step 3:
Test Connectivity
In this section perform connectivity tests
Copy the Internal IP Address of hub-vm.
Connect to spoke1-vm and check the connection. a. Navigate to VM instances console by clicking Navigation Menu > Compute Engine > VM instances.
SSH into spoke1-vm instance.
- In the SSH shell of
spoke1-vm, run the following command replacing<IP_OF_HUB-VM>with the IP of hub-vm:
ping -c 5 <IP_OF_HUB-VM>
- Repeat the above steps to connect with hub-vm.
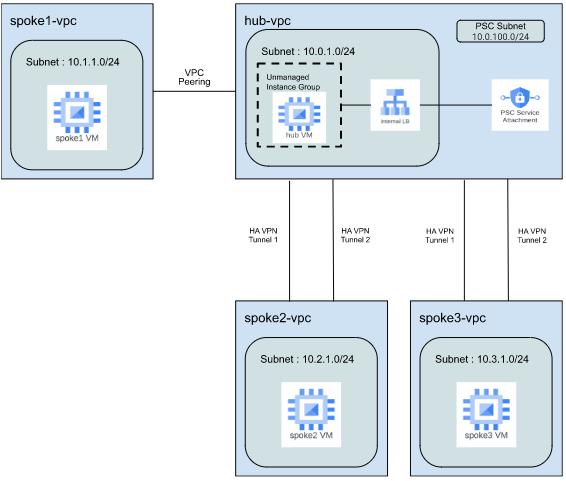
Task 3: Create High availability (HA) VPN Spokes
Once you complete all the steps in task 3, your GCP setup should look similar to the diagram below.
Step 1:
- In this step, you need to create the Spoke2 VPC and the required resources within the Spoke2 VPC. You should create a Virtual Private Cloud (VPC) Network, Subnet, Firewall rules, and Virtual Machine (VM) instance.
Create a Virtual Private Cloud (VPC) Network and Subnet
Create the spoke2-vpc VPC network and the subnet. To make sure that there are no IP overlaps and conflicts, we recommend using the IP range listed in the table below.
| Service | Value |
| VPC Network name | spoke2-vpc |
| Subnet | spoke2-subnet |
| Region | us-central1 |
| IP Range | 10.2.1.0/24 |
Create a Firewall Rule
Create the firewall rules to allow inbound ICMP traffic from all IPs. You also need to create a firewall rule to allow ssh traffic from Identity Aware Proxy (IAP).
| Service | Value |
| Firewall Rule 1 | |
| Name | spoke2-firewall1 |
| Network | spoke2-vpc |
| Targets | All instances in the network |
| Source IPV4 ranges | 0.0.0.0/0 |
| Ports and Protocols | icmp |
| Firewall Rule 2 | |
| Name | spoke2-firewall2 |
| Network | spoke2-vpc |
| Targets | All instances in the network |
| Source IPV4 ranges | 35.235.240.0/20 |
| Ports and Protocols | tcp 22 |
Create a Virtual Machine (VM) Instance
Create the spoke2-vm instance. Later in the lab, you will use this VM to test connectivity to other VPC networks.
| Service | Value |
| VM instance name | spoke2-vm |
| Region | us-central1 |
| Zone | us-central1-a |
| Machine Type | e2-medium |
| Network Interface | spoke2-vpc |
Click Check my progress
Check VPC, Subnet, VM instance, and Firewall rules.
Check my progress
Step 2:
- In this step, you need to create the Spoke3 VPC and the required resources within the Spoke3 VPC. You should create a Virtual Private Cloud (VPC) Network, Subnet, Firewall rules, and Virtual Machine (VM) instance.
Create a Virtual Private Cloud (VPC) Network and Subnet
Create the spoke3-vpc VPC network and the subnet. To make sure that there are no IP overlaps and conflicts, we recommend using the IP range listed in the table below.
| Service | Value |
| VPC Network name | spoke3-vpc |
| Subnet | spoke3-subnet |
| Region | us-central1 |
| IP Range | 10.3.1.0/24 |
Create a Firewall Rule
Create the firewall rules to allow inbound ICMP traffic from all IPs. You also need to create a firewall rule to allow ssh traffic from Identity Aware Proxy (IAP).
| Service | Value |
| Firewall Rule 1 | |
| Name | spoke3-firewall1 |
| Network | spoke3-vpc |
| Targets | All instances in the network |
| Source IPV4 ranges | 0.0.0.0/0 |
| Ports and Protocols | icmp |
| Firewall Rule 2 | |
| Name | spoke3-firewall2 |
| Network | spoke3-vpc |
| Targets | All instances in the network |
| Source IPV4 ranges | 35.235.240.0/20 |
| Ports and Protocols | tcp 22 |
Create a Virtual Machine (VM) Instance
Create the spoke2-vm instance. Later in the lab, you will use this VM to test connectivity to other VPC networks.
| Service | Value |
| VM instance name | spoke3-vm |
| Region | us-central1 |
| Zone | us-central1-a |
| Machine Type | e2-medium |
| Network Interface | spoke3-vpc |
Click Check my progress
Check VPC, Subnet, VM instance, and Firewall rules.
Check my progress
Step 3:
Now that spoke2-vpc and spoke3-vpc are configured, you need to connect the two VPCs to the hub-vpc using Cloud VPN. In this section, you should create High Availability (HA) VPN gateways, Peer VPN gateways, Cloud routers, and VPN Tunnels with the below configurations.
NOTE: To make sure that there are no IP conflicts and overlaps, please use the IP addresses provided in the tables below.
Create VPN Gateways
Create a HA VPN gateway in all the VPCs that you need to connect. Follow the below steps.
In the Google Cloud console, go to the VPN page.
If you are creating a gateway for the first time, click Create VPN connection.
Select the High availability(HA) VPN.
Click Continue.
Specify a VPN gateway name using values from the table.
Under VPC network, select an existing network by using values from the table.
Select a Region using values from the table.
Click Create and continue.
Before adding the VPN tunnels.Refresh the console page and continue to create other two gateways.
Repeat the above steps to create two more gateways with VPN gateway name spoke2-gateway and spoke3-gateway.
| Service | Name | Network | Region |
| HA VPN Gateway | hub-gateway | hub-vpc | us-central1 |
| HA VPN Gateway | spoke2-gateway | spoke2-vpc | us-central1 |
| HA VPN Gateway | spoke3-gateway | spoke3-vpc | us-centarl1 |
NOTE: Ensure all three HA VPN Gateway are created before creating VPN tunnels.
Create VPN Tunnels
In this section, you will create a total 4 pair of HA VPN tunnels. Follow the below steps.
NOTE: To make sure that there are no IP conflicts and overlaps, please use the IP addresses provided in the tables below.
Use the same IKE pre-shared key.
Go back to VPN Page, On the Cloud VPN Tunnels Page, click Create VPN Tunnel.
Select Gateway using values from the table. Click Continue.
For Peer VPN Gateway, Select Google Cloud and select your project ID.
Select the respective Peer Gateway (VPN gateway name) using values from the table.
In the routing options, under cloud router click create new router using values from the table. Click Create.
Add respective Tunnel Name using values from the table.
Use a Pre-shared key as testkey. Ensure to use the SAME Pre-shared key for all tunnels.
Click Done.
Repeat for 2nd Tunnel.
Click Create and Continue.
Click on Configure BGP Session.
By using values from the table, Enter the name of BGP Session.
Enter Peer ASN Value from the table.
Under Allocate BGP IPv4 address, Select Manually.
Enter Cloud Router BGP IPv4 address and BGP peer IPv4 address values from the table.
Click Save and Continue.
Repeat the above steps to configure BGP Sessions the second tunnel.
Click Save BGP Configuration.
Click Ok.
Repeat the above steps for all remaining tunnels, always refer to the table for the required information.
| VPN Gateway | Peer VPN Gateway | Cloud Router Name | Cloud Router Google ASN | Tunnel Names | BGP Name | Peer ASN | Cloud Router BGP IP | BGP Peer IP |
| hub-gateway | spoke2-gateway | hub-router | 65000 | tun-hub-spoke2-1 |
tun-hub-spoke2-2 | bgp-hub-spoke2-1
bgp-hub-spoke2-2 | 65002 | 169.254.21.1
169.254.22.1 | 169.254.21.2
169.254.22.2 |
| spoke2-gateway | hub-gateway | spoke2-router | 65002 | tun-spoke2-hub-1
tun-spoke2-hub-2 | bgp-spoke2-hub-1
bgp-spoke2-hub-2 | 65000 | 169.254.21.2
169.254.22.2 | 169.254.21.1
169.254.22.1 |
| hub-gateway | spoke3-gateway | hub-router | 65000 | tun-hub-spoke3-1
tun-hub-spoke3-2 | bgp-hub-spoke3-1
bgp-hub-spoke3-2 | 65003 | 169.254.31.1
169.254.32.1 | 169.254.31.2
169.254.32.2 |
| spoke3-gateway | hub-gateway | spoke3-router | 65003 | tun-spoke3-hub-1
tun-spoke3-hub-2 | bgp-spoke3-hub-1
bgp-spoke3-hub-2 | 65000 | 169.254.31.2
169.254.32.2 | 169.254.31.1
169.254.32.1 |
Click Check my progress
Check HA VPN gateways, Cloud Routers, and VPN Tunnels.
Check my progress
Step 4:
Test Connectivity
In this section perform connectivity tests
Copy the IP Address of hub-vm.
Connect to spoke2-vm and check the connection.
a. Navigate to VM instances console by clicking Navigation Menu > Compute Engine > VM instances.
SSH into spoke2-vm instance.
- In the SSH shell of
spoke2-vm, run the following command replacing<IP_OF_HUB-VM>with the Private IP of hub-vm:
ping -c 5 <IP_OF_HUB-VM>
- Repeat the above steps to connect with spoke3-vm.
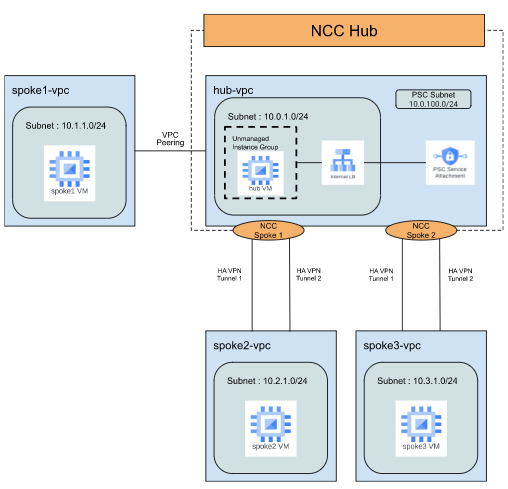
Task 4: Create Network Connectivity Center (NCC) to Connect Spoke 2 and Spoke 3
Once you complete all the steps in task 4, your GCP setup should look similar to the diagram below.
NOTE: Refer to the public doc to learn how to Connect two sites by using VPN spokes.
For the hub created add only one spoke first and after its creation add another.
Step 1:
A hub is a global management resource to which you attach spokes and also it provides full mesh connectivity between all spokes.
- In this step, you should create a Network Connectivity Center (NCC) hub with the below configurations.
| Service | Name |
| NCC Hub | hub-23 |
Click Check my progress
Check NCC Hub.
Check my progress
Step 2:
- In this step, you should create 2 NCC spokes and associate them with the NCC hub that you created in the previous step.
NOTE: Refer to the public doc to learn how to [Connect two sites by using VPN spokes](https://cloud.google.com/network-connectivity/docs/network-connectivity-center/tutorials/connecting-two-offices-with-vpns) .
| Name | Type | Region | Site-to-Site Data Transfer | Network | Tunnels |
| hubspoke2 | VPN Tunnel | us-central1 | On | hub-vpc | tun-hub-spoke2-1 |
tun-hub-spoke2-2 |
| hubspoke3 | VPN Tunnel | us-central1 | On | hub-vpc | tun-hub-spoke3-1
tun-hub-spoke3-2 |
Click Check my progress
Check NCC spokes.
Check my progress
Step 3:
NCC enables connectivity between the two VPN spokes (spoke2-VPC and spoke3-vpc). In this step, you will test the connectivity between spoke2-vm and spoke3-vm.
Test Connectivity
In this section perform connectivity tests
Copy the Private IP Address of spoke2-vm.
Connect to spoke3-vm and check the connection.
a. Navigate to VM instances console by clicking Navigation Menu > Compute Engine > VM instances.
SSH into spoke3-vm instance.
- In the SSH shell of
spoke3-vm, run the following command replacing<IP_OF_SPOKE2-VM>with the Private IP of hub-vm:
ping -c 5 <IP_OF_SPOKE2-VM>
- Repeat the above steps with copy the IP Address of spoke3-vm and connect to spoke2-vm.
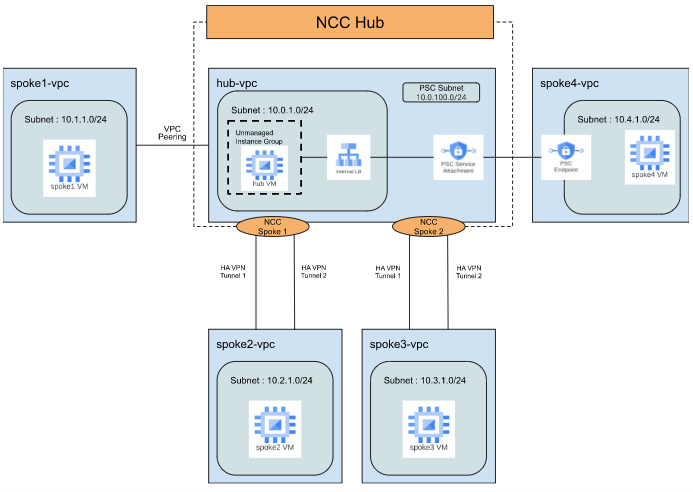
Task 5: Create Private Service Connect (PSC) Spoke and PSC Endpoint
Once you complete all the steps in task 5, your GCP setup should look similar to the diagram below.
Step 1:
- In this step, you need to create the Spoke4 VPC and the required resources within the Spoke1 VPC. You should create a Virtual Private Cloud (VPC) Network, Subnet, Firewall rules, Virtual Machine (VM) instance, and PSC endpoint.
Create a Virtual Private Cloud (VPC) Network and Subnet
Create the spoke4-vpc VPC network and the subnet. To make sure that there are no IP overlaps and conflicts, we recommend using the IP range listed in the table below.
| Service | Value |
| VPC Network name | spoke4-vpc |
| Subnet | spoke4-subnet |
| Region | us-central1 |
| IP Range | 10.4.1.0/24 |
Create a Firewall Rule
Create a firewall rule to allow ssh traffic from Identity Aware Proxy (IAP)
| Service | Value |
| Firewall Rule name | spoke4-firewall |
| Network | spoke4-vpc |
| Targets | All instances in the network |
| Source IPV4 ranges | 35.235.240.0/20 |
| Ports and Protocols | tcp 22 |
Create a Virtual Machine (VM) Instance
Create the spoke4-vm instance. Later in the lab, you will use this VM to test connectivity to other VPC networks.
| Service | Value |
| VM instance name | spoke4-vm |
| Region | us-central1 |
| Zone | us-central1-a |
| Machine Type | e2-medium |
| Network Interface | spoke4-vpc |
Click Check my progress
Check VPC, Subnet, VM instance, and Firewall rules.
Check my progress
Step 2:
- In this step, you should create a Private Service Connect (PSC) endpoint to consume the Web service in hub-vpc.
| Service | Name |
| TARGET | Published Service |
| Target Service | [SERVICE ATTACHMENT] |
| Endpoint Name | pscendpoint |
| Network | spoke4-vpc |
| Subnet | spoke4-subnet |
| IP Address | [CREATE NEW IP] |
NOTE: Value for Target Service is easily found by going to the Published Service created in Task1 and copying the Service Attachment URL.
Click Check my progress
Check PSC Endpoint.
Check my progress
Step 3:
Test Connectivity
In this section perform connectivity tests
Copy the Address of the Private Service Connect endpoint.
Connect to spoke4-vm and check the connection.
Navigate to VM instances console by clicking Navigation Menu > Compute Engine > VM instances.
SSH into spoke4-vm instance.
- In the SSH shell of
spoke4-vm, run the following command replacing<IP_OF_PSC_ENDPOINT>with the endpoint IP:
curl -I <IP_OF_PSC_ENDPOINT>
- You should see similar output.
HTTP/1.1 200 OK
Date: Fri, 31 Mar 2023 08:21:25 GMT
Server: Apache/2.4.54 (Debian)
Last-Modified: Fri, 31 Mar 2023 05:28:29 GMT
ETag: "29cd-5f82b7ab3af4b"<br>
Accept-Ranges: bytes<br>
Content-Length: 10701<br>
Vary: Accept-Encoding<br>
Content-Type: text/html<br>
Task 6: Create Connectivity Tests to Use Network Intelligence Center
Step 1:
- Connectivity Tests is a diagnostics tool that lets you check connectivity between network endpoints. In this step, you should create a connectivity test with the below configurations.
Create the following connectivity test and observe the output of each test:
test-spoke1-hub : Source will be the spoke1-vm and destination will be hub-vm. Protocol is ICMP. You can also choose to test connectivity to the hub-vm or the hubILB on port 80.
test-spoke2-hub : Source will be the spoke2-vm and destination will be hub-vm. Protocol is ICMP. You can also choose to test connectivity to the hub-vm or the hubILB on port 80.
test-spoke3-hub : Source will be the spoke3-vm and destination will be hub-vm. Protocol is ICMP. You can also choose to test connectivity to the hub-vm or the hubILB on port 80.
test-spoke2-spoke3 : Source will be the spoke2-vm and destination will be spoke3-vm. Protocol is ICMP.
test-spoke4-hub : Source will be the spoke4-vm and destination will be PSC endpoint IP in spoke4-vpc. Protocol is TCP port 80.
- At a minimum, you should configure the following 5 tests.
| Name | Source | Destination | Protocol |
| test-spoke1-hub | spoke1-vm | hub-vm | ICMP |
| test-spoke2-hub | spoke2-vm | hub-vm | ICMP |
| test-spoke3-hub | spoke3-vm | hub-vm | ICMP |
| test-spoke2-spoke3 | spoke2-vm | spoke3-vm | ICMP |
| test-spoke4-hub | spoke4-vm | IP of spoke4-vpc |
PSC endpoint | TCP 80 |
Click Check my progress
Check the Connectivity test.
Solution of Lab
curl -LO raw.githubusercontent.com/quiccklabs/Labs_solutions/refs/heads/master/Interconnecting%20Networks%20Challenge%20Lab/quicklab.sh
sudo chmod +x quicklab.sh
./quicklab.sh


