
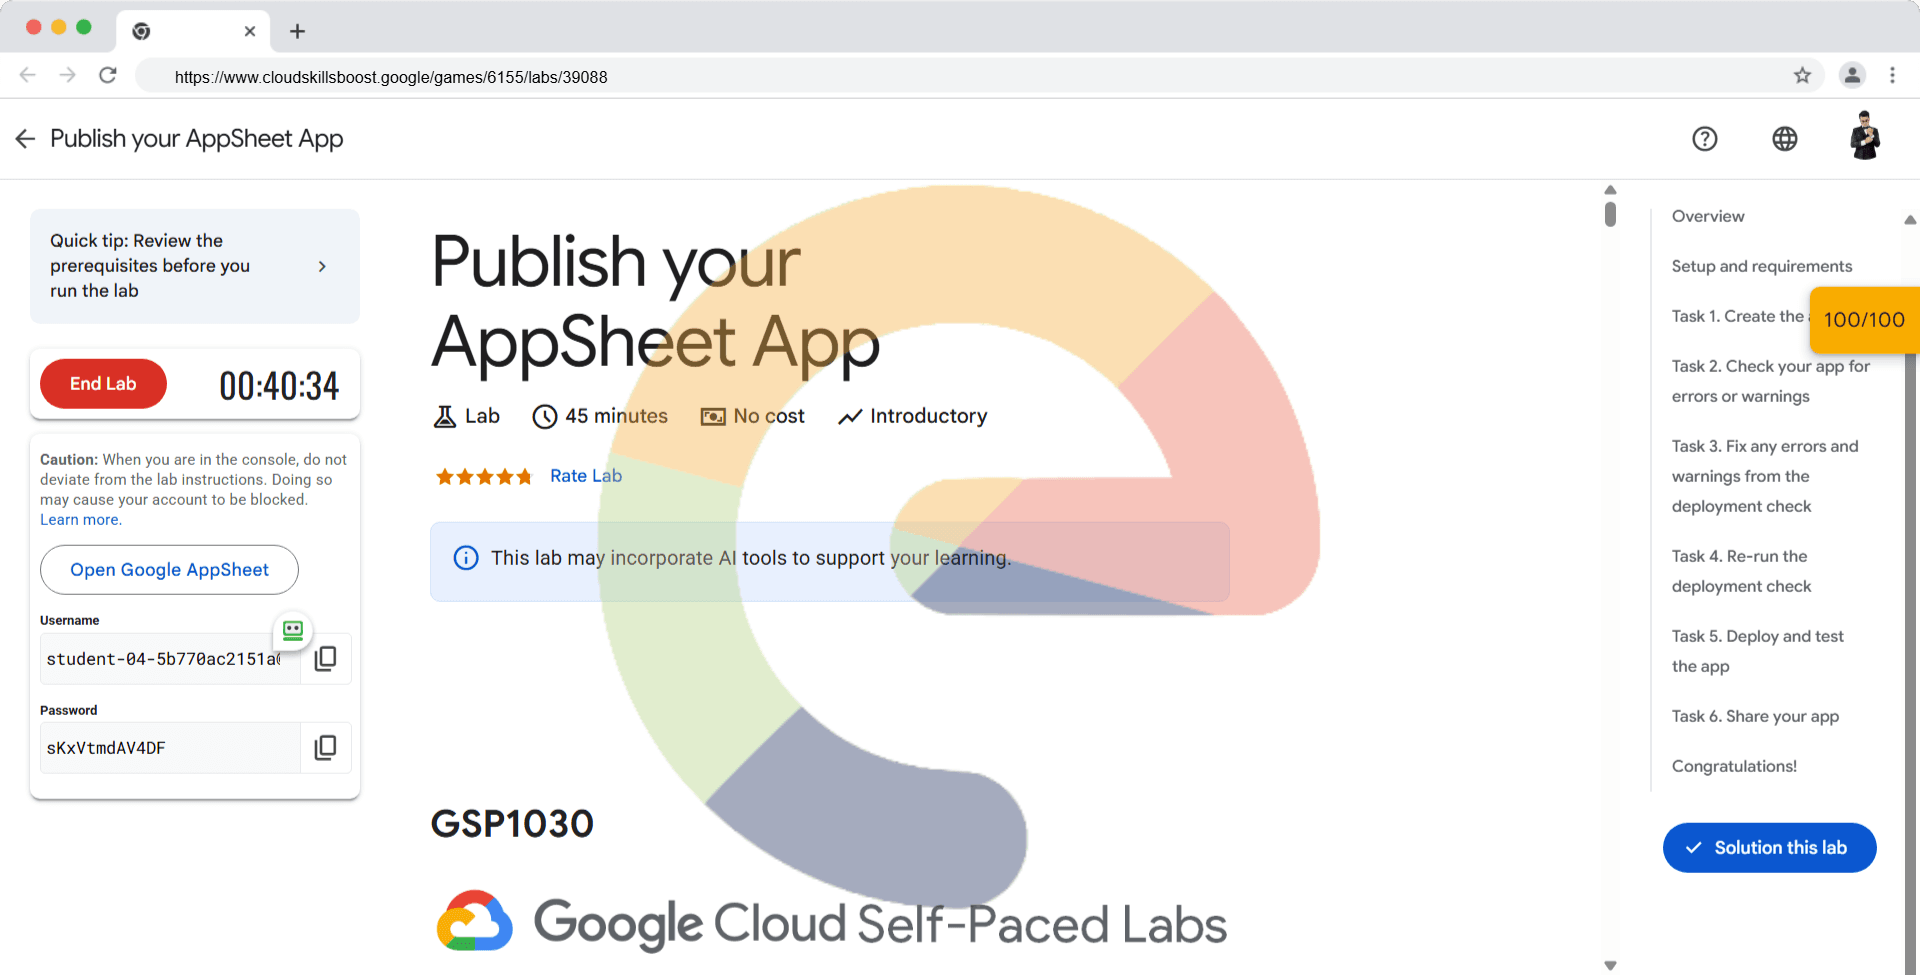
Publish your AppSheet App - GSP1030
A passionate full-stack developer from @ePlus.DEV
Overview
In this lab, you use AppSheet to deploy and publish your app so end users can access and use your app.
What you'll do
In this lab, you learn how to perform the following tasks:
Run a deployment check on your app to check for any errors or warnings.
Fix any errors and resolve any warnings that may be reported.
Deploy and publish your app using instant deployment.
Test the app as an app user.
Task 1. Create the app
When working on your own or your company's app, you normally would incrementally build the app over a continuous project timeline.
Apps that you build are saved and accessible in the Prototype Apps section on the My Apps page until they are deployed and published.
In this task, you create the app that was built in a previous lab, using a template.
Delete prototype app (if listed)
In the lab environment on some occasions it's possible that the app built in a previous lab is still listed in the Prototype Apps section. You cannot use this app to continue working on this lab since the underlying data is not available for use by the app.
The app must first be deleted before continuing with this lab.
If the Customer Contacts app is listed, click the 3-dots menu () and select Delete to delete the app.
Click Ok to confirm the deletion.
Copy the app to your AppSheet account
Click the link to copy the Customer contacts app to your AppSheet account.
In the left menu, click the Copy app icon.
On the Copy App form, specify the following, and leave the remaining settings as their defaults:
Property
Value
(type or select)App name
Customer Contacts
Click Copy app.
Your app is set up with the original contacts and companies data sources, and you can now continue to build out the app's functionality.
Click Check my progress to verify the objective.
Create the app
Check my progress
Task 2. Check your app for errors or warnings
In this task, you check your app for any errors or warnings by running a deployment check.
Run a deployment check
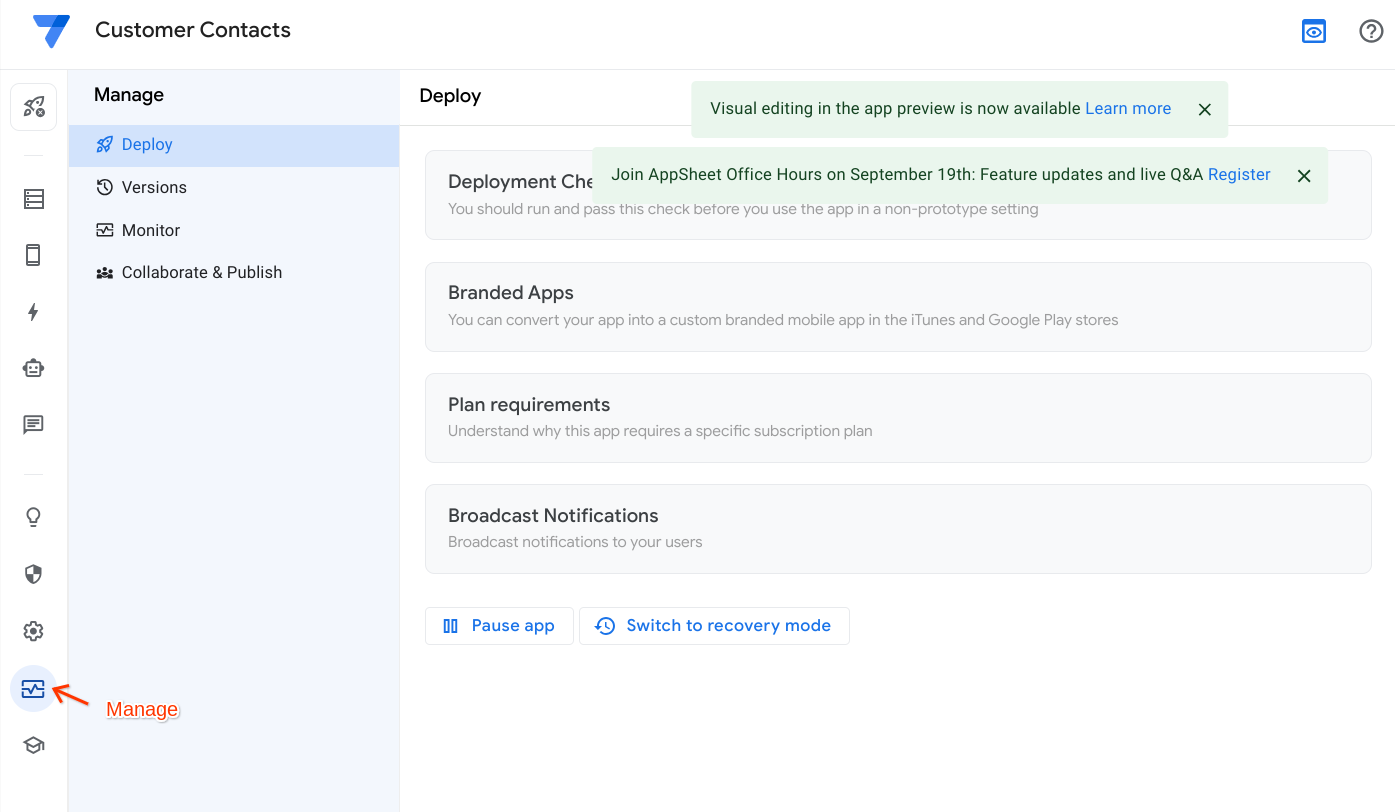
To run a deployment check on your app, navigate to the Manage > Deploy tab in the AppSheet UI.
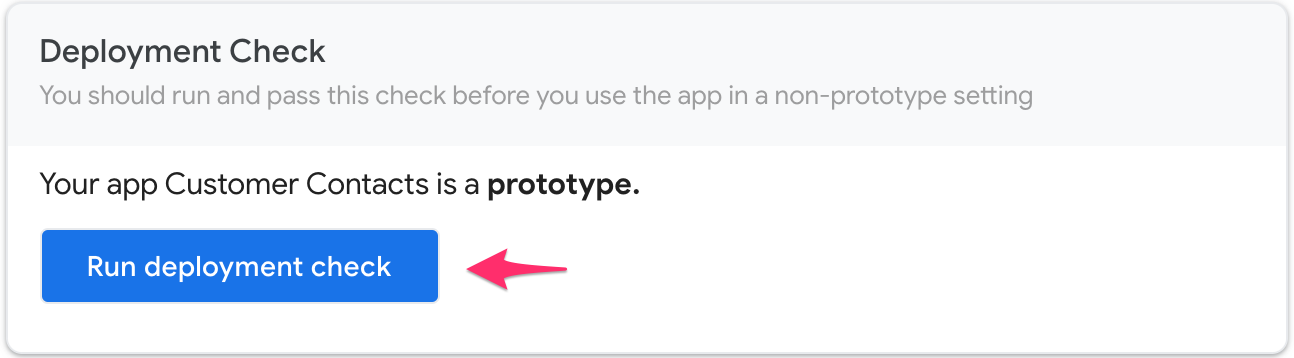
Click Deployment Check.
Click Run Deployment Check.
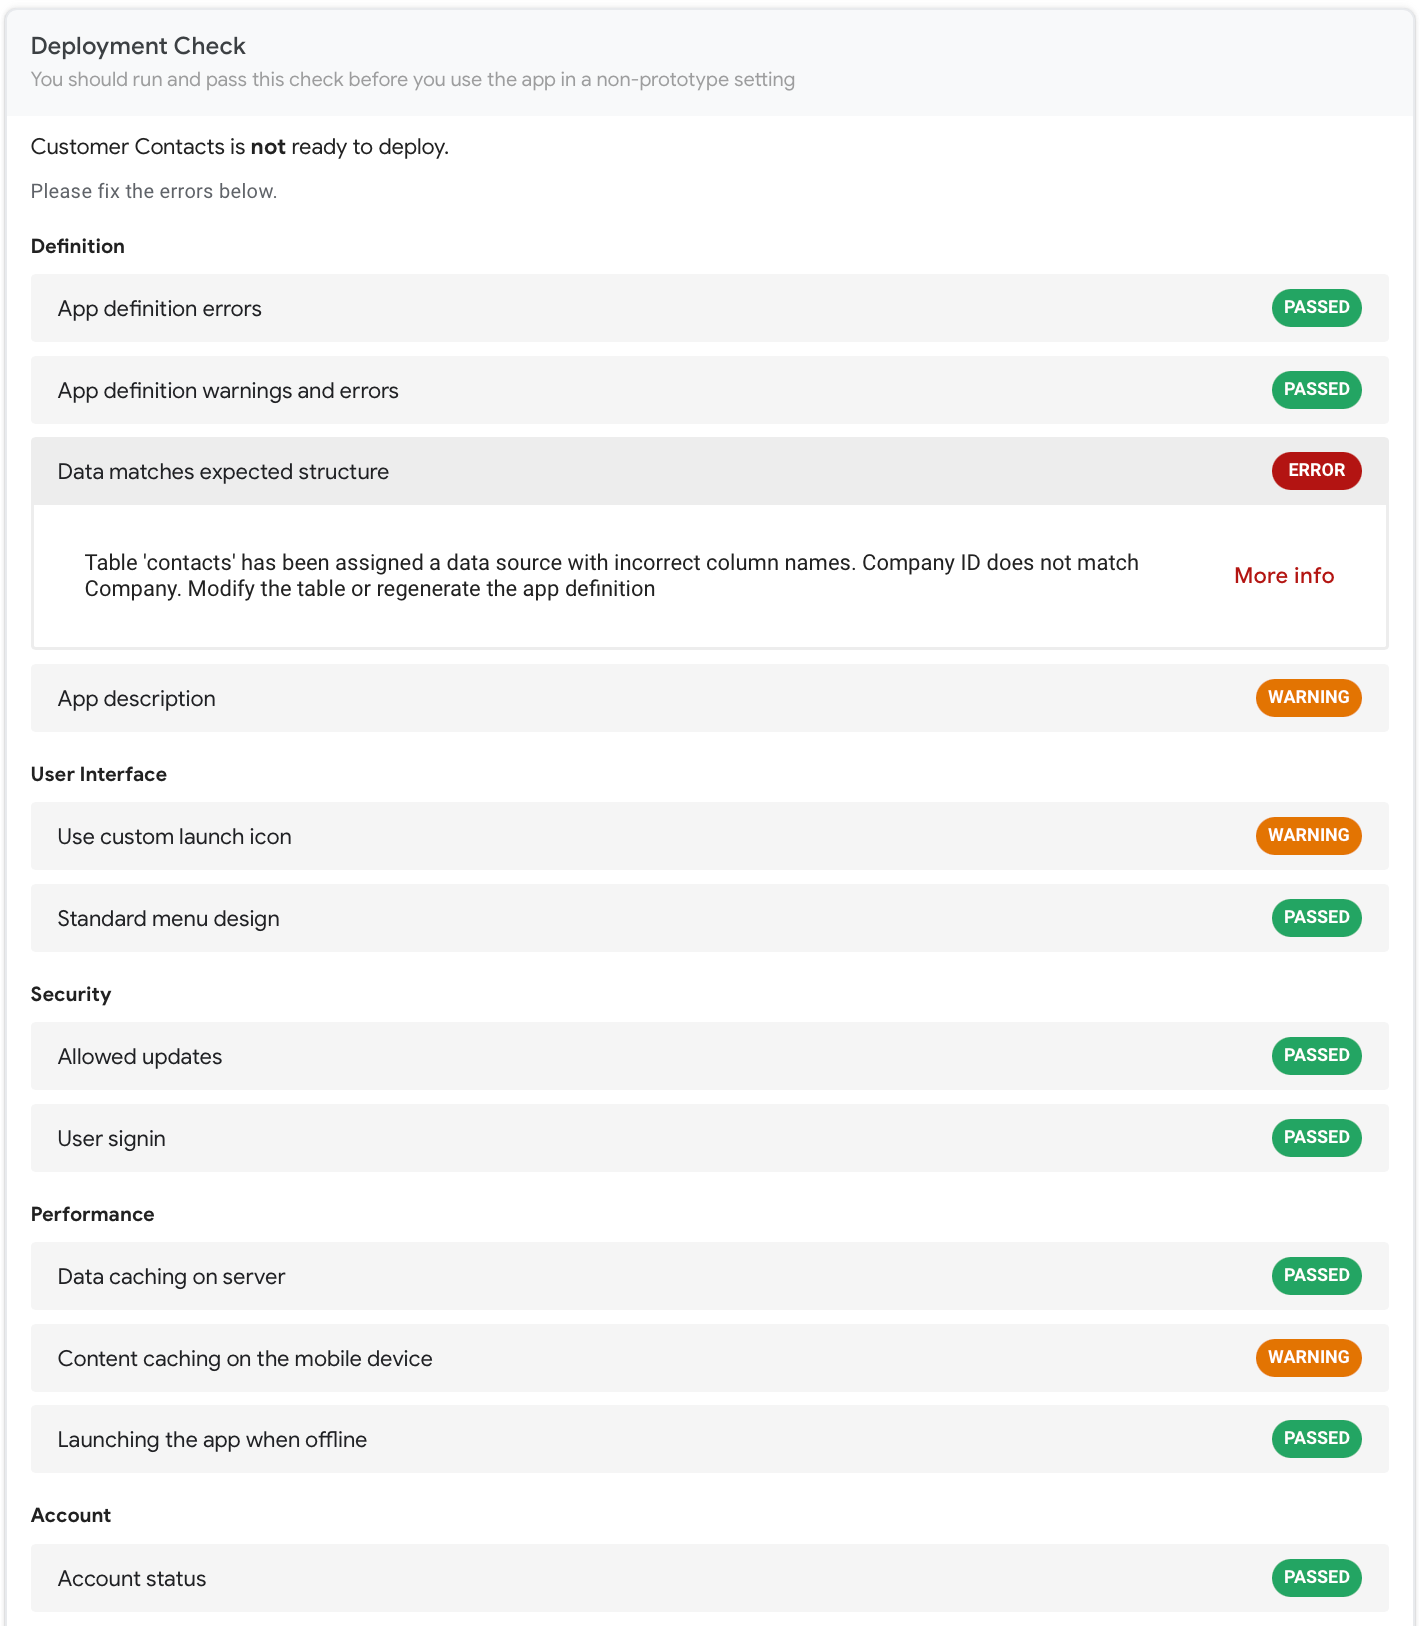
The output of the deployment check lists any errors or warnings that you should fix, before deploying the app.
Inspect the deployment check report
View the report to look for any errors or warnings from the deployment check. Scroll to see the full list of issues.
The report contains a few errors or warnings. You fix these issues in the next task.
Task 3. Fix any errors and warnings from the deployment check
In this task, you review the details of each error or warning as reported in the output of the deployment check and fix them.
Note: Warnings do not prevent you from deploying your app, but you must fix any errors that are reported. It is a good practice to review all warnings and resolve them if possible.
Fix the Data structure error
Click the Data matches expected structure error.
The section expands to provide more details on the error.
Click More info to view more details about this error.
From the description of the error, you can see that there is a mismatch between the name of the
Company IDcolumn in the app definition and the name of the columnCompanyin thecontactsGoogle sheet.To fix this error, navigate to the Data section in the AppSheet editor, and click contacts to open the table definition.
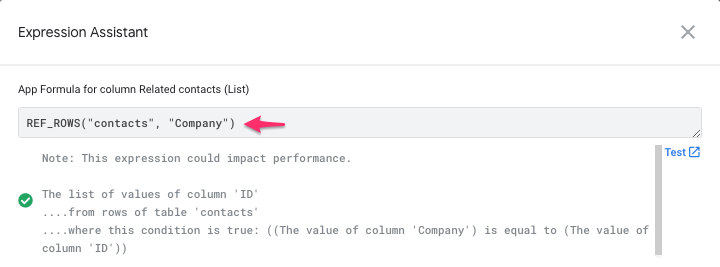
Edit the name of the
Company IDcolumn and update it toCompany.The
Companycolumn is also used in the app formula expression for theRelated contactsreverse reference column in theCompaniestable, which must be updated.In Data, click companies to open the table definition.
Click into the Formula field of the
Related contactscolumn definition to bring up the Expression Assistant.Edit the App Formula expression to update the column name to
Company.Click Save in the Expression Assistant.
Click Save to save your app changes.


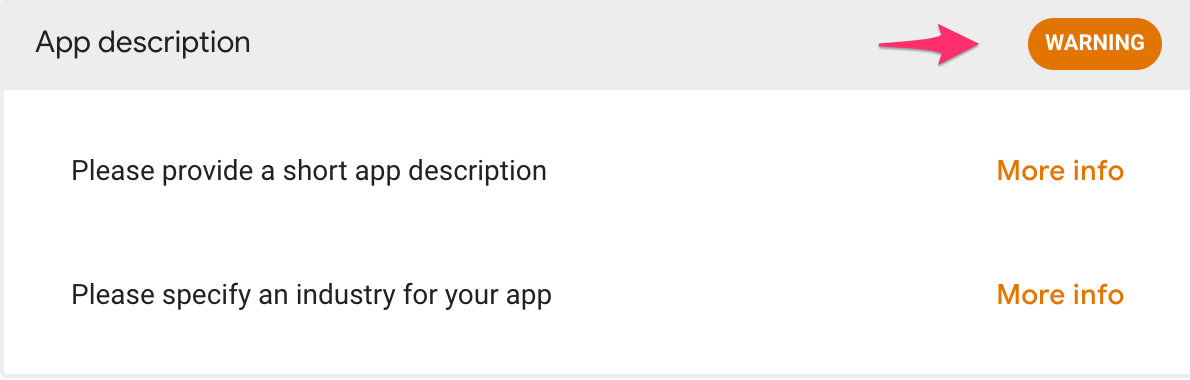
Fix the App description warning
It is a good practice to include a short description of your app.
Click the App description warning.
The section expands to provide more details on the warning.
Click More info to get more details on the issues reported that include the likely cause and resolution steps.
To fix the App description warning, navigate to the Settings, and then click on Information under settings in the AppSheet UI.
Click App Properties.
In the App Properties form, specify the following, and leave the remaining settings as their defaults:
Property
Value
(type or select)Short Description
An app to manage all of your customers and contacts in one place.
Industry
Business Services
Click Save to save your changes.
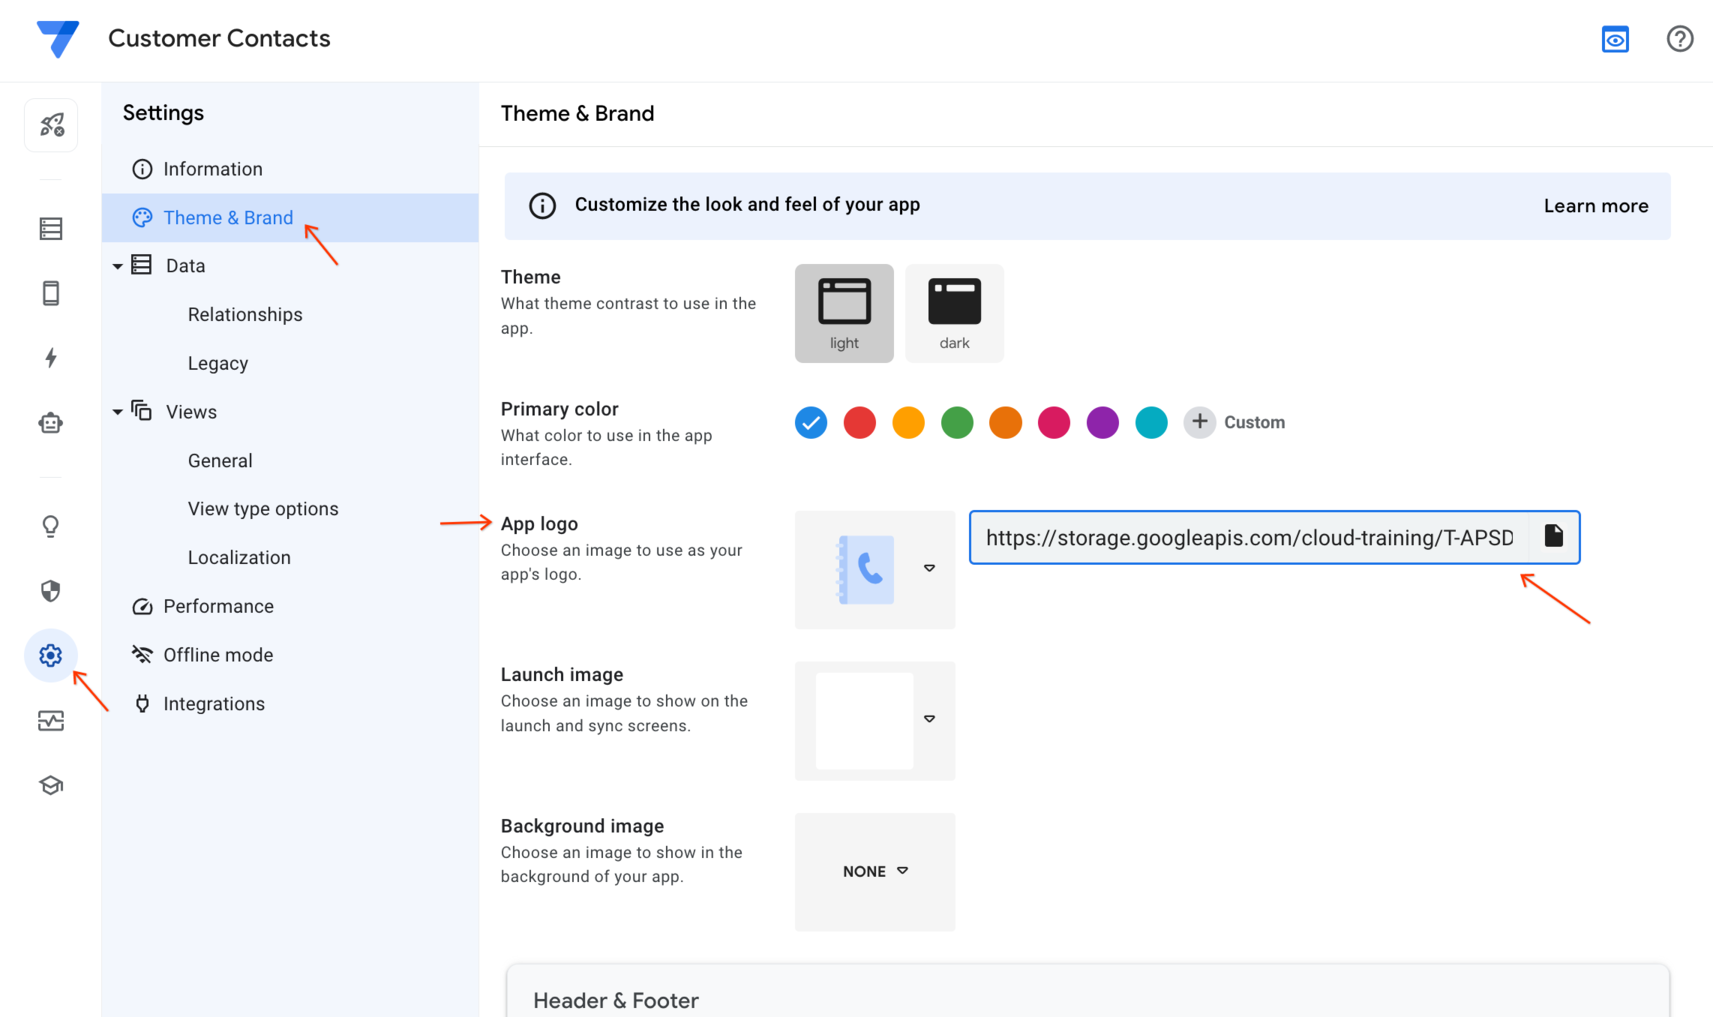
Fix the Custom launch icon warning
Your app is already configured to use one of the logo icons provided by AppSheet. This warning is to remind you to change the logo to your own custom icon.
Click the Use custom app launch icon warning.
The section expands to provide more details on the warning.
Optionally, click More info to get more details on the issues reported that include the likely cause and resolution steps.
To provide a custom app launch icon for your app, navigate to the Settings > Theme & Brand pane in the AppSheet UI.
For App logo, select Custom from the dropdown list.
Copy and paste the url below in the edit box to the right of the logo:
https://storage.googleapis.com/cloud-training/T-APSDEV-B/app_logo.pngClick Save to save your changes.
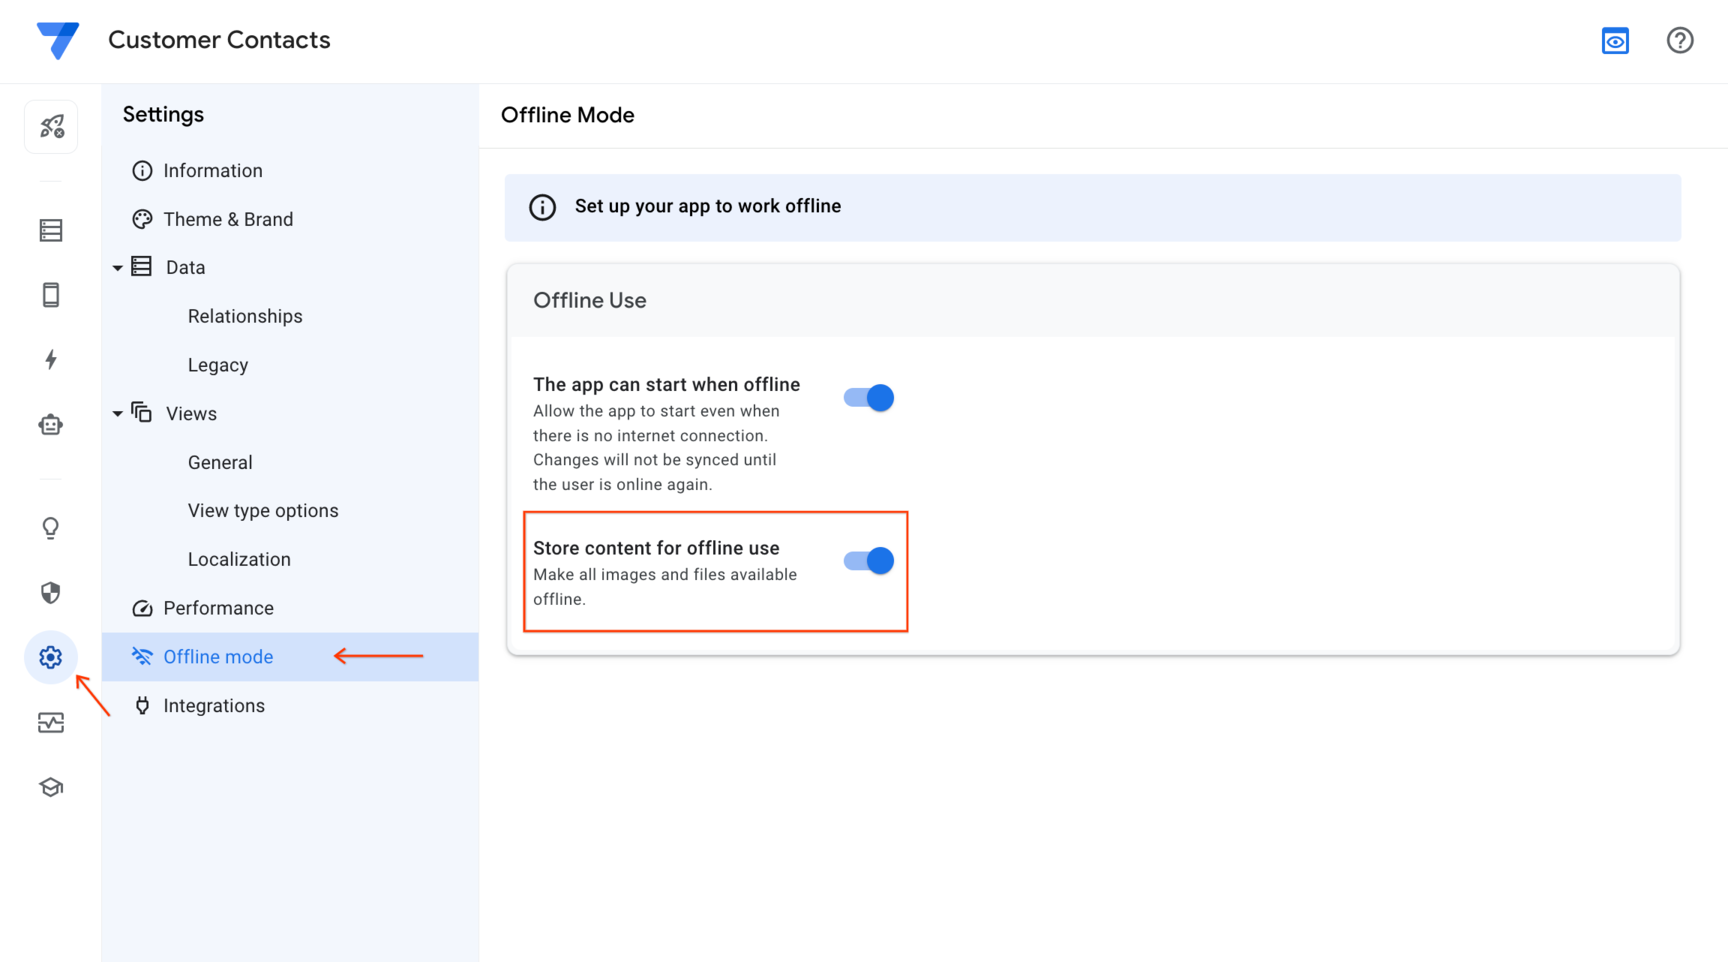
Fix the Content caching on the mobile device warning
This warning indicates that your app could benefit from offline device caching of images and documents.
Click the Content caching on the mobile device warning.
The section expands to provide more details on the warning.
Optionally, click More info to get more details on the issues reported that include the likely cause and resolution steps.
To enable this option, navigate to the Settings > Offline mode pane in the AppSheet UI.
In the Offline Use section.
Enable the Store content for offline use option.
Learn more about offline content caching at the AppSheet documentation site.
Click Save to save your changes.
Task 4. Re-run the deployment check
Once you have fixed all errors and fixed or reviewed any warnings, you should run the deployment check again.
Run the deployment check
Navigate to the Manage > Deploy tab in the AppSheet UI.
If the deployment check report from the previous run is open, click Continue editing, otherwise click on the Deployment Check panel to expand it.
Click Run Deployment Check.
The output of the deployment check should contain no errors or warnings. We can now go ahead and deploy the app in the next task.
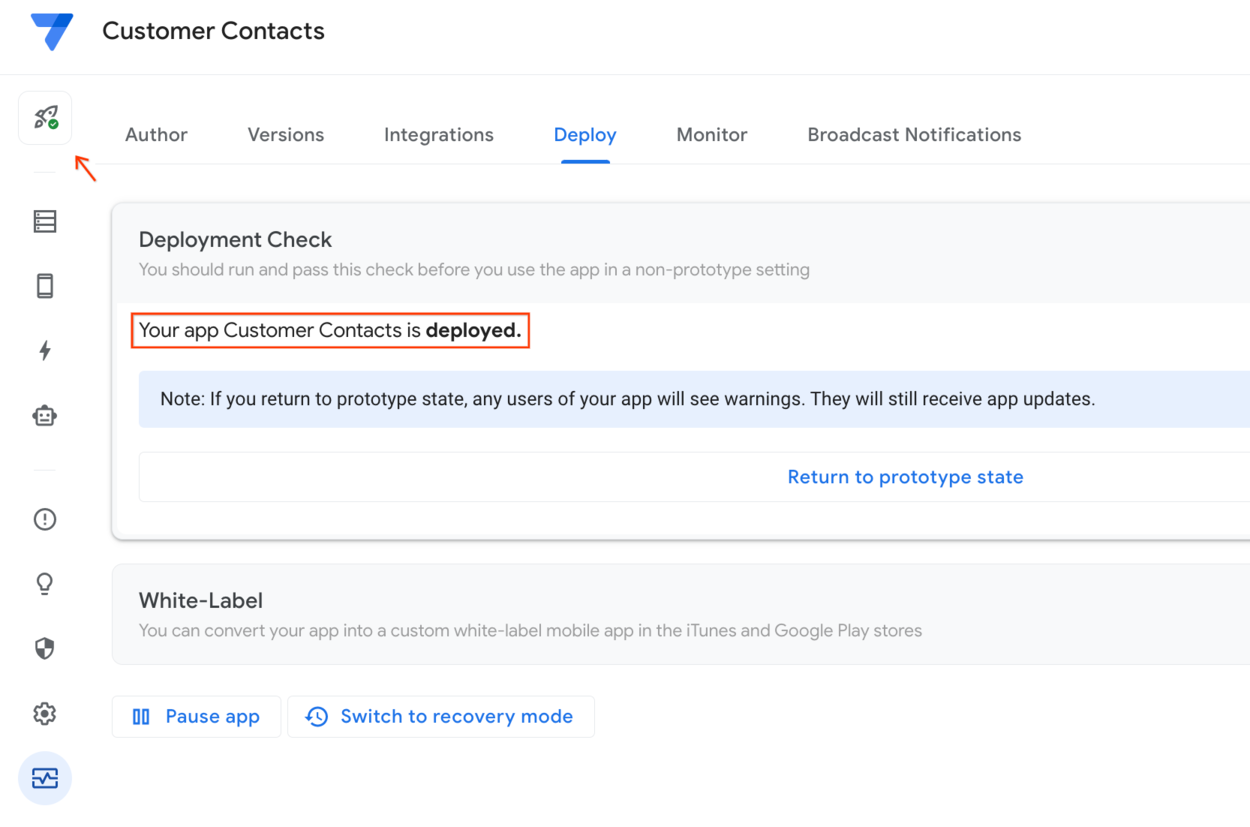
Task 5. Deploy and test the app
In this task, you deploy the app and test it outside of the AppSheet UI directly within a browser.
Deploy the app
In the Deployment Check panel, click Move app to deployed state.
AppSheet now deploys your app and changes the app's state to Deployed.
Test the app
In the AppSheet UI, click the Share icon.
In the Share app dialog, click Copy sharing links.
Copy the Browser Link by clicking on the copy icon.
To open the app, paste the link in a separate browser window.
Alternatively, click on the Open in tab icon in the upper-right corner of the AppSheet editor above the app preview.
The app should load in the new browser window.
Test out the features of the app from the desktop browser to make sure all the functionality works as expected.
From the desktop browser that is running the app, click the ShipTo icon to open the shipping form.
In the form specify the following, and leave the remaining settings as their defaults:
Property
Value
(type or select)Product Name
Test Product
Quantity
4
Status
New
Company
Any company from the list
Verify that the app automatically displays the Shipping Info based on the selected company.
Click Save to submit the form and save the new shipping entry to the shipTo table.

Click Check my progress to verify the objective.
Deploy and test the app
Check my progress
Task 6. Share your app
Once you have fully tested your app, you can share the app with yourself or any user so that they can download and start using the app.
Add users
The first step in sharing your app with users is to add them as users of your app.
To add a user to your app, click in the AppSheet UI.
In the Share app dialog, type a valid email address.
Note: Type your own valid email address so you can run the app as a user on your device in the next task.
Optionally, you can add any additional user email addresses.
Check the reCaptcha box to verify that you are not a robot.
Optionally, update the invite message.
Click Send.
Note: The reCaptcha verification has an expiry time, so you may have to check it again if it times out.
Verify receipt of the email
- Login to the email account you used in the previous task and verify that the email was received.
Solution of Lab
New Solution
https://www.youtube.com/watch?v=3BJkoM5iMNU
Download File: GSP1030.xlsx / link backup

Open https://docs.google.com/spreadsheets


Old Solution
https://www.youtube.com/watch?v=x0iZ1hVFtTA
Download File: GSP1030.xlsx


