
Running Databases in GKE (Solution)
A passionate full-stack developer from @ePlus.DEV
Overview
In this lab, you create a Google Kubernetes Engine (GKE) cluster, and then deploy databases into it. You see two ways to deploy the databases: first using your own configuration code, and then using a Kubernetes package manager called Helm.
Objectives
In this lab, you learn how to perform the following tasks:
Create a GKE cluster.
Deploy MySQL on the cluster.
Use Helm to deploy MySQL on the cluster.
Setup
In this task, you use Qwiklabs and perform initialization steps for your lab.
For each lab, you get a new Google Cloud project and set of resources for a fixed time at no cost.
Sign in to Qwiklabs using an incognito window.
Note the lab's access time (for example,
1:15:00), and make sure you can finish within that time.
There is no pause feature. You can restart if needed, but you have to start at the beginning.When ready, click Start lab.
Note your lab credentials (Username and Password). You will use them to sign in to the Google Cloud Console.
Click Open Google Console.
Click Use another account and copy/paste credentials for this lab into the prompts.
If you use other credentials, you'll receive errors or incur charges.Accept the terms and skip the recovery resource page.
Task 1. Create a GKE cluster
Open a new web browser window and navigate to the Google Cloud Console (console.cloud.google.com). Use the project selector to choose the first project with a leading name of 'qwiklabs-gcp.'
On the Navigation menu (), click Kubernetes Engine > Clusters.
Click Create.
Click Switch to Standard Cluster.
In the switch dialog box, click Switch to Standard Cluster.
For Location type, select Zonal.
Accept all defaults and click Create. It will take a couple minutes for the cluster to be ready.
When the cluster is ready, click Connect from the Actions menu.
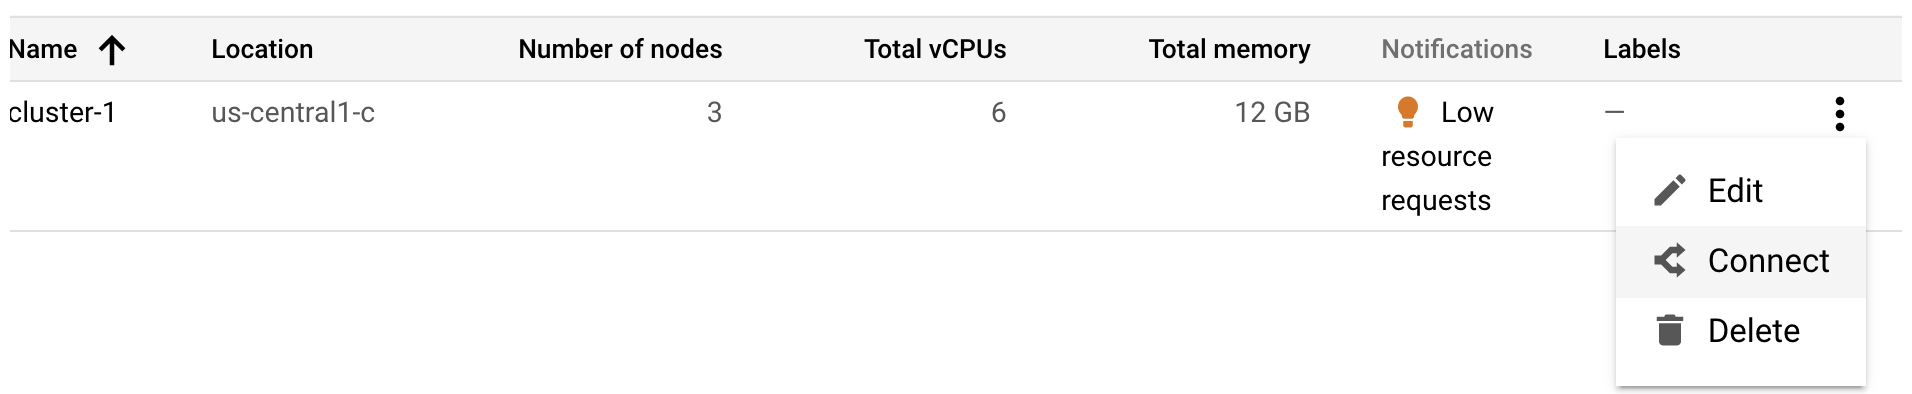
The command for connecting to the cluster is specified.
- To open Cloud Shell with the command entered, click Run in Cloud Shell, and if prompted click Continue.
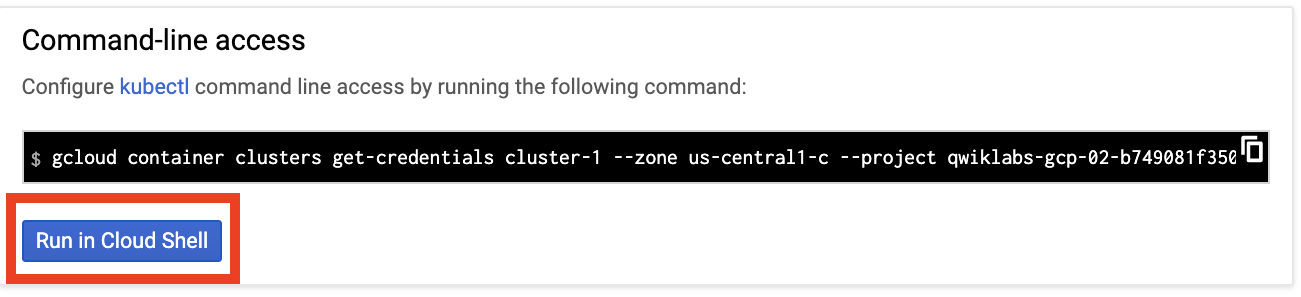
- Press ENTER to run the command. If prompted click Authorize.
You are connected to the cluster and ready to deploy a program.
- Test the connection with the following kubectl command:
kubectl get nodes
This command returns a list of the three virtual machines that make up this cluster.
Click Check my progress to verify the objective.
Create a Kubernetes cluster
Check my progress
Review
You just created a Kubernetes cluster. Next, you configure and deploy MySQL to run in it.
Task 2. Deploy MySQL on the cluster
You need a root password for the database. You store the password as a Kubernetes secret. The secret is a key-value pair. In this case, the key is ROOT_PASSWORD and the value is password.
- To create the secret, enter the following command:
kubectl create secret generic mysql-secrets --from-literal=ROOT_PASSWORD="password"
- Create a folder for the configuration files you create, and change to it:
mkdir mysql-gke
cd mysql-gke
- Create the Kubernetes configuration files. In Cloud Shell, click Open Editor. Click on Open in a new window to open the editor in a new window.

- Select the mysql-gke folder on the left.
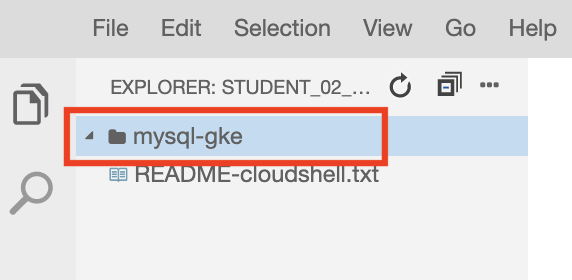
Right click the mysql-gke folder, and then click New File.
For name, type volume.yaml.
Enter the following YAML code and save the file:
apiVersion: v1
kind: PersistentVolumeClaim
metadata:
  name: mysql-data-disk
spec:
  accessModes:
    - ReadWriteOnce
  resources:
    requests:
      storage: 1Gi
This reserves 1 gigabyte of disk space for the MySQL database. Note the name mysql-data-disk. This name will be used in the next file.
- To configure the MySQL database, create another new file in the mysql-gke folder, name it deployment.yaml, and paste the following code into it:
apiVersion: apps/v1
kind: Deployment
metadata:
  name: mysql-deployment
  labels:
    app: mysql
spec:
  replicas: 1
  selector:
    matchLabels:
      app: mysql
  template:
    metadata:
      labels:
        app: mysql
    spec:
      containers:
        - name: mysql
          image: mysql:8.0
          ports:
            - containerPort: 3306
          volumeMounts:
            - mountPath: "/var/lib/mysql"
              subPath: "mysql"
              name: mysql-data
          env:
            - name: MYSQL_ROOT_PASSWORD
              valueFrom:
                secretKeyRef:
                  name: mysql-secrets
                  key: ROOT_PASSWORD
            - name: MYSQL_USER
              value: testuser
            - name: MYSQL_PASSWORD
              value: password
      volumes:
        - name: mysql-data
          persistentVolumeClaim:
            claimName: mysql-data-disk
Notes:
On line 19, the MySQL docker image is specified.
Starting at line 26, an environment variable is created for the database root password using the secret you created earlier. There are also variables to create a test user with a simple password.
On the last line, the disk space you allocated in the previous file is used.
The database needs a service so it can be accessed.
- Create a third file in the mysql-gke folder, name it service.yaml, and paste the following code into it:
apiVersion: v1
kind: Service
metadata:
  name: mysql-service
spec:
  selector:
    app: mysql
  ports:
  - protocol: TCP
    port: 3306
    targetPort: 3306
Note: This creates a service that provides access to the database from within the cluster that forwards requests to the MySQL database.
In Cloud Shell, click Open Terminal to return to the command line. Make sure you are in the correct folder and type ls to verify that you have your three YAML files.
To deploy your database, enter the following kubectl commands:
kubectl apply -f volume.yaml
kubectl apply -f deployment.yaml
kubectl apply -f service.yaml
- Wait a minute for the resources to be created, and then enter the following command:
kubectl get pods
The pod that has your database installed should be running. If it is not running yet, wait a little while and try again.
Note: At this point, there are no client applications and the database is only accessible from inside the cluster. In the next step, you access the database from inside the pod where it is running.
Click Check my progress to verify the objective.
Deploy MySQL on the cluster
Check my progress
Copy the name of the pod obtained from the last command to the clipboard. It will begin with
mysql-deployment-followed by a unique string.Enter the following command but replace the pod name with your pod's name:
kubectl exec -it mysql-deployment-76fdc44468-rfhbp -- /bin/bash
Now you're at a bash prompt within the MySQL pod.
- To log in to MySQL, enter the following:
mysql -u root -p
When prompted, enter the password password. This gives you a mysql prompt.
Run the following command:
show databases;
- Create a new database:
create database pets;
- To confirm that your database was created, enter:
show databases;
Type exit to exit MySQL.
Type exit again to return to the Cloud Shell command prompt.
To remove everything that was created, enter the following commands:
kubectl delete -f service.yaml
kubectl delete -f deployment.yaml
kubectl delete -f volume.yaml
Review
You deployed a MySQL database to a Kubernetes cluster using Kubernetes configuration files.
Helm is a package manager for Kubernetes. It can make deploying databases and other applications easier on a Kubernetes cluster. You use it next.
Task 3. Use Helm to deploy MySQL on the cluster
You should still be in Cloud Shell, connected to your Kubernetes cluster.
- To add the Bitnami Helm repository to your cluster, enter the following command:
helm repo add bitnami https://charts.bitnami.com/bitnami
- To update the Helm packages, enter the following command:
helm repo update
- Install a MySQL named mydb using Helm:
helm install mydb bitnami/mysql
Click Check my progress to verify the objective.
Use Helm to deploy MySQL on the cluster
Check my progress
Read the output from the Helm install command and connect to your database using the instructions provided.
When you are connected to the database, exit to return to the Cloud Shell command prompt.
To see your Helm deployment, enter the following command:
helm ls
Notice that the deployment has the name mydb specified in the install command.
- To delete the deployment, enter the following command:
helm delete mydb
Congratulations! You have created a Kubernetes cluster and then deployed MySQL databases into it, first using your own configuration code, and then using Helm.
Solution of Lab
curl -LO raw.githubusercontent.com/quiccklabs/Labs_solutions/refs/heads/master/Running%20Databases%20in%20GKE/quicklab.sh
sudo chmod +x quicklab.sh
./quicklab.sh


