Setting Up Google Meet for Distance Learning - GSP980

A passionate full-stack developer from @ePlus.DEV
Overview
Google Meet is a voice and video communication service. As part of Google Workspace for Education, Google Meet provides easy-to-use, reliable, and secure video conferencing to connect your school community with video for classes, parent-teacher conferences, professional development, and more.
In this lab you will learn how to set up and manage Google Meet from the Google Workspace Admin Console and use Google Meet features available to teachers for distance learning.
What you'll do
Set up Google Meet
Manage features that support distance learning
Use Google Meet as a teacher
Use Google Meet as student
Google Meet
Google Meet allows you to start and join video and audio meetings. It integrates seamlessly with Classroom and other Google Workspace for Education products to make joining and presenting in a class or conference easy. Teachers use Google Meet for distance learning to:
Start and join video meetings in Classroom using a dedicated link for a class
Use moderation features to control participation
Get attendance reports
Start a video meeting from Gmail
Control access to video meetings
Google Meet can also be used for meetings with parents, students, teachers, and other support staff.
For more information, refer to Google Meet Help.
Task 1. Setup and requirements (Admin)
Before you click the Start Lab button
Read these instructions. Labs are timed and you cannot pause them. The timer, which starts when you click Start Lab, shows how long Google Cloud resources are made available to you.
This hands-on lab lets you do the lab activities in a real cloud environment, not in a simulation or demo environment. It does so by giving you new, temporary credentials you use to sign in and access Google Cloud for the duration of the lab.
To complete this lab, you need:
- Access to a standard internet browser (Chrome browser recommended).
Note: Use an Incognito (recommended) or private browser window to run this lab. This prevents conflicts between your personal account and the student account, which may cause extra charges incurred to your personal account.
- Time to complete the lab—remember, once you start, you cannot pause a lab.
Note: Use only the student account for this lab. If you use a different Google Cloud account, you may incur charges to that account.
Start your lab
When you are ready, click Start Lab in the upper left.
Sign in to the Google Workspace Admin Console
To access the Google Workspace Admin Console, you must find your credentials and then sign in.
Find your lab's User Email and Password
To access the resources and console for this lab, locate the User Email and Password in the Lab Details panel. This panel is on the left or at the top, depending on the width of the browser window. Use these credentials to log in to the Google Workspace Admin Console.
If your lab requires other resource identifiers or connection-related information, they appear on this panel as well.
Sign in to the Admin Console
- Click Open Google Workspace Admin Console.
Tip: Open the tabs in separate windows, side-by-side.
Note: If you see the Verify your account dialog:
Click Next.
Click the prefilled user.
Click Use another account.
On the Sign in page, log in using the User Email and Password details provided.
When prompted, click I understand and ACCEPT TERMS OF SERVICE to accept all terms and conditions.
Click Get set up to continue.
After a few seconds, the Admin Console opens.
Right-click Verify in the red box at the top or right-click on Verify domain on the red box in the Domains card, and select Open link in new tab.
Note: To complete this step in a real-life scenario, you'd need to add an actual DNS record.
Click the new tab, called Domain setup, to complete the Google Workspace domain verification steps.
On the Let's set up your domain page, click Get Started.
On the Choose how to verify your domain page, click Other verification options.
From the Domain host dropdown, select Other as a domain host and then click Continue.
At the bottom of the Add verification code page, select the Come back here and confirm once you have updated the code on your domain host checkbox, and then click Confirm.
Wait until it says Your domain is verified! and then close the Domain setup tab.
Note: Do not click Activate Gmail.
Return to the Admin Console tab and refresh the page.
This lab provides a temporary Google Workspace Enterprise account. There are a number of differences between the Enterprise and Education versions so that options in the Google Admin Console in this lab may slightly differ from options in the Education version of the Google Admin Console. For example, an Education version allows services to be restricted based on age. This feature is not available in the Google Workspace version used in this lab.
Add OUs to the domain
Before users can access Google Meet or other apps and services in your domain, called Google Workspace Labs, the Workspace admin must add them to the domain. In this section, as an admin, you will:
- Create a role-oriented structure by adding 2 child OUs (organizational units) called Teachers and Students to the top-level domain (Google Workspace Labs).
Create teacher and student OUs
Create a role-oriented organizational structure in a top-level OU with 2 child OUs.
On the Google Admin Home page, in the Main menu (
), click Directory (
) > Organizational units.


The Organizational units window opens. The top-level OU, Google Workspace Labs, is in the Organizational units list.
Click Create organizational unit to create a new OU.
In the Create organizational unit dialog:
Name the organizational unit "Teachers".
(Optional) Enter a description.
Click Create.
The new OU, Teachers, is now listed in the Organizational units list. You may have to refresh the browser tab to see the Teachers OU.
- Repeat steps 2 and 3 to create another OU named "Students".
The Teachers and Students OUs are now listed under the top-level OU in the Organizational units list.
Click Check my progress to verify the objective.
Create a structure
Add users
Add users to the OUs:
In the Main menu (
), click Directory (
) > Users.
Click Add new user from the top menu. The Add new user dialog opens.
Type Maria for First name and Kearns for Last name. Leave all other fields at their default, and click on continue.
When the Adding Users dialog opens, record the Username and Password to log into the classroom as a teacher later in the lab.
Click Dismiss.
Select Maria Kearns, click on More Options > Change Organizational unit field, and then click Students > Continue > Change.
Type Alex for First name and Miller for Last name, and then click Continue.
Repeat steps 4 and 5 to copy the Username and Password to log into the classroom as a teacher later in the lab.
Select Alex Miller, click on More Options > Change Organizational unit field, and then click Teachers > Continue > Change.
Click Directory
> Users to see the users you added.
The new users are listed in the Users list. You may need to reload your browser window to see them.
Click Check my progress to verify the objective.
Add users
Task 2. Enable Google Meet (Admin)
In Google Workspace for Education, Google Meet is accessible within Classroom. This allows teachers to host secure video meetings and students can easily find and use the Google Meet link for class. The Google Meet service must be enabled for teachers and students in order for them to use Google Meet. The Workspace admin would enable Google Meet for anyone who needs it.
To check that Google Meet is enabled:
In the Main menu (
), click Home (
).

The Welcome to the Google Workspace Admin Console page opens.
Click the Apps card. You may have to scroll down or click Show more to see it.
Click the Google Workspace card to see the list of services and the service status for apps in all OUs.
Find Google Meet in the Services list, then check the Service Status to be sure the service status is ON for everyone.
If needed, turn the service ON:
Hover over Google Meet, and then click the three vertical dots inline and to the right, then select Turn ON for everyone. The Turn ON Google Meet dialog opens.
Click Turn On.
The Google Meet Service Status is now ON for everyone.
Note: If you've toggled the Service Status on and off, be sure you've enabled (Service Status is ON for everyone) Google Meet before going to the next section.
Task 3. View and manage Google Meet features in the Google Admin console (Admin)
View the Google Meet feature status
To see the feature status for a user, group, or OU:
Still on the Google Workspace App page in the Google Admin console, click Google Meet in the services list. The Settings for Google Meet page opens.
Click the Meet video settings card. The Meet video settings window opens, which shows if features are on or off.
In the Google Meet panel on the left, click Users.
Start typing the name of a user you previously added, and then click to select that user. The Meet video settings on the right show the feature status for that user.
Note: Although you can view the feature status for an individual user, you can't change the settings for that user while in this view. To update settings for a user, add the user to an organizational unit or access the group with the correct Google Meet settings.
Manage Google Meet features
To manage Google Meet features, when you view the feature status you can enable or disable the feature. As an example, to turn off recording for students (users in the Students OU):
Reset your view: In the Main menu (
), click Home (
).
Click the Apps card.
Click the Google Workspace card.
From the services list, click Google Meet.
Click the Meet video settings card.
In the Google Meet panel, click the Students OU.
Hover over and then click the Recording row. The Recording dialog opens.
Uncheck Let people record their meetings. and then click Override.
Your setting is saved. Users in the Students OU can no longer record meetings.
For more information, refer to Turn a service on or off for Google Workspace users.
Click Check my progress to verify the objective.
Manage Google Meet features by an OU
Task 4. Manage Google Meet features (Teacher)
As part of Google Workspace for Education, Google Meet features support distance learning:
Integration with Classroom
Control who can start a video meeting
Moderation controls for teachers
Mute participants
Remove and re-invite participants
Host controls
Teachers (users in the Teachers OU), as the meeting host, configure these features.
Integration with Classroom
Google Meet is integrated with Classroom so teachers and students can access Google Meet from Classroom.
Because of the focuses on Google Meet as part of distance learning, this lab has you launch Google Meet from Classroom.
Create a Google Meet Link
In Classroom, teachers create a unique Google Meet link for each class and post it on the class page. Only teachers can create the Google Meet link. Students use this link to enter a class.
To create a Google Meet link in Classroom:
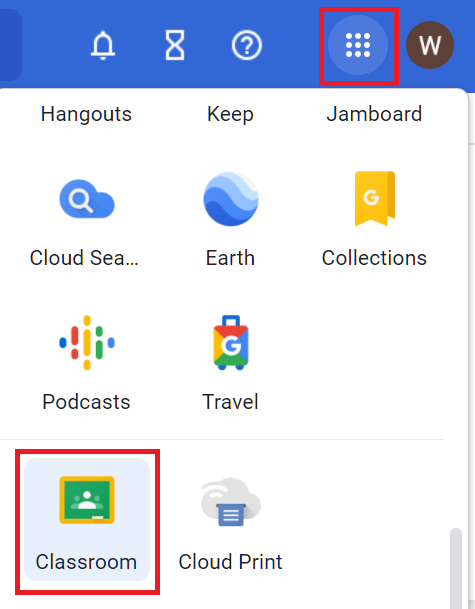
Click Apps (
) in the top right and then click Classroom.

Click Switch Account next to Workspace User to open the Choose an account dialog.
Click Use another account. The Sign in page opens.
In the Email or phone field, enter the username for
teacher OUthat you previously recorded. Click Next.Enter the password you previously saved for the teacher.
Accept Terms as needed.
Create a new password, maybe something like “luv2Teach”.
Click Continue. The Pick your role dialog opens.
Choose I’m a teacher. The Classroom page opens. If you don't see the Create class button, reload the browser tab.
Click Create class.
Name the class "History" and click Create. The class page opens.
Click Generate link in the Meet card. The Manage Meet link dialog opens.
Click Save. The class page opens.
The Google Meet card now has a Join button.
Click Check my progress to verify the objective.
Create a class
Control Access
When you (as a teacher) create a Google Meet link for the class, you become the host. You control who can access video meetings and how video meetings are accessed. In this section, you configure Google Meet as follows for your History class:
The video meeting starts when the teacher joins.
When students try to join, they enter a waiting room until a teacher joins the meeting.
After the meeting starts, students in the class don't have to ask to join the meeting.
Anyone who's not in the class must first ask to join, and the teacher decides whether to let them join.
To configure meeting access:
Still on the class page in Classroom, click Join to launch Google Meet.
Click Join now. Your meeting starts.
Click Host controls (
) in the bottom right.
Slide Host management on.

This lets you restrict what participants can do in the meeting. For example, when Host management is on, you can mute everyone on the call.
- Scroll down to Meeting access and, if needed, slide Host must join before anyone else off.
When Meeting access is off:
The host must join first
Only people invited by the host can join without asking
Everyone else must ask to join, including people who dial in
Only hosts can dial out of a meeting
- Click X in the upper right of the Settings dialog to close the dialog.
Stay in this meeting for the next section.
Mute Participants
If there's feedback or background noise, you can mute others. Only meeting creators, calendar event owners, or those who set up the meeting on an in-room hardware device can mute others.
Since 2 participants are required to view the mute option, join the meeting as a student to have 2 participants:
Return to the History class page and click Join to launch Google Meet in a new browser tab.
In the upper right, next to the user avatar, click Switch account.
Click Use another account.
Sign in using the email and password you previously recorded for the user in the Students OU.
Create a new password, maybe something like “luv2Learn”.
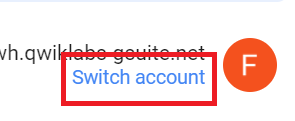
Note: Because the student was not invited to the class in Classroom, they are not considered invited participants to this meeting and must ask the host to join.
Click Ask to join to enter the meeting.
In the teacher's meeting window, click Admit.
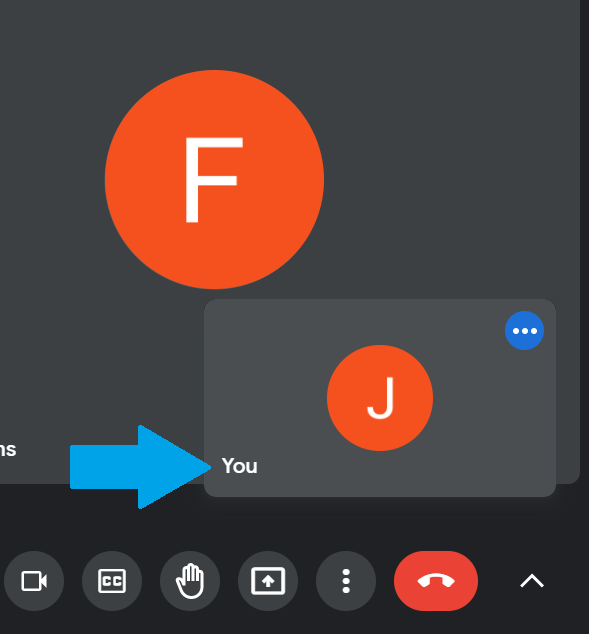
You now have two meeting windows open in two browser tabs, one for each participant. In each meeting window, you see 2 user avatars. Notice the "You" next to the user avatar shows which participant is using that meeting window.
At the top right of both meeting windows, click People (
) to view the participants. Stay in the meeting window where you are the meeting host.

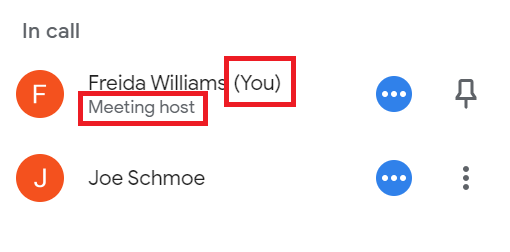
You now have a participant to mute.
- To mute one participant, next to the student's name, click Mute the student's microphone (3 dots in a blue circle). Click Cancel in the confirmation dialog so you can mute all in the next step.
Note: For privacy reasons, you cannot unmute anyone.
To mute all participants, at the top of the People panel, click Mute all (
).

Remove and invite participants
Teachers, as meeting hosts, can remove a student during a meeting. To remove the student:
At the top right, click People (
).
Next to your student participant's name, click More actions (
) > Remove from the call (
) or Hang up (
).
Click Remove to confirm the removal.


After removing a participant or student, teachers can invite a participant back to a video meeting:
To invite a participant to a video meeting:
At the top right, click People (
). The People pane opens on the right.
Click Add people (
). The Add people dialog opens.
Enter the participant's email and then click Send email. The participant can then join the meeting through the invite or the original link.

End the meeting
To end the meeting:
- On the bottom, click Leave Call.
In the End this video call for everyone? dialog, click End the call for everyone

- Just to be neat, close all the Google Meet instances. Click X in the browser tabs of the instances.
Task 5. Test your learning
True or false: You can view and change feature settings for a user in the Google Admin Console.
True
False
True or false: A teacher, as a meeting host, can mute and unmute a participant.
True
False
True or false: You find host controls in Google Meet, not the Google Workspace Admin Console.
True
False
True or false: Although it’s integrated with Classroom, you can launch Google Meet without Classroom.
True
False
Solution of Lab
Manual
https://www.youtube.com/watch?v=be6SRCCo1Hc
Google Meet for Google Workspace: Quick Lab Guide
This guide focuses only on the tasks required by Check my progress.
Important: Use an Incognito or private browser window and sign in only with the temporary lab credentials.
Progress Checklist
| Objective | Required action |
|---|---|
| Create a structure | Create the Teachers and Students organizational units |
| Add users | Add Maria to Students and Alex to Teachers |
| Manage Google Meet features by an OU | Disable meeting recording for Students |
| Create a class | Create the History class and generate its Meet link |
1. Sign In and Verify the Domain
Click Start Lab.
Click Open Google Workspace Admin Console.
Sign in with the User Email and Password provided by the lab.
Accept the Terms of Service and click Get set up.
In the red warning box, right-click Verify or Verify domain, then select Open link in new tab.
In the new tab, click Get Started.
Select Other verification options.
For Domain host, select Other, then click Continue.
Select Come back here and confirm once you have updated the code on your domain host.
Click Confirm and wait for Your domain is verified!
Close the verification tab and refresh the Admin Console.
Do not click Activate Gmail.
2. Create the Organizational Units
Go to: Admin Console → Directory → Organizational units
Create these two child organizational units directly under the root organization:
TeachersStudents

3. Add the Users
With only two users, manual creation is normally faster than preparing and processing a CSV import.
Go to: Admin Console → Directory → Users → Add new user
Create and assign the users as follows:
| First name | Last name | Organizational unit | Role |
|---|---|---|---|
| Maria | Kearns | Students |
Student |
| Alex | Miller | Teachers |
Teacher |

For each user:
Enter the first and last name.
Click Continue.
Save the generated email address and password.
Open the user and select More Options → Change organizational unit.
Select the required OU, then click Continue → Change.
Click Check my progress for Add users.
Alex Miller is the teacher account.
Maria Kearns is the student account.


4. Ensure Google Meet Is Enabled
Go to:
Admin Console → Apps → Google Workspace → Google Meet
Find Google Meet and confirm that its status is:
ON for everyone
If it is disabled:
Hover over Google Meet.
Open the three-dot menu.
Select Turn ON for everyone.
Click Turn On.
This section has no separate progress check, but Meet must be enabled before the teacher can generate a Meet link.
5. Disable Recording for Students
Go to: Admin Console → Apps → Google Workspace → Google Meet → Meet video settings
Select the Students OU in the left panel.
Open the Recording setting.
Clear Let people record their meetings.
Click Override.
Click Check my progress for Manage Google Meet features by an OU.


6. Create the History Class
Open Google Classroom.
Select Switch account → Use another account.

Sign in with the Alex Miller account from the
TeachersOU.
Change the temporary password if prompted.

When asked to choose a role, select I'm a teacher.

Click Create class.

Enter the exact class name:
HistoryClick Create.

In the class Meet card, click Generate link.

Click Save.

Confirm that the Meet card displays a Join button.
Click Check my progress for Create a class.