
Simplify Network Connectivity for AlloyDB for PostgreSQL: Challenge Lab - GCC040
A passionate full-stack developer from @ePlus.DEV
Challenge lab overview
This lab challenges you to perform actions and automation across products. Instead of following step-by-step instructions, you are given a common business scenario and a set of tasks – you then figure out how to complete them on your own, using your skills to come up with a solution that demonstrates your understanding of key concepts. An automated scoring system provides feedback on whether you have completed your tasks correctly. Are you up for the challenge?
Objectives
This lab challenges you to do the following:
Configure AlloyDB within a single VPC: Set up an AlloyDB cluster and establish connectivity from a compute instance within the same VPC.
Establish multi-VPC connectivity via Cloud HA VPN: Connect a compute instance in a separate VPC to the AlloyDB cluster using Cloud HA VPN (high-availability VPN).
Setup and requirements
Before you click the Start Lab button
Read these instructions. Labs are timed and you cannot pause them. The timer, which starts when you click Start Lab, shows how long Google Cloud resources will be made available to you.
This hands-on lab lets you do the lab activities yourself in a real cloud environment, not in a simulation or demo environment. It does so by giving you new, temporary credentials that you use to sign in and access Google Cloud for the duration of the lab.
To complete this lab, you need:
- Access to a standard internet browser (Chrome browser recommended).
Note: Use an Incognito or private browser window to run this lab. This prevents any conflicts between your personal account and the Student account, which may cause extra charges incurred to your personal account.
- Time to complete the lab---remember, once you start, you cannot pause a lab.
Note: If you already have your own personal Google Cloud account or project, do not use it for this lab to avoid extra charges to your account.
How to start your lab and sign in to the Google Cloud console
Click the Start Lab button. If you need to pay for the lab, a pop-up opens for you to select your payment method. On the left is the Lab details pane, which is populated with the temporary credentials that are needed for this lab.
Copy the Password and then click Open Google Cloud console. The lab spins up resources, then opens another tab that shows the Sign in page.
Tip: Open the tabs in separate windows, side by side.
Note: If you see the Choose an account page, click Use another account.
On the Sign in page, verify that the username from the Lab details pane is auto-filled. Click Next.
Paste the password in the Enter your password field. Click Next.
Important: Use the credentials from the Lab details pane. Using your personal Google Cloud account may incur charges to your account.
Click through the subsequent pages:
Understand your account management.
Accept the terms and conditions.
After a few moments, the console opens.
Note: You can view the menu with a list of Google Cloud products and services by clicking the Navigation menu in the top left.

Challenge scenario
Here is an overview of Cymbal Health, an established health network in East Central Minnesota dedicated to reimagining and transforming the way that healthcare can be delivered.
Cymbal Health connects care and coverage under one health plan to make it easier for patients to receive high quality care at an affordable cost.
In 1980, Cymbal Children’s Hospital opened in Minneapolis to combat profiteering hospitals targeting vulnerable families. As the hospital grew into a health network, it created an HMO division in 2002 with the goal of becoming an integrated delivery system and was renamed Cymbal Health. In 2019, Cymbal Health reported a total of $4.1 billion in revenue and employed 12,100 clinical_trialss.
Cymbal Health is a digitally transforming organization. It is inspired by clients like: Kaiser Permanente, United Healthcare, UNC Health.
Cymbal Health is modernizing its database infrastructure by leveraging Google Cloud services. As part of this initiative, the organization is migrating critical healthcare data to AlloyDB for PostgreSQL to support their real-time analytics and patient management systems.
Your challenge
Cymbal Health’s IT team needs to ensure secure and efficient access to the AlloyDB service from two key locations:
An internal healthcare application hosted on a compute instance within the same Virtual Private Cloud (VPC) as the AlloyDB service.
A separate research facility that operates in a different VPC, with connectivity established via Cloud HA VPN to ensure secure, reliable access to the database.
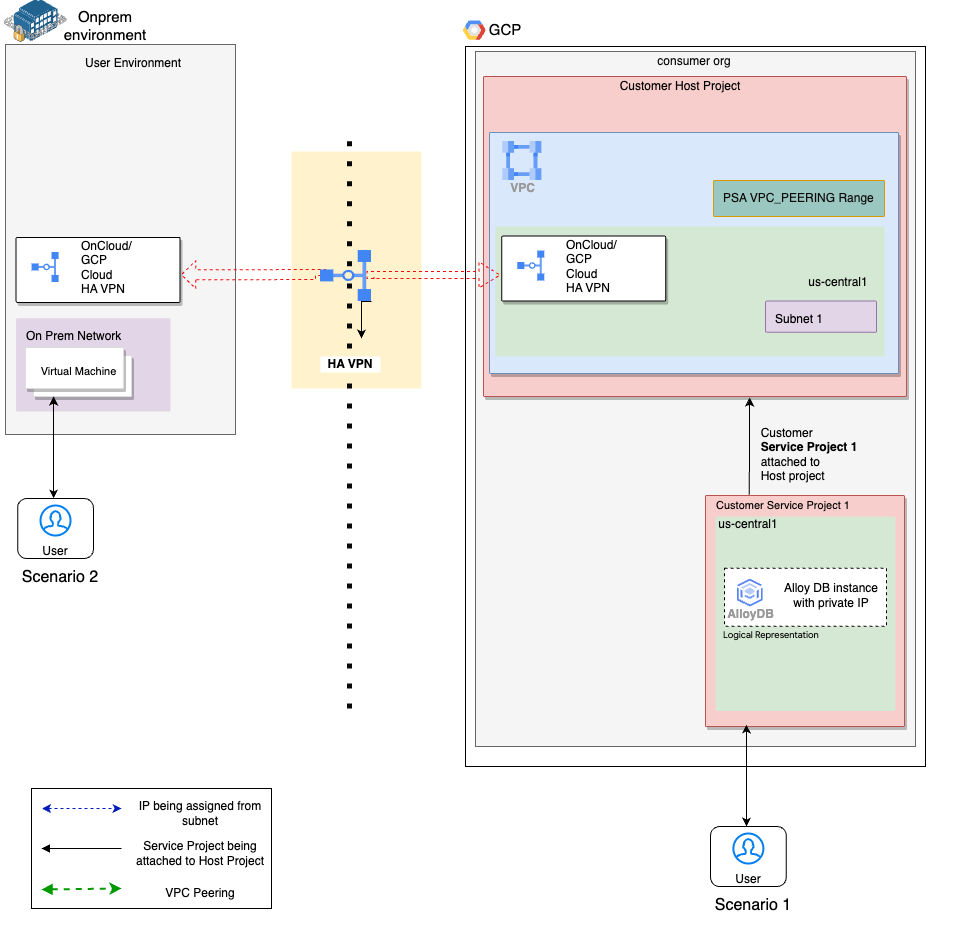
As part of Cymbal Health’s cloud architecture team, you are tasked with configuring the AlloyDB service and establishing private network connectivity from both locations. Your goal is to ensure secure and private access to AlloyDB while minimizing network complexity.
Task 1. Enable private services access
In this task, you must create private services access to establish network connectivity between your AlloyDB instance and the resources present in the cloud-vpc network.
- Create an allocated IP address range in the
cloud-vpcnetwork for private service connection.
| Parameter | Configuration |
| Name | psa-range |
| IP range | 10.8.12.0/24 |
Create a private connection between the
cloud-vpcnetwork and the underlying Google Cloud VPC network.Update the VPC peering configuration associated with the private connection to import and export custom routes.
Click Check my progress to verify your performed task.
Step Completed!
Create Private services access and VPC network peering
Check my progress
Step Completed!
Task 2. Create the AlloyDB for PostgreSQL cluster
- Create the AlloyDB for PostgreSQL cluster and primary instance using the following configurations:
| Parameter | Configuration |
| Cluster ID | cymbal-alloydb-cluster |
| Password | URBgn3JnwlAv |
| Region | europe-west1 |
| Network | cloud-vpc |
| Allocated IP range | psa-range (10.8.12.0/24) |
| Instance ID | cymbal-alloydb-instance |
Click Check my progress to verify your performed task.
Please create the AlloyDB for PostgreSQL instance with the given specifications and wait while the instance is created.
Create an AlloyDB for PostgreSQL cluster
Check my progress
Please create the AlloyDB for PostgreSQL instance with the given specifications and wait while the instance is created.
Task 3. Verify AlloyDB connectivity within the VPC
In this task, you must verify the connectivity from the cloud-vpc network to the AlloyDB cluster by creating the sample table from the cloud-vm instance using the PostgreSQL interactive terminal (psql).
- SSH into the
cloud-vmVM instance and create a table calledpatientsin the AlloyDB instance calledcymbal-alloydb-instance.
CREATE TABLE patients (
    patient_id INT PRIMARY KEY,
    first_name VARCHAR(50),
    last_name VARCHAR(50),
    date_of_birth DATE,
    medical_record_number VARCHAR(100) UNIQUE,
    last_visit_date DATE,
    primary_physician VARCHAR(100)
);
Insert at least 2 sample records into the
patientstable.Retrieve and display the data from the
patientstable.
Click Check my progress to verify your performed task.
Verify AlloyDB connectivity within VPC
Check my progress
Task 4. Establish a HA VPN connection
Create a HA VPN connection between the cloud-vpc and on-prem-vpc networks.
SSH into the on-prem-vm instance and run the following command to perform curl using the cloud-vm private IP to verify the VPN connection:
curl 10.0.1.2
Your output should resemble the following.
Output:
Welcome to Google Cloud!
Click Check my progress to verify your performed task.
Establish a HA VPN connection
Check my progress
Task 5. Verify AlloyDB connectivity across the Cloud VPN connection
In this task, you must verify the connectivity from the on-prem-vpc network to the AlloyDB cluster by creating the sample table from the on-prem-vm instance using the PostgreSQL interactive terminal (psql).
Create and advertise the required custom routes to enable AlloyDB connectivity across your Cloud VPN connection.
SSH into the
on-prem-vminstance and run the following query to create a table calledclinical_trialsin the AlloyDB instance calledcymbal-alloydb-instance:
CREATE TABLE clinical_trials (
    trial_id INT PRIMARY KEY,
    trial_name VARCHAR(100),
    start_date DATE,
    end_date DATE,
    lead_researcher VARCHAR(100),
    number_of_participants INT,
    trial_status VARCHAR(20)
);
Insert at least 2 sample records into the clinical_trials table.
Retrieve and display the data from the clinical_trials table.
Click Check my progress to verify your performed task.
Verify AlloyDB connectivity across Cloud VPN connection
Solution of Lab
Launch Cloud Shell: Start your Google CloudShell session by clicking here.
curl -LO raw.githubusercontent.com/quiccklabs/Labs_solutions/refs/heads/master/Simplify%20Network%20Connectivity%20for%20AlloyDB%20for%20PostgreSQL%20Challenge%20Lab/quicklabgcc040.sh
sudo chmod +x quicklabgcc040.sh
./quicklabgcc040.sh
This runs the script to set up your environment for the lab. It will provision resources and configure them as needed.

SSH into the
cloud-vmVM instance
psql -h REPLACE_IP -U postgres -d postgres
CREATE TABLE patients (
    patient_id INT PRIMARY KEY,
    first_name VARCHAR(50),
    last_name VARCHAR(50),
    date_of_birth DATE,
    medical_record_number VARCHAR(100) UNIQUE,
    last_visit_date DATE,
    primary_physician VARCHAR(100)
);


INSERT INTO patients (patient_id, first_name, last_name, date_of_birth, medical_record_number, last_visit_date, primary_physician)
VALUES
(1, 'John', 'Doe', '1985-07-12', 'MRN123456', '2024-02-20', 'Dr. Smith'),
(2, 'Jane', 'Smith', '1990-11-05', 'MRN654321', '2024-02-25', 'Dr. Johnson');


CREATE TABLE clinical_trials (
    trial_id INT PRIMARY KEY,
    trial_name VARCHAR(100),
    start_date DATE,
    end_date DATE,
    lead_researcher VARCHAR(100),
    number_of_participants INT,
    trial_status VARCHAR(20)
);


INSERT INTO clinical_trials (trial_id, trial_name, start_date, end_date, lead_researcher, number_of_participants, trial_status)
VALUES
    (1, 'Trial A', '2025-01-01', '2025-12-31', 'Dr. John Doe', 200, 'Ongoing'),
    (2, 'Trial B', '2025-02-01', '2025-11-30', 'Dr. Jane Smith', 150, 'Completed');


