Introduce
The Instagram Basic Display API allows users of your app to get basic profile information, photos, and videos in their Instagram accounts.
The API can be used to access any type of Instagram account but only provides read-access to basic data. If you are building an app that will allow Instagram Businesses or Creators to publish media, moderate comments, identify @mentioned and hashtagged media, or get data about other Instagram users, use the Instagram Graph API instead.
Common Uses
Get an Instagram User Access Token and permissions from an Instagram user Get an Instagram user's profile Get an Instagram user's images, videos, and albums
# Register on Instagram Basic Display API and get an Access Token
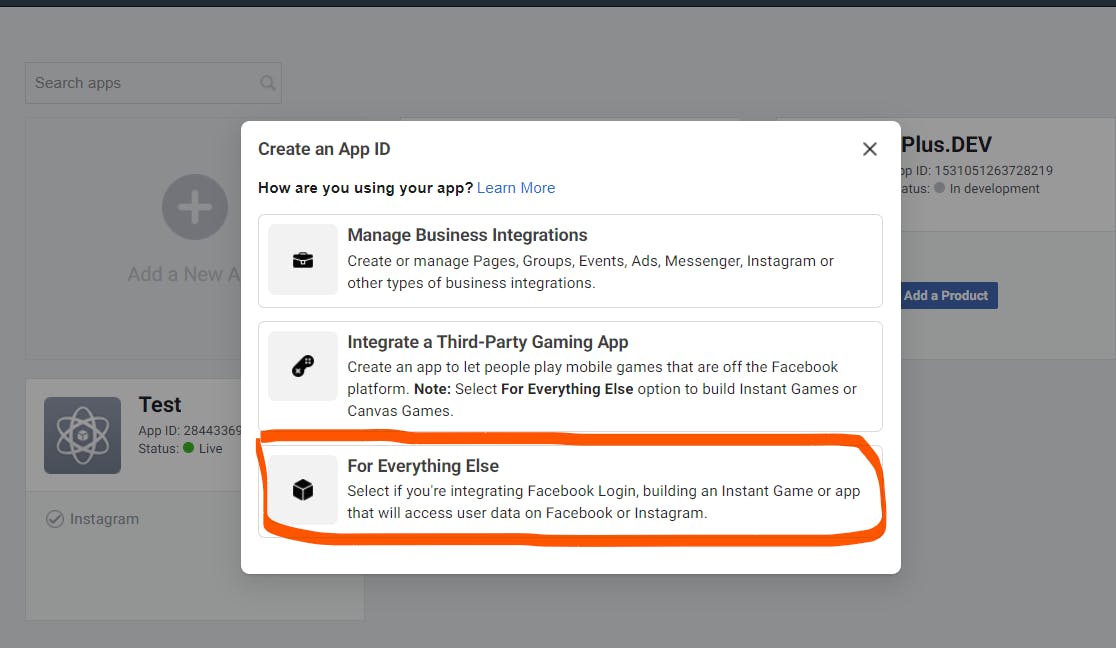
- Step 1: Create a Facebook App
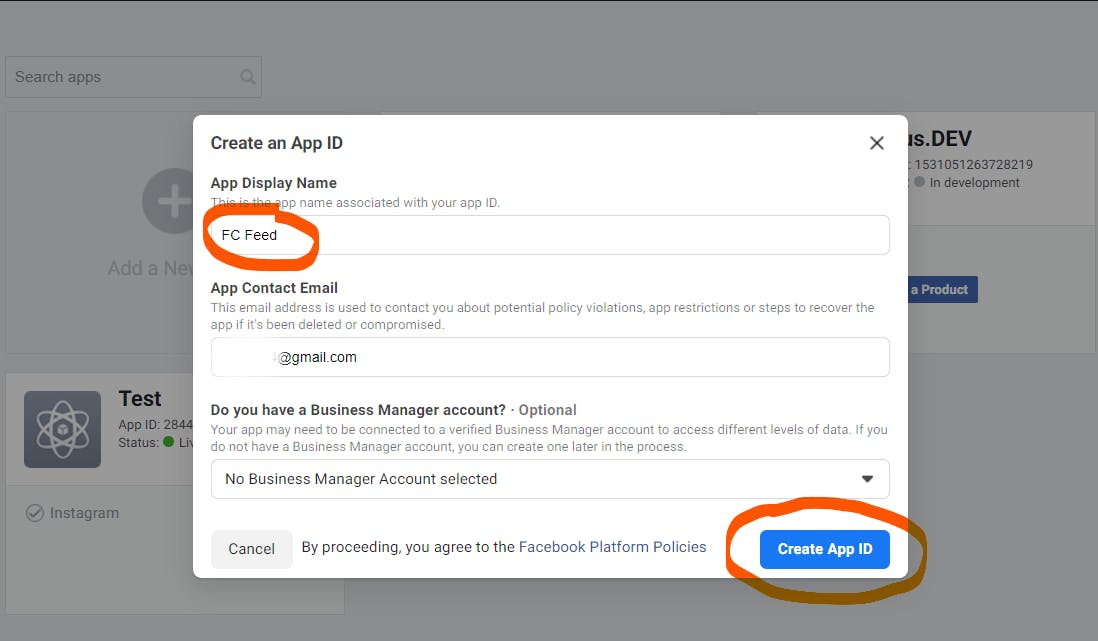
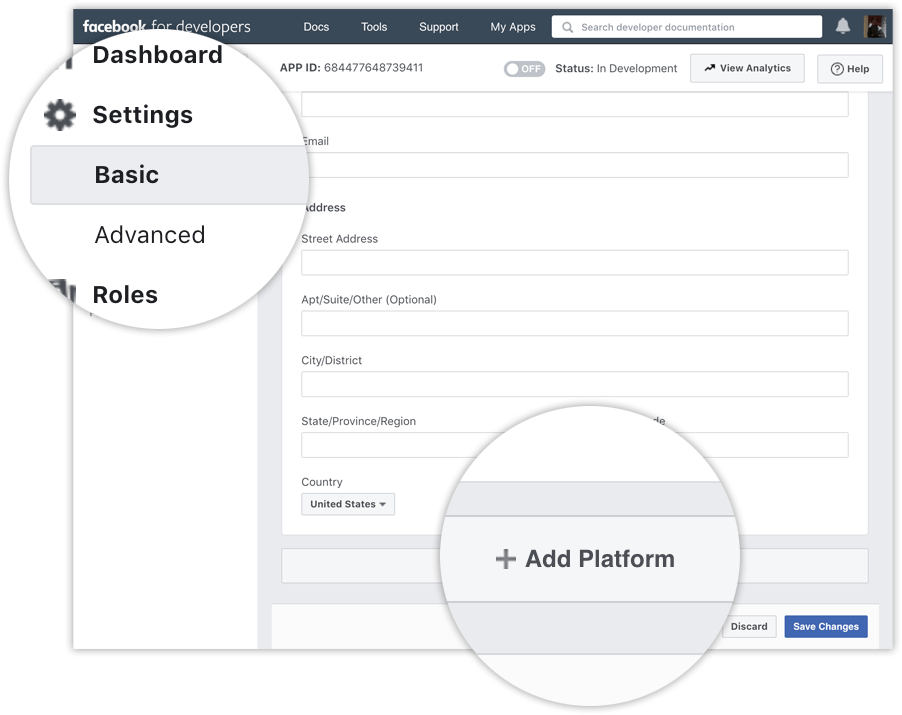
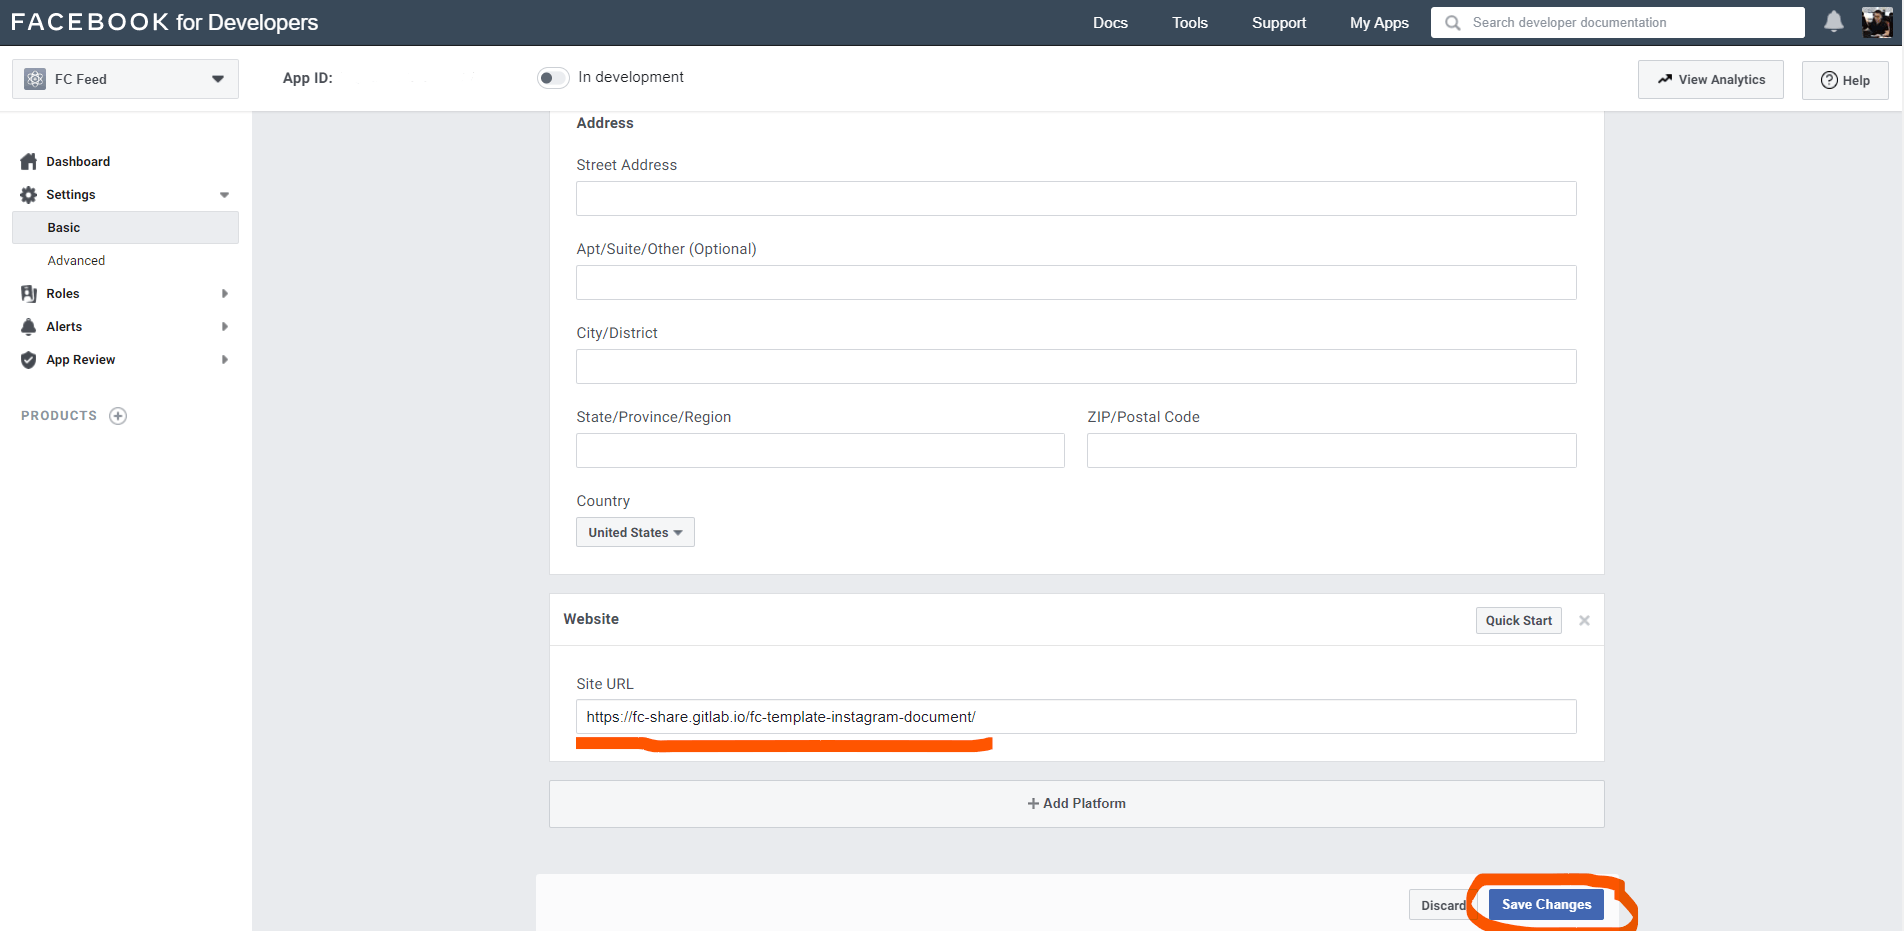
Go to developers.facebook.com, click My Apps, and create a new app. Once you have created the app and are in the App Dashboard, navigate to Settings > Basic, scroll the bottom of page, and click Add Platform.
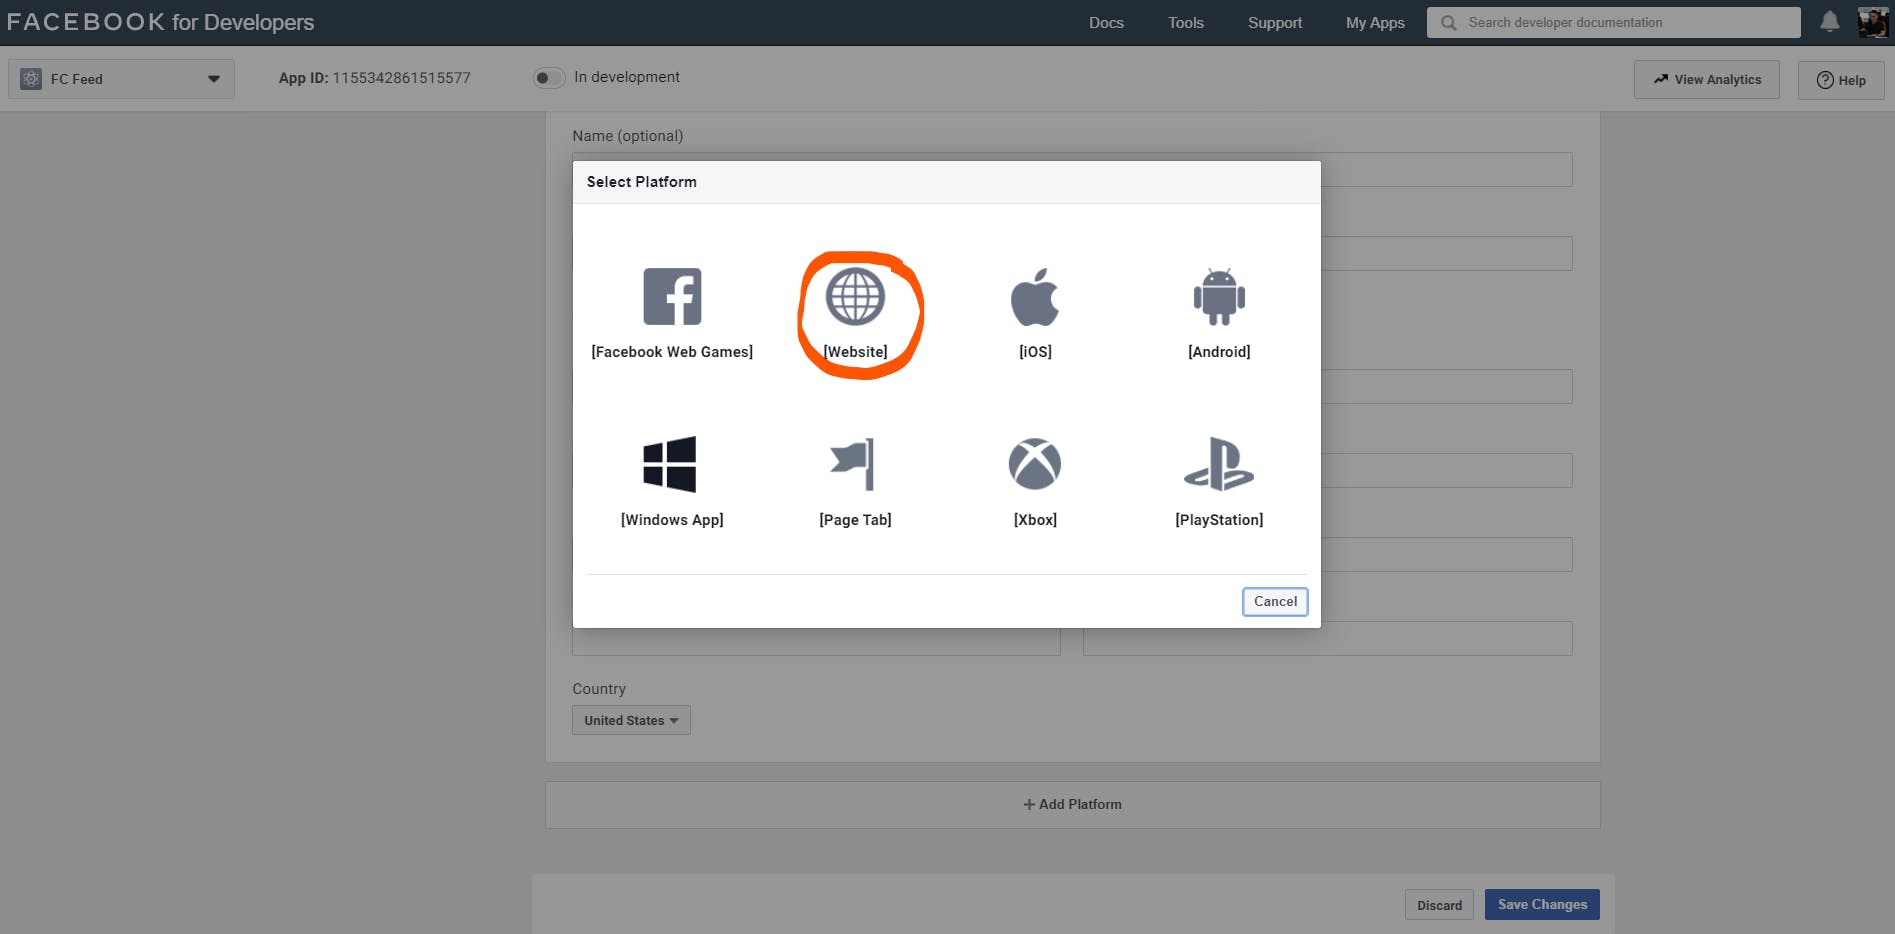
Choose Website, add your website’s URL, and save your changes. You can change the platform later if you wish, but for this tutorial, use Website.
Please enter your website address below as an example
https://fc-share.gitlab.io/fc-template-instagram-document/auth/
- Step 2: Configure Instagram Basic Display
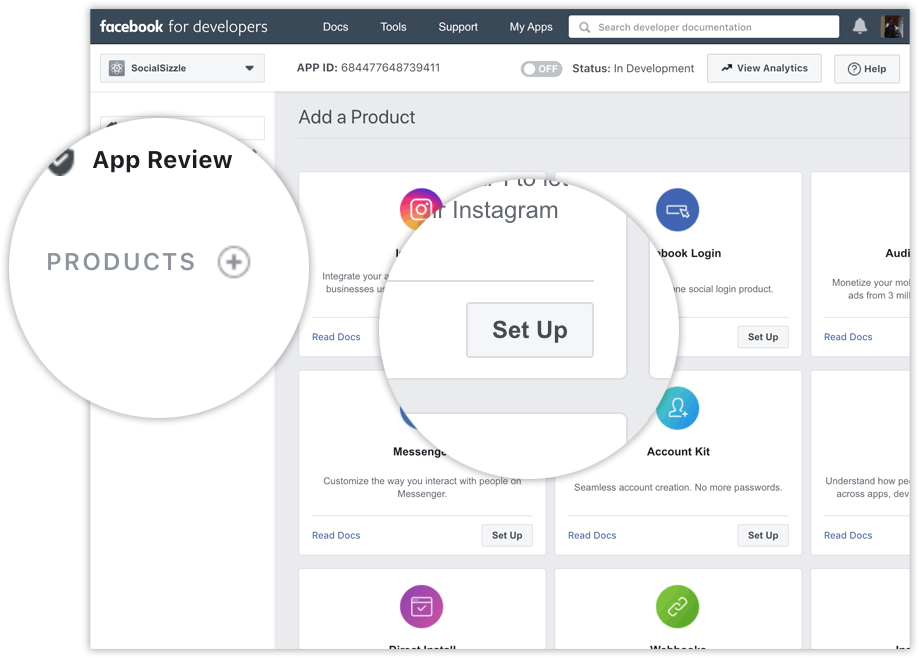
Click Products, locate the Instagram product, and click Set Up to add it to your app.
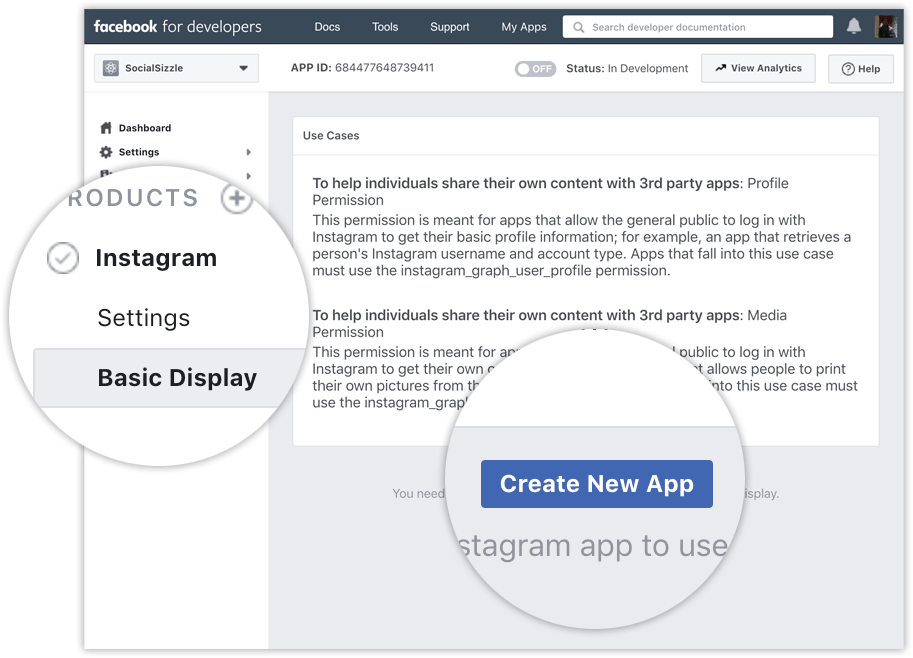
Click Basic Display, scroll to the bottom of the page, then click Create New App.
https://fc-share.gitlab.io/fc-template-instagram-document/auth/
- Step 3: Add an Instagram Test User
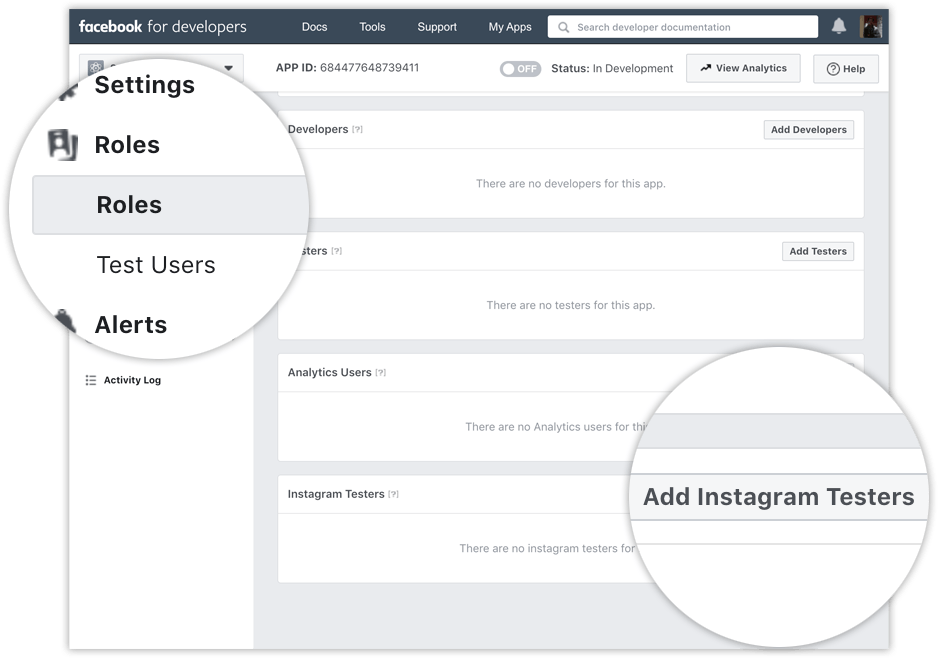
Navigate to Roles > Roles and scroll down to the Instagram Testers section. Click Add Instagram Testers and enter your Instagram account’s username and send the invitation.
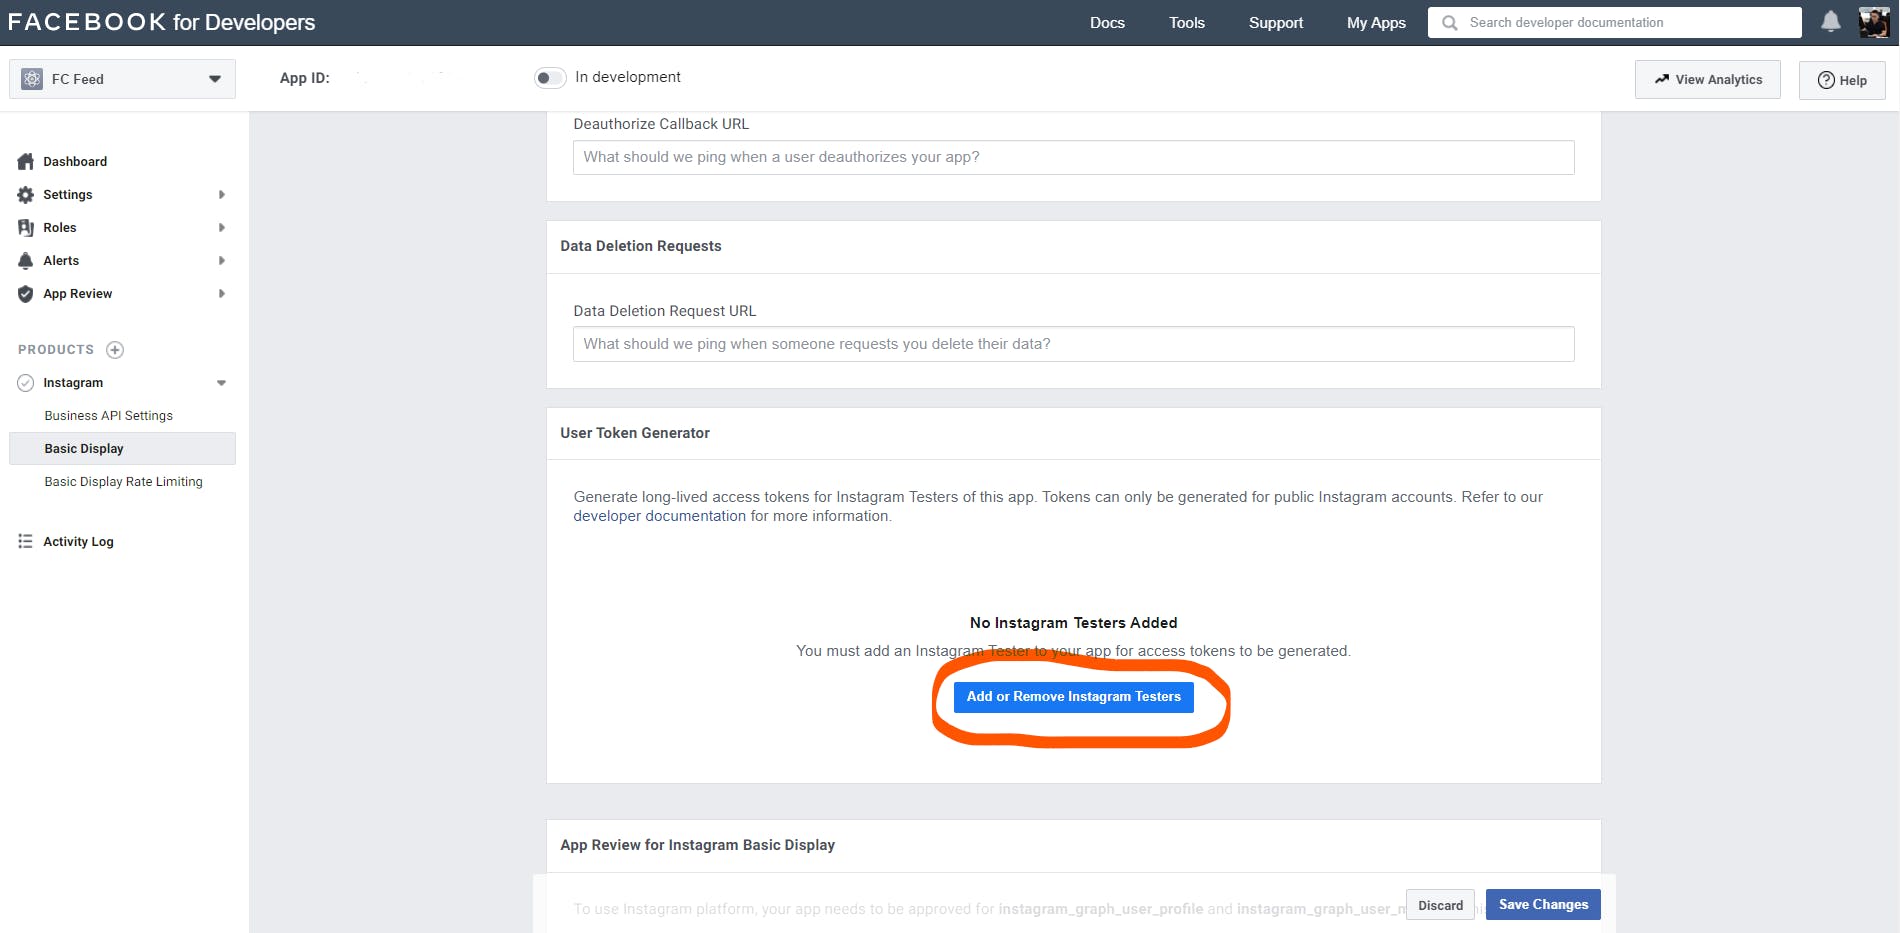
Open a new web browser and go to www.instagram.com and sign into your Instagram account that you just invited. Navigate to (Profile Icon) > Edit Profile > Apps and Websites > Tester Invites and accept the invitation.
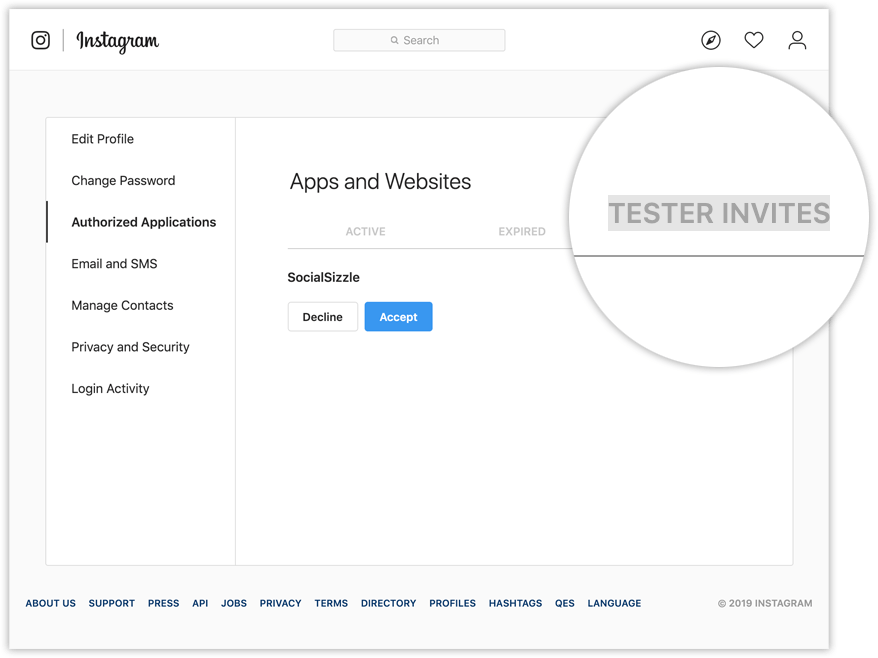
Your Instagram account is now eligible to be accessed by your Facebook app.
- Step 4: Authenticate the Test User
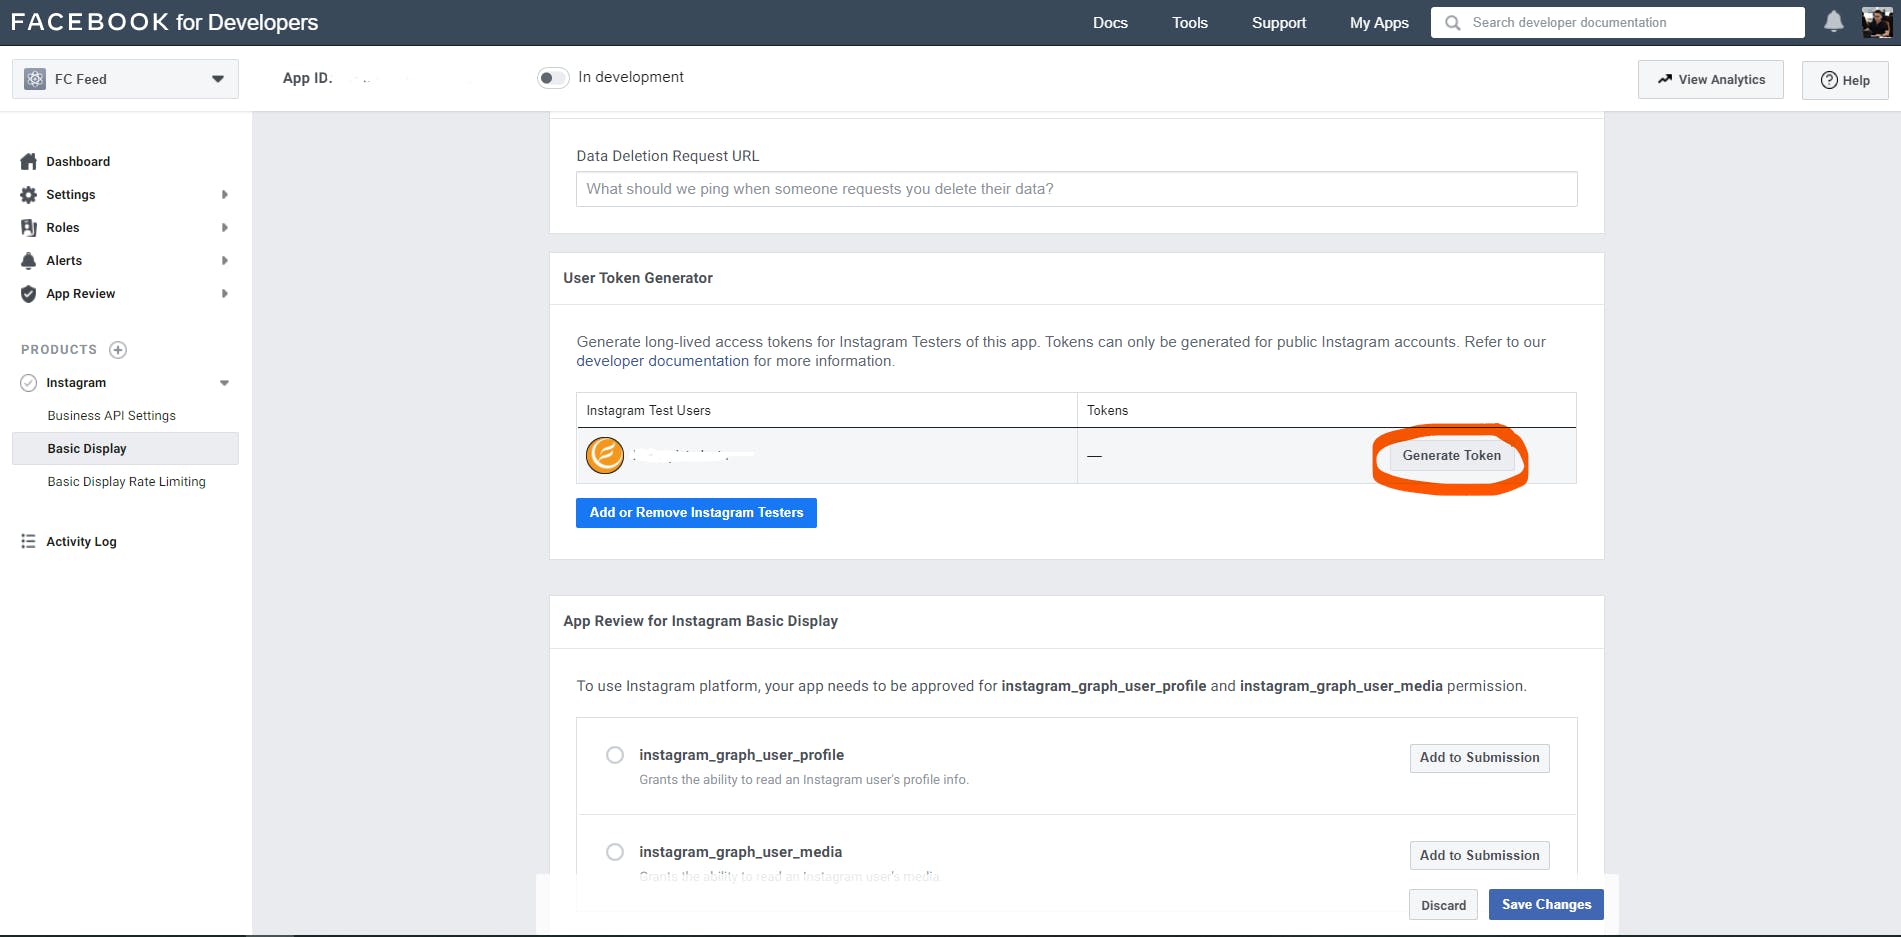
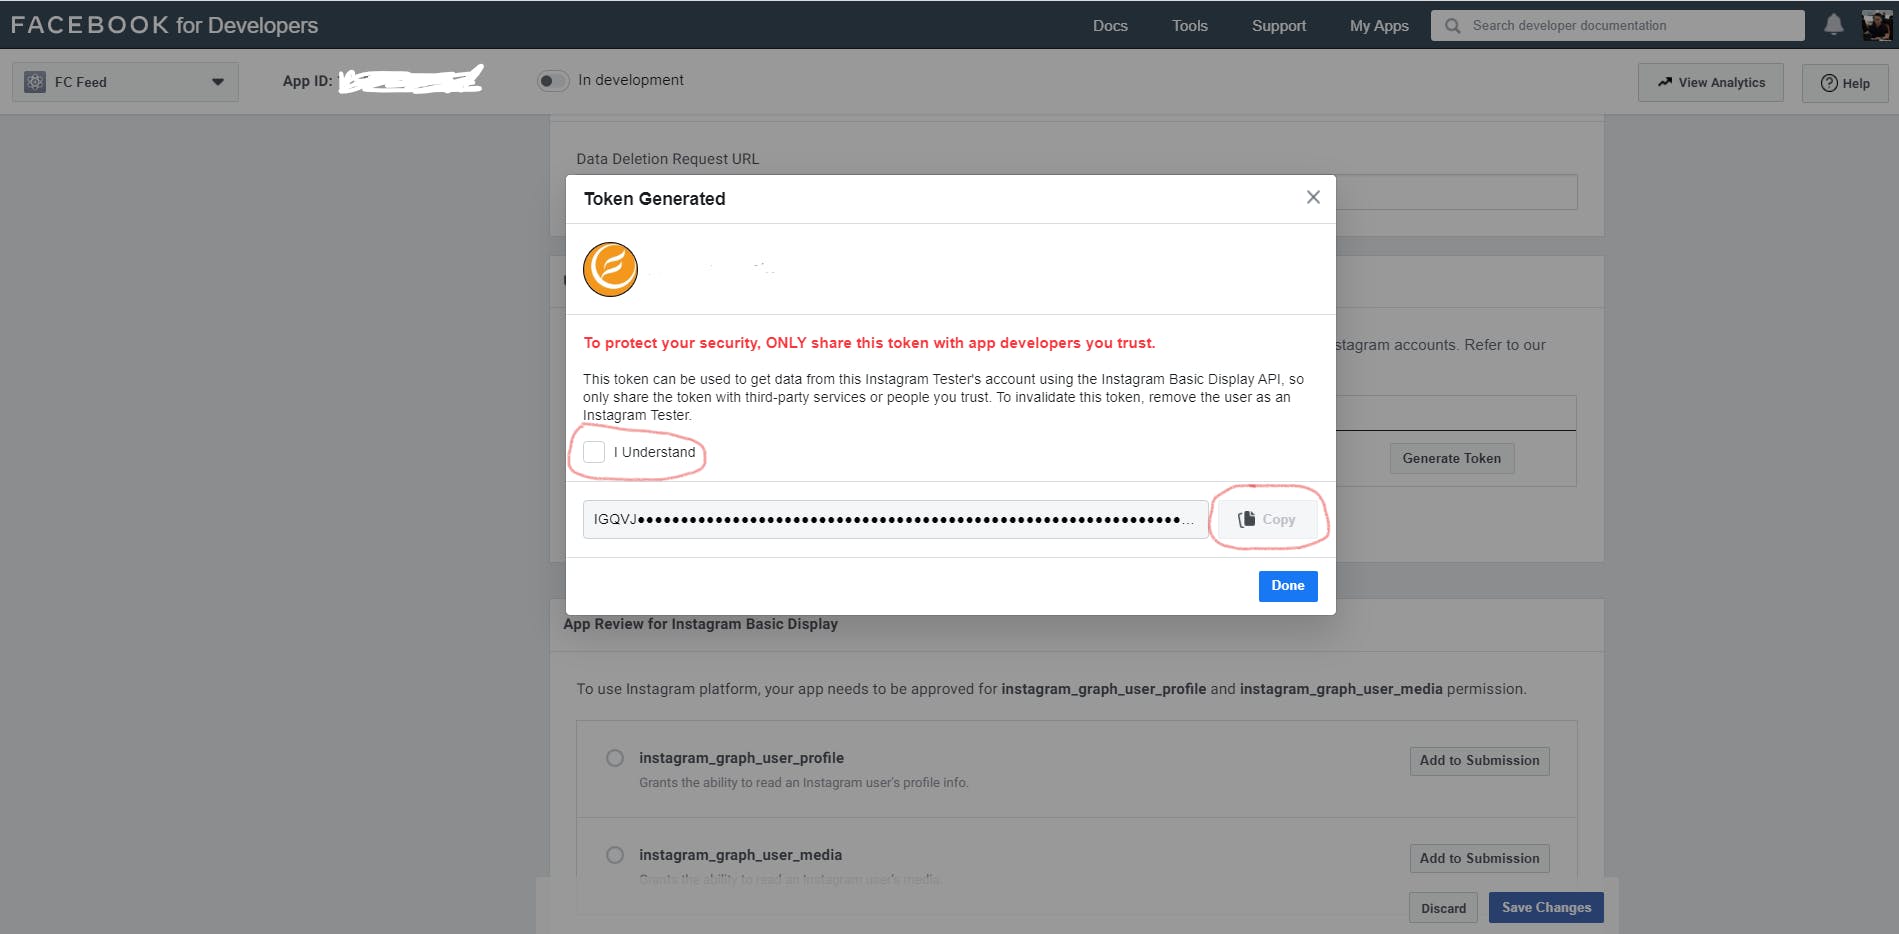
Access the token generator in the App Dashboard > Products > Instagram > Basic Display tab.
Click on Generate Token button for Instagram Tester user of your app. Please note Tokens can only be generated for public Instagram accounts.
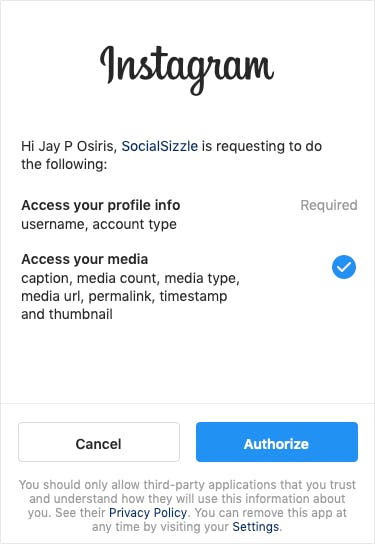
Authenticate if requested, follow the instructions, accept permissions and copy the Access Token it appears.
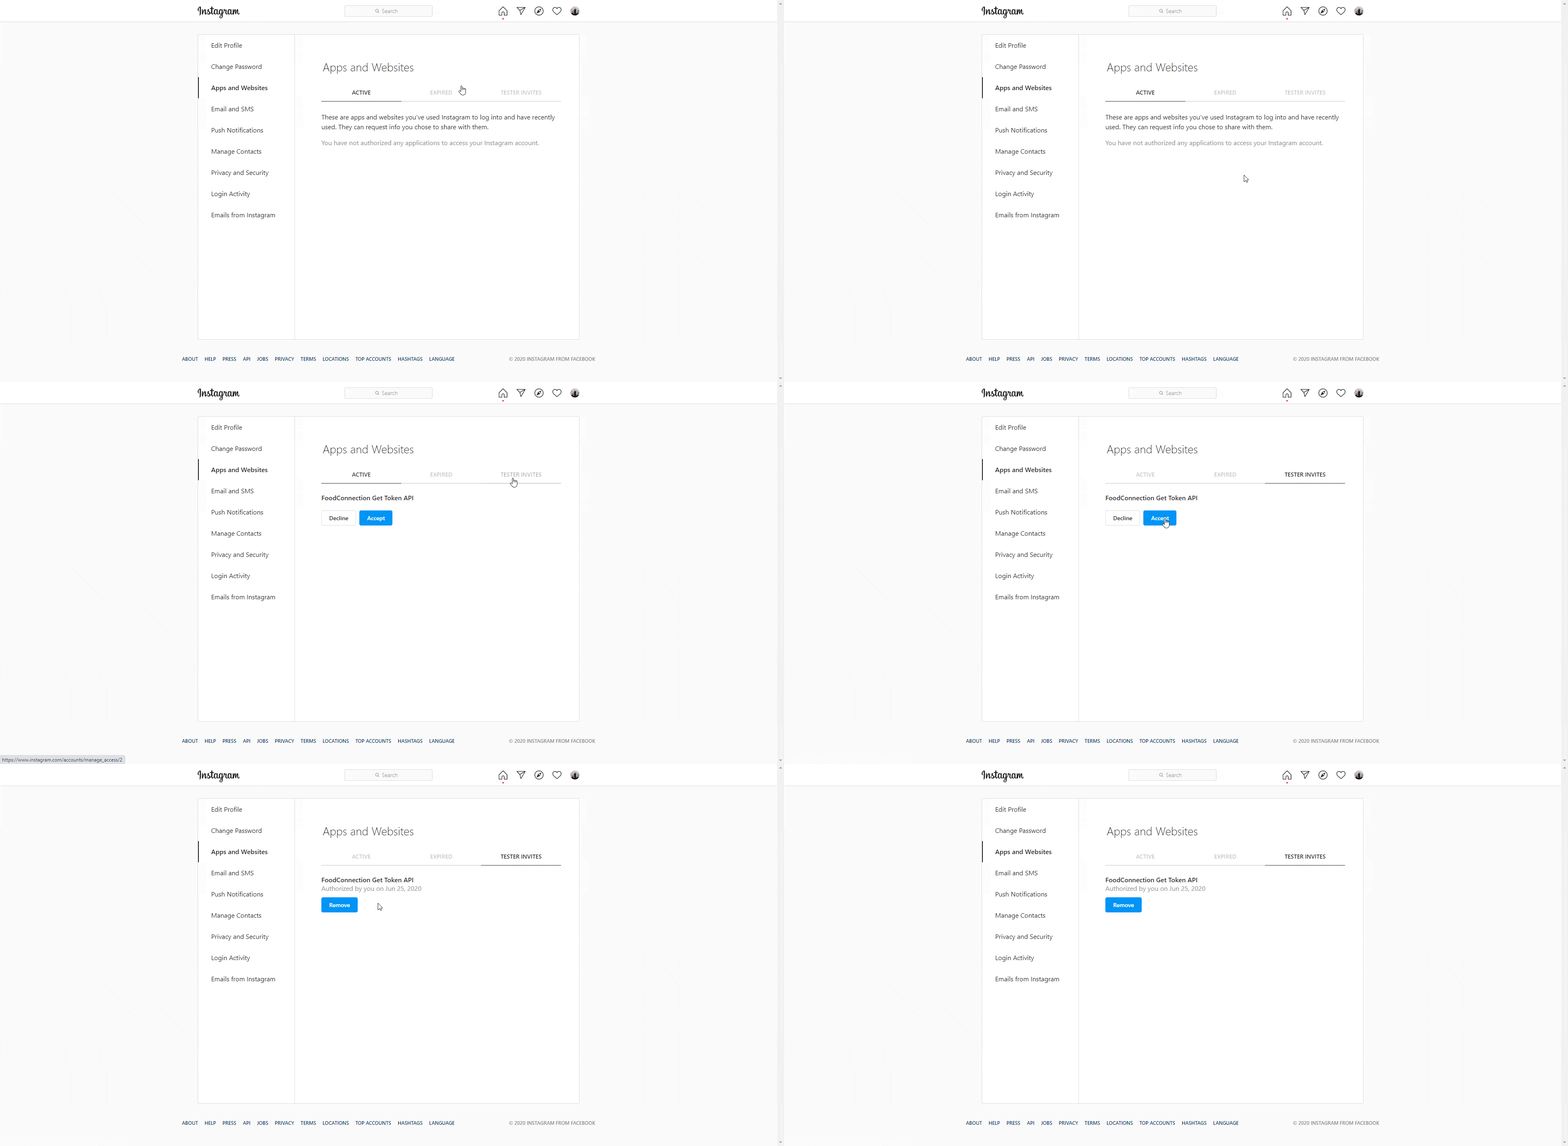
Your Instagram account is now eligible to be accessed by your Facebook app.
Construct the Authorization Window URL below, replacing {app-id} with your Instagram app’s ID (from the App Dashboard > Products > Instagram > Basic Display > Instagram App ID field) and {redirect-uri} with your website URL that you provided in Step 2 ("Valid OAuth Redirect URIs"). The URL must be exactly the same.
https://api.instagram.com/oauth/authorize?client_id={app-id}&redirect_uri={redirect-uri}&scope=user_profile,user_media&response_type=code
For example:
https://api.instagram.com/oauth/authorize?client_id=3518059988204696&redirect_uri=https://fc-share.gitlab.io/fc-template-instagram-document/auth/&scope=user_profile,user_media&response_type=code
Open a new browser window and load the Authorization Window URL. It should appear and display your Instagram user’s name, the app’s name, and a description of the permissions your app is requesting.
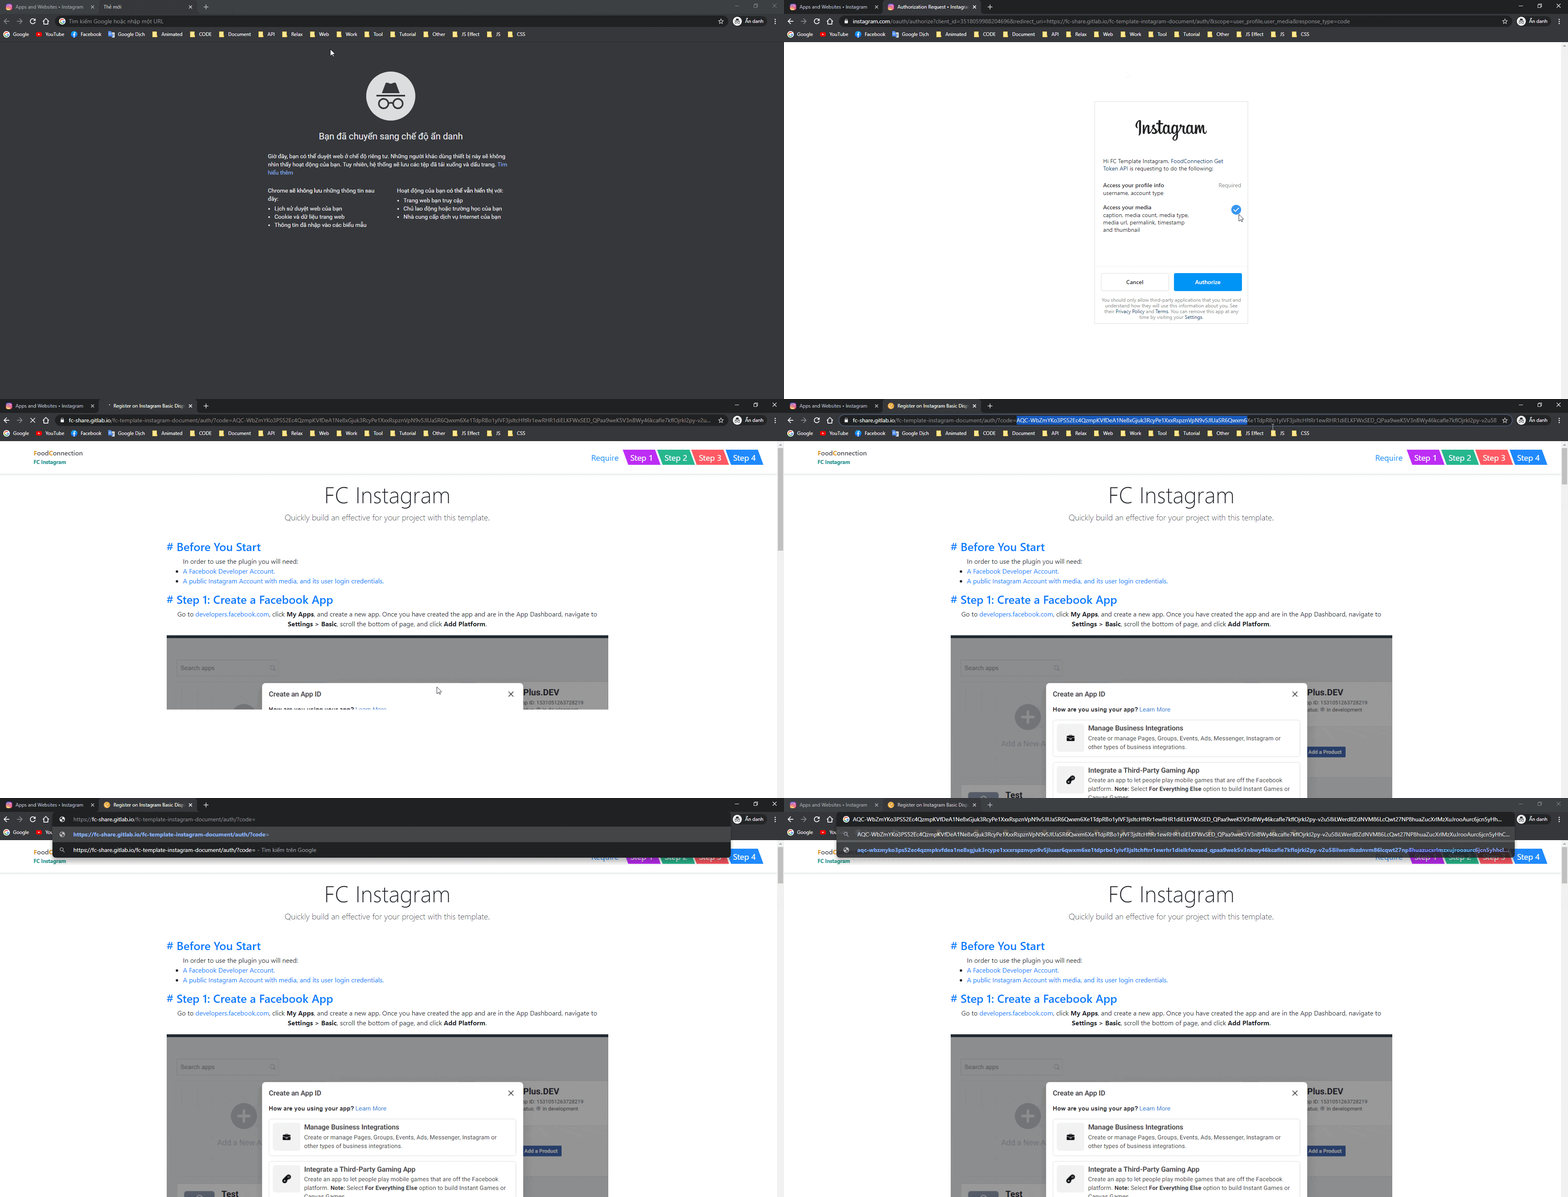
Authenticate your Instagram test user by signing into the Authorization Window, then click Authorize to grant your app access to your profile data. Upon success, the page will redirect you to the redirect URI you included in the previous step and append an Authorization Code.
For example:
https://fc-share.gitlab.io/fc-template-instagram-document/auth/?code=AQC-WbZmY....GbkbKVfzWPH3k0_p-HDkdyTvnpw#require
Note that #_ has been appended to the end of the redirect URI, but it is not part of the code itself. Copy the code (without the #_ portion) so you can use it in the next step.
AQC-WbZmY....GbkbKVfzWPH3k0_p-HDkdyTvnpw
Use Instagram Basic Display API with Javascript
FC Instagram: core file (FCInstagram.js)
/*!
 * FC Instagram - Development FCV Team
 * Website: https://eplus.dev
 * Since: 2019-11
 * Version: v2.0.0
 * Github: https://gitlab.com/fc-share/template-instagram
 * Document Instagram Basic Display API: https://developers.facebook.com/docs/instagram-basic-display-api
 */

var FCInstagram = window.FCInstagram || {};
FCInstagram.name = "FC Instagram";
FCInstagram.version = "2.0.0";

// Info
console.info(
  "%c " + FCInstagram.name + " %c v" + FCInstagram.version + " %c",
  "margin-left: 5px; padding: 1px; color: #FEFEFE; font-size: 12px; line-height: 15px; background: #F79433; border-radius: 3px 0 0 3px;",
  "padding: 1px; color: #FEFEFE; font-size: 12px; line-height: 15px; background: #FF5722; border-radius: 0 3px 3px 0;",
  "background: transparent;"
);

// Utility for older browsers
if (typeof Object.create !== "function") {
  Object.create = function (obj) {
    function F() {}

    F.prototype = obj;
    return new F();
  };
}

(function ($, window, document, undefined) {
  var Instagram = {
    API_URL: "https://graph.instagram.com/me/media?fields=",
    API_FIELDS: "caption,media_url,media_type,permalink,timestamp,username",

    /**
     * Initializes the plugin.
     * @param {object} options
     * @param {jQuery Object} elem
     */
    initialize: function (options, elem) {
      this.elem = elem;
      this.$elem = $(elem);
      (this.accessToken = $.fn.FCInstagram.accessData.accessToken),
        (this.options = $.extend({}, $.fn.FCInstagram.options, options));

      this.messages = {
        defaultImageAltText: "Instagram Photo",
        notFound: "This user account is private or doesn't have any photos.",
      };

      this.getPhotos();
    },

    /**
     * Calls the fetch function and work with the response.
     */
    getPhotos: function () {
      var self = this;
    //   messages = null;

      self.fetch().done(function (results) {
        if (results.data) {
          self.displayPhotos(results);
        } else if (results.error.message) {
          $.error("FCInstagram.js - Error: " + results.error.message);
        } else {
          $.error("FCInstagram.js - Error: user does not have photos.");
        }
      });
    },

    /**
     * Makes the ajax call and returns the result.
     */
    fetch: function () {
      var getUrl =
        this.API_URL + this.API_FIELDS + "&access_token=" + this.accessToken;

      return $.ajax({
        type: "GET",
        dataType: "jsonp",
        cache: false,
        url: getUrl,
      });
    },

    /**
     * Appends the markup to the DOM with the images.
     * @param {object} results
     */
    displayPhotos: function (results) {
      var $element,
        $video,
        hasCaption,
        imageGroup = [],
        imageCaption,
        autoplay,
        max;

      max =
        this.options.max >= results.data.length
          ? results.data.length
          : this.options.max;

      if (results.data === undefined || results.data.length === 0) {

        this.$elem.append(this.messages.notFound);

        return;
      }

      for (var i = 0; i < max; i++) {
        if (
          results.data[i].media_type === "IMAGE" ||
          results.data[i].media_type === "CAROUSEL_ALBUM"
        ) {
          hasCaption =
            results.data[i].caption !== null ||
            results.data[i].caption !== undefined;

          imageCaption = hasCaption
            ? $("<span>").text(results.data[i].caption).html()
            : this.messages.defaultImageAltText;

          $element = $("<a>", {
            href: results.data[i].permalink,
            target: "_blank",
            title: imageCaption,
            style:
              "background:url(" +
              results.data[i].media_url +
              ") no-repeat center / cover;",
            rel: "nofollow",
          });

          // Add item
          imageGroup.push($element);

        } else if (results.data[i].media_type === "VIDEO") {
          autoplay =
            this.options.autoplay == true
              ? "autoplay muted loop playsinline"
              : "";

          $source = $("<source>", {
            src: results.data[i].media_url,
            type: "video/mp4",
          });

          $video = $("<video " + autoplay + ">").append($source);

          $element = $("<a>", {
            href: results.data[i].permalink,
            target: "_blank",
            title: imageCaption,
            rel: "nofollow",
          }).append($video);

          // Add item
          imageGroup.push($element);

        }
      }

      this.$elem.append(imageGroup);

      if (typeof this.options.complete === "function") {
        this.options.complete.call(this);
      }
    },
  };

  /**
   * FCInstagram Plugin Definition.
   */
  jQuery.fn.FCInstagram = function (options) {
    if (jQuery.fn.FCInstagram.accessData.accessToken) {
      this.each(function () {
        var instagram = Object.create(Instagram);

        instagram.initialize(options, this);
      });
    } else {
      $.error("You must define an accessToken on jQuery.FCInstagram");
    }
  };

  // Plugin Default Options.
  jQuery.fn.FCInstagram.options = {
    complete: null,
    max: 9,
    autoplay: false
  };

  // Instagram Access Data.
  jQuery.fn.FCInstagram.accessData = {
    accessToken: null,
  };
})(jQuery, window, document);
- JS
<!-- BEGIN - FC Instagram - Script -->
    <script src="instagram/shared/js/FCInstagram.js"></script>
    <script>
    jQuery.fn.FCInstagram.accessData = {
        accessToken: "", // Token
    };
    $('#instafeed').FCInstagram({
        max: 9, // A number between 1 and 25 of photos to show. Default: 9
        autoplay: true, // Set autoplay video: true/false. Default: false
        complete: function () { // A callback function to execute after the display of the photos.
            console.log('completed');
        }
    });
    </script>
<!-- END - FC Instagram - Script -->
- CSS
/* *
* FC Instagram - Development FCV Team
* Website: https://eplus.dev
* Since: 2019-11
* Version: v2.0.0
* */

/* BEGIN - MEDIUM */
.instagram-gallery-medium {
    width: 480px;
    cursor: pointer;
    display: -webkit-flex;
    display: -moz-flex;
    display: -ms-flex;
    display: -o-flex;
    display: flex;
    flex-wrap: wrap;
}

.instagram-gallery-medium > a {
    width: 150px;
    height: 150px;
    position: relative;
    overflow: hidden;
    margin: 5px;
}

.instagram-gallery-medium > a > video{
    width: 100%;
    height: 100%;
    object-fit: cover;
}


/* Extra small devices (portrait phones, less than 576px) */
@media (max-width: 575px) {
    .instagram-gallery-medium {
        width: 320px;
    }

    .instagram-gallery-medium > a {
        width: 100px;
        height: 100px;
        margin: 2px;
    }
}

/* END - MEDIUM */
- HTML
<!-- BEGIN - Show Instagram -->
    <div id="instafeed" class="instagram-gallery-medium"></div>
<!-- END - Show Instagram -->
| # | Required | Default | Type | Description |
| accessToken | Yes | null | String | This is your Instagram Application AccessToken. |
| max | No | 9 | Number | A number between 1 and 25 of photos to show. |
| autoplay | No | false | Boolean | Video Autoplay On / Off with setup true/false. |
| complete | No | null | Function | A callback function to execute after the display of the photos. |
Demo

Live demo: https://fc-share.gitlab.io/fc-template-instagram-document/
Documention
Copyright: https://eplus.dev
