Assessing Data Quality with Knowledge Catalog - GSP1158
A passionate full-stack developer from @ePlus.DEV
Overview
Knowledge Catalog is an intelligent data fabric that enables organizations to centrally discover, manage, monitor, and govern their data across data lakes, data warehouses, and data marts to power analytics at scale.
A valuable feature of Knowledge Catalog is the ability to define and run data quality checks on Knowledge Catalog assets such as BigQuery tables and Cloud Storage files. Using Data quality tasks, you can integrate data quality checks into everyday workflows by validating data that is part of a data production pipeline, regularly monitoring the quality of your data against a set of criteria, and building data quality reports for regulatory requirements.
In this lab, you learn how to assess data quality using Knowledge Catalog by creating a custom data quality specification file and using it to define and run a data quality job on BigQuery data.
What you'll do
Create a Knowledge Catalog lake, zone, and asset.
Query a BigQuery table to review data quality.
Create and upload a data quality specification file.
Define and run a data quality job.
Review the results of a data quality job.
Setup and requirements
Before you click the Start Lab button
Read these instructions. Labs are timed and you cannot pause them. The timer, which starts when you click Start Lab, shows how long Google Cloud resources are made available to you.
This hands-on lab lets you do the lab activities in a real cloud environment, not in a simulation or demo environment. It does so by giving you new, temporary credentials you use to sign in and access Google Cloud for the duration of the lab.
To complete this lab, you need:
- Access to a standard internet browser (Chrome browser recommended).
Note: Use an Incognito (recommended) or private browser window to run this lab. This prevents conflicts between your personal account and the student account, which may cause extra charges incurred to your personal account.
- Time to complete the lab---remember, once you start, you cannot pause a lab.
Note: Use only the student account for this lab. If you use a different Google Cloud account, you may incur charges to that account.
How to start your lab and sign in to the Google Cloud console
Click the Start Lab button. If you need to pay for the lab, a dialog opens for you to select your payment method. On the left is the Lab Details pane with the following:
The Open Google Cloud console button
Time remaining
The temporary credentials that you must use for this lab
Other information, if needed, to step through this lab
Click Open Google Cloud console (or right-click and select Open Link in Incognito Window if you are running the Chrome browser).
The lab spins up resources, and then opens another tab that shows the Sign in page.
Tip: Arrange the tabs in separate windows, side-by-side.
Note: If you see the Choose an account dialog, click Use Another Account.
If necessary, copy the Username below and paste it into the Sign in dialog.
student-01-094166495408@qwiklabs.net
Copied!
You can also find the Username in the Lab Details pane.
Click Next.
Copy the Password below and paste it into the Welcome dialog.
oce3wrq3hOAz
Copied!
You can also find the Password in the Lab Details pane.
Click Next.
Important: You must use the credentials the lab provides you. Do not use your Google Cloud account credentials.
Note: Using your own Google Cloud account for this lab may incur extra charges.
Click through the subsequent pages:
Accept the terms and conditions.
Do not add recovery options or two-factor authentication (because this is a temporary account).
Do not sign up for free trials.
After a few moments, the Google Cloud console opens in this tab.
Note: To access Google Cloud products and services, click the Navigation menu or type the service or product name in the Search field.

Activate Cloud Shell
Cloud Shell is a virtual machine that is loaded with development tools. It offers a persistent 5GB home directory and runs on the Google Cloud. Cloud Shell provides command-line access to your Google Cloud resources.
Click Activate Cloud Shell
at the top of the Google Cloud console.
Click through the following windows:
Continue through the Cloud Shell information window.
Authorize Cloud Shell to use your credentials to make Google Cloud API calls.

When you are connected, you are already authenticated, and the project is set to your Project_ID, qwiklabs-gcp-02-8a194eeebd44. The output contains a line that declares the Project_ID for this session:
Your Cloud Platform project in this session is set to qwiklabs-gcp-02-8a194eeebd44
gcloud is the command-line tool for Google Cloud. It comes pre-installed on Cloud Shell and supports tab-completion.
- (Optional) You can list the active account name with this command:
gcloud auth list
Copied!
- Click Authorize.
Output:
ACTIVE: * ACCOUNT: student-01-094166495408@qwiklabs.net
To set the active account, run: $ gcloud config set account ACCOUNT
- (Optional) You can list the project ID with this command:
gcloud config list project
Copied!
Output:
[core] project = qwiklabs-gcp-02-8a194eeebd44
Note: For full documentation of gcloud, in Google Cloud, refer to the gcloud CLI overview guide.
Enable Dataproc API
In the Google Cloud console title bar, enter Cloud Dataproc API in the Search field and then click Cloud Dataproc API from the search results.
Click Enable if it isn't already enabled.
Task 1. Create a lake, zone, and asset in Knowledge Catalog
To define and run data quality tasks, you need some Knowledge Catalog resources.
In this task, you create a new Knowledge Catalog lake to store ecommerce customer information, add a raw zone to the lake, and then attach a pre-created BigQuery dataset as a new asset in the zone.
Create a lake
In the Google Cloud console, in the Navigation menu (
) > View All Products, navigate to Analytics > Knowledge Catalog.

If prompted Welcome to the new Knowledge Catalog experience, click Close.
Under Manage lakes, click Manage.
Click Create lake.
Enter the required information below to create a new lake. Leave all other fields as the default values:
| Property | Value | | Display Name | Ecommerce Lake | | Region | europe-west1 |
- Click Create.
It can take up to 3 minutes for the lake to be created.
Add a zone to the lake
On the Manage tab, click the name of your lake.
Click Add Zone.
Enter the required information below to create a new zone. Leave all other fields as the default values:
| Property | Value | | Display Name | Customer Contact Raw Zone | | Type | Raw zone | | Data locations | Regional |
- Click Create.
It can take up to 2 minutes for the zone to be created.
Note: You can perform the next task once the status of the zone is Active.
Attach an asset to a zone
On the Zones tab, click Customer Contact Raw Zone.
On the Assets tab, click Add Asset.
Click Add an asset.
Enter the required information below to attach a new asset. Leave other fields as the default values.
| Property | Value | | Type | BigQuery dataset | | Display Name | Contact Info | | Dataset | qwiklabs-gcp-02-8a194eeebd44.customers |
Click Done.
Click Continue.
For Discovery settings, select Inherit to inherit the Discovery settings from the zone level, and then click Continue.
Click Submit.
Click Check my progress to verify the objective.
Create a lake, zone, and asset in Knowledge Catalog
Task 2. Query a BigQuery table to review data quality
This lab uses two pre-created BigQuery datasets:
customers: Contains one table named contact_info, which contains contact information for customers such as a customer ID, name, email, and more. This is the table that you explore and check for data quality issues throughout this lab.
customers_dq_dataset: Does not contain any tables. When you define a data quality job in a later task, you use this dataset as the destination for a new table containing the data quality job results.
In this task, you query the customers dataset to identify data quality issues to include as checks in a data quality job. You also specify the customers_dq_dataset dataset to store data quality job results in a later task.
Open the BigQuery console
- In the Google Cloud Console, select Navigation menu > BigQuery.
The Welcome to BigQuery in the Cloud Console message box opens. This message box provides a link to the quickstart guide and the release notes.
- Click Done.
The BigQuery console opens.
Query the contact_info table
- In the Classic explorer pane, click the expander arrow next to your project ID, (
qwiklabs-gcp-02-8a194eeebd44), to list the contents.
You should see the three datasets:
customer_contact_raw_zone
customers
customers_dq_dataset
- In the SQL Editor, click SQL query (+). Paste the following query, and then click Run:
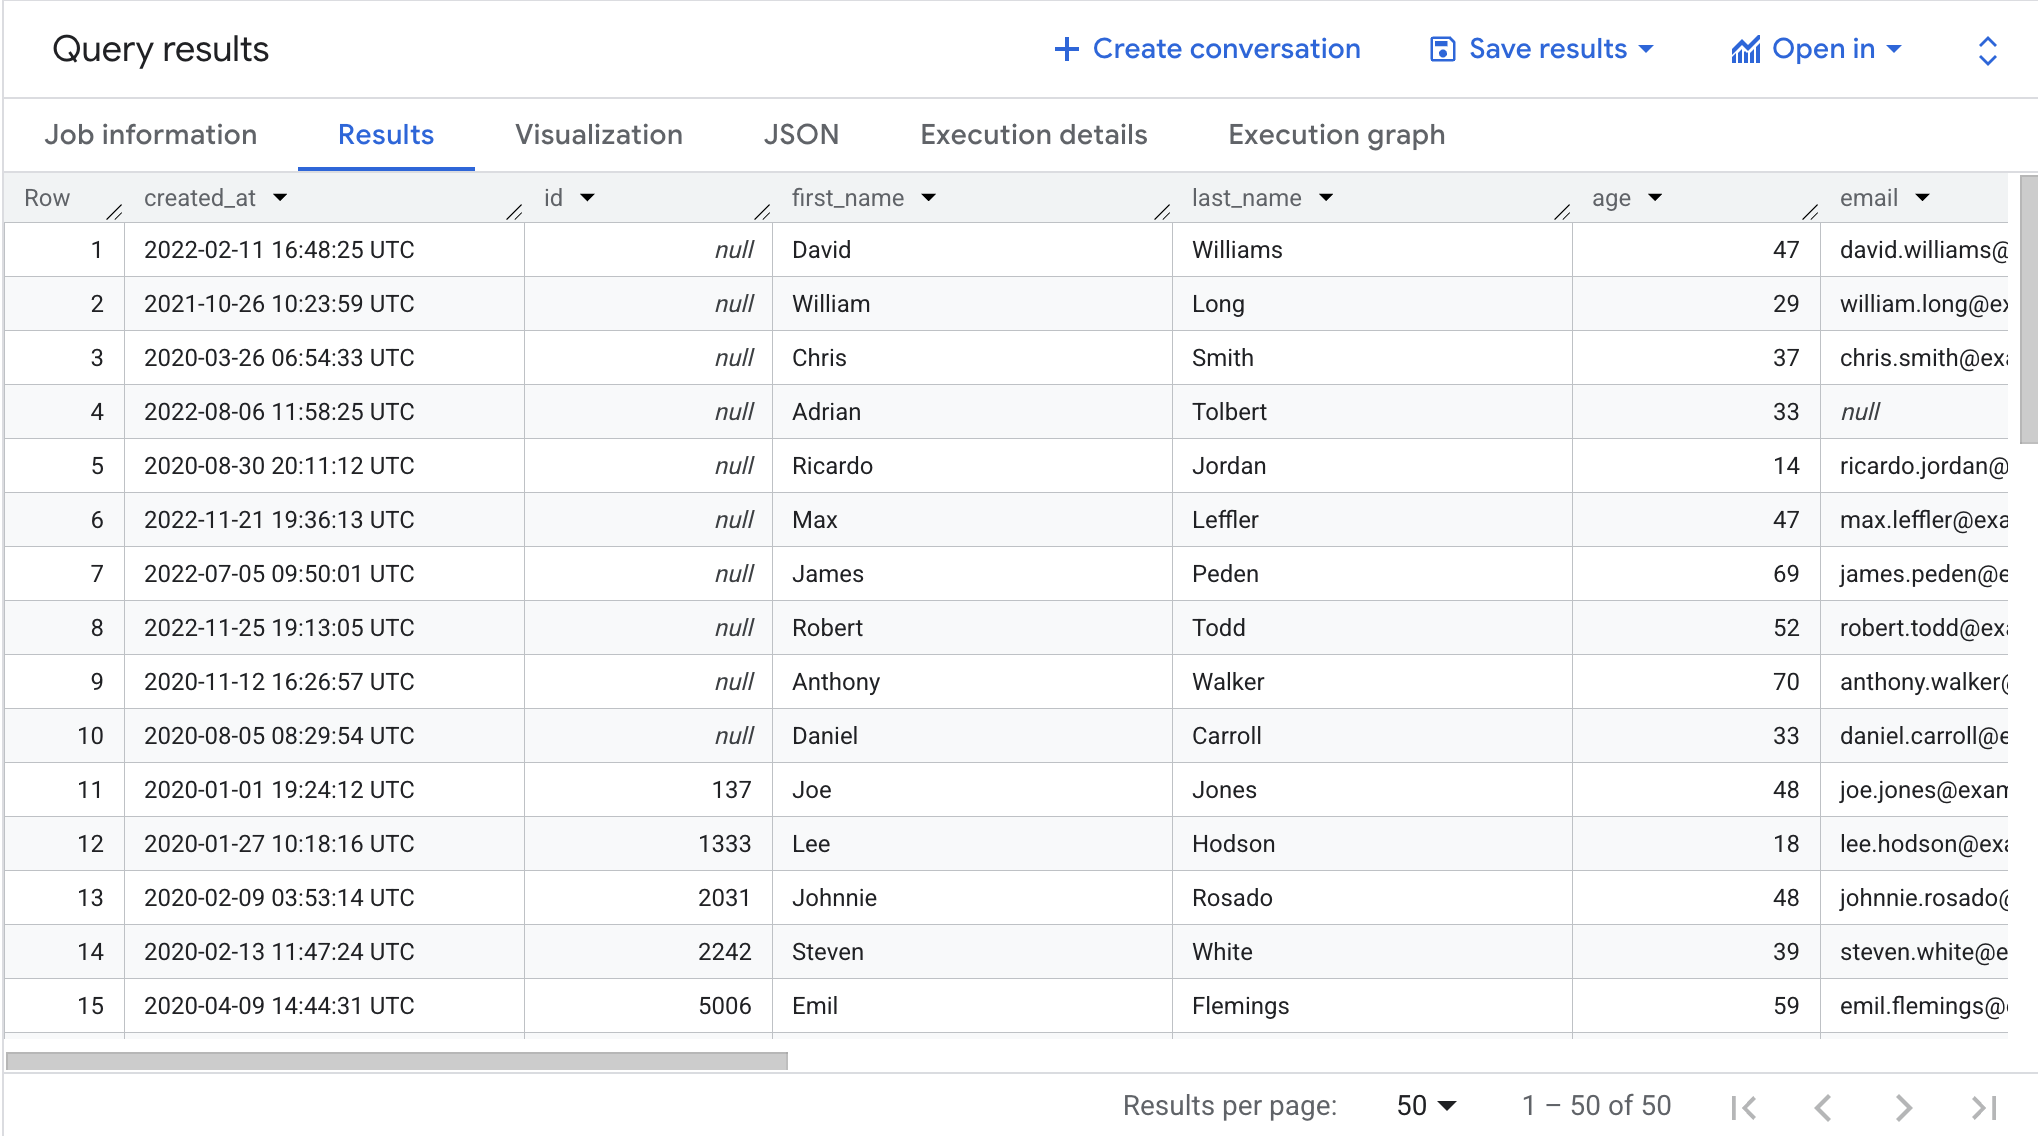
SELECT * FROM qwiklabs-gcp-02-8a194eeebd44.customers.contact_info ORDER BY id LIMIT 50
This query selects 50 records from the original table and orders the records by the customer id in the results.
Scroll through the results in the Results pane.
Notice that some records are missing customer IDs or have incorrect emails, which can make it difficult to manage customer orders.
Click Check my progress to verify the objective.
Query BigQuery table to review data quality
Task 3. Create and upload a data quality specification file
Knowledge Catalog data quality check requirements are defined using the CloudDQ YAML specification files. Once created, the YAML specification file is uploaded to a Cloud Storage bucket that is made accessible to the data quality job.
The YAML file has four keys sections:
A list of rules to run (either pre-defined or customized rules).
Row filters to select a subset of data for validation.
Rule bindings to apply the defined rules to the table(s).
Optional rule dimensions to specify the types of the rules that the YAML file can contain.
In this task, you define a new YAML specification file for data quality checks that identify null customer IDs and emails in the specified BigQuery table. You also specify a pre-created BigQuery dataset named customer_dq_dataset to store the data quality results in a table named dq_results.
After you define the file, you upload it to a pre-created Cloud Storage bucket for use in a later task to run the data quality job.
Create the data quality specification file
- In Cloud Shell, run the following command to create a new empty file for the data quality specification:
nano dq-customer-raw-data.yaml
Copied!
- Paste the following code into the file:
rules:
nonNullExpectation: {} column: id dimension: COMPLETENESS threshold: 1
regexExpectation: regex: '^[^@]+[@]{1}[^@]+$' column: email dimension: CONFORMANCE ignoreNull: true threshold: .85 postScanActions: bigqueryExport: resultsTable: projects/qwiklabs-gcp-02-8a194eeebd44/datasets/customers_dq_dataset/tables/dq_results
Copied!
- Review the code to identify the two primary data quality rules that are defined in this file.
The dq-customer-raw-data.yaml specifies two rules:
The first rule refers to the completeness dimension such as null values.
The second rule refers to the conformance dimension such as invalid values.
In this file, the two rules are bound to specific table columns:
The first rule binding binds a notNullExpectation rule to the id column of the contact_info table with a threshold of 100%, which validates if the ID column has any NULL values.
The second rule binding binds a regexExpectation rule to the email column of the contact_info table with a threshold of 85%, which checks for valid emails.
- Enter
CTRL+X, thenY, to save and close the file.
Upload the file to Cloud Storage
- In Cloud Shell, run the following command to upload the file to a Cloud Storage bucket:
gsutil cp dq-customer-raw-data.yaml gs://qwiklabs-gcp-02-8a194eeebd44-bucket
Copied!
Click Check my progress to verify the objective.
Create and upload a data quality specification file
Task 4. Define and run an auto data quality job in Knowledge Catalog
The data quality process uses a data quality specification YAML file to run a data quality job and generates data quality metrics that are written to a BigQuery dataset.
In this task, you define and run an auto data quality job using the data quality specification YAML file in Cloud Storage. When you define the job, you also specify the customer_dq_dataset dataset to store the data quality results.
- In Cloud Shell, run the following command to create a data quality scan:
gcloud dataplex datascans create data-quality customer-orders-data-quality-job
--project=qwiklabs-gcp-02-8a194eeebd44
--location=europe-west1
--data-source-resource="//bigquery.googleapis.com/projects/qwiklabs-gcp-02-8a194eeebd44/datasets/customers/tables/contact_info"
--data-quality-spec-file="gs://qwiklabs-gcp-02-8a194eeebd44-bucket/dq-customer-raw-data.yaml"
Note: In this lab, the Compute Engine default service account has been preconfigured to have the appropriate IAM roles and permissions. For more information, review the Knowledge Catalog documentation titled Create a service account.
Return to the console and navigate to Knowledge Catalog.
Under Govern, click Data profiling & quality.
Click customer-orders-data-quality-job.
Click Run Now.
Note: It can take several minutes for the job to run.
Once the job is complete, notice that it's status is 1 dimension 1 rule failed.
- Click View results.
Notice that data quality rule for the email column is Passed, but for the id column, it is Failed. This is expected because:
The rule for the id column is a
Null Checkwith a threshold of100%. This means that for the rule to pass, all rows must have a value for the id. In this case,10%rows of id column of the contact_info table are havingnullvalues. Hence, this rule is getting Failed.The rule for the email column is a
Regex Checkwith a threshold of85%. This means that the rule will fail, if15%of the records have an invalid email format. In this case,~10.5%rows of email column of the contact_info table are having invalid email. Hence this rule is getting Passed.
Click Check my progress to verify the objective.
Define and run a data quality job in Knowledge Catalog
Task 5. Review data quality results in BigQuery
In this task, you review the tables in the customers_dq_dataset to identify records that are missing customer ID values or have an invalid values for emails.
Return to BigQuery, and in the Classic explorer pane, expand the arrow next to your project ID to list the contents:
qwiklabs-gcp-02-8a194eeebd44Click the expander arrow next to the customer_dq_dataset dataset.
Click the dq_results table.
Click the Preview tab to see the results.
Scroll to the column named rule_failed_records_query.
Copy the query, it starts with
WITH.Click SQL query (+). Copy and paste the query into the SQL Editor and click Run.
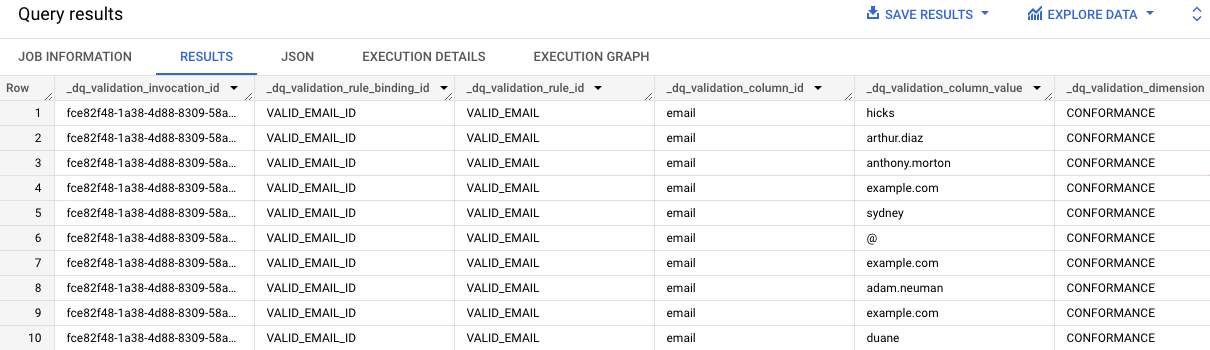
The results of the query provide the email values in the contact_info table that are not valid. Notice "email" in each entry in the dq_validation_column_id column.
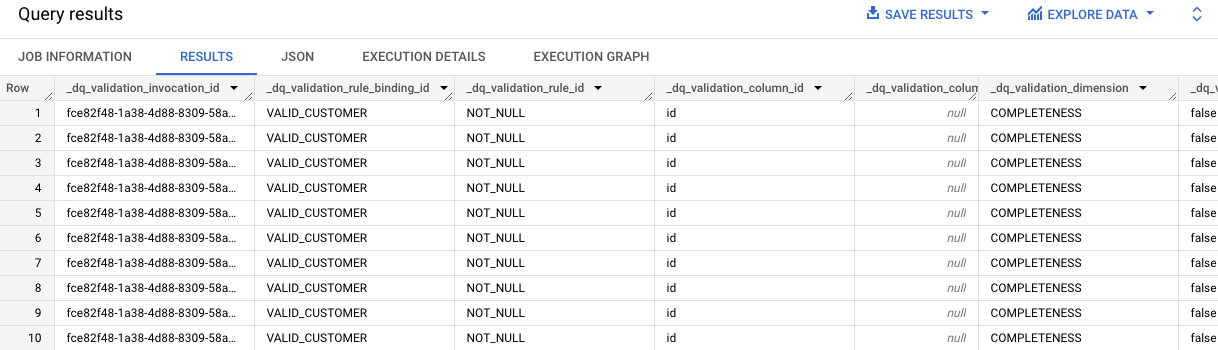
Repeat steps 7-8 for the second cell that contains the query for the VALID_CUSTOMER rule results.
The results of the query identify that there are 10 records in the contact_info table that are missing ID values.
Notice "id" in each entry in the dq_validation_column_id column.
Click Check my progress to verify the objective.
Review data quality results in the BigQuery table
Solution of Lab
Quick
curl -LO raw.githubusercontent.com/ePlus-DEV/storage/refs/heads/main/labs/GSP1158/lab.sh
source lab.sh
Task 3:
https://console.cloud.google.com/bigquery

SELECT * FROM `customers.contact_info` ORDER BY id LIMIT 50
Task 5:


Manual
Solution 1:
https://www.youtube.com/watch?v=kVg0GaNim0g
Solution 2: