Build an LLM and RAG-based Chat Application using AlloyDB and LangChain - GSP1226

Overview
One of the best tools for reducing Gen AI hallucinations is to use Retrieval Augmented Generation (RAG). RAG is the concept of retrieving some data or information, then augmenting your prompt used with your Large Language Model (LLM), which allows it to generate more accurate responses based on the data included in the prompt.
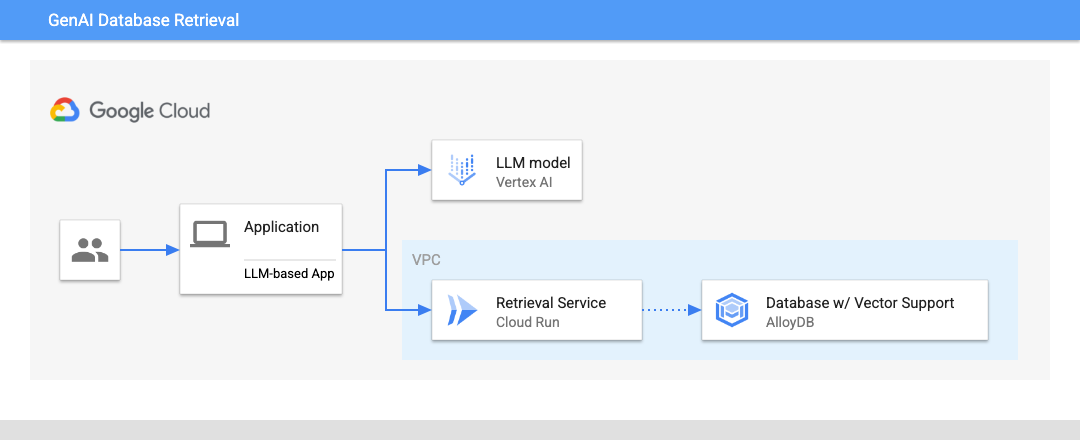
You'll also leverage the capabilities of AlloyDB AI, Google Cloud's database for AI-powered applications, and LangChain, a framework for developing applications, to connect the LLM to external data sources. By the end of this lab, you'll have a functional chat application that can intelligently answer questions by retrieving relevant information from your database.
What you'll learn
How LLMs process language and how RAG enhances their capabilities by retrieving relevant information from a knowledge base.
Set up and interact with AlloyDB, a scalable and performant PostgreSQL database designed for demanding workloads.
Explore LangChain's tools and components for building LLM-powered applications, including document loaders, prompt templates, and chains.
Connect AlloyDB as a vector store with LangChain, allowing the chat application to access and retrieve relevant information for generating responses.
Develop a user-friendly interface for interacting with the chat application, allowing users to ask questions and receive informative answers.
Setup and Requirements
Before you click the Start Lab button
Read these instructions. Labs are timed and you cannot pause them. The timer, which starts when you click Start Lab, shows how long Google Cloud resources are made available to you.
This hands-on lab lets you do the lab activities in a real cloud environment, not in a simulation or demo environment. It does so by giving you new, temporary credentials you use to sign in and access Google Cloud for the duration of the lab.
To complete this lab, you need:
- Access to a standard internet browser (Chrome browser recommended).
Note: Use an Incognito (recommended) or private browser window to run this lab. This prevents conflicts between your personal account and the student account, which may cause extra charges incurred to your personal account.
- Time to complete the lab—remember, once you start, you cannot pause a lab.
Note: Use only the student account for this lab. If you use a different Google Cloud account, you may incur charges to that account.
How to start your lab and sign in to the Google Cloud console
Click the Start Lab button. If you need to pay for the lab, a dialog opens for you to select your payment method. On the left is the Lab Details pane with the following:
The Open Google Cloud console button
Time remaining
The temporary credentials that you must use for this lab
Other information, if needed, to step through this lab
Click Open Google Cloud console (or right-click and select Open Link in Incognito Window if you are running the Chrome browser).
The lab spins up resources, and then opens another tab that shows the Sign in page.
Tip: Arrange the tabs in separate windows, side-by-side.
Note: If you see the Choose an account dialog, click Use Another Account.
If necessary, copy the Username below and paste it into the Sign in dialog.
student-00-c2eb34e2c0b7@qwiklabs.netYou can also find the Username in the Lab Details pane.
Click Next.
Copy the Password below and paste it into the Welcome dialog.
57c5v2uPZYFQYou can also find the Password in the Lab Details pane.
Click Next.
Important: You must use the credentials the lab provides you. Do not use your Google Cloud account credentials.
Note: Using your own Google Cloud account for this lab may incur extra charges.
Click through the subsequent pages:
Accept the terms and conditions.
Do not add recovery options or two-factor authentication (because this is a temporary account).
Do not sign up for free trials.
After a few moments, the Google Cloud console opens in this tab.
Note: To access Google Cloud products and services, click the Navigation menu or type the service or product name in the Search field.

Activate Cloud Shell
Cloud Shell is a virtual machine that is loaded with development tools. It offers a persistent 5GB home directory and runs on the Google Cloud. Cloud Shell provides command-line access to your Google Cloud resources.
Click Activate Cloud Shell at the top of the Google Cloud console.
Click through the following windows:
Continue through the Cloud Shell information window.
Authorize Cloud Shell to use your credentials to make Google Cloud API calls.
When you are connected, you are already authenticated, and the project is set to your Project_ID, qwiklabs-gcp-01-66510639eea9. The output contains a line that declares the Project_ID for this session:
Your Cloud Platform project in this session is set to qwiklabs-gcp-01-66510639eea9
gcloud is the command-line tool for Google Cloud. It comes pre-installed on Cloud Shell and supports tab-completion.
- (Optional) You can list the active account name with this command:
gcloud auth list
- Click Authorize.
Output:
ACTIVE: *
ACCOUNT: student-00-c2eb34e2c0b7@qwiklabs.net

To set the active account, run:
    $ gcloud config set account `ACCOUNT`
- (Optional) You can list the project ID with this command:
gcloud config list project
Output:
[core]
project = qwiklabs-gcp-01-66510639eea9
Note: For full documentation of gcloud, in Google Cloud, refer to the gcloud CLI overview guide.
Configure Cloud Shell
Inside Cloud Shell, make sure that your project ID is setup:
Usually the project ID is shown in parentheses in the command prompt in the cloud shell as it is shown in the picture:

Configure your default region to us-central1 to use the Vertex AI models. Read more about regional restrictions.
gcloud config set compute/region us-central1
Task 1. Initialize the Environment
Install Postgres client
Install the PostgreSQL client software on the deployed VM
- Connect to the VM:
gcloud compute ssh instance-1 --zone=us-central1-c
Enter Y and then when asked for a passphrase press ENTER twice.
Note: First time the SSH connection to the VM can take longer since the process includes creation of RSA key for secure connection and propagating the public part of the key to the project
Expected console output:
student@cloudshell:~ (test-project-402417)$ gcloud compute ssh instance-1 --zone=us-central1-a
Updating project ssh metadata...working..Updated [https://www.googleapis.com/compute/v1/projects/test-project-402417].
Updating project ssh metadata...done.
Waiting for SSH key to propagate.
Warning: Permanently added 'compute.5110295539541121102' (ECDSA) to the list of known hosts.
Linux instance-1 5.10.0-26-cloud-amd64 #1 SMP Debian 5.10.197-1 (2023-09-29) x86_64

The programs included with the Debian GNU/Linux system are free software;
the exact distribution terms for each program are described in the
individual files in /usr/share/doc/*/copyright.

Debian GNU/Linux comes with ABSOLUTELY NO WARRANTY, to the extent
permitted by applicable law.
student@instance-1:~$
- Install the software running command inside the VM:
sudo apt-get update
sudo apt-get install --yes postgresql-client
Expected console output:
student@instance-1:~$ sudo apt-get update
sudo apt-get install --yes postgresql-client
Get:1 file:/etc/apt/mirrors/debian.list Mirrorlist [30 B]
Get:4 file:/etc/apt/mirrors/debian-security.list Mirrorlist [39 B]
Hit:7 https://packages.cloud.google.com/apt google-compute-engine-bookworm-stable InRelease
Get:8 https://packages.cloud.google.com/apt cloud-sdk-bookworm InRelease [1652 B]
Get:2 https://deb.debian.org/debian bookworm InRelease [151 kB]
Get:3 https://deb.debian.org/debian bookworm-updates InRelease [55.4 kB]
...redacted...
update-alternatives: using /usr/share/postgresql/15/man/man1/psql.1.gz to provide /usr/share/man/man1/psql.1.gz (psql.1.gz) in auto mode
Setting up postgresql-client (15+248) ...
Processing triggers for man-db (2.11.2-2) ...
Processing triggers for libc-bin (2.36-9+deb12u7) ...
Connect to the Instance
Connect to the primary instance from the VM using psql.
Continue with the opened SSH session to your VM. If you have been disconnected then connect again using the same command as above.
- Use the previously noted $PGASSWORD and the cluster name to connect to AlloyDB from the Compute Engine VM:
export PGPASSWORD=alloydbworkshop2023
export PROJECT_ID=$(gcloud config get-value project)
export REGION=us-central1
export ADBCLUSTER=alloydb-aip-01
export INSTANCE_IP=$(gcloud alloydb instances describe $ADBCLUSTER-pr --cluster=$ADBCLUSTER --region=$REGION --format="value(ipAddress)")
psql "host=$INSTANCE_IP user=postgres sslmode=require"
Expected console output:
student@instance-1:~$ export PGPASSWORD=P9...
student@instance-1:~$ export REGION=us-central1
student@instance-1:~$ export ADBCLUSTER=alloydb-aip-01
student@instance-1:~$ export INSTANCE_IP=export INSTANCE_IP=$(gcloud alloydb instances describe $ADBCLUSTER-pr --cluster=$ADBCLUSTER --region=$REGION --format="value(ipAddress)")
student@instance-1:~$ psql "host=$INSTANCE_IP user=postgres sslmode=require"
psql (13.11 (Debian 13.11-0+deb11u1), server 14.7)
WARNING: psql major version 13, server major version 14.
         Some psql features might not work.
SSL connection (protocol: TLSv1.3, cipher: TLS_AES_256_GCM_SHA384, bits: 256, compression: off)
Type "help" for help.

postgres=>
- Exit from the psql session keeping the SSH connection up:
exit
Expected console output:
postgres=> exit

student@instance-1:~$
Task 2. Initialize the database
You are going to use your client VM as a platform to populate the database with data and host your application. The first step is to create a database and populate it with data.
Create database
Create a database named assistantdemo.
Note: If your SSH session was terminated you need to reset your environment variables such as: export PGPASSWORD= export INSTANCE_IP=
- In the VM session execute:
psql "host=$INSTANCE_IP user=postgres" -c "CREATE DATABASE assistantdemo"
Expected console output:
student@instance-1:~$ psql "host=$INSTANCE_IP user=postgres" -c "CREATE DATABASE assistantdemo"
CREATE DATABASE
student@instance-1:~$
- Enable pgVector extension:
psql "host=$INSTANCE_IP user=postgres dbname=assistantdemo" -c "CREATE EXTENSION vector"
Expected console output:
student@instance-1:~$ psql "host=$INSTANCE_IP user=postgres dbname=assistantdemo" -c "CREATE EXTENSION vector"
CREATE EXTENSION
student@instance-1:~$
Click Check my progress to verify the objective.
Create a database and enable pgVector extension.
Task 3. Install Python
next, you are going to use prepared Python scripts from GitHub repository, but before doing that, you need to install the required software.
- In the VM execute:
sudo apt install -y python3.11-venv git
python3 -m venv .venv
source .venv/bin/activate
pip install --upgrade pip
Expected console output:
student@instance-1:~$ sudo apt install -y git build-essential libssl-dev zlib1g-dev \
student@instance-1:~$ sudo apt install -y python3.11-venv git
python3 -m venv .venv
source .venv/bin/activate
pip install --upgrade pip
Reading package lists... Done
Building dependency tree... Done
Reading state information... Done
The following additional packages will be installed:
  git-man liberror-perl patch python3-distutils python3-lib2to3 python3-pip-whl python3-setuptools-whl
Suggested packages:
  git-daemon-run | git-daemon-sysvinit git-doc git-email git-gui gitk gitweb git-cvs git-mediawiki git-svn ed diffutils-doc
The following NEW packages will be installed:
  git git-man liberror-perl patch python3-distutils python3-lib2to3 python3-pip-whl python3-setuptools-whl python3.11-venv
0 upgraded, 9 newly installed, 0 to remove and 2 not upgraded.
Need to get 12.4 MB of archives.
After this operation, 52.2 MB of additional disk space will be used.
Get:1 file:/etc/apt/mirrors/debian.list Mirrorlist [30 B]
...redacted...
Installing collected packages: pip
  Attempting uninstall: pip
    Found existing installation: pip 23.0.1
    Uninstalling pip-23.0.1:
      Successfully uninstalled pip-23.0.1
Successfully installed pip-24.0
(.venv) student@instance-1:~$
- In the VM execute:
python -V
Expected console output:
(.venv) student@instance-1:~$ python -V
Python 3.11.2
(.venv) student@instance-1:~$
Task 4. Populate Database
Clone the GitHub repository with the code for the retrieval service and sample application.
- In the VM execute:
git clone https://github.com/GoogleCloudPlatform/genai-databases-retrieval-app.git
Expected console output:
student@instance-1:~$ git clone https://github.com/GoogleCloudPlatform/genai-databases-retrieval-app.git
Cloning into 'genai-databases-retrieval-app'...
remote: Enumerating objects: 525, done.
remote: Counting objects: 100% (336/336), done.
remote: Compressing objects: 100% (201/201), done.
remote: Total 525 (delta 224), reused 179 (delta 135), pack-reused 189
Receiving objects: 100% (525/525), 46.58 MiB | 16.16 MiB/s, done.
Resolving deltas: 100% (289/289), done.
- Prepare configuration file. In the VM execute:
cd genai-databases-retrieval-app/retrieval_service
cp example-config.yml config.yml
sed -i s/127.0.0.1/$INSTANCE_IP/g config.yml
sed -i s/my-password/$PGPASSWORD/g config.yml
sed -i s/my_database/assistantdemo/g config.yml
sed -i s/my-user/postgres/g config.yml
cat config.yml
Note: If your SSH session was terminated you need to set your environment variables such as: export PGPASSWORD= REGION=us-central1 INSTANCE_IP=$(gcloud alloydb instances describe $ADBCLUSTER-pr --cluster=$ADBCLUSTER --region=$REGION --format="value(ipAddress)")
Expected console output:
student@instance-1:~$ cd genai-databases-retrieval-app/retrieval_service
cp example-config.yml config.yml
sed -i s/127.0.0.1/$INSTANCE_IP/g config.yml
sed -i s/my-password/$PGPASSWORD/g config.yml
sed -i s/my_database/assistantdemo/g config.yml
sed -i s/my-user/postgres/g config.yml
cat config.yml
host: 0.0.0.0
# port: 8080
datastore:
  # Example for AlloyDB
  kind: "postgres"
  host: 10.65.0.2
  # port: 5432
  database: "assistantdemo"
  user: "postgres"
  password: "P9..."
- Now populate database with the sample dataset. In the VM execute:
pip install -r requirements.txt
python run_database_init.py
The first command is adding all required packages to the Python virtual environment and the second command is populating the database with the data.
Expected console output(redacted):
student@instance-1:~/genai-databases-retrieval-app/retrieval_service$ pip install -r requirements.txt
python run_database_init.py
Collecting asyncpg==0.28.0 (from -r requirements.txt (line 1))
  Obtaining dependency information for asyncpg==0.28.0 from https://files.pythonhosted.org/packages/77/a4/88069f7935b14c58534442a57be3299179eb46aace2d3c8716be199ff6a6/asyncpg-0.28.0-cp311-cp311-manylinux_2_17_x86_64.manylinux2014_x86_64.whl.metadata
  Downloading asyncpg-0.28.0-cp311-cp311-manylinux_2_17_x86_64.manylinux2014_x86_64.whl.metadata (4.3 kB)
Collecting fastapi==0.101.1 (from -r requirements.txt (line 2))
...
database init done.
student@instance-1:~/genai-databases-retrieval-app/retrieval_service$
Populate database with the sample dataset.
Task 5. Deploy the Retrieval Service to Cloud Run
Now you can deploy the retrieval service to Cloud Run. The service is responsible for working with the database. It extracts the necessary information from the database based on the request from an AI application.
Create Service Account
Create a service account for the extension service and grant necessary privileges.
- Open another Cloud Shell tab using the "+" at the top.
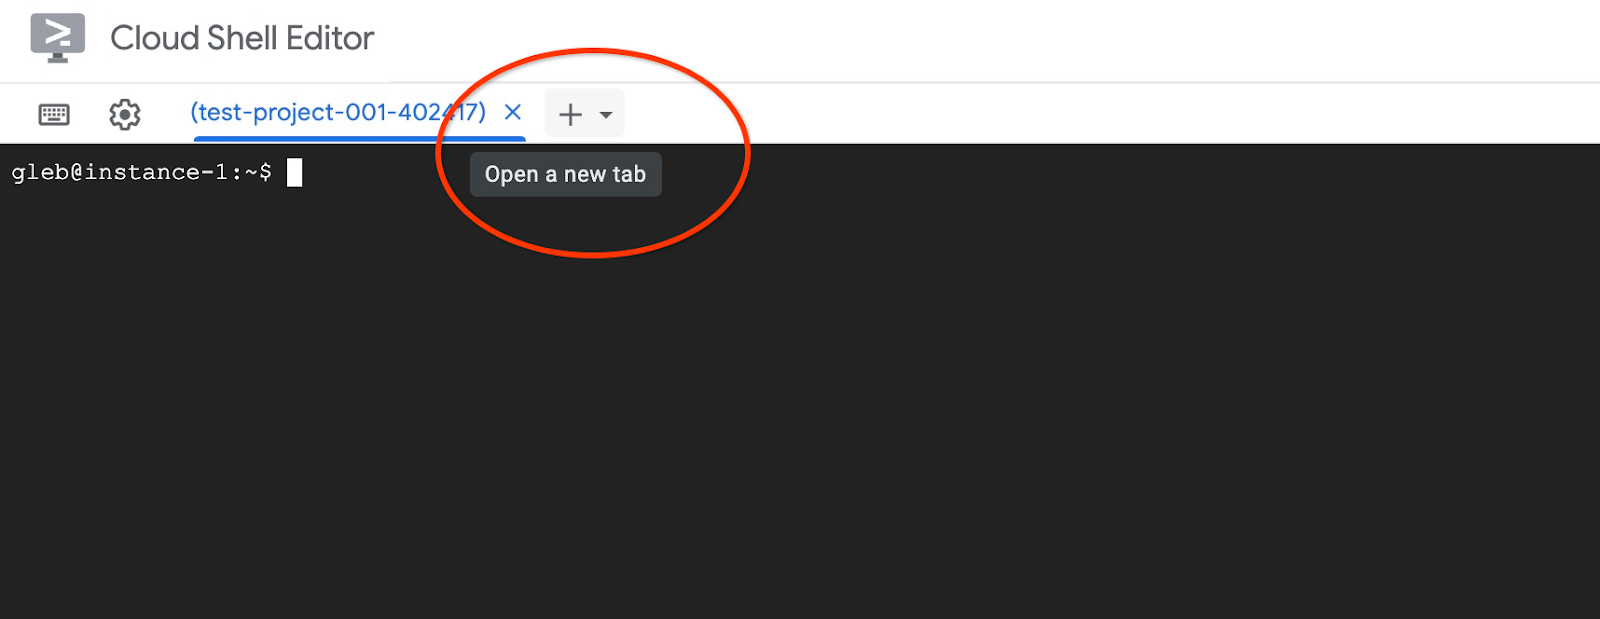
- In the new Cloud Shell tab execute:
export PROJECT_ID=$(gcloud config get-value project)
gcloud iam service-accounts create retrieval-identity
gcloud projects add-iam-policy-binding $PROJECT_ID \
  --member="serviceAccount:retrieval-identity@$PROJECT_ID.iam.gserviceaccount.com" \
  --role="roles/aiplatform.user"
Expected console output:
student@cloudshell:~ (gleb-test-short-003)$ gcloud iam service-accounts create retrieval-identity
Created service account [retrieval-identity].
- Close the tab by either execution command "exit" in the tab:
exit
Create the service account retrieval-identity.
Task 6. Deploy the Retrieval Service
Continue in the first tab where you are connected to the VM through SSH by deploying the service.
- In the VM SSH session execute:
cd ~/genai-databases-retrieval-app
gcloud alpha run deploy retrieval-service \
    --source=./retrieval_service/\
    --no-allow-unauthenticated \
    --service-account retrieval-identity \
    --region us-central1 \
    --network=default \
    --quiet
Expected console output:
student@instance-1:~/genai-databases-retrieval-app$ gcloud alpha run deploy retrieval-service \
    --source=./retrieval_service/\
    --no-allow-unauthenticated \
    --service-account retrieval-identity \
    --region us-central1 \
    --network=default
This command is equivalent to running `gcloud builds submit --tag [IMAGE] ./retrieval_service/` and `gcloud run deploy retrieval-service --image [IMAGE]`

Building using Dockerfile and deploying container to Cloud Run service [retrieval-service] in project [gleb-test-short-003] region [us-central1]
X Building and deploying... Done.
  ✓ Uploading sources...
  ✓ Building Container... Logs are available at [https://console.cloud.google.com/cloud-build/builds/6ebe74bf-3039-4221-b2e9-7ca8fa8dad8e?project=1012713954588].
  ✓ Creating Revision...
  ✓ Routing traffic...
    Setting IAM Policy...
Completed with warnings:
  Setting IAM policy failed, try "gcloud beta run services remove-iam-policy-binding --region=us-central1 --member=allUsers --role=roles/run.invoker retrieval-service"
Service [retrieval-service] revision [retrieval-service-00002-4pl] has been deployed and is serving 100 percent of traffic.
Service URL: https://retrieval-service-onme64eorq-uc.a.run.app
student@instance-1:~/genai-databases-retrieval-app$
Verify The Service
Now we can check if the service runs correctly and the VM has access to the endpoint. We use gcloud utility to get the retrieval service endpoint. Alternatively you can check it in the cloud console and replace in the curl command the "$(gcloud run services list –filter="(retrieval-service)" by the value from there.
- In the VM SSH session execute:
curl -H "Authorization: Bearer $(gcloud auth print-identity-token)" $(gcloud run services list --filter="(retrieval-service)" --format="value(URL)")
Expected console output:
student@instance-1:~/genai-databases-retrieval-app$ curl -H "Authorization: Bearer $(gcloud auth print-identity-token)" $(gcloud  run services list --filter="(retrieval-service)" --format="value(URL)")
{"message":"Hello World"}student@instance-1:~/genai-databases-retrieval-app$
If you see the "Hello World" message it means your service is up and serving the requests.
Deploy the Retrieval Service.
Task 7. Deploy sample application
When you have the retrieval service up and running, you can deploy a sample application which is going to use the service. The application can be deployed on the VM or any other service like Cloud Run, Kubernetes or even locally on a laptop.
Next you are going to deploy a sample application on the VM.
Prepare the environment
First, add the necessary modules to Python.
- In the VM SSH session execute:
cd ~/genai-databases-retrieval-app/llm_demo
pip install -r requirements.txt
Expected output (redacted):
student@instance-1:~$ cd ~/genai-databases-retrieval-app/llm_demo
pip install -r requirements.txt
Collecting fastapi==0.104.0 (from -r requirements.txt (line 1))
  Obtaining dependency information for fastapi==0.104.0 from https://files.pythonhosted.org/packages/db/30/b8d323119c37e15b7fa639e65e0eb7d81eb675ba166ac83e695aad3bd321/fastapi-0.104.0-py3-none-any.whl.metadata
  Downloading fastapi-0.104.0-py3-none-any.whl.metadata (24 kB)
...
Run Assistant application
Before starting the application you need to set up some environment variables. The basic functionality of the application, such as query flights and airport amenities, requires BASE_URL which points application to the retrieval service. We can get it using the gcloud command .
- In the VM SSH session execute:
export BASE_URL=$(gcloud run services list --filter="(retrieval-service)" --format="value(URL)")
Expected output (redacted):
student@instance-1:~/genai-databases-retrieval-app/llm_demo$ export BASE_URL=$(gcloud run services list --filter="(retrieval-service)" --format="value(URL)")
Prepare Client ID
To use more advanced capabilities of the application like booking and changing flights we need to sign-in to the application using our Google account and for that purpose we need to provide CLIENT_ID environment variable using the OAuth client ID from the Prepare Client ID chapter:
To use booking functionality of the application we need to prepare OAuth 2.0 Client ID using Cloud Console. It will be when we sign into the application since booking is using clients credentials to record the booking data in the database.
In the Cloud Console go to the APIs and Services and click on "OAuth consent screen" and click Get Started.
Then follow on the next screen.
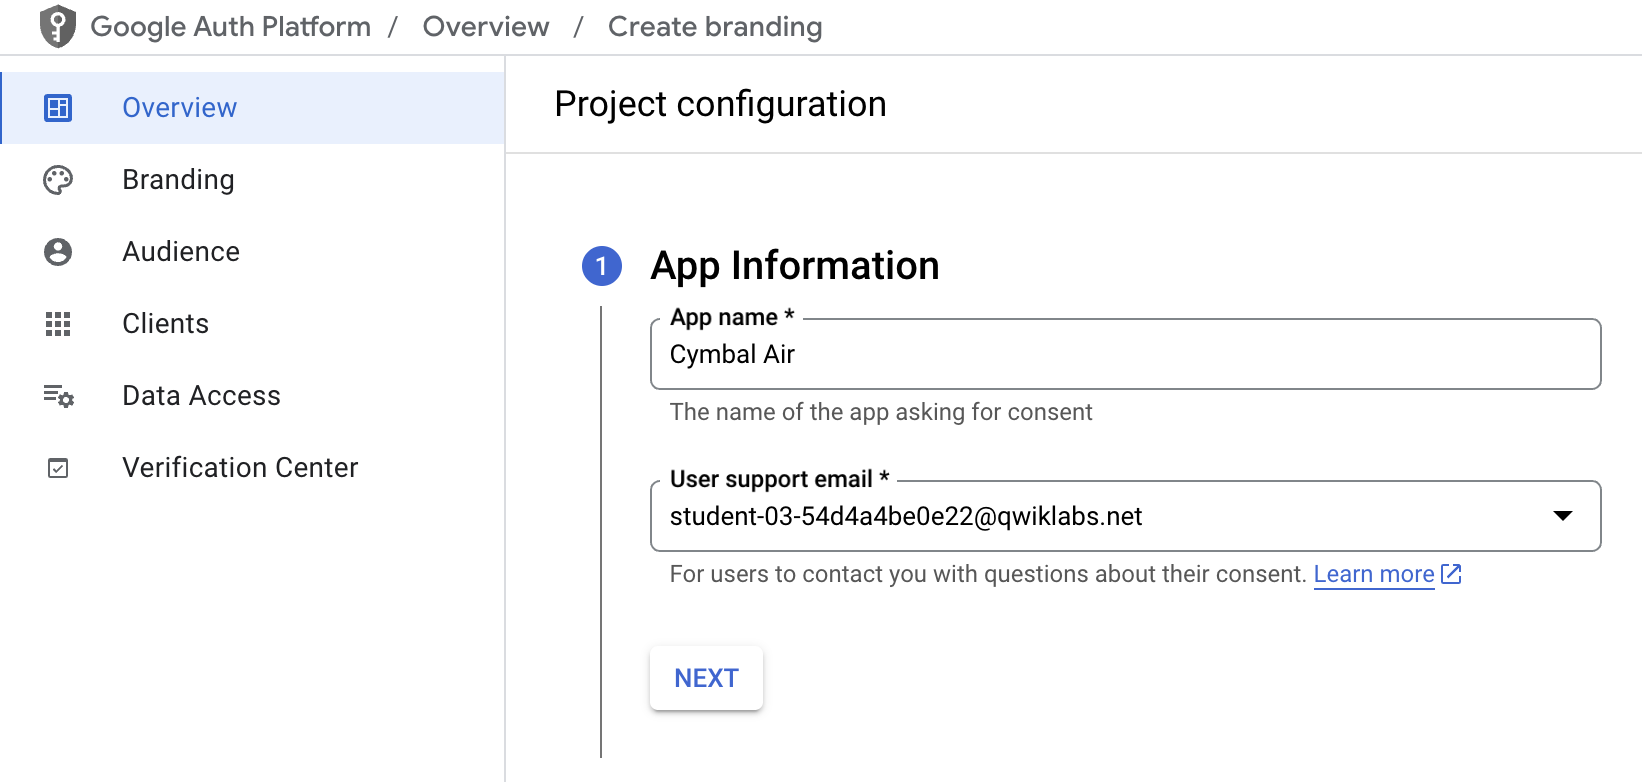
- You need to fill out required fields such as "App name" and "User support email". Select Internal for "Audience" and finally the "Contact information".
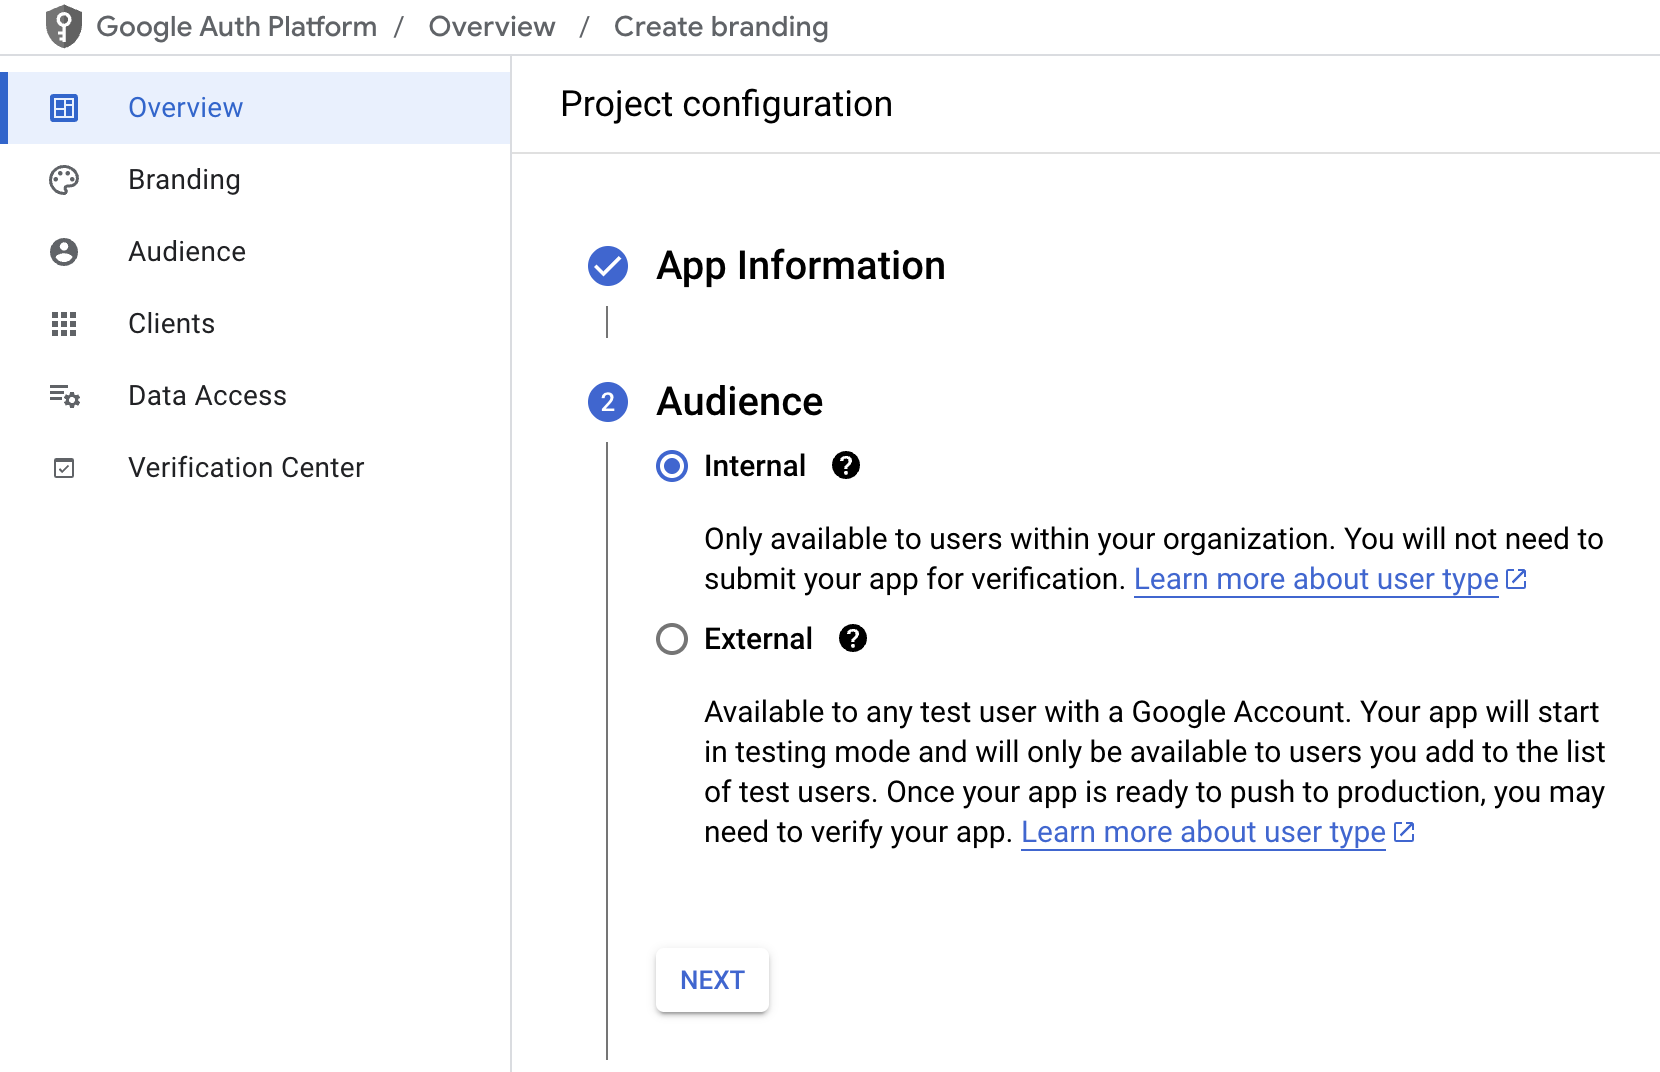
Agree to the user data policy. Click Continue and then click Create at the bottom of the page and it will lead you to the next page.
The next step is to create the client ID. On the left panel you click "Clients" which lead you to the credentials for OAuth2.
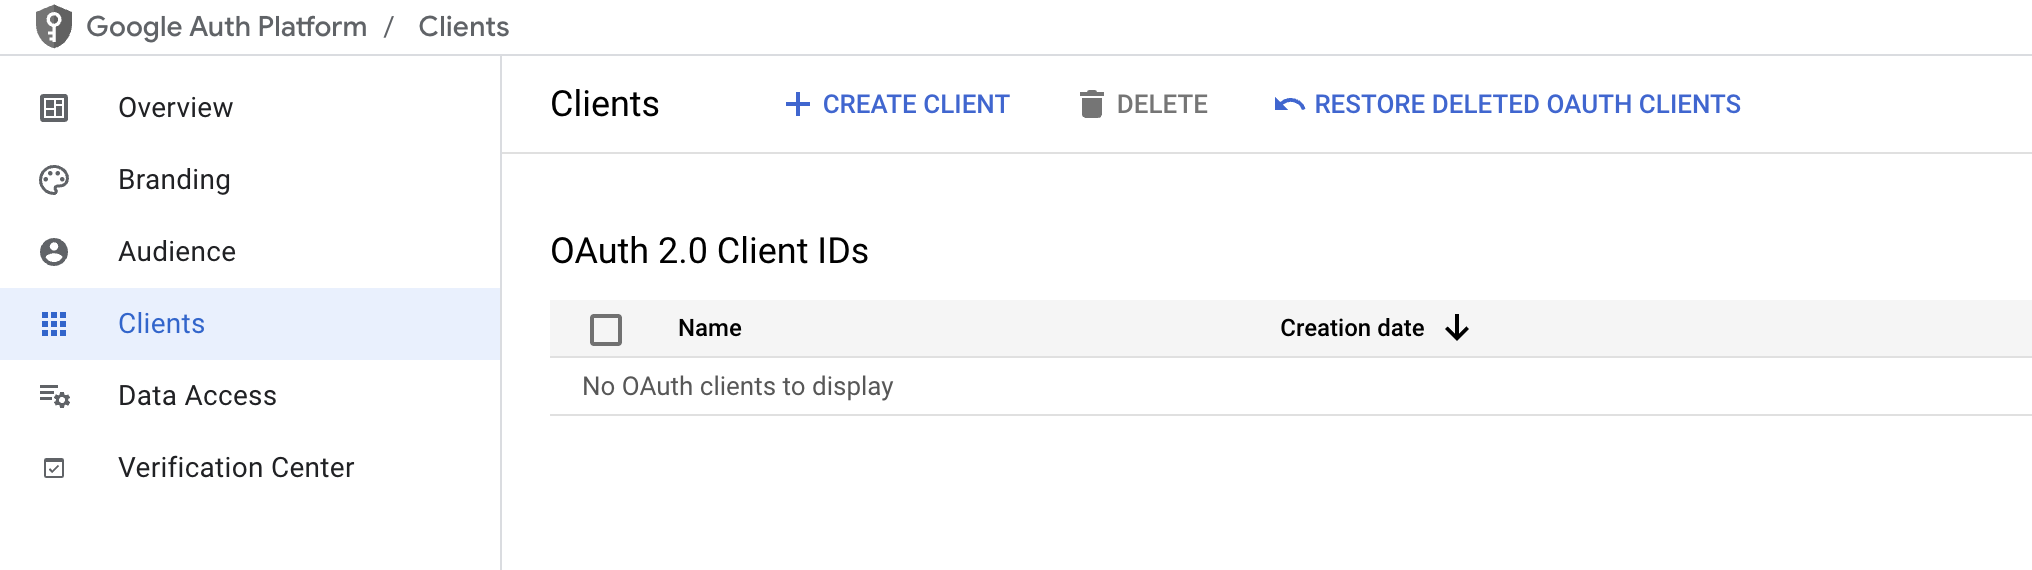
- Here you click "Create client" at the top. Then it will open another screen.
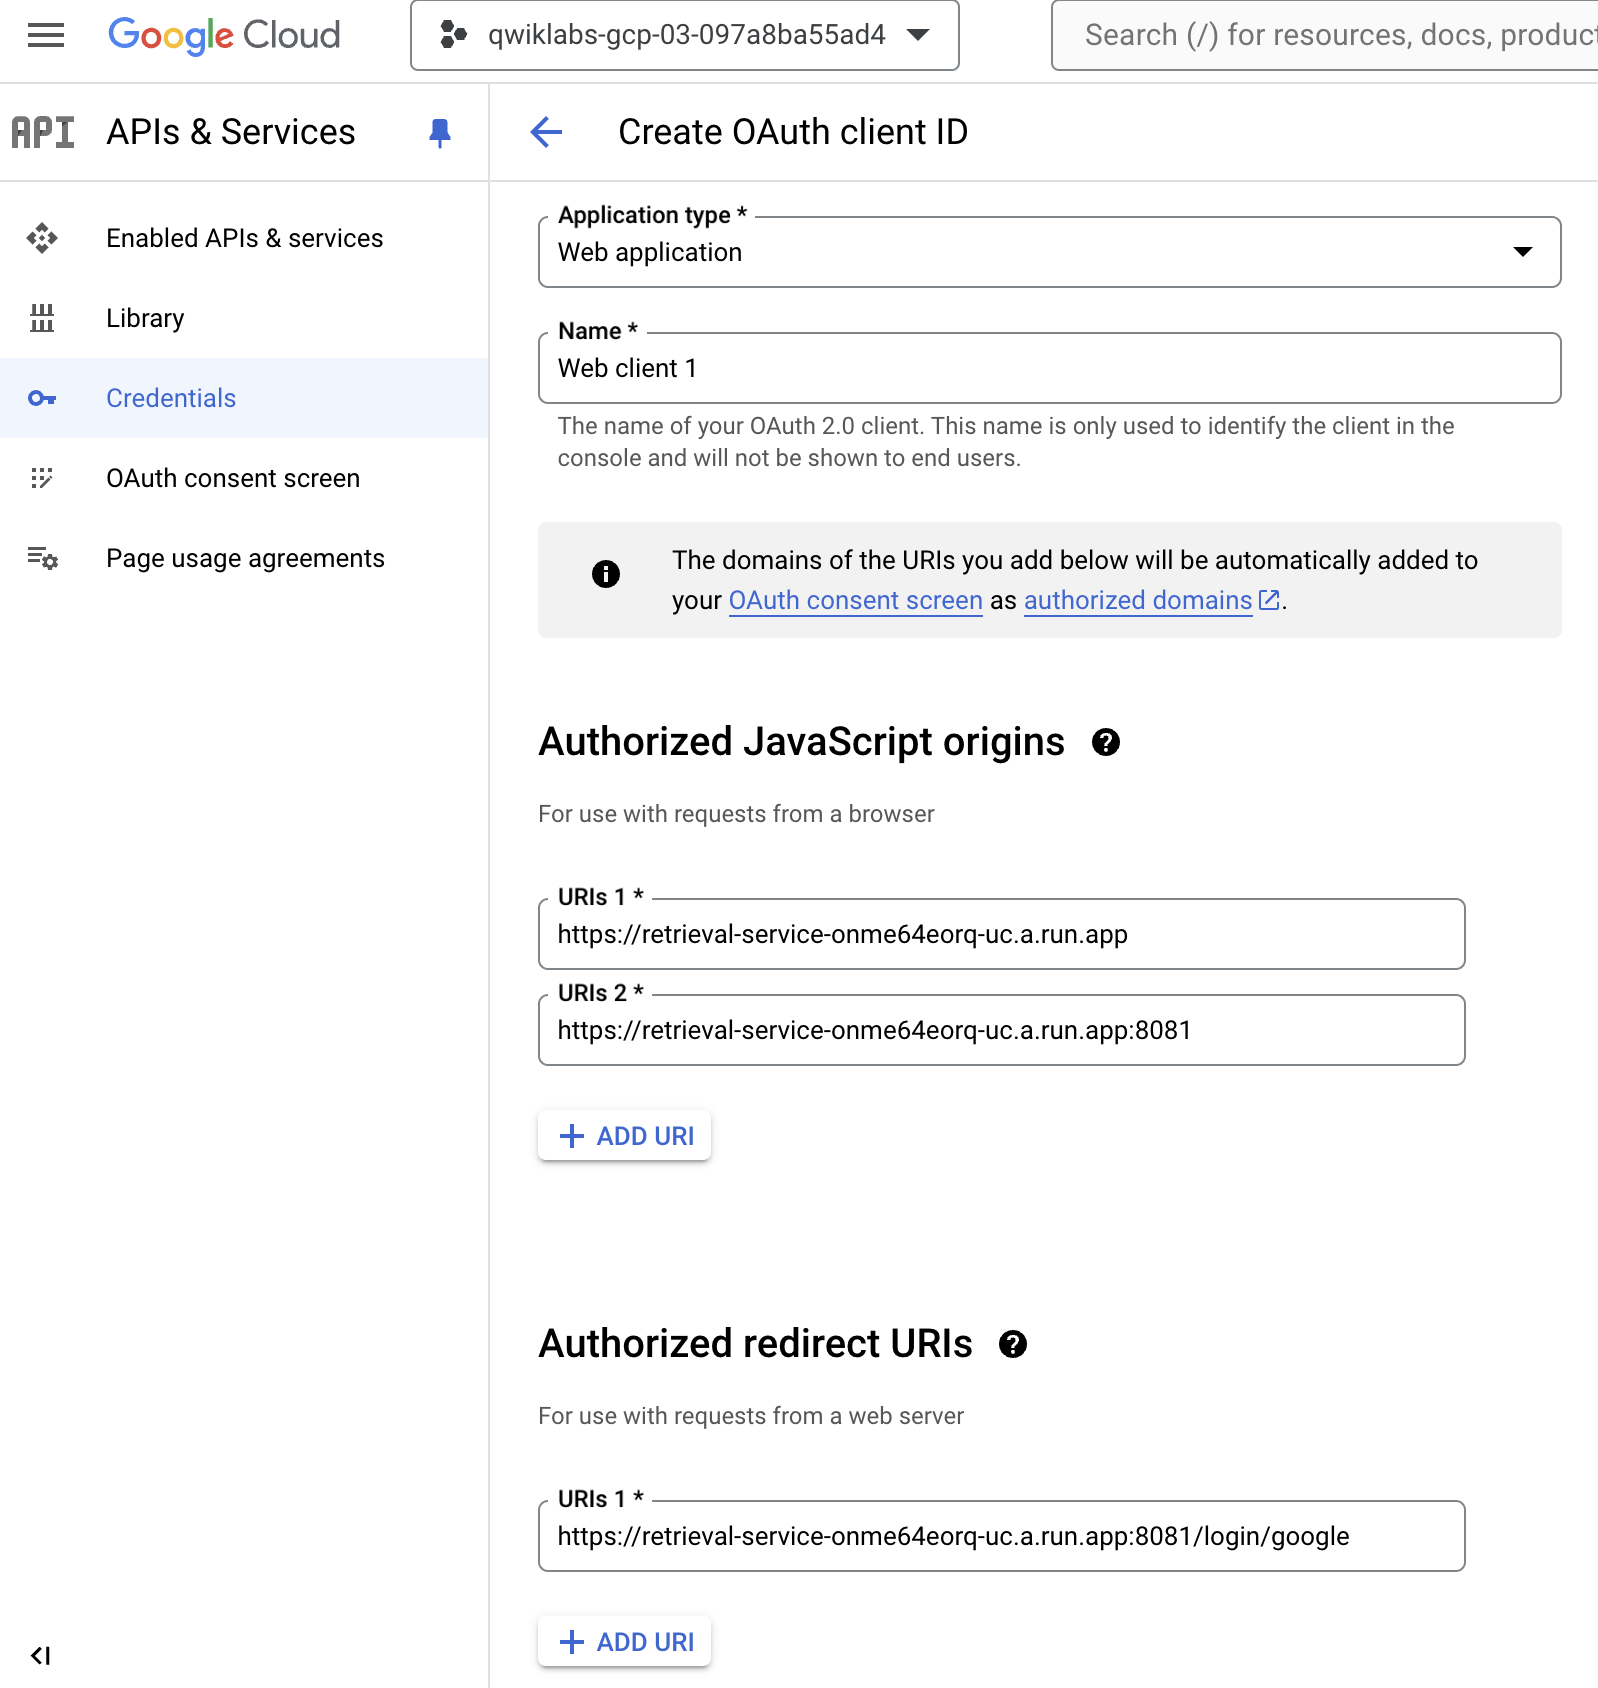
Pick up "Web application" from the dropdown list for application type and put your application URI (and port - optionally) as the "Authorized JavaScript origins". And you need to add to the "Authorized redirect URIs" your application host with "/login/google" at the end to be able to use the authorization popup screen.
After pushing the "Create" button.
We will need the Client ID (and optionally Client secret) later to use with your application.
export CLIENT_ID=450....apps.googleusercontent.com
Note: Replace the CLIENT_ID value with your Client Id that you just created.
Expected output (redacted):
student@instance-1:~/genai-databases-retrieval-app/llm_demo$ export CLIENT_ID=215....apps.googleusercontent.com
Create a Client Id.
Now you can run the application:
python run_app.py
Expected output:
student@instance-1:~/genai-databases-retrieval-app/llm_demo$ python main.py
INFO:     Started server process [28565]
INFO:     Waiting for application startup.
INFO:     Application startup complete.
INFO:     Uvicorn running on http://0.0.0.0:8081 (Press CTRL+C to quit)
Connect to the Application
You have several ways to connect to the application running on the VM. For example you can open port 8081 on the VM using firewall rules in the VPC or create a load balancer with public IP. Here we are going to use a SSH tunnel to the VM translating the local port 8080 to the VM port 8081.
- Open another Cloud Shell tab using the sign "+" at the top.
- In the new cloud shell tab start the tunnel to your VM by executing the
gcloudcommand:
gcloud compute ssh instance-1 --zone=us-central1-c -- -L 8080:localhost:8081
It will show an error "Cannot assign requested address" - please ignore it.
Here is the expected output:
student@cloudshell:~ gcloud compute ssh instance-1 --zone=us-central1-a -- -L 8080:localhost:8081
bind [::1]:8081: Cannot assign requested address
linux instance-1.us-central1-a.c.gleb-codelive-01.internal 6.1.0-21-cloud-amd64 #1 SMP PREEMPT_DYNAMIC Debian 6.1.90-1 (2024-05-03) x86_64

The programs included with the Debian GNU/Linux system are free software;
the exact distribution terms for each program are described in the
individual files in /usr/share/doc/*/copyright.

Debian GNU/Linux comes with ABSOLUTELY NO WARRANTY, to the extent
permitted by applicable law.
Last login: Sat May 25 19:15:46 2024 from 35.243.235.73
student@instance-1:~$
It opens port 8080 in your Cloud Shell which can be used for the Web preview.
- Click on the Web preview button on the right top of your Cloud Shell then select Preview on port 8080.
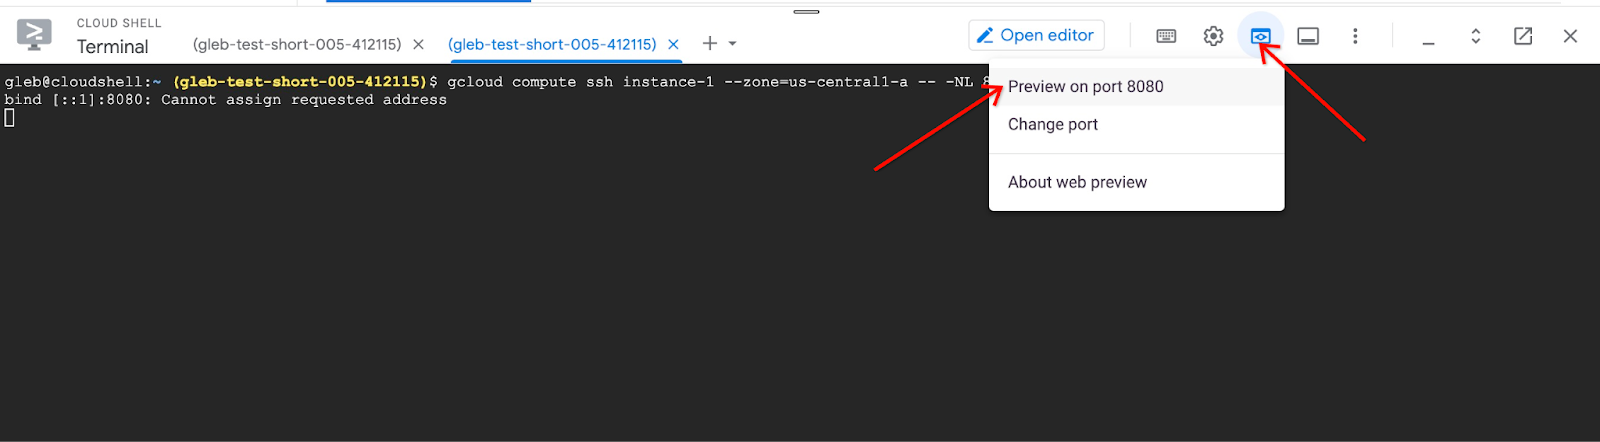
This opens a new tab in your web browser with the application interface. You should see the Cymbal Air Customer Service Assistant page. In the address bar of the page you'll see the URI to the preview page.
- Remove the part
/?authuser=0&redirectedPreviously=trueat the end.
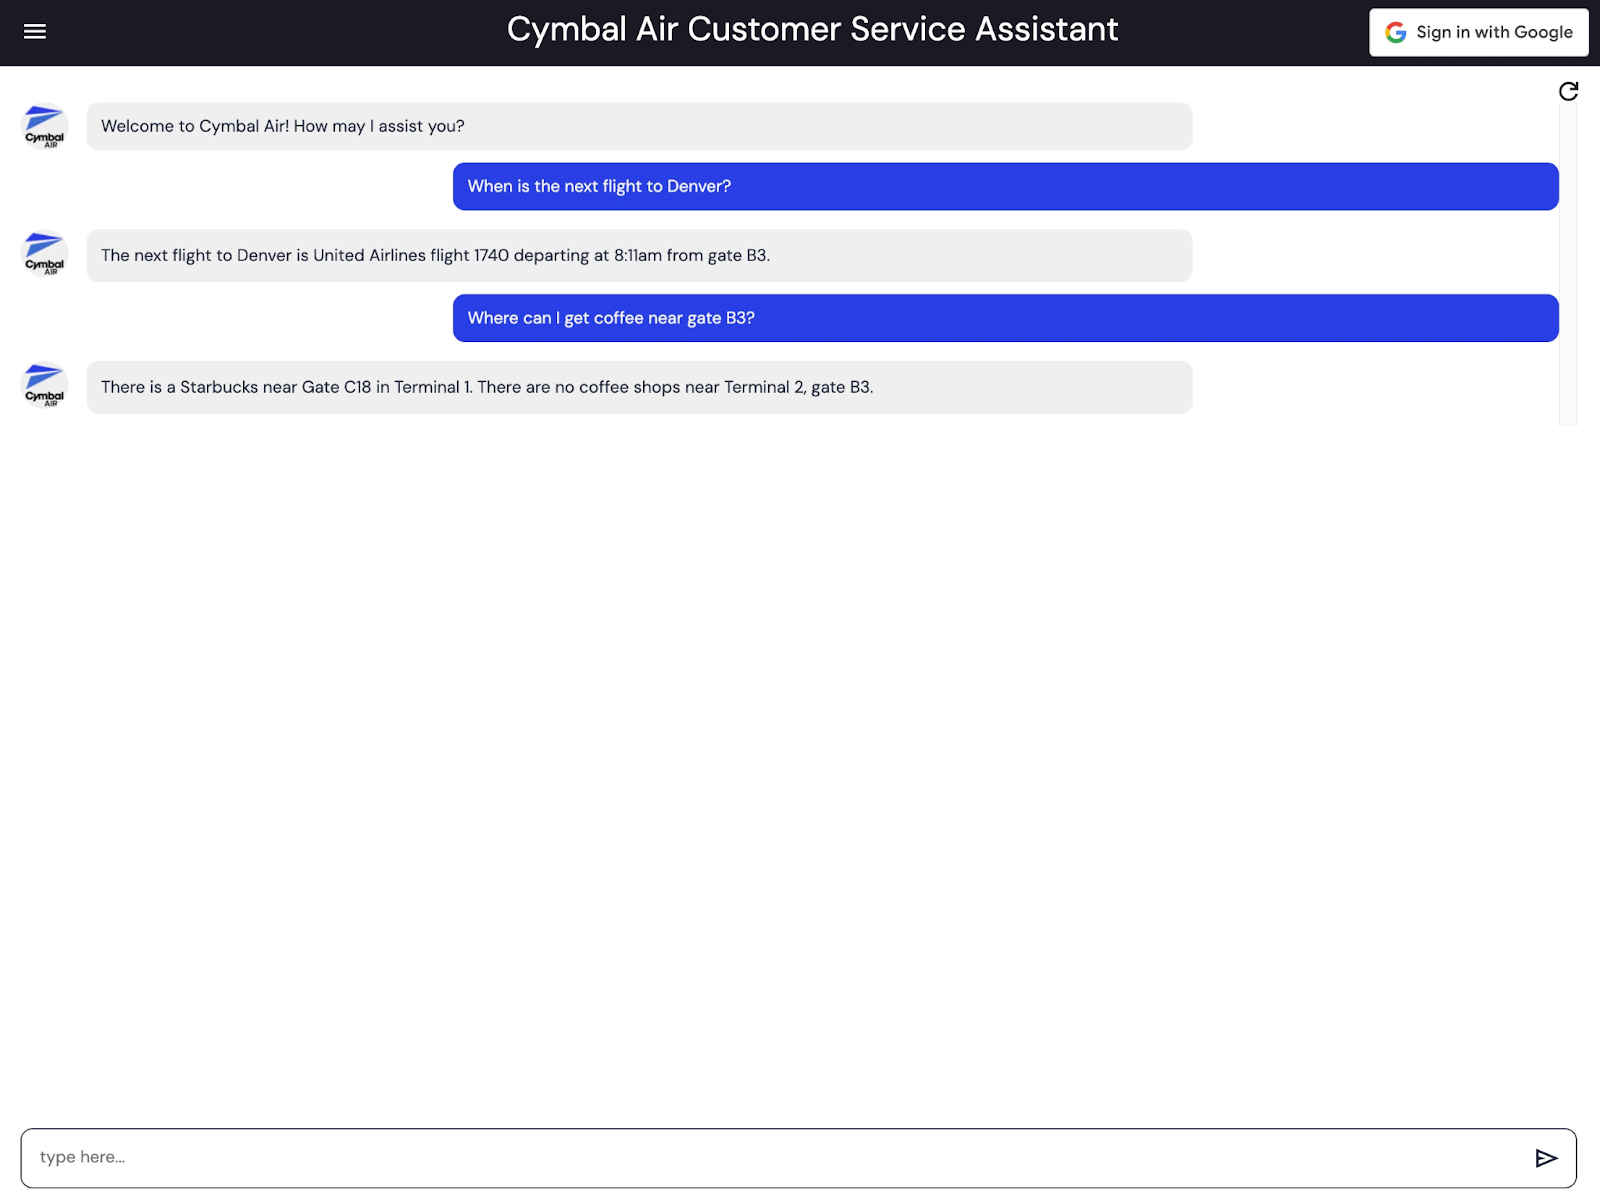
Use the first part of URI like "https://8080-cs-35704030349-default.cs-us-east1-vpcf.cloudshell.dev/" is to be left in the browser window and to provide as the "Authorized JavaScript origins" and "Authorized redirect URIs" for our credentials created in the "Prepare Client ID" chapter replacing or adding to the originally provided http://localhost:8080 values. The upper value would look like "https://8080-cs-35704030349-default.cs-us-east1-vpcf.cloudshell.dev" and the lower one would be "https://8080-cs-35704030349-default.cs-us-east1-vpcf.cloudshell.dev/login/google"
(Optional) Task 100 Sign into the application
- Click the__Sign in__ button at the top right of the application screen to provide our credentials. That is optional and required only if you want to try booking functionality of the application.
This demo showcases the Cymbal Air customer service assistant. Cymbal Air is a fictional passenger airline. The assistant is an AI chatbot that helps travellers to manage flights and look up information about Cymbal Air's hub at San Francisco International Airport (SFO).
It can help answer users questions like:
When is the next flight to Denver?
Are there any luxury shops around gate D50?
Where can I get coffee near gate A6?
Where can I buy a gift?
When you are signed in to the application you can try other capabilities like booking flights or check if the seat assigned to you is a window or aisle seat.
The application uses the latest Google foundation models to generate responses and augment it by information about flights and amenities from the operational AlloyDB database. You can read more about this demo application on the GitHub page of the project.
Solution of Lab
About the author
A passionate full-stack developer from @ePlus.DEV
Comments
Join the discussionNo comments yet. Be the first to comment.
Tip & Tricks
Quick and practical tips to help users optimize tasks, improve skills, and solve common problems effectively across various areas like tech, lifestyle, productivity, and more.