Configure Global Extended Application LB using HTTPS - GSP652
A passionate full-stack developer from @ePlus.DEV
Overview
In this lab you will learn how to use the Google Cloud console to deploy a Global External Application Load Balancer to securely distribute HTTPS traffic across multiple backend web servers. The load balancer will communicate with backends over HTTP, while clients will connect to the load balancer over HTTPS.
What you'll learn or Objectives
Deploy and configure backend infrastructure suitable for a Global External Application Load Balancer on Google Cloud.
Set up a Global External Application Load Balancer on Google Cloud with an HTTPS frontend, including SSL/TLS certificate management.
Verify successful traffic distribution and HTTPS termination by testing the load balancer's external IP address.
Understand the role of health checks in maintaining backend availability.
Setup
Before you click the Start Lab button
Read these instructions. Labs are timed and you cannot pause them. The timer, which starts when you click Start Lab, shows how long Google Cloud resources are made available to you.
This hands-on lab lets you do the lab activities in a real cloud environment, not in a simulation or demo environment. It does so by giving you new, temporary credentials you use to sign in and access Google Cloud for the duration of the lab.
To complete this lab, you need:
- Access to a standard internet browser (Chrome browser recommended).
Note: Use an Incognito (recommended) or private browser window to run this lab. This prevents conflicts between your personal account and the student account, which may cause extra charges incurred to your personal account.
- Time to complete the lab—remember, once you start, you cannot pause a lab.
Note: Use only the student account for this lab. If you use a different Google Cloud account, you may incur charges to that account.
How to start your lab and sign in to the Google Cloud console
Click the Start Lab button. If you need to pay for the lab, a dialog opens for you to select your payment method. On the left is the Lab Details pane with the following:
The Open Google Cloud console button
Time remaining
The temporary credentials that you must use for this lab
Other information, if needed, to step through this lab
Click Open Google Cloud console (or right-click and select Open Link in Incognito Window if you are running the Chrome browser).
The lab spins up resources, and then opens another tab that shows the Sign in page.
Tip: Arrange the tabs in separate windows, side-by-side.
Note: If you see the Choose an account dialog, click Use Another Account.
If necessary, copy the Username below and paste it into the Sign in dialog.
student-04-3a1dd06502d2@qwiklabs.netCopied!
You can also find the Username in the Lab Details pane.
Click Next.
Copy the Password below and paste it into the Welcome dialog.
qWMEPZWxCJedCopied!
You can also find the Password in the Lab Details pane.
Click Next.
Important: You must use the credentials the lab provides you. Do not use your Google Cloud account credentials.
Note: Using your own Google Cloud account for this lab may incur extra charges.
Click through the subsequent pages:
Accept the terms and conditions.
Do not add recovery options or two-factor authentication (because this is a temporary account).
Do not sign up for free trials.
After a few moments, the Google Cloud console opens in this tab.
Note: To access Google Cloud products and services, click the Navigation menu or type the service or product name in the Search field.

Resources built for this lab
(2) Compute Engine VM instances with web server running on each.
Firewall rules are configured to allow incoming HTTP traffic on port 80 to the VMs.
Verify that the resources are ready:
In the console, go to Compute Engine.
Copy the External IP for one of the VMs that have been created.
Open a new browser, paste the copied IP, and navigate to the backend-vm-
us-west1. You should see "Hello from backend-vm-us-west1!"Repeat this step for the other instance, and navigate to backend-vm-
europe-west4and read the message.
Task 1. Create Instance Groups
In the Google Cloud Console, go to Navigation Menu > Compute Engine > Instance groups.
First, create an
unmanaged instance groupfor theus-west1region. Click Create Instance Group:
| Property | Value |
|---|---|
| Name | us-west1-instance-group |
| Region | us-west1 |
| Zone | Select the zone us-west1-b |
| Network | default |
| VM instances | Select backend-vm-us-west1 |
Click Create.
Next, create an instance group for the 2nd region,
europe-west4:Repeat the process for the second instance group:
| Property | Value |
|---|---|
| Name | europe-west4-instance-group |
| Region | europe-west4 |
| Zone | Select the zone europe-west4-b |
| Network | default |
| VM instances | Select backend-vm-europe-west4 |
- Click Create.
Task 2. Create a health check
Navigate to Health Checks: In the Google Cloud Console, go to Navigation Menu > Compute Engine > Health checks.
Click Create a health check.
Name:
http-health-checkProtocol:
HTTPPort: 80
Request path: /
Check interval: 5 seconds
Timeout: 5 seconds
Unhealthy threshold: 2
Healthy threshold: 2
Click Create.
Task 3. Create a backend service
Type load balancing in the search bar on the top. Under Products & Pages, click on Load balancing.
Click Create load balancer.
Load balancer type: Select Application Load Balancer (HTTP/HTTPS) and click Next.
Public facing or internal: Select Public facing (external) and click Next.
Global or single region deployment: Select Best for global workloads and click Next.
Load balancer generation: Select Global external Application Load Balancer and click Next.
Click Configure.
Now create the Backend configuration.
Click Backend configuration.
Click dropdown next to Backend services & backend buckets then click Create backend service add:
| Property | Value |
|---|---|
| Name | global-backend-service |
| Backend type | Instance group |
| Protocol | HTTP (The ALB handles HTTPS, then communicates to backends via HTTP) |
| Port name | Leave default or set to http |
Health Check: Select http-health-check.
Under New Backend specify the following.
| Property | Value |
|---|---|
| Instance group | Select us-west1-instance-group |
| Port numbers | 80 |
Click Done.
Click Add a backend then specify:
| Property | Value |
|---|---|
| Instance group | Select europe-west4-instance-group |
| Port numbers | 80 |
Click Done.
Click Create then Ok.
Configure frontend with HTTPS
Click Frontend configuration.
Add the following under Add Frontend IP and port :
| Property | Value |
|---|---|
| Name | https-frontend |
| Protocol | HTTPS (includes HTTP/2) |
| IP version | IPv4 |
| IP address | click Create IP Address |
| Name | global-lb-ip, click Reserve |
| Port | 443 |
Move to the next section for how to set up the certificate.
Create a Certificate
For a real-world scenario, use a Google-managed SSL certificate. Next you'll create a self-signed certificate for use in this lab only.
Click Activate Cloud Shell
at the top of the Google Cloud console and open it in a new window.
Run the below command to a generated private key.

openssl genrsa -out key.pem 2048
Copied!
- View the private key. You will need it in this task.
cat key.pem
Copied!
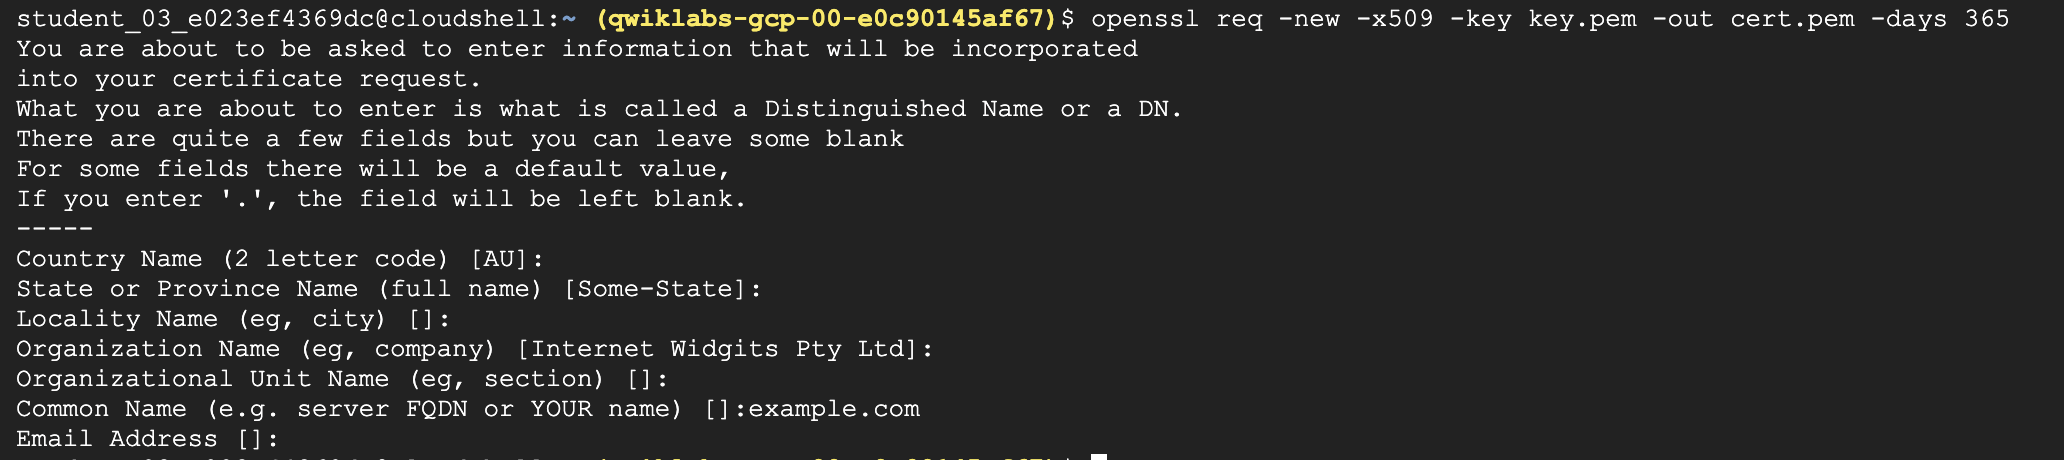
- Run the below command to generated a generated public key certificate. For the "Common Name", use a placeholder like
example.com. Press ENTER to leave the remaining fields blank.
openssl req -new -x509 -key key.pem -out cert.pem -days 365
Copied!
- View the certificate. You will need it in this task.
cat cert.pem
Copied!
Under Choose certificate repository, select Use Classic Certificates.
Click dropdown next to Certificate then click Create a new certificate.
| Property | Value |
|---|---|
| Name | self-signed-lb-cert |
| Mode | Upload my certificate |
| Certificate | Paste a generated public key certificate viewed earlier (from cert.pem). |
| Private key | Paste a generated private key viewed earlier (from key.pem). |
Important: In a production environment, never use a self-signed certificate. Always use a trusted Certificate Authority (CA) or Google-managed certificates.
Click Create.
Click Use certificate for a self-signed certificate.
Select the checkbox for Enable HTTP to HTTPS redirect.
Click Done.
Review and create the Load Balancer
Review all configurations on the summary page.
Set Load Balancer Name to
global-ext-application-lbClick Create.
Wait for the load balancer to provision. This may take a few minutes.
Task 4. Test and verify Load Balancing
Access the Load Balancer
Once the load balancer is provisioned (status will show a green checkmark), copy the IP address displayed under Frontend configuration to use in the next step.
Open a new web browser and navigate to:
https://[YOUR_LOAD_BALANCER_IP_ADDRESS]Copied!
You will likely encounter a "Your connection is not private" warning due to the self-signed certificate. Proceed past this warning.
Observe Load Balancing
- Refresh the page multiple times. You should observe the content changing between "Hello from backend-vm-
us-west1!" and "Hello from backend-vm-europe-west4!".
- This demonstrates that the Global External Application Load Balancer is distributing traffic across your backend instances in different regions.
- Observe the URL: It should remain https://[YOUR_LOAD_BALANCER_IP_ADDRESS], indicating that the ALB is handling HTTPS termination.
Task 5. Understand health checks
Simulate a backend failure
SSH into backend-vm-
us-west1! by clicking the SSH button next to your backend on the VM instances page.Stop the Nginx service:
sudo systemctl stop nginxCopied!
Monitor Health Checks: In the Google Cloud console, navigate back to Network services > Load balancing, click on your load balancer, and then click on the Backend services tab. You should see the health status of
us-west1-instance-group change to UNHEALTHY after a short period.Test Load Balancer Again: Refresh your browser accessing the load balancer's IP. You should now consistently see "Hello from backend-vm-
europe-west4!" [backend 2], as the load balancer has detected the backend-vm-us-west1backend as unhealthy and is routing all traffic to the healthy backend-vm-europe-west4backend.
Restore backend and verify
SSH into backend-vm-
us-west1! [backend 1] by clicking the SSH button next to your backend on the VM instances page.Start the Nginx service:
sudo systemctl start nginxCopied!
Monitor the health check in the Google Cloud console until
us-west1-instance-group returns to HEALTHY.Refresh your browser accessing the load balancer's IP. You should again see traffic being distributed between both backends.
Task 6. Clean up
In a production environment, to avoid incurring charges, you should delete the resources that you are not using. Resources for this lab will be automatically deleted. Practice the steps to delete resources.
Delete Load Balancer: In the console, navigate to Network services > Load balancing. Select your load balancer and click Delete. Confirm the deletion. This will also delete the associated IP address and backend service.
Delete Instance Groups: In the console, navigate to Compute Engine > Instance groups. Select both
us-west1-instance-group andeurope-west4-instance-group and click Delete.Delete VM Instances: In the console, navigate to Compute Engine > VM instances. Select both backend-vm-
us-west1and backend-vm-europe-west4and click Delete.
Solution of Lab
https://www.youtube.com/watch?v=uaSOyg_CS6E