Getting Started with Cloud Shell and gcloud - GSP002
A passionate full-stack developer from @ePlus.DEV
Overview
Cloud Shell provides you with command-line access to computing resources hosted on Google Cloud. Cloud Shell is a Debian-based virtual machine with a persistent 5-GB home directory, which makes it easy for you to manage your Google Cloud projects and resources. The gcloud command-line tool and other utilities you need are pre-installed in Cloud Shell, which allows you to get up and running quickly.
In this hands-on lab, you learn how to connect to computing resources hosted on Google Cloud via Cloud Shell with the gcloud tool.
You are encouraged to type the commands themselves, which reinforces the core concepts. Many labs will include a code block that contains the required commands. You can easily copy and paste the commands from the code block into the appropriate places during the lab.
What you'll do
Practice using
gcloudcommands.Connect to compute services hosted on Google Cloud.
Prerequisites
- Familiarity with standard Linux text editors such as
vim,emacs, ornano.
Setup and requirements
Before you click the Start Lab button
Read these instructions. Labs are timed and you cannot pause them. The timer, which starts when you click Start Lab, shows how long Google Cloud resources are made available to you.
This hands-on lab lets you do the lab activities in a real cloud environment, not in a simulation or demo environment. It does so by giving you new, temporary credentials you use to sign in and access Google Cloud for the duration of the lab.
To complete this lab, you need:
- Access to a standard internet browser (Chrome browser recommended).
Note: Use an Incognito (recommended) or private browser window to run this lab. This prevents conflicts between your personal account and the student account, which may cause extra charges incurred to your personal account.
- Time to complete the lab—remember, once you start, you cannot pause a lab.
Note: Use only the student account for this lab. If you use a different Google Cloud account, you may incur charges to that account.
How to start your lab and sign in to the Google Cloud console
Click the Start Lab button. If you need to pay for the lab, a dialog opens for you to select your payment method. On the left is the Lab Details pane with the following:
The Open Google Cloud console button
Time remaining
The temporary credentials that you must use for this lab
Other information, if needed, to step through this lab
Click Open Google Cloud console (or right-click and select Open Link in Incognito Window if you are running the Chrome browser).
The lab spins up resources, and then opens another tab that shows the Sign in page.
Tip: Arrange the tabs in separate windows, side-by-side.
Note: If you see the Choose an account dialog, click Use Another Account.
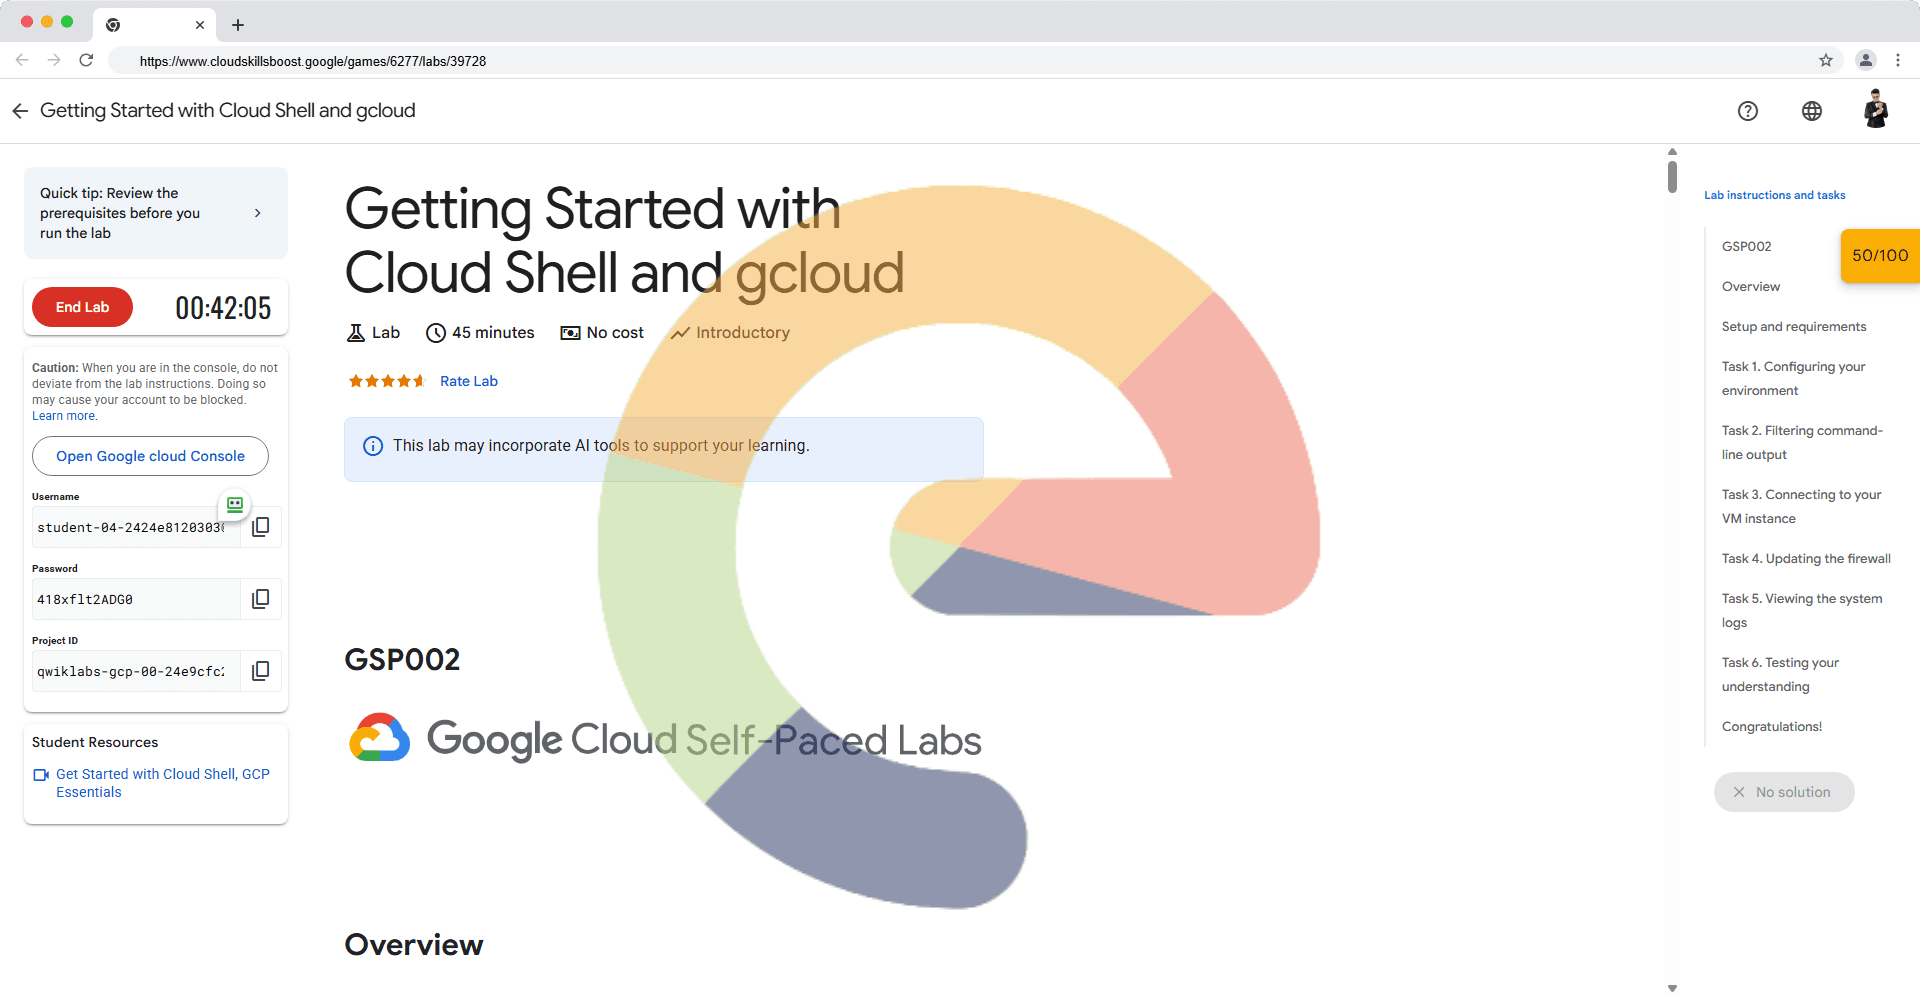
If necessary, copy the Username below and paste it into the Sign in dialog.
student-04-2424e8120303@qwiklabs.netYou can also find the Username in the Lab Details pane.
Click Next.
Copy the Password below and paste it into the Welcome dialog.
418xflt2ADG0You can also find the Password in the Lab Details pane.
Click Next.
Important: You must use the credentials the lab provides you. Do not use your Google Cloud account credentials.
Note: Using your own Google Cloud account for this lab may incur extra charges.
Click through the subsequent pages:
Accept the terms and conditions.
Do not add recovery options or two-factor authentication (because this is a temporary account).
Do not sign up for free trials.
After a few moments, the Google Cloud console opens in this tab.
Note: To access Google Cloud products and services, click the Navigation menu or type the service or product name in the Search field.

Activate Cloud Shell
Cloud Shell is a virtual machine that is loaded with development tools. It offers a persistent 5GB home directory and runs on the Google Cloud. Cloud Shell provides command-line access to your Google Cloud resources.
Click Activate Cloud Shell at the top of the Google Cloud console.
Click through the following windows:
Continue through the Cloud Shell information window.
Authorize Cloud Shell to use your credentials to make Google Cloud API calls.
When you are connected, you are already authenticated, and the project is set to your Project_ID, qwiklabs-gcp-00-24e9cfc25db6. The output contains a line that declares the Project_ID for this session:
Your Cloud Platform project in this session is set to qwiklabs-gcp-00-24e9cfc25db6
gcloud is the command-line tool for Google Cloud. It comes pre-installed on Cloud Shell and supports tab-completion.
- (Optional) You can list the active account name with this command:
gcloud auth list
- Click Authorize.
Output:
ACTIVE: *
ACCOUNT: student-04-2424e8120303@qwiklabs.net

To set the active account, run:
    $ gcloud config set account `ACCOUNT`
- (Optional) You can list the project ID with this command:
gcloud config list project
Output:
[core]
project = qwiklabs-gcp-00-24e9cfc25db6
Note: For full documentation of gcloud, in Google Cloud, refer to the gcloud CLI overview guide.
After Cloud Shell is activated, you can use the command line to invoke the Cloud SDK gcloud tool or other tools available on the virtual machine instance. Later in the lab, you will use your $HOME directory, which is used in persistent disk storage to store files across projects and between Cloud Shell sessions. Your $HOME directory is private to you and cannot be accessed by other users.
Task 1. Configuring your environment
In this section, you'll learn about aspects of the development environment that you can adjust.
Understanding regions and zones
Certain Google Compute Engine resources live in regions or zones. A region is a specific geographical location where you can run your resources. Each region has one or more zones. For example, the us-central1 region denotes a region in the Central United States that has zones us-central1-a, us-central1-b, us-central1-c, and us-central1-f. The following table shows zones in their respective regions:
| Western US | Central US | Eastern US | Western Europe | Eastern Asia |
| us-west1-a | us-central1-a | us-east1-b | europe-west1-b | asia-east1-a |
| us-west1-b | us-central1-b | us-east1-c | europe-west1c | asia-east1-b |
| - | us-central1-c | us-east1-d | europe-west1-d | aisia-east1-c |
| - | us-central1-f | - | - | - |
Resources that live in a zone are referred to as zonal resources. Virtual machine instances and persistent disks live in a zone. If you want to attach a persistent disk to a virtual machine instance, both resources must be in the same zone. Similarly, if you want to assign a static IP address to an instance, the instance must be in the same region as the static IP address.
Note: Learn more about regions and zones and see a complete list in Google Cloud Compute Engine's Regions and Zones documentation.
Set the region to
europe-west1gcloud config set compute/region europe-west1To view the project region setting, run the following command:
gcloud config get-value compute/regionSet the zone to
europe-west1-d:gcloud config set compute/zone europe-west1-dTo view the project zone setting, run the following command:
gcloud config get-value compute/zone
Finding project information
Copy your project ID to your clipboard or text editor. The project ID is listed in 2 places:
In the Cloud Console, on the Dashboard, under Project info. (Click Navigation menu (
), and then click Cloud overview > Dashboard.)
On the lab tab near your username and password.
In Cloud Shell, run the following
gcloudcommand, to view the project id for your project:gcloud config get-value projectIn Cloud Shell, run the following
gcloudcommand to view details about the project:gcloud compute project-info describe --project $(gcloud config get-value project)Find the zone and region metadata values in the output. You'll use the zone (
google-compute-default-zone) from the output later in this lab.Note: When the
google-compute-default-regionandgoogle-compute-default-zonekeys and values are missing from the output, no default zone or region is set. The output includes other useful information regarding your project. Take some time to explore this in more detail.

Setting environment variables
Environment variables define your environment and help save time when you write scripts that contain APIs or executables.
Create an environment variable to store your Project ID:
export PROJECT_ID=$(gcloud config get-value project)Create an environment variable to store your Zone:
export ZONE=$(gcloud config get-value compute/zone)To verify that your variables were set properly, run the following commands:
echo -e "PROJECT ID: $PROJECT_ID\nZONE: $ZONE"If the variables were set correctly, the echo commands will output your Project ID and Zone.
Creating a virtual machine with the gcloud tool
Use the gcloud tool to create a new virtual machine (VM) instance.
To create your VM, run the following command:
gcloud compute instances create gcelab2 --machine-type e2-medium --zone $ZONEOutput:
 Created [https://www.googleapis.com/compute/v1/projects/qwiklabs-gcp-04-326fae68bc3d/zones/us-east1-c/instances/gcelab2].
 NAME     ZONE           MACHINE_TYPE   PREEMPTIBLE  INTERNAL_IP  EXTERNAL_IP   STATUS
 gcelab2  europe-west1-d     e2-medium               10.128.0.2   34.67.152.90  RUNNING
Command details
gcloud computeallows you to manage your Compute Engine resources in a format that's simpler than the Compute Engine API.instances createcreates a new instance.gcelab2is the name of the VM.The
--machine-typeflag specifies the machine type as e2-medium.The
--zoneflag specifies where the VM is created.If you omit the
--zoneflag, thegcloudtool can infer your desired zone based on your default properties. Other required instance settings, such asmachine typeandimage, are set to default values if not specified in thecreatecommand.
Test completed task
Click Check my progress to verify your performed task. If you have successfully created a virtual machine with the gcloud tool, an assessment score is displayed.
Create a virtual machine with gcloud
Check my progress
- To open help for the
createcommand, run the following command:
gcloud compute instances create --help
Note: Press Enter or the spacebar to scroll through the help content. To exit the content, type Q.
Exploring gcloud commands
The gcloud tool offers simple usage guidelines that are available by adding the -h flag (for help) onto the end of any gcloud command.
Run the following command:
gcloud -h
You can access more verbose help by appending the --help flag onto a command or running the gcloud help command.
Run the following command:
gcloud config --helpTo exit type
Qand hit Enter.Run the following command:
gcloud help configThe results of the
gcloud config --helpandgcloud help configcommands are equivalent. Both return long, detailed help.There are global flags in
gcloudthat govern the behavior of commands on a per-invocation level. Flags override any values set in SDK properties.View the list of configurations in your environment:
gcloud config listTo see all properties and their settings:
gcloud config list --allList your components:
gcloud components listThis command displays the
gcloudcomponents that are ready for you to use in this lab.
Task 2. Filtering command-line output
The gcloud command-line interface (CLI) is a powerful tool for working at the command line. You may want specific information to be displayed.
List the compute instance available in the project:
gcloud compute instances listNote: Having multiple resources deployed in a project is very common. Fortunately
gcloudhas some clever formatting that can help identify specific resources.Example Output:
 NAME: gcelab2
 ZONE: europe-west1-d
 MACHINE_TYPE: e2-medium
 PREEMPTIBLE:
 INTERNAL_IP: 10.142.0.2
 EXTERNAL_IP: 35.237.43.111
 STATUS: RUNNING
List the gcelab2 virtual machine:
gcloud compute instances list --filter="name=('gcelab2')"Example Output:
 NAME: gcelab2
 ZONE: europe-west1-d
 MACHINE_TYPE: e2-medium
 PREEMPTIBLE:
 INTERNAL_IP: 10.142.0.2
 EXTERNAL_IP: 35.237.43.111
 STATUS: RUNNING
In the above command, you asked gcloud to only show the information matching the criteria i.e. a virtual instance name matching the criteria.
Note: Your output format may differ from the one provided in the lab manual.
List the firewall rules in the project:
gcloud compute firewall-rules listOutput:
 NAME                         NETWORK      DIRECTION  PRIORITY  ALLOW                         DENY  DISABLED
 default-allow-icmp           default      INGRESS    65534     icmp                                False
 default-allow-internal       default      INGRESS    65534     tcp:0-65535,udp:0-65535,icmp        False
 default-allow-rdp            default      INGRESS    65534     tcp:3389                            False
 default-allow-ssh            default      INGRESS    65534     tcp:22                              False
 dev-net-allow-ssh            dev-network  INGRESS    1000      tcp:22                              False
 serverless-to-vpc-connector  dev-network  INGRESS    1000      icmp,udp:665-666,tcp:667            False
 vpc-connector-egress         dev-network  INGRESS    1000      icmp,udp,tcp                        False
 vpc-connector-health-check   dev-network  INGRESS    1000      tcp:667                             False
 vpc-connector-to-serverless  dev-network  EGRESS     1000      icmp,udp:665-666,tcp:667            False
List the firewall rules for the default network:
gcloud compute firewall-rules list --filter="network='default'"Output:
 NAME                         NETWORK      DIRECTION  PRIORITY  ALLOW                         DENY  DISABLED
 default-allow-icmp           default      INGRESS    65534     icmp                                False
 default-allow-internal       default      INGRESS    65534     tcp:0-65535,udp:0-65535,icmp        False
 default-allow-rdp            default      INGRESS    65534     tcp:3389                            False
 default-allow-ssh            default      INGRESS    65534     tcp:22                              False
List the firewall rules for the default network where the allow rule matches an ICMP rule:
gcloud compute firewall-rules list --filter="NETWORK:'default' AND ALLOW:'icmp'"Output:
 NAME                         NETWORK      DIRECTION  PRIORITY  ALLOW                         DENY  DISABLED
 default-allow-icmp           default      INGRESS    65534     icmp                                False
 default-allow-internal       default      INGRESS    65534     tcp:0-65535,udp:0-65535,icmp        False
Task 3. Connecting to your VM instance
gcloud compute makes connecting to your instances easy. The gcloud compute ssh command provides a wrapper around SSH, which takes care of authentication and the mapping of instance names to IP addresses.
To connect to your VM with SSH, run the following command:
gcloud compute ssh gcelab2 --zone $ZONEOutput:
 WARNING: The public SSH key file for gcloud does not exist.
 WARNING: The private SSH key file for gcloud does not exist.
 WARNING: You do not have an SSH key for gcloud.
 WARNING: [/usr/bin/ssh-keygen] will be executed to generate a key.
 This tool needs to create the directory
 [/home/gcpstaging306_student/.ssh] before being able to generate SSH Keys.
Do you want to continue? (Y/n)To continue, type Y.
 Generating public/private rsa key pair.
 Enter passphrase (empty for no passphrase)
To leave the passphrase empty, press Enter twice.
Note: You have connected to the virtual machine created earlier in the lab. Did you notice how the command prompt changed?
The prompt now says something similar to sa_107021519685252337470@gcelab2.
The reference before the @ indicates the account being used.
After the @ sign indicates the host machine being accessed.
Install
nginxweb server on to virtual machine:sudo apt update && sudo apt install -y nginxYou don't need to do anything here. To disconnect from SSH and exit the remote shell, run the following command:
exitYou should be back at your project's command prompt.
Task 4. Updating the firewall
When using compute resources such as virtual machines, it's important to understand the associated firewall rules.
List the firewall rules for the project:
gcloud compute firewall-rules listOutput:
 NAME                         NETWORK      DIRECTION  PRIORITY  ALLOW                         DENY  DISABLED
 default-allow-icmp           default      INGRESS    65534     icmp                                False
 default-allow-internal       default      INGRESS    65534     tcp:0-65535,udp:0-65535,icmp        False
 default-allow-rdp            default      INGRESS    65534     tcp:3389                            False
 default-allow-ssh            default      INGRESS    65534     tcp:22                              False
 dev-net-allow-ssh            dev-network  INGRESS    1000      tcp:22                              False
 serverless-to-vpc-connector  dev-network  INGRESS    1000      icmp,udp:665-666,tcp:667            False
 vpc-connector-egress         dev-network  INGRESS    1000      icmp,udp,tcp                        False
 vpc-connector-health-check   dev-network  INGRESS    1000      tcp:667                             False
 vpc-connector-to-serverless  dev-network  EGRESS     1000      icmp,udp:665-666,tcp:667            False
From the above you can see there are two networks available. The
defaultnetwork is where the virtual machinegcelab2is located.Try to access the nginx service running on the
gcelab2virtual machine.Note: Communication with the virtual machine will fail as it does not have an appropriate firewall rule. The nginx web server is expecting to communicate on tcp:80. To get communication working you need to:
Add a tag to the gcelab2 virtual machine
Add a firewall rule for http traffic
Add a tag to the virtual machine:
gcloud compute instances add-tags gcelab2 --tags http-server,https-serverUpdate the firewall rule to allow:
gcloud compute firewall-rules create default-allow-http --direction=INGRESS --priority=1000 --network=default --action=ALLOW --rules=tcp:80 --source-ranges=0.0.0.0/0 --target-tags=http-serverClick Check my progress to verify the objective.
Update the firewall
Check my progress
List the firewall rules for the project:
gcloud compute firewall-rules list --filter=ALLOW:'80'Output:
 NAME                NETWORK  DIRECTION  PRIORITY  ALLOW   DENY  DISABLED
 default-allow-http  default  INGRESS    1000      tcp:80        False
Verify communication is possible for http to the virtual machine:
curl http://$(gcloud compute instances list --filter=name:gcelab2 --format='value(EXTERNAL_IP)')
You will see the default nginx output.
Task 5. Viewing the system logs
Viewing logs is essential to understanding the working of your project. Use gcloud to access the different logs available on Google Cloud.
View the available logs on the system:
gcloud logging logs listOutput:
 NAME: projects/qwiklabs-gcp-01-4b75909db302/logs/GCEGuestAgent
 NAME: projects/qwiklabs-gcp-01-4b75909db302/logs/OSConfigAgent
 NAME: projects/qwiklabs-gcp-01-4b75909db302/logs/autoscaler.googleapis.com%2Fstatus_change
 NAME: projects/qwiklabs-gcp-01-4b75909db302/logs/cloudaudit.googleapis.com%2Factivity
 NAME: projects/qwiklabs-gcp-01-4b75909db302/logs/cloudaudit.googleapis.com%2Fdata_access
 NAME: projects/qwiklabs-gcp-01-4b75909db302/logs/cloudaudit.googleapis.com%2Fsystem_event
 NAME: projects/qwiklabs-gcp-01-4b75909db302/logs/compute.googleapis.com%2Fautoscaler
 NAME: projects/qwiklabs-gcp-01-4b75909db302/logs/compute.googleapis.com%2Finstance_group_manager_events
 NAME: projects/qwiklabs-gcp-01-4b75909db302/logs/compute.googleapis.com%2Fshielded_vm_integrity
 NAME: projects/qwiklabs-gcp-01-4b75909db302/logs/run.googleapis.com%2Fstderr
 NAME: projects/qwiklabs-gcp-01-4b75909db302/logs/run.googleapis.com%2Fstdout
View the logs that relate to compute resources:
gcloud logging logs list --filter="compute"Output:
 NAME: projects/qwiklabs-gcp-01-4b75909db302/logs/compute.googleapis.com%2Fautoscaler
 NAME: projects/qwiklabs-gcp-01-4b75909db302/logs/compute.googleapis.com%2Finstance_group_manager_events
 NAME: projects/qwiklabs-gcp-01-4b75909db302/logs/compute.googleapis.com%2Fshielded_vm_integrity
Read the logs related to the resource type of
gce_instance:gcloud logging read "resource.type=gce_instance" --limit 5Read the logs for a specific virtual machine:
gcloud logging read "resource.type=gce_instance AND labels.instance_name='gcelab2'" --limit 5
Task 6. Testing your understanding
The following multiple-choice question should reinforce your understanding of this lab's concepts.
Three basic ways to interact with Google Cloud services and resources are:
Cloud Console
GStreamer
GLib
Command-line interface
Client libraries
Solution of Lab
curl -LO raw.githubusercontent.com/quiccklabs/Labs_solutions/refs/heads/master/Getting%20Started%20with%20Cloud%20Shell%20and%20gcloud/quicklabgsp002.sh
sudo chmod +x quicklabgsp002.sh
./quicklabgsp002.sh